iiNet BOB2 Manuale utente

Wireless Setup Guide

1Wireless Security Key 2WPA & SSID
Your Operating System
Depending on your computer’s operating system, wireless setup will be done a little differently. This guide includes
instructions on wireless setup for Windows 7, Windows XP and Mac OSX.
Jump to the page that reflects your operating system to complete setup.
BoB2TM Wireless Setup
The following information provides an easy, step-by-step guide to setting up your wireless network. By now you’ve used
the Quick Installation Guide to connect your modem to the Internet. The next step is to set up your computer to
the internet wirelessly using BoB2TM.
Before starting Wireless Setup, please ensure:
• You have setup BoB2TM using the Quick Installation Guide.
• BoB2TM is switched on in the same room as your computer.
• You are using a wireless computer.
Let’s get started.
Firstly, you need to identify your unique wireless security key (WPA) and wireless
network name (SSID). These are located on the label at the base of the BoB2TM
(figure 1).
It’s important you don’t share your wireless security key (WPA) with anyone. You’ll
need to enter this key during Wireless Setup.
figure 1
WPA
SSID
Now, write down your wireless security key (WPA) and network
name (SSID) in the boxes below. These ID’s are case sensitive,
so be careful to write these codes exactly as they have been
printed.
Wireless Security Key (WPA)
Wireless Network Name (SSID)
Wireless Setup for Windows 7
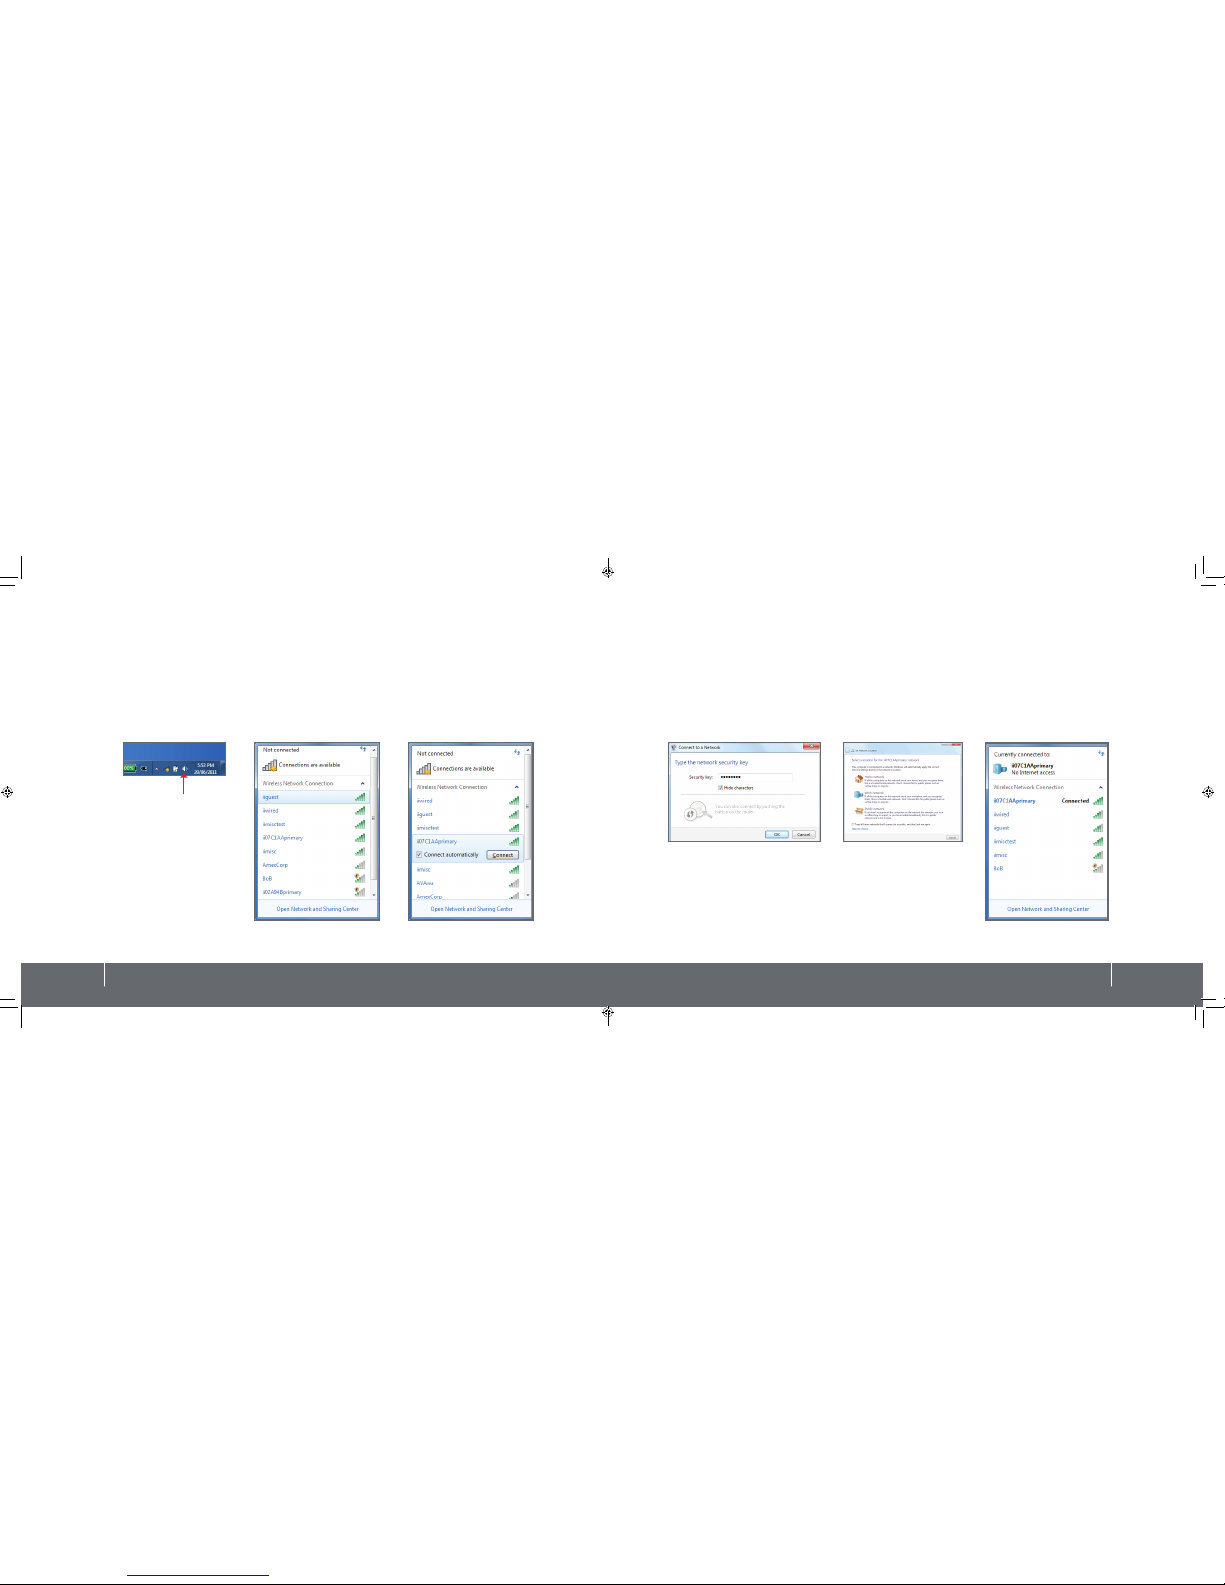
1.Click on the Wireless Network icon in the system tray located in the bottom right of your computer (figure 1).
2. A menu will appear with the wireless networks currently in range. Look for the name that matches the Wireless
Network Name SSID you wrote down on page 2 and click on it (figure 2).
3. Ensure the Connect Automatically option is ticked and then click on the Connect button (figure 3).
3 Wireless Setup for Windows 7 4Wireless Setup for Windows 7
4. Next, you’ll be required to enter your wireless security key (WPA). This code is case sensitive so ensure it’s typed in
exactly as you wrote it down on page 2, then press OK (figure 4).
5. Click on the Wireless Network icon in your computer’s system tray again to confirm the connection to your
modem’s wireless network. You should see the word “connected” next to the wireless network name (figure 5).
6. Connection to your BoB2TM’s wireless network is now complete. Try using a browser to surf to a website.
figure 1
figure 2 figure 3
figure 4 figure 4a
figure 5
wireless network icon

Wireless Setup for Windows XP
1.Click on the Start Menu, open the Connect To menu item and select Wireless Network Connection (figure 1).
2. Once the Wireless Network Connection window appears, select the wireless network name (SSID) you wrote
down on page 2. Next, click the Connect button (figure 2).
3. Next, you’ll be required to enter your wireless security key (WPA) in the network key box. This code is case
sensitive so enter it exactly as you recorded it on page 2 (figure 3).
4. In a few moments, your computer will have connected to the wireless network. To confirm a connection has
been made, click on the wireless icon in the bottom right corner of your screen and look for the connect status
(figure 4).
5. Connection to BoB2TM‘s network is now complete. Try using a browser to surf to a website.
5 Wireless Setup for Windows XP 6Wireless Setup for Mac OSX
Wireless Setup for Mac OSX
1.On the top menu bar, click the AirPort icon and select the Turn AirPort On option (figure 1).
2. After a moment, your computer will list the available wireless networks, select the wireless network name (SSID)
you wrote down on page 2 (figure 2).
3. Next, you’ll be required to enter your wireless security key (WPA). This code is case sensitive so enter it exactly as
you recorded it on page 2. Don’t forget to tick the “Remember this network” box (figure 3).
4. Click the AirPort icon and confirm you are connected to the newly created wireless network.
Observe the tick next to the network name (figure 4).
5. Connection to BoB2TM’s network is now complete. Try using a browser to surf to a website.
figure 1 figure 2
figure 3 figure 4
figure 1 figure 2 figure 3
figure 4

Hooray!
You have successfully connected your computer wirelessly.
Having trouble?
If you’re still experiencing problems please contact iiNet Support for assistance. iiNet provides free
technical support for BoB2TM.
iiNet Support
13 22 58
support@iinet.net.au
iiNet Business Support
13 24 49
bizsupport@iinet.net.au
iiwsg062011v005
Altri manuali per BOB2
5
Indice


