ILD 7 Manuale utente

1
ILD 7 and ILD 8: DS/EN 13229 – NS 3058 – AEA
Manual version No 13-1 GB 01 07 13
Model ILD 7 and ILD 8

2
CONTENT
Thank you for having confidence in us 3
Technical data sheet 4
Before installation 5
Packing 5
First time use 5
Mounting 6
Fitting top/behind 6
Accessories 7
Wearing parts 8
Closed combustion system 9
Chimney and flue collar 9
Fuel overloading 10
Fuel 10
Refueling on to a low fire bed 11
Fuel overloading 11
Environmental use 11
Using stove under various weather conditions 11
Primary air control 12
Secondary air control 13
Ash drawer and bottom grate 14
Advise and tips 14
Cutting out ash waste 14
Open dampers 15
Lighting the stove 16
Cleaning maintenance 17
Measurements 18
Installations examples 19
Combustible wall 20
Firewall, insulated flue pipe 21
Spare parts ILD 7 23
Spare parts ILD 8 24
Trouble shooting 25
The Clean Air Act 1993 and smoke control areas 26

3
Thank you for having confidence in us
Ild is a range of safe, environmentally friendly and efficient high-quality stoves, which
meet all requirements for a modern heating source In order to get the best out of your
stove, we recommend that you read this booklet and our homepage www ildstoves com
carefully

4
Technical data sheet
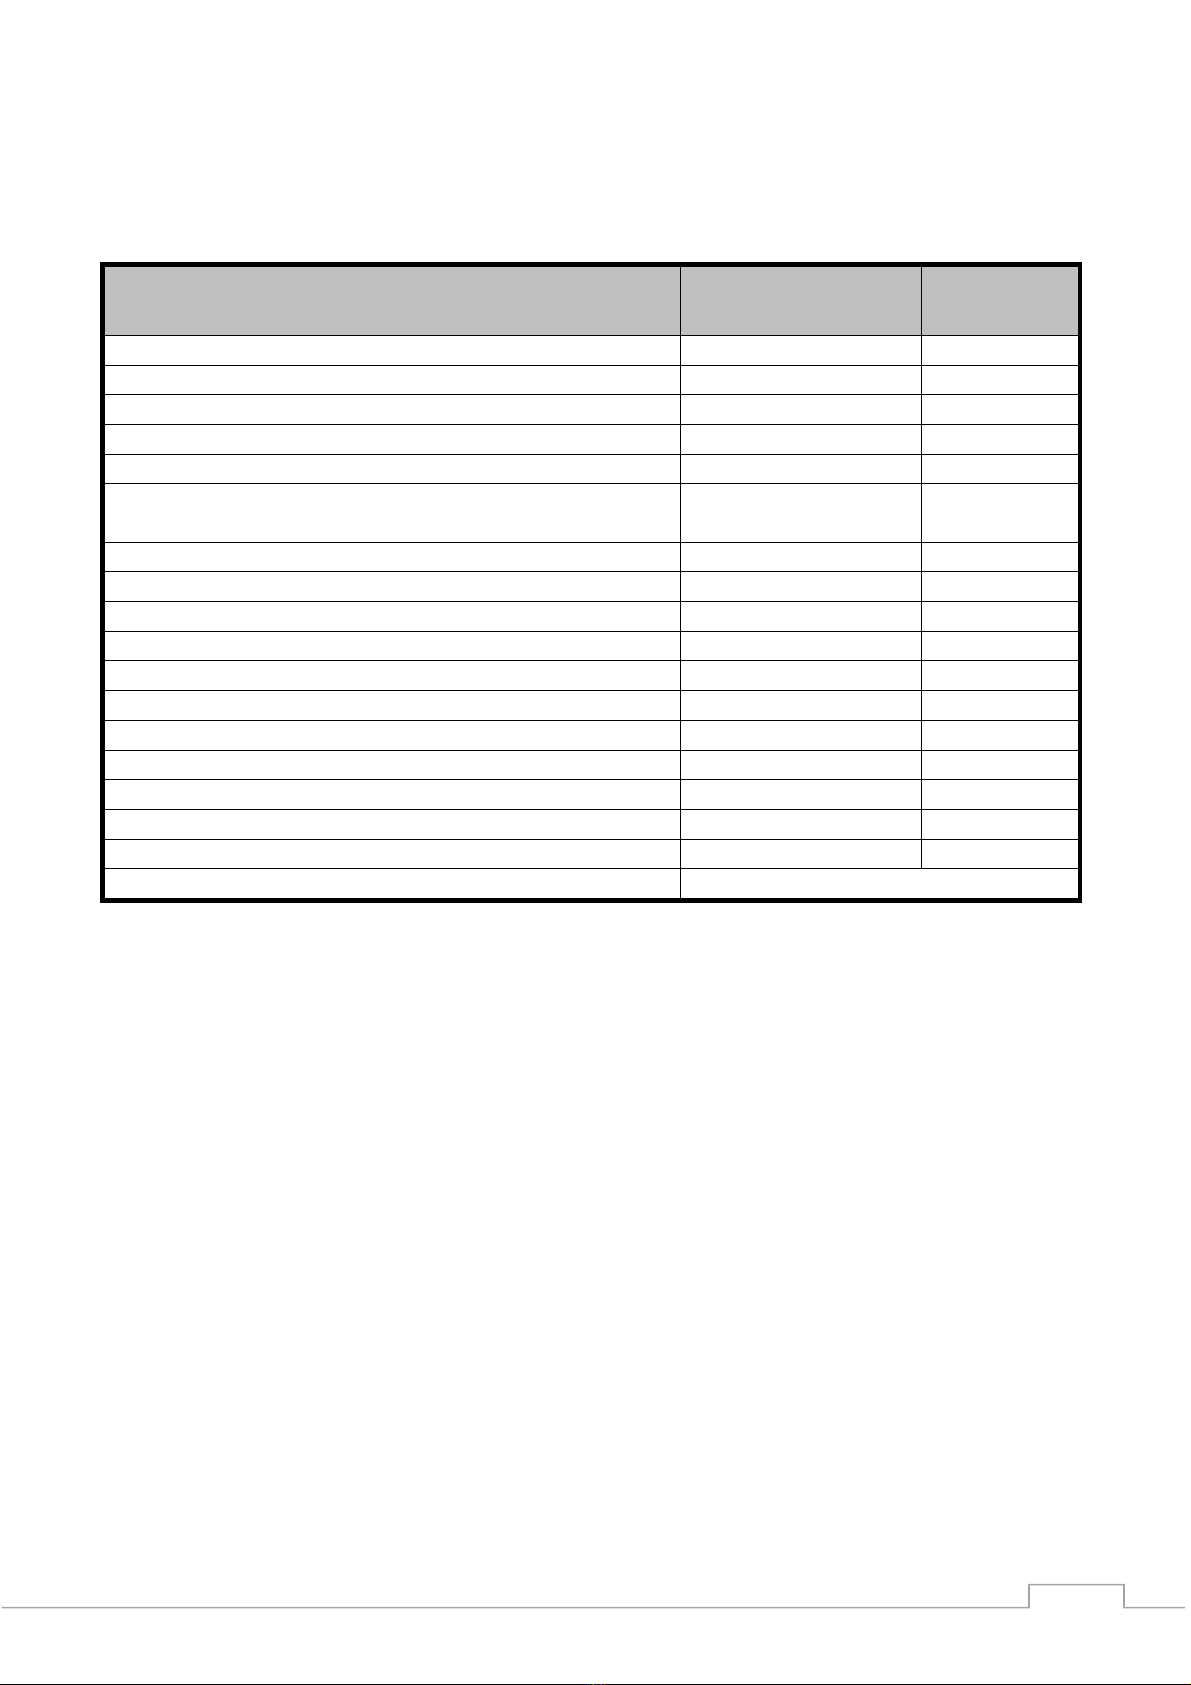
Model 7 Træ Enheder
CO
-
E
mission ved 13 %
O
2:
0,09
9
8
%
NO
x
@
13 % O
2
143
m
g/
N
m
3
Efficiency
83%
%
Nominal performance
4,7
kW
Chimney
temparature
DS/EN 13240
263
C
0
Recommended under pressure in flue connection
piece 16 Pa
Flue pipe under pressure
DS/EN 13240
12
Pa
Combustion air requirements
13
m
3
/t
Fuelconsumption
1,52
kg/t
Refuelling amount
1,26
kg
Refuelling
frequency for nominal output
45
Min
Weight
77
Kg
Flue connection piece internal diameter
145
mm
Flue connection piece external diameter
149
mm
Max fuelsize diameter
8
cm
Max fuel lenght
20
cm
Flue gas flow
3,7
g/s
Type of verification
DS/EN
13240
-
DEFRA
-
NS3058

5
Before installation
Ensure that your Local registered installer can recommend wood stove installation
Ensure that updated European, national and local standards can be fulfilled
Ensure that the area can support the stove and installation weight
Ensure that there will be sufficient space and access to service
Ensure that the Chimney has a minimum draft of 12 Pa
Ensure that the heat output of the stove is suitable for the room
Warning! Do not make any unauthorized changing on the stove
acking
The stove comes packaged in the cardboard box on wooden pallet nailed down on vertical
boards at the corners In cardboard box stove is fixed with EPS styrofoam elements
Consult local regulations on the disposal of these materials; the wood has been treated to
repel vermin and may not be burnt in stove
First time use
Before the stove is heated up for the first time, we advise you to open all the doors and
windows in the room where the stove is installed, to ensure optimum ventilation When the
stove is at operating temperature, the surface treatment will harden and emit a strong
odour for a short time
As a result of the heating and due to the ensuing change in temperature the stove will
produce sounds which can be loud and variated

6
Mounting
Before mounting, ensure that there is an even and secure bace This has to be able to carry
the weight of the stove as well as the chimney and any other equipment
There must be fire resistant floor around the stove, to protect the floor against damages
from sparks National and local regulations always have to be followed
If it is necessary to connect an elbow pipe a curved rather than a sharp elbow pipe is
recommended as this causes the least possible reduction in the chimney draught See more
under general directions and chimney
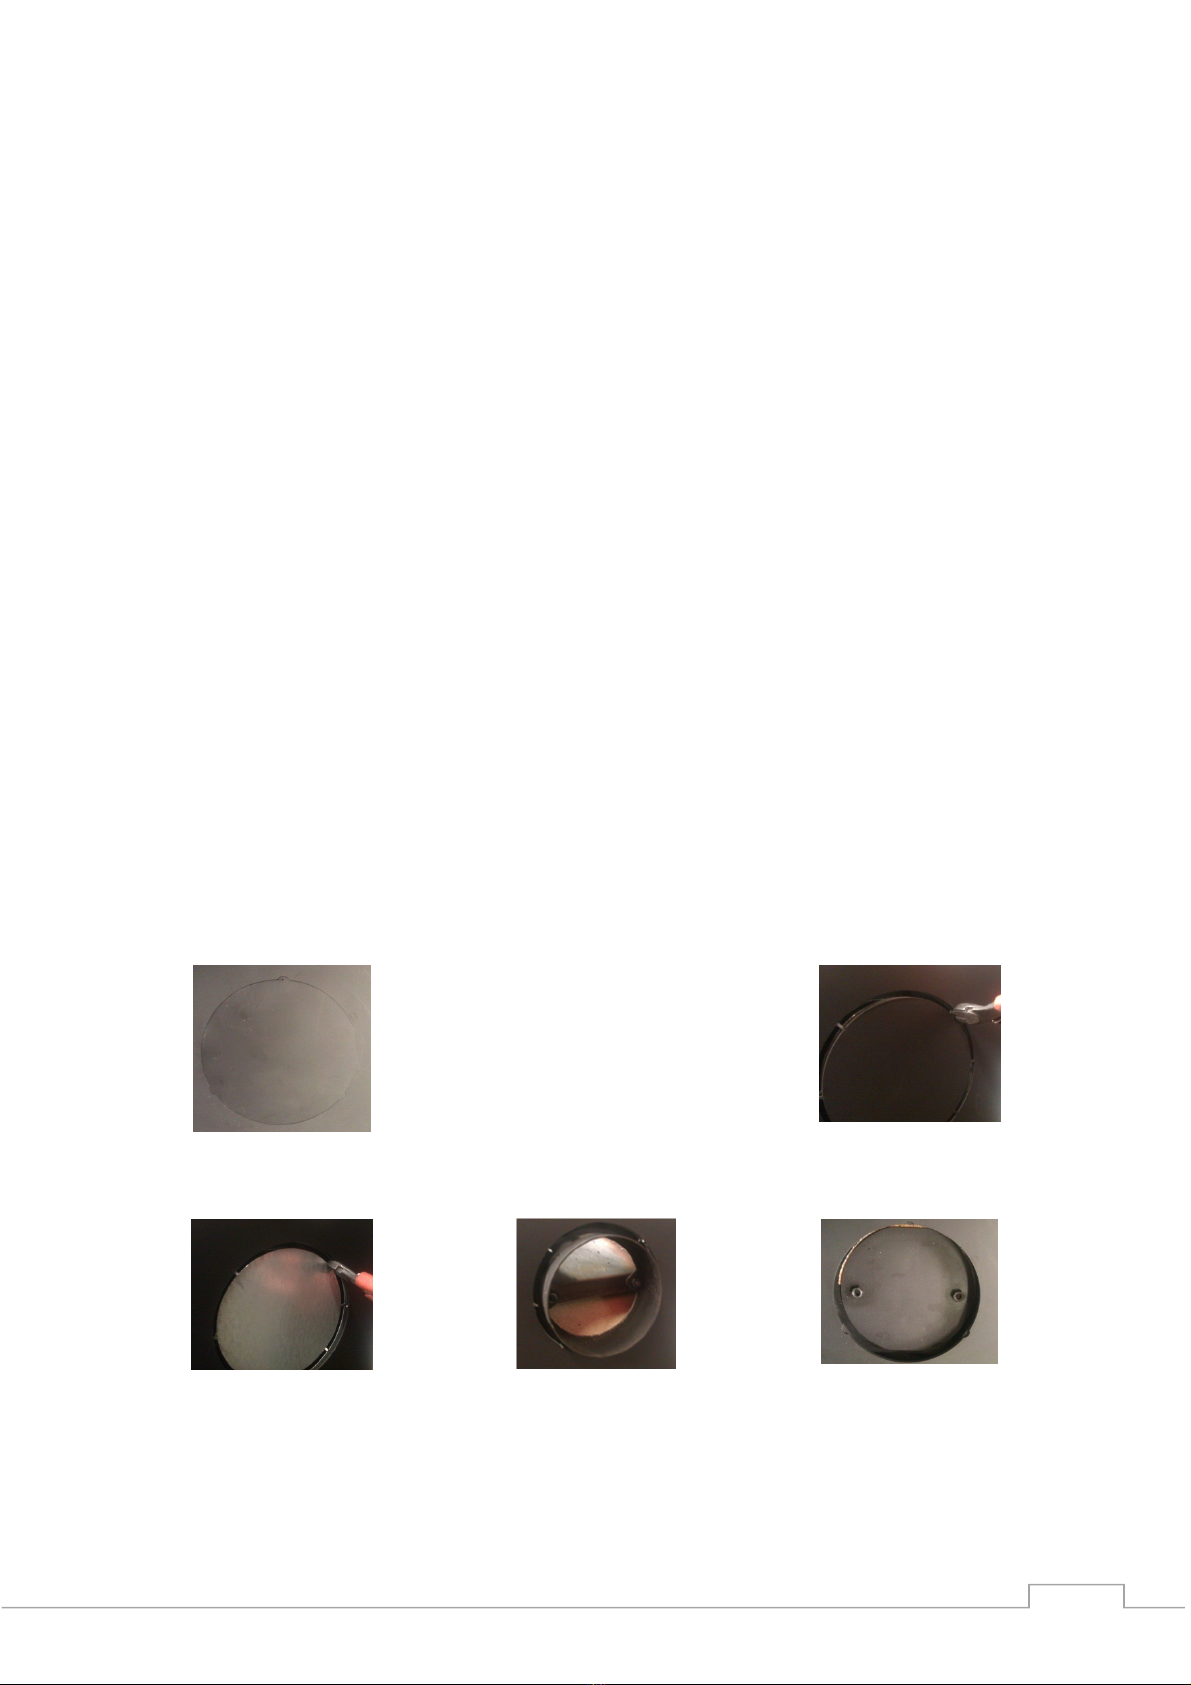
Flue connection pipe top/rear
1 By mounting in the top, remove the cover piece and connect the flue connection is
mounted with 2 pcs bolts (pic 1/4)
2 By mounting on the rear side, the cover piece is removed by cutting the “treads”
with a nipper (pic 2)
3 Hereafter do the same with the inside coverplate (pic 3)
4 At the end the flue connection piece can be mounted in the rear outlet (pic 4)
(remember to move the bolted connection piece to the top outlet and mount it
here) (pic 5)
Pic
1
Pic
2
Pic
3
Pic
4
Pic
5

7
Accessories
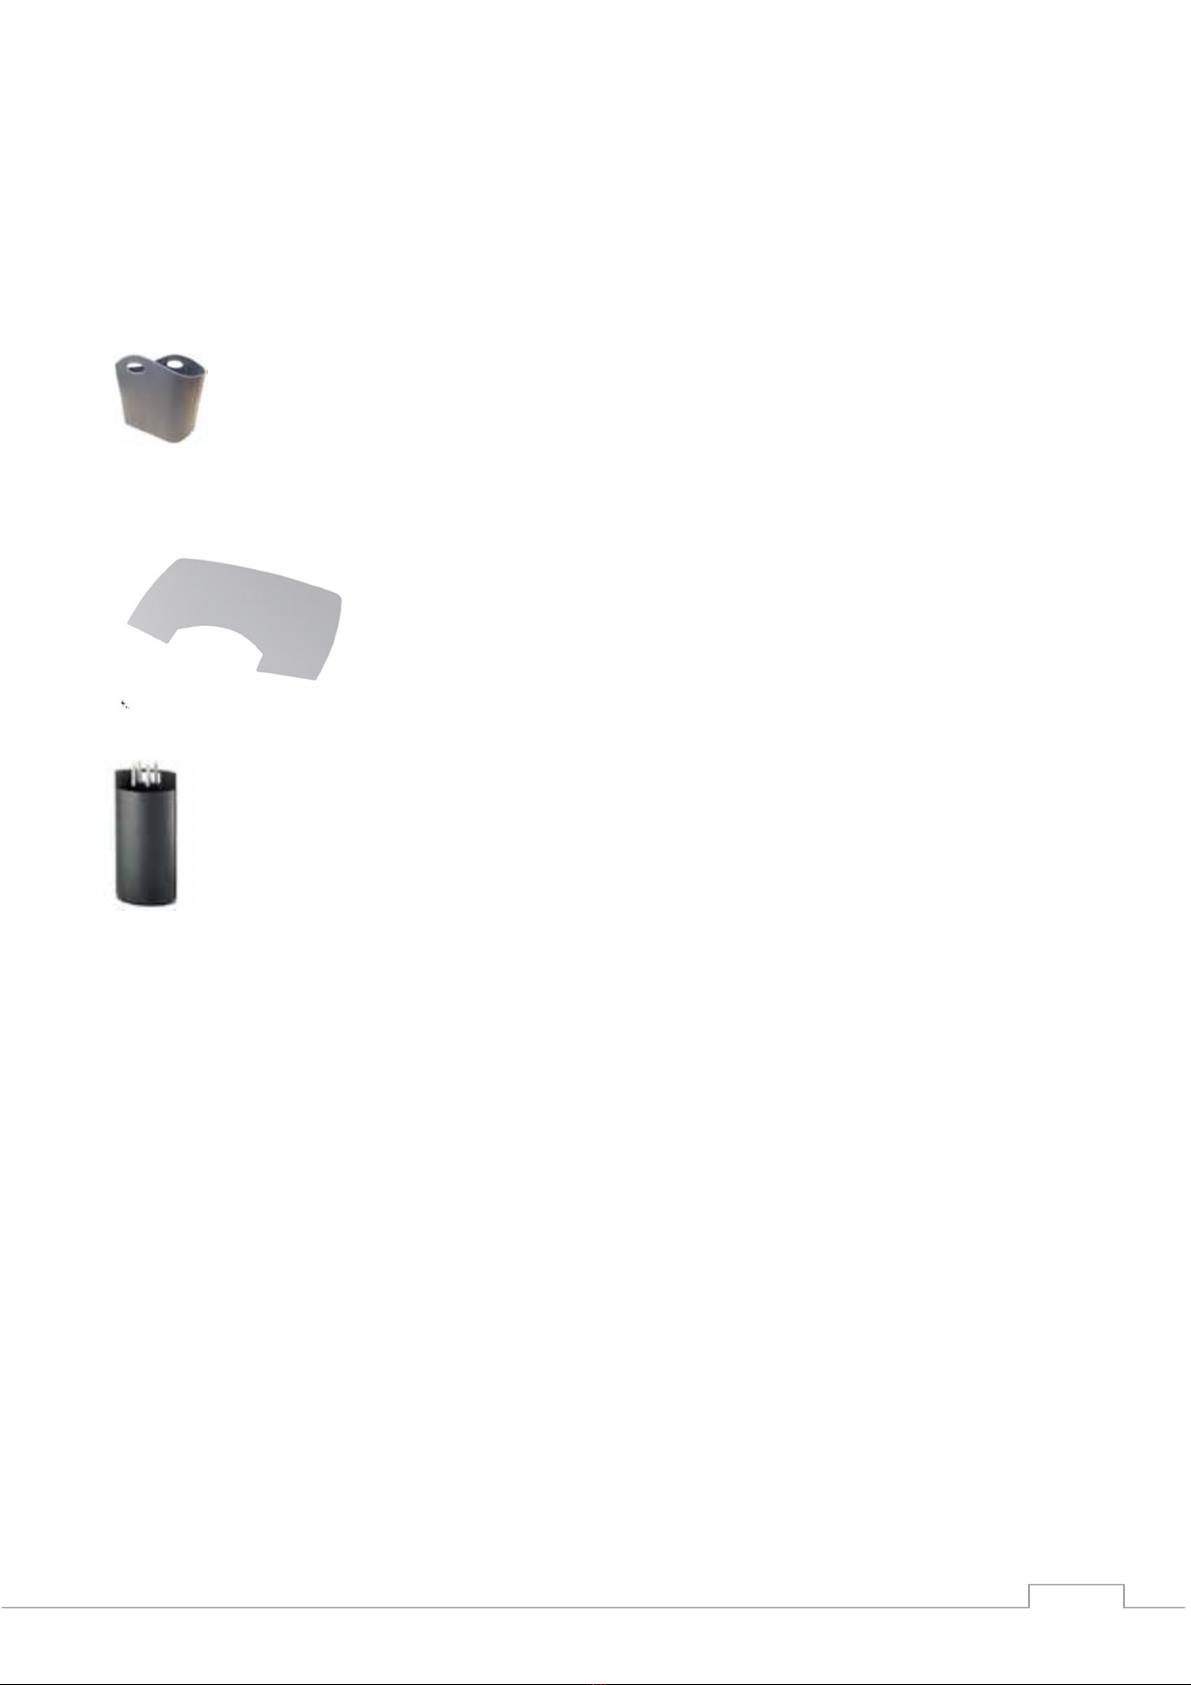
Painting black 150ml: 9817059
Shaped floor plate steel:
Narrow:
50046743
Wide:
50046679
Shaped floor plate glass:
Narrow:
10046698
Wide:
10046699
Wood log basket with handles: 50027557
Fireplace tools:
50037031

8
Wearing parts
When replacing or cleaning the combustion chamber´s insulation (vermiculite) remove this
by taking the smoke deflector plate out first
Gently lift the plate and remove the pins in the side plates which hold the plate in place
Push the front of the deflector plate up and turn carefully so it is possible to remove the
plate from the burn chamber
Now remove the Chamotte stones which are placed on each side of the cast iron in the
bottom of the stove Now remove to two metal pieces that hold the side plates (Only in
ILD 8) Side plates and back plates and finally the back plate can now be removed Do this
gently so the plates are not damaged
Deflector plate

9
Closed combustion system
When located in highly insulated houses, the combustion air is supplied through the bottom
rear of the stove, which is connected to a Ø100mm ventilation pipe
The installation must have a maximum length of 6m and a consist of maximum 3 bends as
well as a single inlet grate, the total counter pressure must not exceed 2 Pa , at a minimum
chimney draught of 18 Pa, measured at the stoves connection piece
Special weather and geographical conditions mean that the installation must always be
carried out and approved by a ventilation specialist
It is recommended to mount valves, so it is possible to close for the ventilations system If
the stove is not in use in a longer period, these valves can be closed to prevent draft
Chimney & flue connection piece
The chimney must have a minimum draught of 16 Pa measured at the stove´s connection
piece If you are not sure of the stove´s draught a chimney sweep can measure it
The chimney sweep will also ensure that the chimney is airtight, safe and equipped with a
cleanout door If there are any other connections to the chimney, the chimney sweep
should also be asked for advice before installation
Upon delivery, the flue pipe connection piece, which is used to fit the indoor flue pipe, is
located inside the stove, in for transport The connection piece can immediately be
connected to the stove´s top outlet
If a rear connection is required, move the cover plate to the top outlet and the connection
piece from the top to the rear outlet You will find more on this under installation
The local building and housing authorities must always approve the installation
The connection pipe must be manufactured in accordance with EN 1856-2
Remember to always ensure that the seal between the stove and flue connection piece is
intact and airtight
Do not place more than 30 kg on top of the stove/connection piece This can damage the
stove
It is important that the stove, connection pipe and the chimney are situated with enough
space for cleaning sweeping and emptying

10
Stoking and overloading
The stove is approved as an intermitted heater which means that you must stoke the
stove with a suitable amount of fuel (see data) which then burns down into embers before
you stoke it the next time Be careful of over stoking this causes great wear and tear to
the stove and may, in serious cases, destroy the stove The maximum amount of fuel
specified, (see data) should not be exceeded, overloading can cause excess smoke The
recommended frequency for firing is 45min
Fuel
FuelFuel
Fuel
Any dry and seasoned woods can be used, there are however major differences in density,
tendency to spark, processing, time of seasoning and burning time
Don’t ever use any wood treated with any chemicals
Don’t ever use any liquid fuels
Don’t ever use the stove for any kind of waste materials
Use wood fuel only
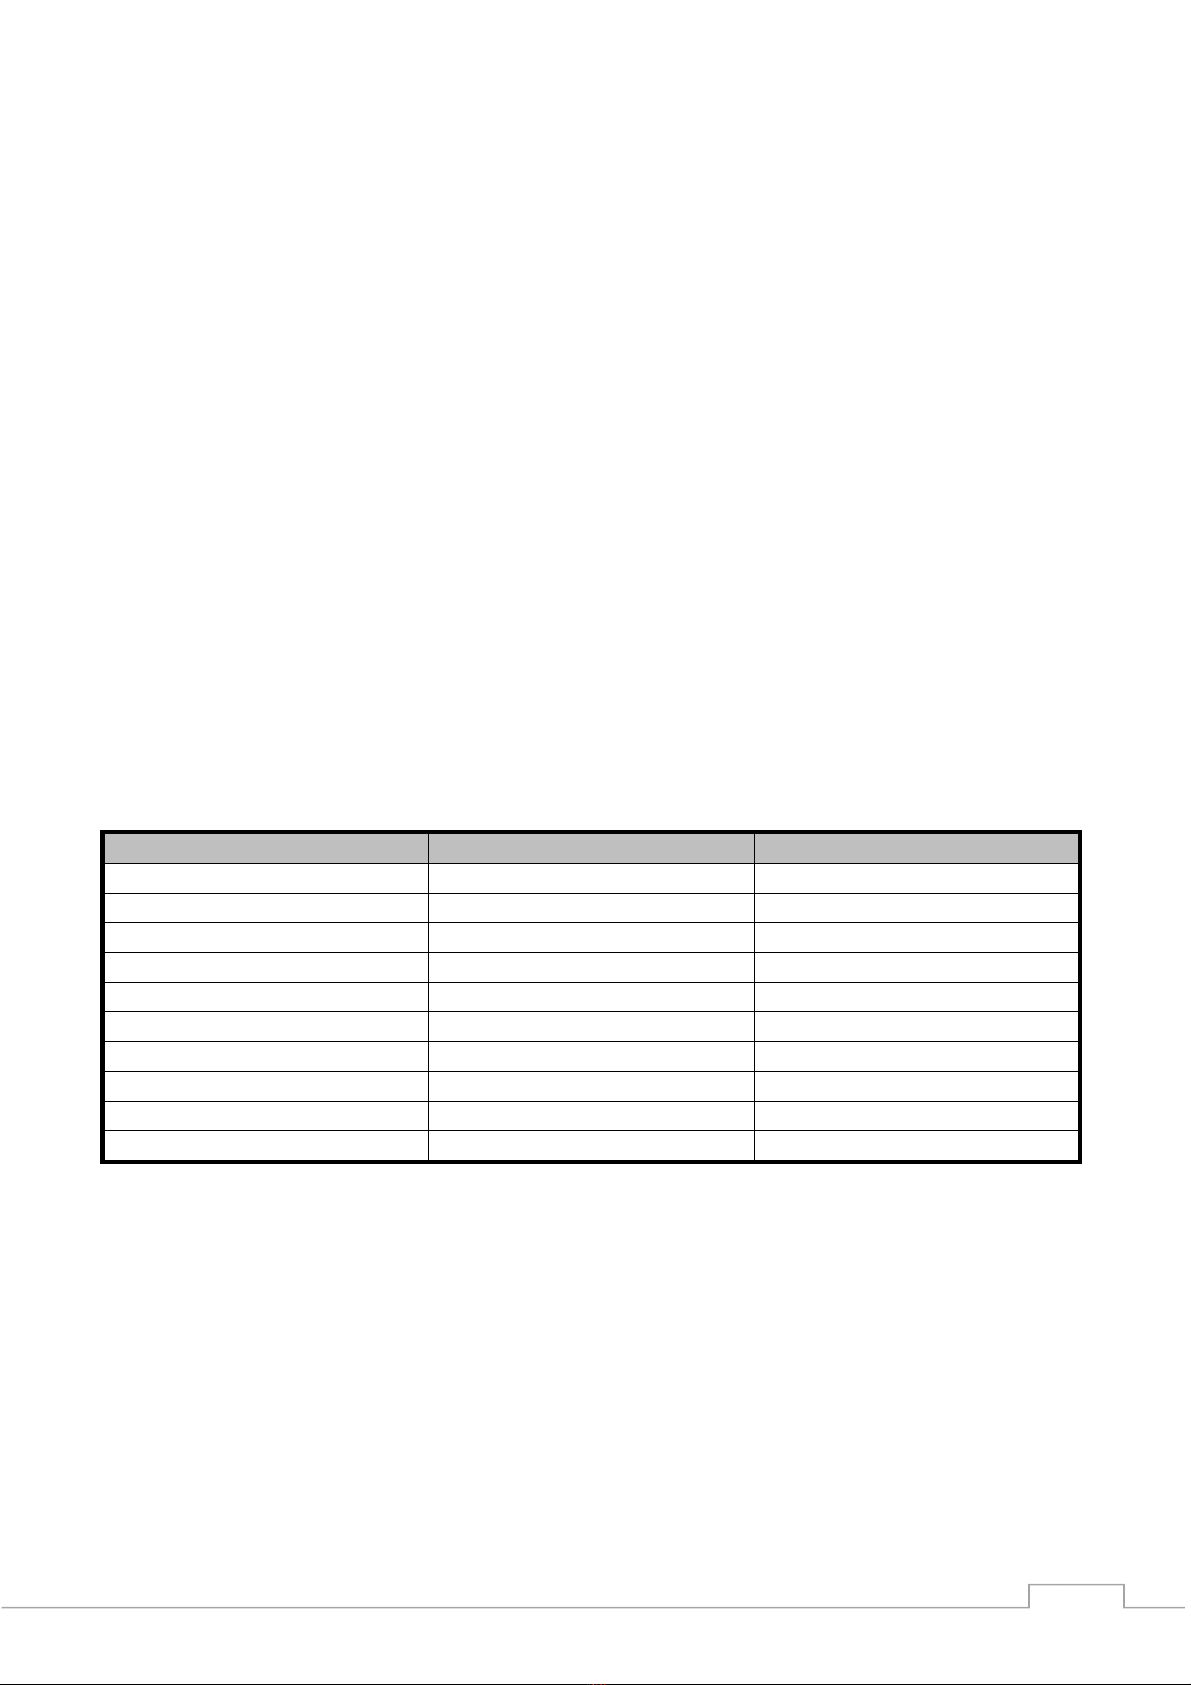
Type of wood
Dry wood Kg/m
3
Compared to beech %
Hornbeam
640
110
Beech
580
100
Ash
570
98
Oak
570
98
Maple
570
98
Birch
540
88
Mountain pine
490
83
Spruce
370
65
Poplar
370
65
It is recommended to buy a moisture content meter, make it a habit to check that your
wood has less than 18% moisture content, preferably 16 %
Questo manuale è adatto per i seguenti modelli
1
Indice
Altri manuali ILD Stufa a legna