InStyler 19mm Manuale utente

1
InStyler®User Manual
Getting The Best Results with Your New InStyler®
19mm InStyler Rotating Iron

2
IMPORTANT SAFETY INFORMATION
WARNINGS: TO REDUCE THE RISK OF SERIOUS INJURY, READ
ALL INSTRUCTIONS AND WARNINGS COMPLETELY BEFORE
USING THIS PRODUCT
InStyler Rotating Iron has been carefully engineered for both effectiveness and safety,
however, basic safety precautions should always be followed when using any product,
especially when children are present.
• INSTYLERROTATINGIRONISNOTINTENDEDFORUSEBYCHILDREN.
• KEEPAWAYFROMWATER.
• DANGER-As with most electrical appliances, electric parts are electrically live even
when the switch is off. To reduce the risk of electric shock:
1. ALWAYSUNPLUGITIMMEDIATELYAFTERUSING.
2. DONOT use while bathing or showering.
3. DONOT place or store InStyler Rotating Iron where it can fall or be pulled into a
tub, toilet or sink or any other water source.
4. DONOT use InStyler Rotating Iron near water.
5. DONOT place in or drop into water or other liquid.
6. If InStyler Rotating Iron falls into water, DONOTREACHINTOTHEWATER! Unplug
it immediately.
• WARNING:TOREDUCETHERISKOFBURNS,FIRES,ELECTRICALSHOCK,DEATH,
INJURYORDAMAGETOPROPERTY:
1. Counterfeit versions of the InStyler Rotating Iron do exist. To ensure you have
purchased a genuine product, and to reduce the risk of burns, electrical shock
and malfunctions, purchase from authorized dealers only.
2. Use InStyler Rotating Iron only for its intended use as described in this manual.
DONOT use attachments not recommended by the manufacturer.
3. NEVER operate the InStyler Rotating Iron if it has a damaged cord or plug, if
it is not working properly, if it has been dropped or damaged or if it has been
dropped into water. If the power supply cord or plug is damaged, the InStyler
Rotating Iron must be replaced by the manufacturer or an authorized service agent
in order to avoid a hazard.
4. Keep this product and the cord away from water and heated surfaces. DONOT
wrap the cord around the InStyler Rotating Iron until unit is completely cool.
5. This product has moving parts. Children and pets should be kept away when
product is in use.
6. The InStyler Rotating Iron should NEVER be left unattended when plugged in.

3
7. NEVER use while sleeping.
8. NEVER drop or insert any object into any opening or hole on The InStyler Rotating Iron.
9. DONOT operate outdoors or where aerosol (spray) products are being used or
where oxygen is being administered.
10. DONOT use an extension cord with the InStyler Rotating Iron.
11. The InStyler barrel and unit bottom may be hot during use. DONOT allow eyes or
skin to touch the heated surfaces.
12. DONOT place InStyler on any unprotected surface while it is operating or cooling
down after use, except for the InStyler carrier/mat, which has been provided.
13. DONOT operate with a voltage converter.
14. This product is designed for hair styling. DONOT use for any other purpose.
15. This product is a personal care device and is NOT intended for commercial use.
16. DONOT use this product if any parts become damaged. Inspect the InStyler
product prior to beginning hair styling to ensure all parts are secure in their place.
17. DONOT subject this product to excessive force or shock that may result in
malfunction, shorter life span or distorted parts.
18. DONOT tamper with this product’s components. Doing so may cause
unnecessary damage. This product contains no user-serviceable parts.
19. DONOT use liquid cleaners, aerosol cleaners, or any cleaner containing alcohol,
detergent, abrasive or corrosive materials.
20. The InStyler Rotating Iron should be used only on clean dry hair.
21. This appliance is not intended for use by persons (including children) with reduced
physical, sensory or mental capabilities or lack of experience or knowledge. They
should be given supervision or instruction in the use of the appliance by a person
responsible for their safety.
• IMPORTANT:The InStyler Rotating Iron should NEVER be used with any type of synthetic
hair extension. The InStyler can be used on real human hair extensions ONLY, with the
following precautions. If your real human hair extensions are sewn in, you can use your
InStyler up to the scalp. If your real human hair extensions are glued in, make sure you
start with your InStyler below the glue.
• SAVETHESEINSTRUCTIONS
• KEEPTHISMANUALINASAFEPLACEFORFUTUREREFERENCEANDMAKESURE
ANYONEWHOUSESTHISPRODUCTALSOREADSTHISMANUAL.
• READALLINSTRUCTIONSBEFOREUSINGYOURINSTYLERROTATINGIRON.
NOASSEMBLYREQUIRED.

4
Features 19mm InStyler Rotating Iron
30SecondRapidHeat-up HeatedRotatingBarrel
Straightens, Curls and Polishes Hair
19mmBarrel
Offers Volume, Tighter Curls
and Tighter Flips
195°CCeramicHeat
Salon Quality Results
MultipleHeatSettings
For Fine, Medium and Coarse Hair
High 3 Bars, 195°C Ideal for thick, coarse hair.
Medium 2 Bars, 157°C Ideal for thin-to-medium textured hair.
Low 1 Bar 140°C Ideal for thin, fine hair.
Off No Bar(s)
• AutomaticSafetyShut-Off
• Voltage:220-240V/50Hz
• Power:35W
SwivelCord
FirstRowofBristles
Separates and Aligns Hair
SecondRowofBristles
Adds Volume and Reduces Frizz
Floating Smoothing Plate
Automatically Aligns to Smooth
HairandReduceFrizz,Without
Crushing or Creasing.
19mm InStyler Rotating Iron

5
EasyStart-Up
1. Plug the InStyler directly into an electrical outlet.
2. Push the On/Off Button once for high-heat (3 Bars, 195°C). Ideal for thick, coarse hair.
3. Push the On/Off Button a second time for medium-heat (2 Bars, 157°C). Ideal for
thin-to-medium textured hair.
4. Push the On/Off Button a third time for low-heat (1 Bar, 140°C). Ideal for thin,
fine hair.
5. Push the On/Off Button a fourth time to turn the InStyler Rotating Iron off (LED Bar(s) will
turn off, NO Bars).
6. The LED bar(s) will flash until the heated barrel and smoothing plate have heated to the
desired heat setting; once the desired heat setting has been achieved, the LED bar(s)
will remain lit.
IntroductionandGettingStarted
CONGRATULATIONS! You have just purchased the most versatile hairstyling tool available
today. From sleek, smooth styles to glamorous, curly looks, and everything in between, the
InStyler is the only tool you’ll need for dynamic, fabulous styles every day!
GETTINGSTARTED...
“GoSlowly!“
• Become familiar with how the InStyler works with your hair. Your instinct will be to glide
the InStyler through the hair quickly, but you will achieve much better results by going
slowly. Even though you’re moving the unit slower, you will still get results faster than us-
ing a curling iron or a flat iron. The unique rotating barrel does most of the work for you.
• Experimentwithitandbecreative. You will quickly see what this innovative tool can
do. The styling tips on the following pages will help give you some ideas of what is
possible. You will become more efficient at styling your hair each time you use your
InStyler.
19mm InStyler Rotating Iron
For more tips, tricks and videos visit, www.instyler.co.uk

6
SafetyFirst-Using your Thermal Guard
NOTE: It is recommended that you use your InStyler with the included
Thermal Guard Training Aid, to help prevent burns while you are getting
used to this unique new hot styling tool.
AttachingYourThermalGuardTrainingAid
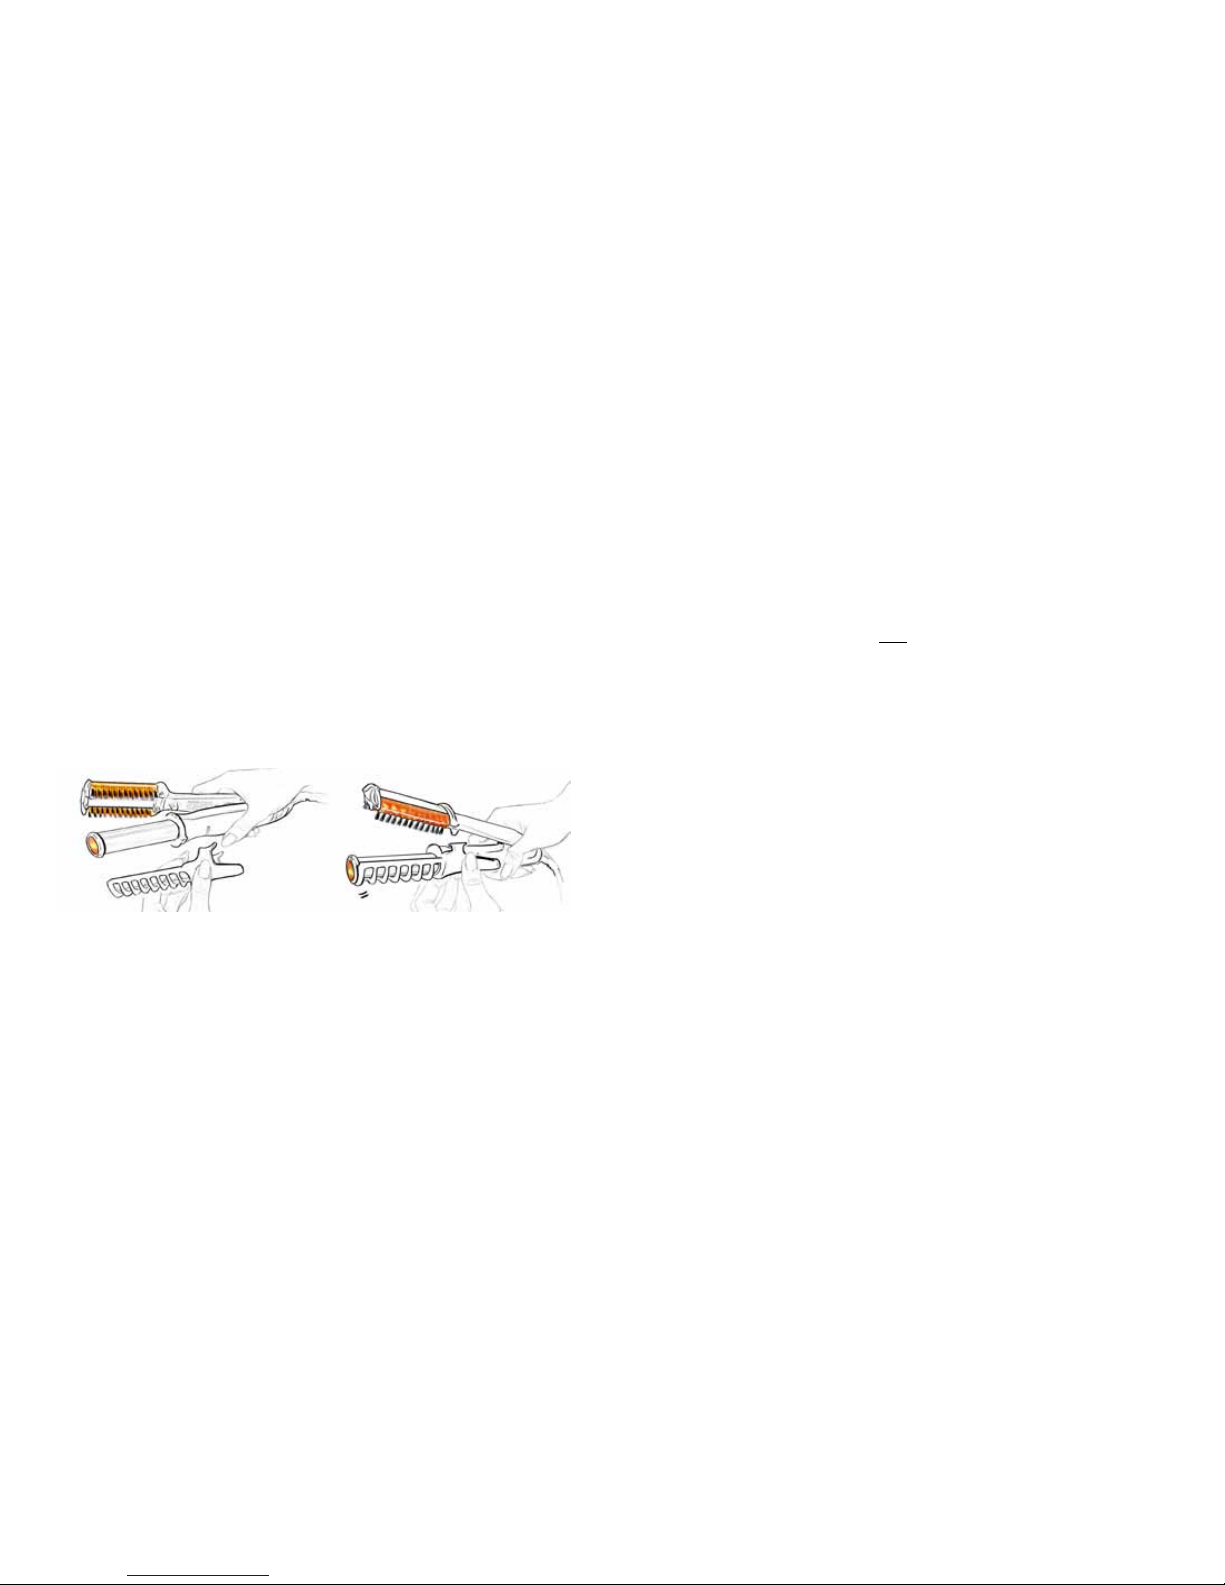
1. To attach, snap the Thermal Guard Training Aid onto the side of the unit directly under the
ring below the barrel.
2. Rotate the Thermal Guard Training Aid until tabs are seated in the indentations on the body
of the InStyler, and the Thermal Guard Training Aid is facing out.
3. Once it is snapped in place, you can use your InStyler as you normally would.
RemovingYourThermalGuardTrainingAid
4. To remove the Thermal Guard Training Aid, firmly grab the Thermal Guard Training Aid,
making sure the barrel of the unit is cool, twist to unseat it and pull to remove.
5. Allow the InStyler to cool before storing. It’sthatsimple!
NOTE: It is important to keep your InStyler clean, as hair product build-up can accumulate
on the barrel and bristles. With the unit unplugged, wipe the outside surface only with a
lightly damp cloth. Bristles can be lightly scrubbed if necessary. Make sure the InStyler is
completely dry before plugging into any power source. Please see page 15 of this manual
for more detailed instructions on cleaning.
For more tips, tricks and videos visit, www.instyler.co.uk
19mm InStyler Rotating Iron

7
HairTypes
The way you use your InStyler depends on what type of hair you have. You’ll get the most out
of your InStyler if you use the techniques best suited to your hair type.
Thethreemaintypesofhairare:
1. Fine-SettheInStyleratLowtoMediumheatsetting.Withnehair,youshouldonlyneed
1 to 2 passes with the InStyler to achieve your desired results.
2. Medium or Normal - Set your InStyler to the Medium to High heat setting. You should
only need 1 to 2 passes with the InStyler to achieve your desired results.
3. ThickorCoarse - Set your InStyler at the highest heat setting and style as desired.
Withcoarsehair,2to3passeswiththeInStylershouldbeenoughtosetyourstyle.
Don’trush! Remember to Takeyourtimeandmoveslowlythroughthehair.
NOTE: For colour treated hair, we also recommend a lightweight shampoo and a light
leave-in conditioner.
• Volumizing products can be used to hold the style.
• To hold your style, end with a professional light finishing spray.
• Although the InStyler uses less heat than other hair appliances, we recommend using
thermal protectant products before use.
TheBasics-Preparation for all hair types.
• Before using your InStyler, you should always start with clean,dryhair.
• You should also detangle first with a brush, and all sections should be combed out for
optimal results and shine.
• Sections of hair to be styled should be no wider than the length of the InStyler barrel.
Werecommendstartingwith2.5cmto7.5cmsectionsatatime for whichever style you
want to achieve.
• Styletheunderlayersofyourhairrst. After under layers are completed, style your
top layers.
• You may use any salon quality styling product with your InStyler, however we do not
recommend the use of any oil-based products with your InStyler.
• For better hold, you can use your favorite light styling spray on each section of hair before
using your InStyler.
• GoSlowly! The most important lesson is to glide the InStyler slowly. Don’t worry if you
see “steam” coming off of your hair when using your InStyler. This is not the result of any
damage to the hair, it is simply excess product that is evaporating from the hair shaft.
19mm InStyler Rotating Iron
For more tips, tricks and videos visit, www.instyler.co.uk

8
SectioningHair
To achieve the style you want with your InStyler, it is important to know how to properly
sectionthehair.
• Withlongerhair,clipupthetoplayersofyourhair,andthenbeginsectioningandstyling
your under layers of hair first.
• For best results, do not use fingers to gather each section of hair. You can gather a much
“cleaner” section with a sectioning comb.
• Start with 2.5cm to 7.5cm sections working around each side of the head to the nape of
the neck.
• Whenstylinghair,griptheInStylerrmlybutnottootightly.Lethairglidethroughit.
LettheInStylerdothework.
InStylerTechniques-Straightening
TostraightenhairusingtheInStyler:
1. Section your hair using a sectioning comb.
2. Position the InStyler so the rotating barrel
side is next to your scalp as illustrated in
the picture.
3. Gently close the InStyler on your section
of hair starting at the roots, and let the
InStyler slowly glide straight down
through the ends of your hair.
TIP: To straighten at the root, simply glide just
the hot barrel over the root area (see illustra-
tion). Do not close the unit. Be cautious to
avoid burning your scalp.
19mm InStyler Rotating Iron
For more tips, tricks and videos visit, www.instyler.co.uk

9
InStylerTechniques-Spiral Curl
ForspiralcurlsusingtheInStyler:
1. For the curling technique, you may find it
easier to remove the Thermal Guard Training
Aid while keeping in mind to be cautious
and avoid burning your face or scalp.
(See page 6 for Thermal Guard Training Aid
removal instructions.)
2. Being careful to not burn your fingers,
wrap a section of hair around the barrel
of your InStyler from root to ends, with
the barrel side facing your scalp
(see illustration).
3. Gently close the InStyler onto the section of
hair. Rotate your wrist slightly to ensure the
ends of your hair are included.
4. Let the InStyler rotate for 5 to 10 seconds on
each section of hair, then gently open the
unit lettingthehairfallfromthebarrel.
5. For tighter, more defined curls, you can let
your InStyler rotate for a few seconds longer.
Let hair cool completely before running
fingers through to separate.
19mm InStyler Rotating Iron
For more tips, tricks and videos visit, www.instyler.co.uk

10
InStylerTechniques-Curl Under
ForipunderstylesusingtheInStyler:
1. Gently close the InStyler onto the section
of hair with the barrel positioned under
the hair section.
2. Slowly glide the InStyler down through the
hair section from the roots to the ends.
(see illustration)
3. Near the end of the hair section, rotate your
wrist so the InStyler brush turns in towards
your face. Allow the barrel to rotate 3 to 5
seconds in place on your ends before
releasing the hair. (see illustration)
InStylerTechniques-Flick Out
ForipoutstylesusingtheInStyler:
1. Gently close the InStyler onto the section
of hair with the barrel positioned over
the section of hair.
2. Slowly glide the InStyler down through the
hair section from the roots to the ends.
(see illustration)
3. Near the end of the hair section, rotate your
wrist so the InStyler brush turns out away from
your face. Allow the barrel to rotate 3 to 5
seconds in place on your ends before
releasing the hair. (see illustration)
19mm InStyler Rotating Iron
For more tips, tricks and videos visit, www.instyler.co.uk
Indice
Altri manuali InStyler Ferro da stiro

InStyler
InStyler Straight Away Manuale utente

InStyler
InStyler FREESTYLE MAX 00710 Manuale utente

InStyler
InStyler Straight Away Manuale utente

InStyler
InStyler STRAIGHT UP Manuale utente

InStyler
InStyler titanium Manuale utente

InStyler
InStyler WET to DRY MAX Manuale utente

InStyler
InStyler MAX Manuale utente

InStyler
InStyler Cerasilk Manuale utente

InStyler
InStyler 1 in. Manuale utente

InStyler
InStyler Tulip Manuale utente