
iRay Technology FINDER II FL35R Manuale utente

IRay Technology Co., Ltd.Add: 11th Guiyang Street, YEDA, Yantai 264006, P.R. ChinaTel: 0086-400-998-3088 Web: www.infirayoutdoor.comEmail: infirayoutdoor@infiray.comOperating ManualFL35R/FH35RFL35R/FH35Rwww.infirayoutdoor.comFINDER ǁThermal Imaging Monocular
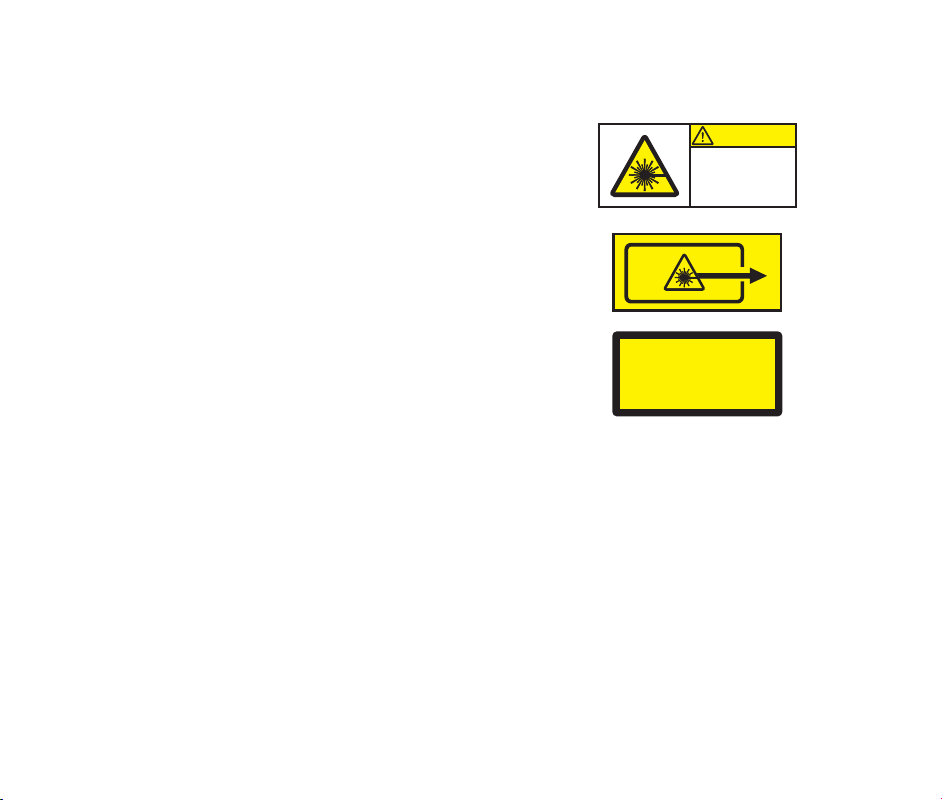
CAUTION
LASER
1M
wavelength: 905nm
maximum power: < 1mW
WARNING!
Information for the userAn additional warning for Class 1M and 2M laser products. This warning shall state that viewing the laser output with telescopic optical instruments (for example, telescopes and binoculars) may pose an eye hazard and thus the user should not direct the beam into an area where such instruments are likely to be used.

SPECIFICATION
Model
FL35R
FH35R
Microbolometer
Resolution, pixels
384 x 288
640 x 512
Pixel size, µm
12
NETD, mk
≤40
≤35
Frame refresh rate, Hz
50
Optical Specifications
Objective Lens, mm
35 / F1.0
Field of view, degree
7.5 x 5.7
12.6 x 10.1
Optical magnification, x
3.4 ~ 13.6
2 ~ 8
Digital zoom, x
1 / 1.5 / 2 / 2.5 / 3 / 3.5 / 4
Minimum focusing distance, m
1
Focusing range of eyepiece, D
-5 ~ +5
Detection range, m(Target size: 1.7mx0.5m, P(n)=99%)
1818
Display
Type
OLED
Resolution, pixels
1024 x 768
Operational Specifications
Battery type
Li-ion battery pack
Max. battery life(t=25℃)*, h
6
5.5
Laser rangefinder range, m
800 ±1
Amount of built-in memory, GB
32
APP compatibility
Support
Dimension, mm
160 x 90 x 50
Weight, g
≤ 400
IP code
IP67
Operation temperature, ℃
-20 ~ +50
* Actual operation time depends on the intensity of Wi-Fi use and the built-in video recorder.3PACKAGE CONTENTSlFinder II Thermal MonocularlPortable BaglType C USB cablelHDMI cablelPower adapterlIBP-2 battery pack *2lIBC-2 battery chargerlHand straplNeck straplCloth for cleaning opticslOperating manualDESCRIPTIONThe Finder II series are easy to carry and can be operated with one hand. With its compact size and light weight, it can be placed in the pocket any time. The built-in laser ranging can quickly locate the target distance. The ergonomic construction and powerful function make the Finder II series to be the best choice for outdoor exploration.DISTINGUISHING FEATURESl12µm thermal imaging detectorlHigh image qualitylIntegratedlaserrangefinderlDisplay off functionlOLED displaylLongdetectiondistancelUltraclear mode for harsh weather conditions2* Improvements may be made to the design and software of this product to enhance its useful features. * Technical parameters of the device may be improved without prior notice of the customer.
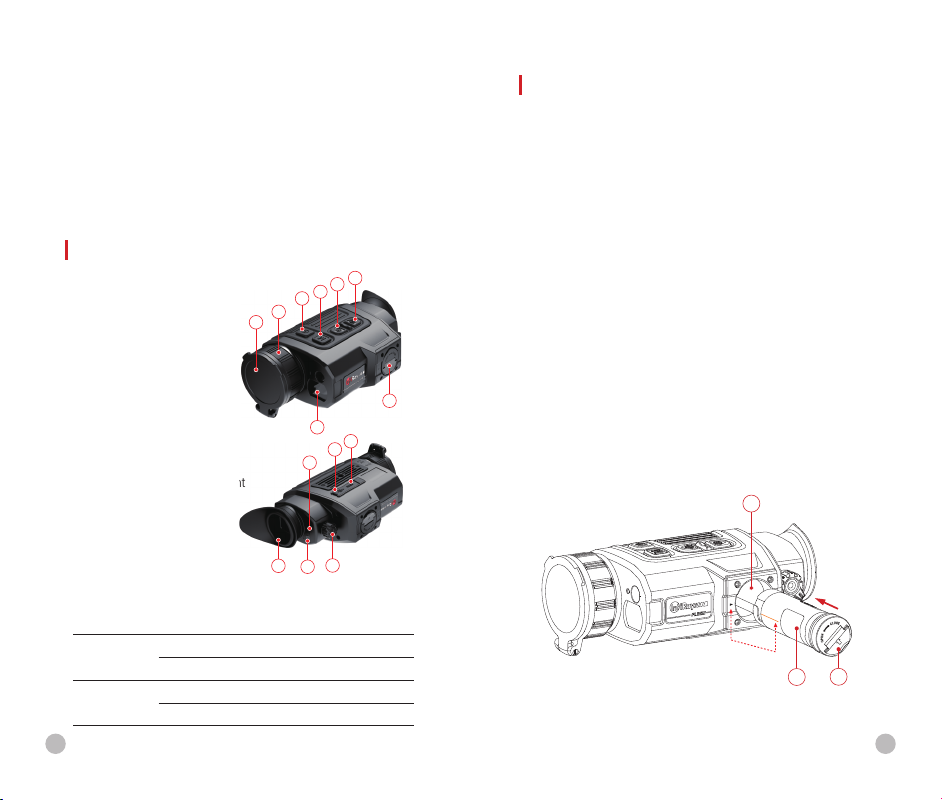
lCool hue and warm hue for selectionl32GB Build-in memorylSupport photo and video recordinglSupport APP connection via Wi-FilBuilt-in digital compass and motion sensorlReplaceable Battery PacklConvenient user interfaceUNITS AND CONTROLS1. Lens cap 2. Lens focus ring3. Power button4. Menu button5. Up/Ranging button6. Down/Photo button7. Laser rangefinder8. IBP-2 battery pack9. Eyepiece10. Infrared sensors switch11. Eyepiece diopter adjustment12. LED indicator13. Type C port14. HDMI portLED indicator displaying the current status of the device13
4
5627811910131412BATTERY AND SAFETYFinder II series is supplied with a quickly removable 18650 Li-ion battery pack, which enabled the device to be used for up to 5.5h. The battery should be fully charged before first use.Battery Pack InstallationlTurn up the puller (15) on the battery pack (8), and align the orange line (D) on the battery pack (8) with the triangle symbol (C) on the battery slot (16) and push the battery pack (8) into the battery slot (16).lWhen the battery pack is completely inserted into the battery slot, turn the puller (15) clockwise to lock the battery pack.lClose the puller (15), and the battery pack is completely installed.lFinder II series can only be powered by this battery pack. If other battery packs are used, it may cause irreparable loss, damage to the device, and can even possibly cause fire.DC8Battery Pack16Battery Slot15Puller
LED Color
LED Status
OperatingMode
●
Normal
Fully charged
Flashing
Standby
●
Normal
Charging
Flashing
Less than 10% battery level
45
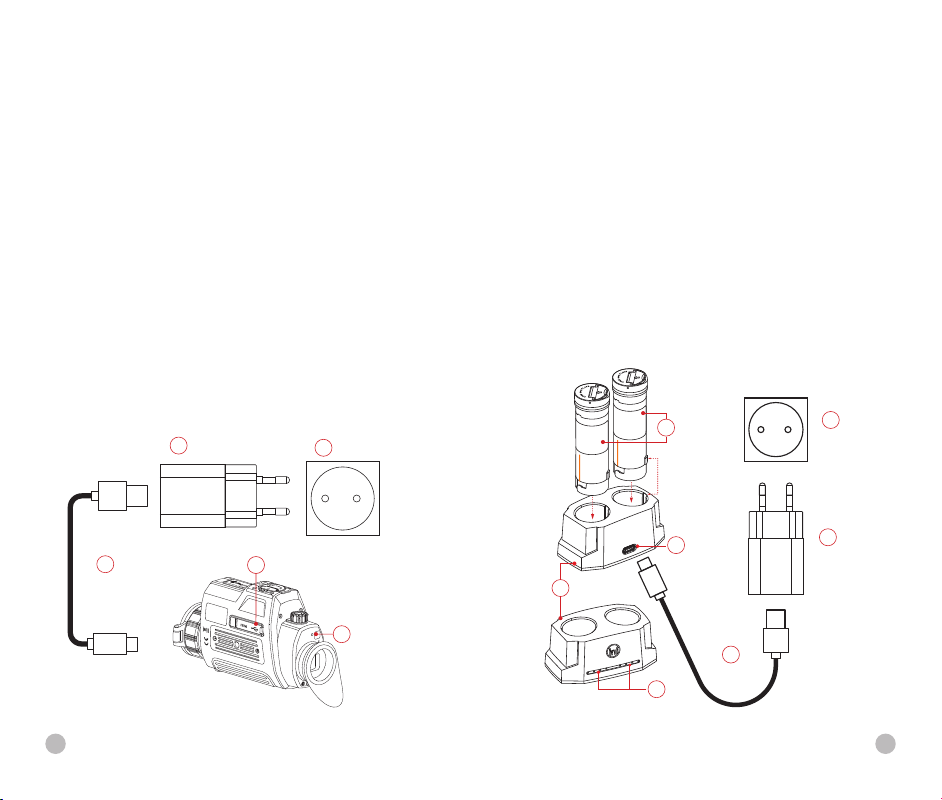
7Method 2: Charging with Battery ChargerlAlign the positioning block (A) of the battery pack (8) with the groove (B) of the battery charger (15), and insert the battery pack (8) into the battery charger (15).lConnect the plug of the USB Type-C cable (18) to the USB connector of the power adapter (19). Plug the power adapter (19) into a socket 100-240V (20) (110V for US).lConnect the other end of the USB cable (18) to the Type-C port (16) of the battery charger (15).lAfter finishing the above steps, the LED indicator (17) on the battery charger (15) will display the battery charge state. lAfter the battery is fully charged, remove the battery pack from the battery charger.LED IndicatorBattery Charger16100-240VPower AdapterSocketType C Port171920USB Cable1815BAAB8BatteryPackMethod 1: Charging with Type-C PortlAlign the orange vertical line on the battery pack with the white triangle symbol next to the battery compartment on the Finder II, and install the battery pack into the battery compartment of the product. For details, see Battery Pack Installation.
lConnect the Type C end of the data cable (18) to the Type C port (13) of the product.lConnect the other end of the data cable (18) to the power adapter (19) that comes with the product, or connect to another USB power socket with a rated output voltage not exceeding 5V.lPlug the adapter (19) into a 100-240V power socket (20) for charging.lwhen charging, the LED indicator will change to red.LED indicator displaying the current status of the deviceUSB Cable18100-240VSocket20Power Adapter1913Type C Port12LED Indicator6

9Battery charge status (see table).Note: Two batteries can be charged at the same time: the second slot is designed for it.Safety MeasureslUse this battery charger to charge the battery pack only. Otherwise it will cause irreparable damage to the battery pack or charger and even may cause fire.lBefore a long storage time, the battery pack should be partially charged, not fully charged or discharged.lDo not charge the battery immediately after you bring it from the cold to the warm. Wait 30 to 40 minutes for it to warm up.lDo not use the charger if it is modified or damaged.lThe device should be charged at a temperature of 0°C ~ +45°C. Otherwise the battery life will be significantly reduced.lWhen charging, please don't leave the battery unattended.lDo not expose the battery to high temperature or open flame.lDo not immerse the battery in water.lThe battery pack has short circuit protection. But situations that may lead to short circuits should be avoided.lDo not charge the battery for more than 24 hours after it is already fully charged.
LED Indicator
Battery charge status
Battery level is from 1% to 25%.
Battery level is from 25% to 50%.
Battery level is from 50% to 75%.
Battery level is from 75% to 99%.
Battery is fully charged.
lIt is not recommended to connect third-party devices that consume more power than allowed.lDo not disassemble or modify the battery pack without professional instructions. Do not knock or drop the battery pack.lThe recommended operating temperature for the device is -20°C ~ +50°C. Do not use the device beyond this temperature range, which may shorten the battery life.lWhen the device is used under sub-zero temperature, the battery capacity drops, which is normal and does not indicate a defect.lPlease keep the battery pack out of the reach of children.EXTERNAL POWER SUPPLYFinder II series supports external power supply, such as the portable power source (5V).lConnect the external power supply to the Type-C port (13) of the device.lThe device will automatically switch to the external power supply and charge the battery pack (8) at the same time.lAt this time, the battery icon on the display will become to the charging icon and the power indicator will turn red, and then turn green after the battery is fully charged. lIf an external power supply is connected, but no battery pack is installed, the battery icon will become a USB icon and the power indicator will turn green.lWhen the external power supply is disconnected, Finder II series will automatically switch to the battery pack power supply and will not shut down.8

11BUTTONOPERATIONS
Button
Device status / operation mode
First short press
Next short press
Long press
Power button
The device is off.
--
--
Power on device
Home screen state
Standby
Wake up the device
Power off device
Defective pixels calibration interface
calibrate a defective pixel
Undo the pixel calibration
Cancel all calibrations of this operation with shutter correction
Shortcut menu/ Main menu
Return to the home screen
Standby
--
Menu button
Home screen state
Open shortcut menu 1
Open shortcut menu 2
Open main menu
Shortcut menu 1
Open shortcut menu 2
Exit the shortcut menu
--
Shortcut menu 2
Exit the shortcut menu
Open shortcut menu 1
--
Main menu
Confirm value, enter menu option
Confirm value, enter menu option
Exit menu option / main menu
Defective pixels calibration interface
Switch cursor movement direction
Switch cursor movement direction
Save and exit calibration
Up/ Ranging button
Home screen state
Turn on the laser ranging function
--
--
Laser ranging mode
Single ranging
--
Switch ranging mode between single and continuous mode
Shortcut menu 1
Adjust E-zoom
Adjust E-zoom
--
Shortcut menu 2
Adjust display brightness
Adjust display brightness
--
Main menu
Navigation up
Navigation up
--
Defective pixels calibration interface
Move one pixel up/ right
Move one pixel up/ right
Move ten pixels up/ right
Down/ Photo button
Home screen state
Take a photo
Take a photo
Start video recording
Video recording
Take a photo
Take a photo
Stop and save video recording
Shortcut menu 1
Image mode adjustment
Image mode adjustment
--
Shortcut menu 2
Adjust image sharpness
Adjust image sharpness
--
Main menu
Navigation down
Navigation down
--
Defective pixels calibration interface
Move one pixel down/left
Move one pixel down/left
Move ten pixels down/left
Up+ Down
Home screen state
Shutter correction
Shutter correction
Background correction
10

1213MENU/STATUSBARICONS
White Hot
Black Hot
Red Hot
Target Highlight
Ironbow
Rainbow
×1/×1.5/×2/×2.5/×3/×3.5/×4
Digital zoom
Display brightness
Image sharpness
Automatic calibration
Manual calibration
Ultraclear mode
Wi-Fi
Video out
PIP
Digital compass
Motion sensor
Auto display off
Microphone
Switch unit
More
Calibration mode
Image Hue
Defective pixel calibration
Compass calibration
Time and Date
System information
AM
Out
MYOPERATIONWARNING! The lens of Finder II series must not be pointed at any sources of intense energy, such as laser-emitting devices or the sun. This may damage the electronic components in the device. Damage caused by failure to comply with the operating guidelines is not covered under warranty.Power on and image adjustmentlRemove the lens cap (1). Press and hold the Power (3) button for 2s to power on the device. Then, the home screen appears after 10s.lRotate the eyepiece diopter adjustment (11) to adjust the resolution of the icons on the display. After the adjustment is completed, for the same user, when using it again there is no need to adjust the diopter again.lRotate the lens focus knob (2) to focus on the object observed.lSet the digital zoom, image mode, screen brightness and image sharpness with a short press of the Menu (4) button (Refer to the Shortcut Menu section in this manual for details).
Factory reset
Return to the Main Menu
Single ranging
Continuous ranging
Battery indication
Battery charging
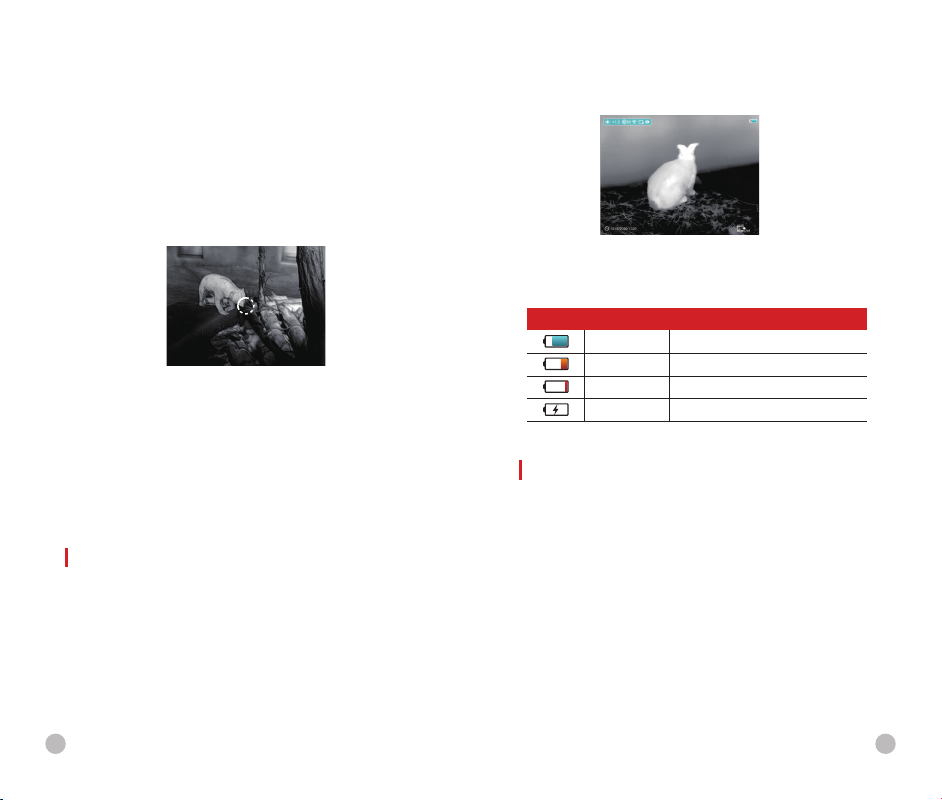
8lLower left corner--Time and datelLower right corner--Video output icon (on). The color of the battery icon represents the current battery level. When the battery icon is shown in red, it indicates that the battery is low. Please charge it in time.CALIBRATING THE SENSORWhen the image is degraded or uneven, it can be improved by calibration. Calibration enables the detector temperature background to be equalized and defects in the image to be eliminated.There are two calibration modes: manual calibration (M) and automatic calibration (A).Select the required mode in the CALIBRATION section of the MAIN MENU.lA mode (automatic).The device is calibrated autonomously by the software algorithm. The lens cap need not be secured (the sensor is closed by an internal shutter).
Icon
Color
Battery level
Blue
30%-100%
Yellow
20%-30%
Red
Less than 10%
--
Charging
15Shut DownlAfter using the device, press and hold the Power (3) button for 3 seconds. The shutdown countdown screen will appear. lWhen the countdown from 3 to 0 is completed as indicated by the countdown icon, the device is powered off. Then release the button. The display is off, the indicator is off, and the device is shut down.StandbylThe standby mode can let the device into a sleep state (turn off the display screen, the main chip is standby).lDuring use, press the Power (3) button briefly, which allows it to be quickly turned off, if necessary. lPress the Power (3) button again to wake up the device.HOME SCREENWhen the device booted up, the home screen shows upon. There is some general information shown on the interface. Detail as follows:lUpper left corner--Color palette, magnification, calibration mode, Wi-Fi (on), Ultraclear mode (on), Microphone (on), Automatic screen off (on), lUpper right corner--Battery level314

lM mode (manual). The device needs to be calibrated manually. ØShort press the Up (5)+Down (6) button for shutter calibration, and long press for background calibration.ØThe lens cap should be closed for background calibration. PHOTOGRAPHING AND VIDEO RECORDINGFinder II Series thermal imager is equipped with a function for video recording and photographing an observed image onto the built-in memory card. The files of images and videos will be named after the time, so it is recommended to reset the system time in the Main Menu or to synchronize the system time and date in the Settings of the APP before using the photo and video function. For specific operations, you can download the operating instructions of the APP from the company's website.PhotographinglTake a photograph with a short press of the Down/Photo (6) button in the home screen. The image freezes for 0.5 seconds with a photo icon ( ) displayed on the upper-right corner of the display.lThe picture file is saved to the build-in memory card.NoteØManual shutter calibration and manual background calibration are still possible even in mode A.16Video RecordinglIn the home screen, press and hold the Down/Photo (6) button to start video recording.lA tooltip showing the recording time (showing in MM: SS (minutes: seconds) format) will appear in the upper right corner of the display.lThe red dot in the tooltip flashes during recording.lDuring recording, short press the Down/Photo (6) button to take a photo also.lStop the video recording by pressing and holding down the Down/Photo (6) button.lVideo and picture files are stored in the built-in memory card after video recording has been turned off.Memory AccessWhen the device is turned on and connected to a computer, it is recognized by the computer as a flash memory card, which is used to access the device's memory and make copies of pictures and videos.lTurn on the device and connect it to the computer through the USB cable. NoteØYou can enter and work on the menu during video recording.ØThe recording time is accumulated in minutes until the recording stops, that is, the time shows 60:00 after 59:59.ØThe maximum duration of a video recording file is 10 minutes. When itʼs more than 10 minutes, the video will be recorded onto a new file. ØThe number of files is limited by the capacity of the device's built-in memory. Regularly monitor the amount of free memory in the built-in memory card, transferring footage and photos to other media to free up space on the memory card.00:0117
Questo manuale è adatto per i seguenti modelli
1
Indice
Altri manuali iRay Technology Monoculare


