JVC GET0471-001A Manuale utente

ENGLISH
For canceling the display demonstration, see page 7.
For installation and connections, refer to the separate manual.
INSTRUCTIONS
GET0471-001A
[U/UH]
KD-SV3305
VCD/CD RECEIVER KD-SV3305
Cover_KD-SV3305_001A_f.indd 1Cover_KD-SV3305_001A_f.indd 1 1/15/07 6:50:38 PM1/15/07 6:50:38 PM
2
ENGLISH
Thank you for purchasing a JVC product.
Please read all instructions carefully before operation, to ensure your complete understanding and to obtain the best
possible performance from the unit.
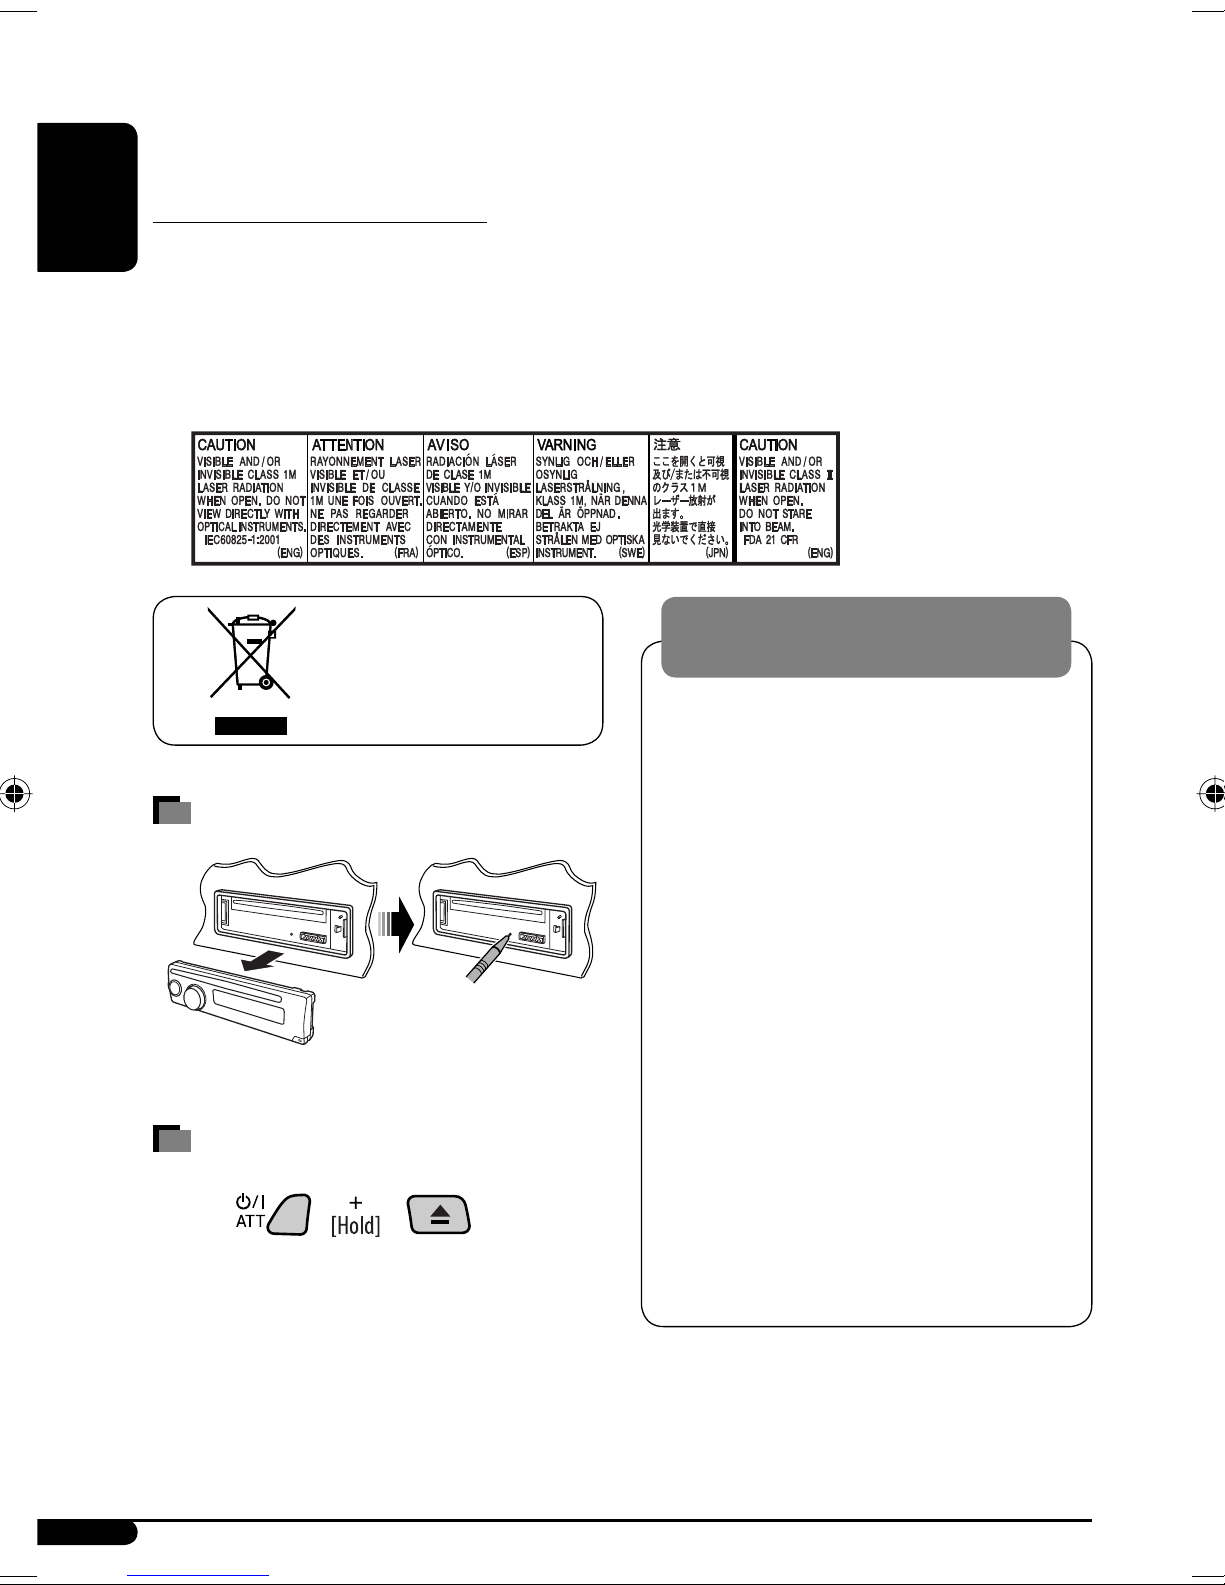
IMPORTANT FOR LASER PRODUCTS
1. CLA 1 LA ER PRODUCT
2. CAUTION: Do not open the top cover. There are no user serviceable parts inside the unit; leave all servicing to
qualified service personnel.
3. CAUTION: Visible and/or invisible class 1M laser radiation when open. Do not view directly with optical
instruments.
4. REPRODUCTION OF LABEL: CAUTION LABEL, PLACED OUT IDE THE UNIT.
How to reset your unit
• Your preset adjustments will also be erased.
How to forcib y eject a disc
• Be careful not to drop the disc when it ejects.
• If this does not work, reset your unit.
WARNINGS:
To prevent accidents and damage
• DO NOT insta any unit in ocations where;
– it may obstruct the steering whee and
gearshift ever operations.
– it may obstruct the operation of safety
devices such as air bags.
– it may obstruct visibi ity.
• DO NOT operate the unit whi e driving.
• If you need to operate the unit whi e
driving, be sure to ook ahead carefu y.
• The driver must not watch the monitor
whi e driving.
If the parking brake is not engaged,
“PARKING” f ashes on the disp ay, and
no p ayback picture wi be shown on the
monitor.
– This warning appears on y when the
parking brake wire is connected to the
parking brake system bui t in the car
(refer to the Insta ation/Connection
Manua ).
[European Union only]
EN02-07_SV3305_007A_f.indd 2EN02-07_SV3305_007A_f.indd 2 1/15/07 11:13:51 AM1/15/07 11:13:51 AM
ENGLISH
3
The fo owing marks are used to indicate...
: Built-in VCD/CD player operations.
: External CD changer operations.
: Indicator displayed for the
corresponding operation.
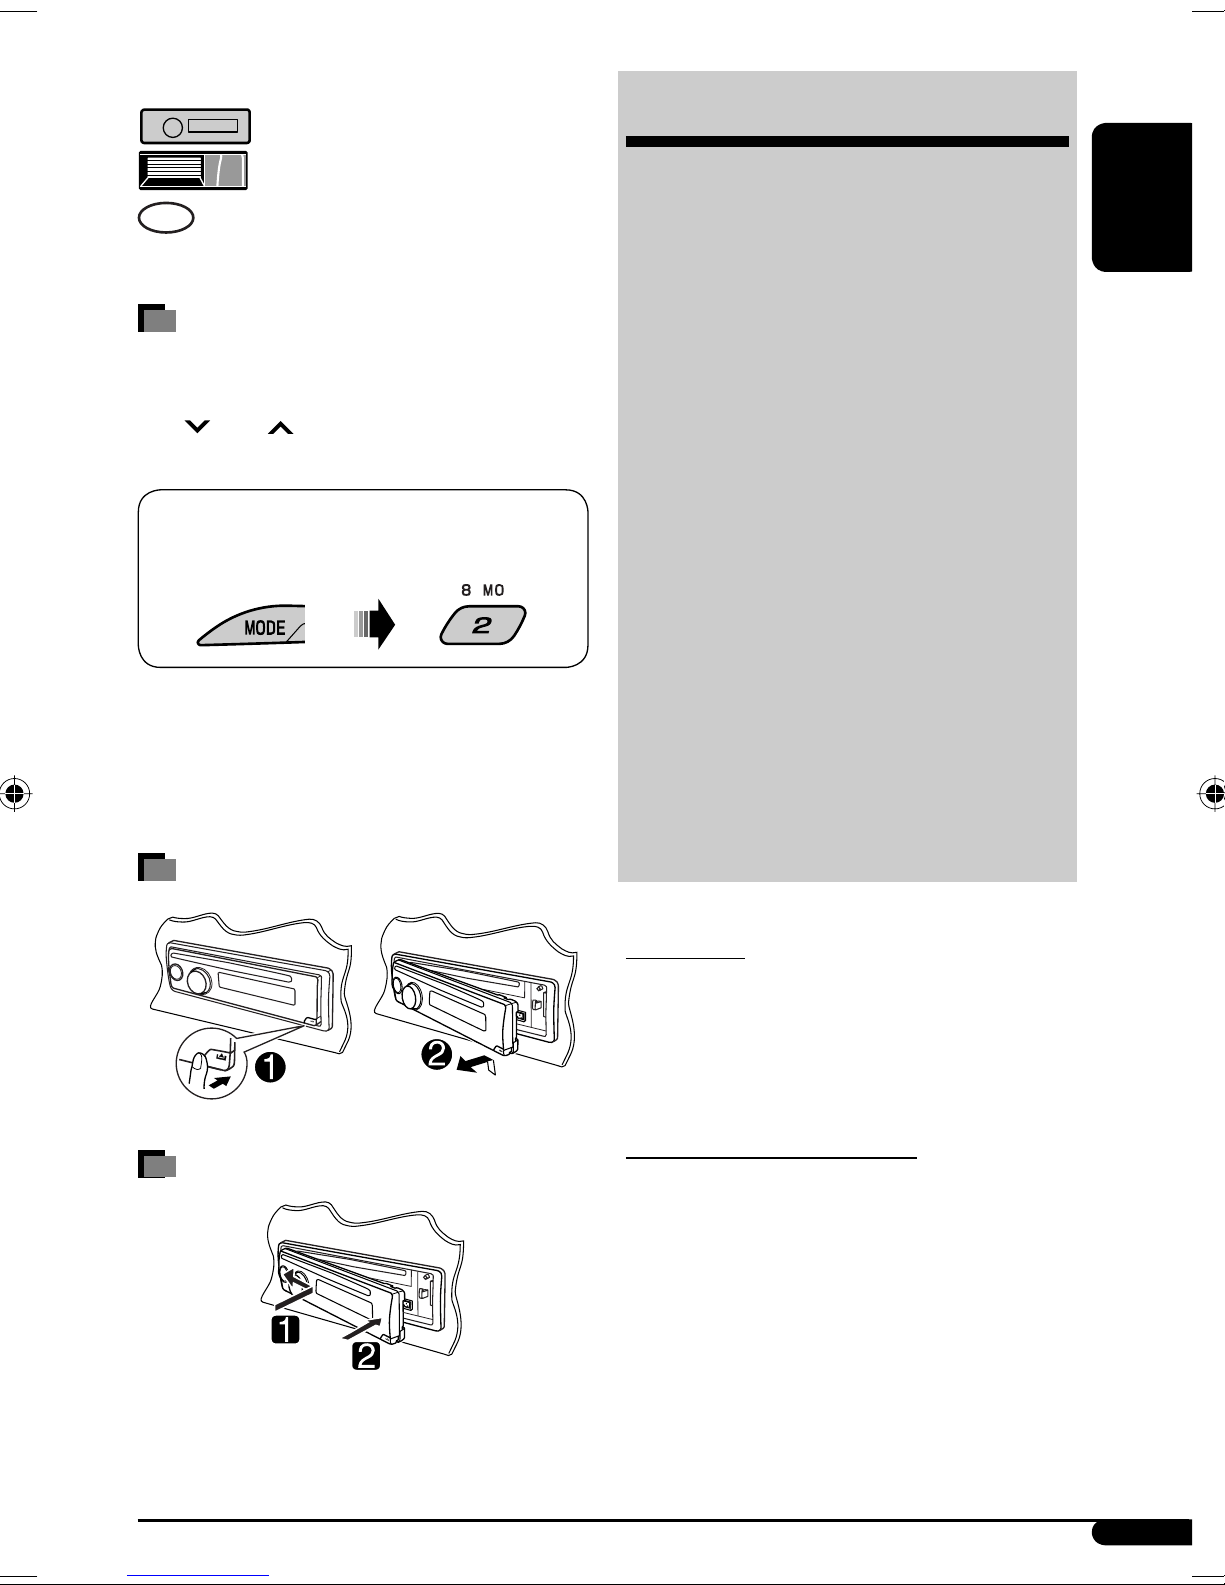
How to use the MODE button
If you press MODE, the unit goes into functions mode,
then the number buttons (except “1” and “4”) and
4 /¢ buttons work as different function
buttons.
Ex.: When number button 2 works as
MO (monaural) button.
To use these buttons for their origina functions
again after pressing MODE, wait for 5 seconds
without pressing any of these buttons until the
functions mode is cleared or press MODE again.
Detaching the contro pane
Attaching the contro pane
CONTENTS
Contro pane .................................. 4
Remote contro er —
RM-RK120 ............. 5
Getting started ................................ 7
Basic operations ................................................... 7
Radio operations ............................. 8
Disc operations ................................ 9
Playing a disc in the unit ..................................... 9
Playing discs in the CD changer ........................... 10
Sound adjustments .......................... 14
Genera settings — PSM ................... 15
iPod/D. p ayer operations ................. 17
Other externa component
operations ................................... 19
Maintenance ................................... 19
More about this unit ........................ 20
Troub eshooting .............................. 23
Specifications .................................. 25
For safety...
• Do not raise the volume level too much, as this will
block outside sounds, making driving dangerous.
• top the car before performing any complicated
operations.
Temperature inside the car...
If you have parked the car for a long time in hot or cold
weather, wait until the temperature in the car becomes
normal before operating the unit.
EN02-07_SV3305_007A_f.indd 3EN02-07_SV3305_007A_f.indd 3 1/15/07 11:13:54 AM1/15/07 11:13:54 AM

4
ENGLISH
i DI P (display) button
o (control panel release) button
; Disc information indicators—TAG (ID3 Tag),
(folder), (track/file)
a Disc type indicators—WMA, MP3
s Playback source indicators—
CH: Lights up only when CD-CH is selected as the
playback source.
DI C: Lights up for the built-in CD player.
d Playback mode / item indicators— RND (random),
(disc), (folder), RPT (repeat)
f LOUD (loudness) indicator
g EQ (equalizer) indicator
h ound mode (C-EQ: custom equalizer) indicators—
JAZZ, CLA IC, HIP HOP, POP , ROCK, U ER
j Tr (track) indicator
k ource display / Volume level indicator
l Main display
/ Tuner reception indicators— T (stereo),
MO (monaural)
Parts identification
Display window
Control panel
1 4 /¢ buttons
2 (standby/on attenuator) button
3 Remote sensor
DO NOT e pose the remote sensor to strong light
(direct sunlight or artificial lighting).
4 Loading slot
5 Display window
6 0 (eject) button
7 EQ (equalizer) button
8 RC (source) button
9 BAND button
6 (play/pause) button
p Control dial
q EL (select) button
w MO (monaural) button
e M ( trong-station equential Memory) button
r Number buttons
t RPT (repeat) button
y RND (random) button
u MODE button
EN02-07_SV3305_007A_1.indd 4EN02-07_SV3305_007A_1.indd 4 1/5/07 2:53:55 PM1/5/07 2:53:55 PM

ENGLISH
5
Main elements and features
1 SOURCE button
• Selects the playback source.
2 (standby/on attenuator) button
• Turns the power on i pressed brie ly or
attenuates the sound when the power is on.
• Turns the power o i pressed and held.
3 2 REV (reverse) / FWD ( orward) 3 buttons
• Searches or stations i pressed brie ly.
• Fast- orwards or reverses the track i pressed and
held.
• Changes the tracks i pressed brie ly.
• While listening to an Apple iPod or a JVC
D. player (in menu selecting mode):
– Selects an item i pressed brie ly. (Then, press
DOWN ∞ to con irm the selection.)
– Skips 10 items at a time i pressed and held.
Continued on the next page
Remote controller — RM-RK120
Installing the lithium coin battery
(CR2025)
Aim the remote controller directly at the remote
sensor on the unit. Make sure there is no obstacle
in bet een.
Warning:
• Do not install any battery other than CR2025 or
its equivalent; otherwise, it may explode.
• Do not leave the remote controller in a place
(such as dashboards) exposed to direct sunlight
or a long time; otherwise, it may explode.
• Store the battery in a place where children
cannot reach to avoid risk o accident.
• To prevent the battery rom over-heating,
cracking, or starting a ire:
– Do not recharge, short, disassemble, heat the
battery, or dispose o it in a ire.
– Do not leave the battery with other metallic
materials.
– Do not poke the battery with tweezers or similar
tools.
– Wrap the battery with tape and insulate when
throwing away or saving it.
EN02-07_SV3305_007A_f.indd 5EN02-07_SV3305_007A_f.indd 5 1/11/07 9:08:29 AM1/11/07 9:08:29 AM

6
ENGLISH
4 VOL. + / – buttons
• Adjusts the volume level.
5 ENTER and number buttons
• elects a track/file directly.
– Press the number button(s), then press ENTER.
– Not used for iPod/D. player operations.
• elects an item from the menu while playing
back a Video CD (VCD) in Playback Control (PBC)
function.
– Press the number button(s), then press ENTER.
• elects the discs while operating the CD changer.
– To select disc number 1 – 6, press number
button 1 – 6 briefly.
– To select disc number 7 – 12, press and hold
number button 1 (7) – 6 (12).
6 EQ (equalizer) button
• elects the sound mode (C-EQ: custom
equalizer).
7 BAND 6 button
• Changes the FM/AM bands.
• tops disc playback temporarily. To resume
playback, press the button again.
– While playing a VCD, the playback scene at the
moment stops and remain still.
– Not used for CD changer, iPod, or D. player
operations.
8 5 UP / DOWN ∞ buttons
• Changes the preset stations.
• Changes the folder of the MP3/WMA discs if
pressed briefly.
• Changes the disc while operating the CD changer
if pressed and held.
• While listening to an iPod or a D. player:
– Pauses/stops or resumes playback with
DOWN ∞.
– Enters the main menu with 5 UP.
(Now 5 UP / DOWN ∞/2 REV / FWD 3 work
as the menu selecting buttons.)*
9 PBC (Playback Control) button
• Activates or deactivates the PBC function.
p RETURN button
• Returns to the previous menu while playing a
VCD in PBC function.
q O D (On- creen Display) button
• Turn on and off the O D on the monitor.
w AUDIO button
• elects the audio channel for VCD playback.
* 5 UP : Returns to the previous menu.
DOWN ∞ : Confirms the selection.
EN02-07_SV3305_007A_1.indd 6EN02-07_SV3305_007A_1.indd 6 1/5/07 2:53:56 PM1/5/07 2:53:56 PM

ENGLISH
7
To drop the volume in a
moment (ATT)
To restore the sound, press the
button again.
To turn off the power
Basic settings
• See also “General settings — PSM” on pages 15 and
16.
1
2
1 Canceling the display demonstrations
Select “ EMO,” then “ EMO OFF.”
2 Setting the clock
Select “CLOCK H” (hour), then adjust the hour.
Select “CLOCK M” (minute), then adjust the
minute.
3 Finish the procedure.
To check the current clock time while the
power is turned off
Getting started
Basic operations
~ Turn on the power.
Ÿ
* You cannot select these sources if they are not
ready or not connected.
! For F /A tuner
⁄ Adjust the volume.
@ Adjust the sound as you want. (See
page 14.)
Caution on volume setting:
iscs produce very little noise compared with other
sources. Lower the volume before playing a disc
to avoid damaging the speakers by the sudden
increase of the output level.
Volume level appears.
EN02-07_SV3305_007A_f.indd 7EN02-07_SV3305_007A_f.indd 7 1/11/07 9:08:47 AM1/11/07 9:08:47 AM

8
ENGLISH
Radio operations
~
Ÿ
! Start searching for a station.
When a station is received, searching stops.
To stop searching, press the same button
again.
To tune in to a station manually
In step ! above...
1
2 Select a desired station frequency.
Lights up when receiving an FM stereo
broadcast with sufficient signal strength.
When an FM stereo broadcast is hard to
receive
Reception improves, but stereo effect will be lost.
To restore the stereo effect, repeat the same
procedure. “MO O OFF” appears and the MO indicator
goes off.
Storing stations in memory
You can preset six stations for each band.
FM station automatic presetting —
SSM (Strong station Sequential
Memory)
1 Select the FM band (FM1 – FM3) you want to
store into.
2
3
“SSM” flashes, then disappears when automatic
presetting is over.
Local FM stations with the strongest signals are
searched and stored automatically in the FM band.
Lights up when monaural mode is activated.
EN08-13_SV3305_007A_f.indd 8EN08-13_SV3305_007A_f.indd 8 1/10/07 4:27:02 PM1/10/07 4:27:02 PM

9
ENGLISH
Manual presetting
Ex.: Storing FM station of 92.5 MHz into preset number
4 of the FM1 band.
1
2
3
Listening to a preset station
1
2 Select the preset station (1 – 6) you want.
To check the other information while
listening to the radio
lock Ô Frequency
reset number flashes for a while.
Continued on the next page
Disc operations
Playing a disc in the unit
All tracks will be played repeatedly until you change the
source or eject the disc.
• If a disc menu appears on the monitor while playing a
VCD with BC, see page 11.
Before performing any operations, make sure the
following....
• Turn on the monitor and select the appropriate
monitor input before playing a VCD.
• If you turn on the monitor, you can also control the
M 3/WMA playback by referring to the monitor
screen (see page 12).
• Select the video system suitable for your monitor (see
page 16).
To stop play temporarily
To resume playback, press the
button again.
To stop play and eject the
disc
EN08-13_SV3305_007A_1.indd 9EN08-13_SV3305_007A_1.indd 9 1/5/07 3:05:59 PM1/5/07 3:05:59 PM

10
ENGLISH
To fast forward or reverse the track
To go to the next or previous tracks
To go to the next or previous folders (only for
MP3 or WMA discs)
For MP3 discs:
For WMA discs:
1
2
To locate a particular track (for CD or VCD
with PBC set to “PBC OFF”) or folder (for MP3
or WMA discs) directly
To select a number from 01 – 06:
To select a number from 07 – 12:
• To use direct folder access on MP3/WMA discs, it
is required that folders are assigned with 2-digit
numbers at the beginning of their folder names—
01, 02, 03, and so on.
To select a particular track in a folder
(for MP3 or WMA discs):
Playing discs in the CD changer
All discs in the magazine will be played repeatedly until
you change the source.
• Ejecting the magazine will also stop playing.
~
* If you have changed the external input setting
to “EXT IN” (see page 16 , you cannot select the
CD changer.
Ÿ Select a disc.
For disc number from 01 – 06:
For disc number from 07 – 12:
About MP3 and WMA discs
MP3 and WMA “tracks” (words “file” and “track” are
used interchangeably) are recorded in “folders.”
About the CD changer
It is recommended to use a JVC MP3-compatible CD
changer with your unit.
• You can also connect MP3-incompatible CD changers.
However, these units are not compatible with MP3
discs.
• You cannot use the CH-X99, CH-X100, and KD-MK
series CD changers with this unit.
• You cannot control and play any WMA or VCD disc in
the CD changer.
• Disc text information recorded in the CD Text can be
displayed when a JVC CD Text compatible CD changer
is connected.
• For connection, see Installation/Connection Manual
(separate volume).
EN08-13_SV3305_007A_1.indd 10EN08-13_SV3305_007A_1.indd 10 1/5/07 2:54:07 PM1/5/07 2:54:07 PM
Questo manuale è adatto per i seguenti modelli
1
Indice
Altri manuali JVC Ricevitore per auto


