JVC DD-8 Istruzioni di installazione e manutenzione
SEPARATE VOLUME
INSTRUCTIONS FOR NETWORK
FUNCTION
LVT1547-002A
[B]
DD-8
DD-3
This manual explains the network function of this system.
DD-83[B]-frontcover.fm Page 1 Wednesday, August 2, 2006 2:32 PM

1
•DLNACERTIFIED
TM Audio/Video/Image Player
• This system complies with DLNA Guidelines 1.0.
• You can play back the following file types using
the network function of this system.
LPCM, WAV, MP3, WMA, JPEG, ASF, DivX,
MPEG1, MPEG2
NOTE
• “DLNA” stands for “Digital Living Network Alli-
ance”. Refer to the following website for details.
http://www.dlna.org/
CyberLink Media Server is a registered trademark along with other company and product names mentioned
in this publication, used for identification purposes and remain the exclusive property of their respective own-
ers.
DLNA and DLNA CERTIFIED are trademarks and/or service marks of Digital Living Network Alliance.
Microsoft, Windows, Windows XP are registered trademarks or trademarks of Microsoft Corporation in the
United States and other countries.
Information on DLNA
DD-83[B]-gpage.fm Page 1 Friday, August 25, 2006 9:37 AM

2
Introduction....................................3
Introduction to the network function................ 3
General flow chart for the network
function ......................................................... 4
Preparation.....................................5
Computer ........................................................5
Networking device........................................... 5
Connection .....................................6
Connecting the main unit to the router............6
Installing CyberLink Media
Server..............................................7
Installing CyberLink Media Server ..................7
Specifying the shared folders..........................8
Confirming the connection
to the computer..............................9
Starting CyberLink Media Server ....................9
Setting up the IP address............11
Occasions requiring the IP address
setup ........................................................... 11
Determining the IP address of the
computer..................................................... 11
Assigning the IP address to the
main unit ..................................................... 13
Playing back files stored on the
computer ......................................16
Playing back audio files ................................16
Reference .....................................18
Adding shared folders ...................................18
Connecting the main unit to the
computer directly ........................................19
Troubleshooting...........................20
Introduction
Connection
Installing CyberLink Media
Server
Confirming the connection to
the computer
Setting up the IP address
Playing back files stored on
the computer
Reference
Table of contents
DD-83[B]-01.fm Page 2 Wednesday, August 23, 2006 4:01 PM
3
Introduction
You can play back video, audio and still picture
files stored on your computer by setting up the net-
work with the computer and the main unit.
You must install CyberLink Media Server from the
bundled CD-ROM to your computer.
CyberLink Media Server is a software for send-
ing video, audio and still picture files stored on
your computer to the main unit.
The network can be easily set up without having to
manually configure the IP address of the main unit
by simply connecting a router with a DHCP func-
tion to the main unit. The DHCP function of the
router automatically assigns the IP address to the
main unit.
NOTE
• If the router does not have a DHCP function or
you do not use the DHCP function, you must
assign the IP address to the main unit manually.
• You can also use the network function by con-
necting the main unit to the computer directly.
(Refer to page 19.)
You can play back the following file types using the
network function of this system.
LPCM, WAV, MP3, WMA, JPEG, ASF, DivX,
MPEG1, MPEG2
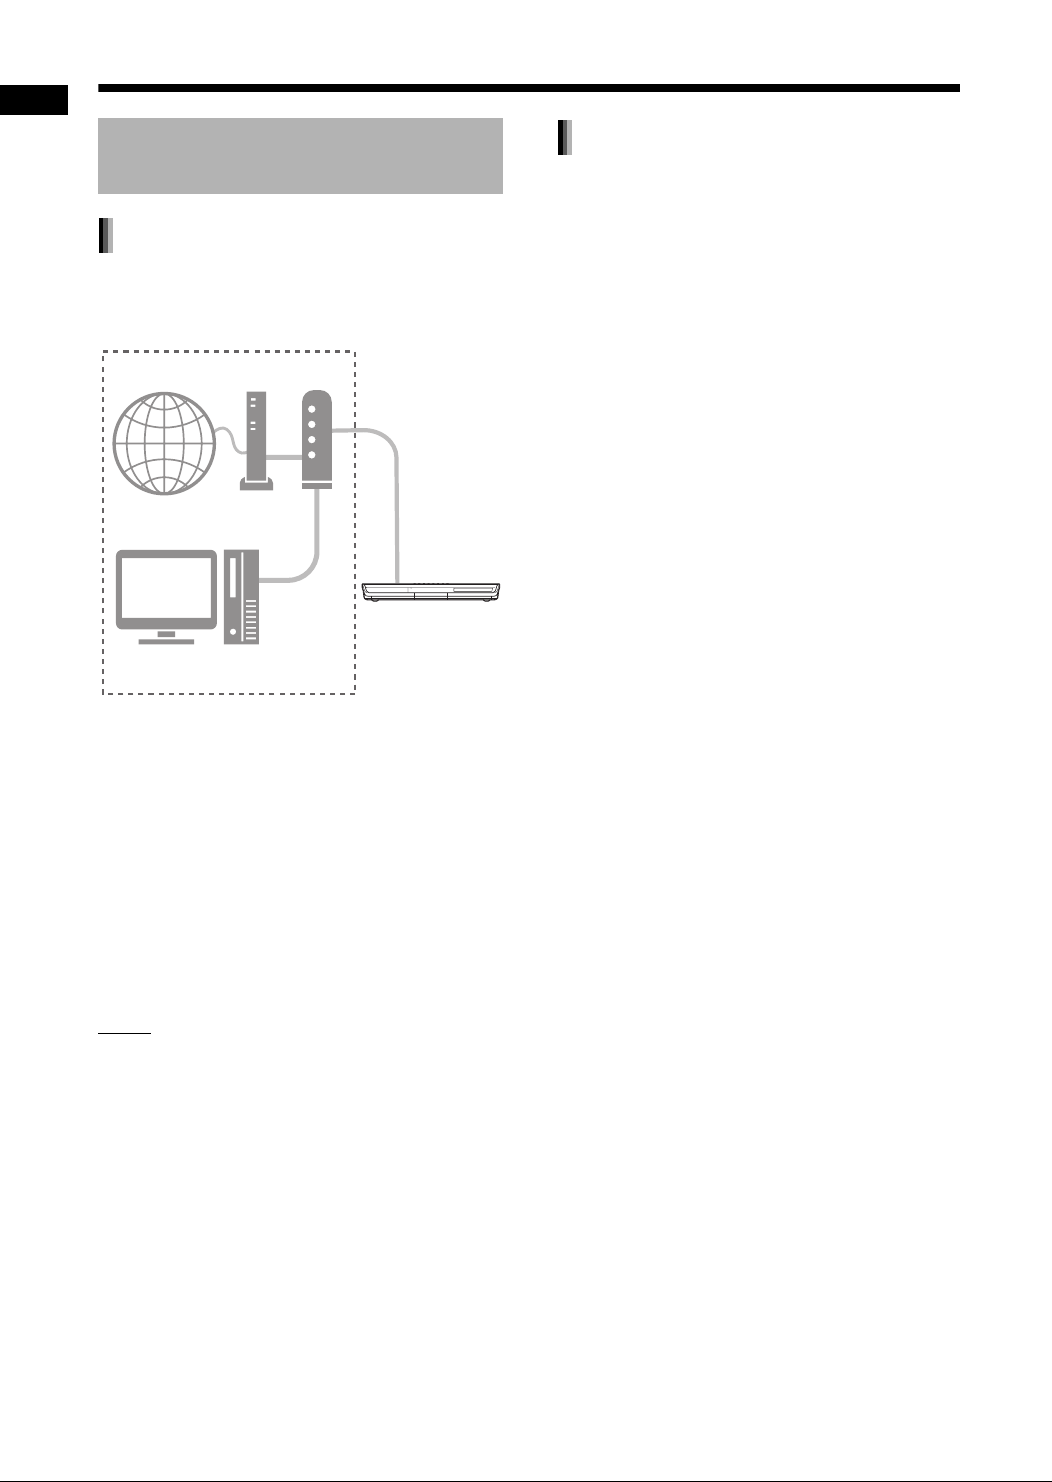
Introduction to the network
function
Outline of the network function
Internet Modem Router
Environment in use
Computer
Main unit
File types compatible with this system
Introduction
DD-83[B]-02.fm Page 3 Friday, August 25, 2006 9:37 AM
4
Introduction
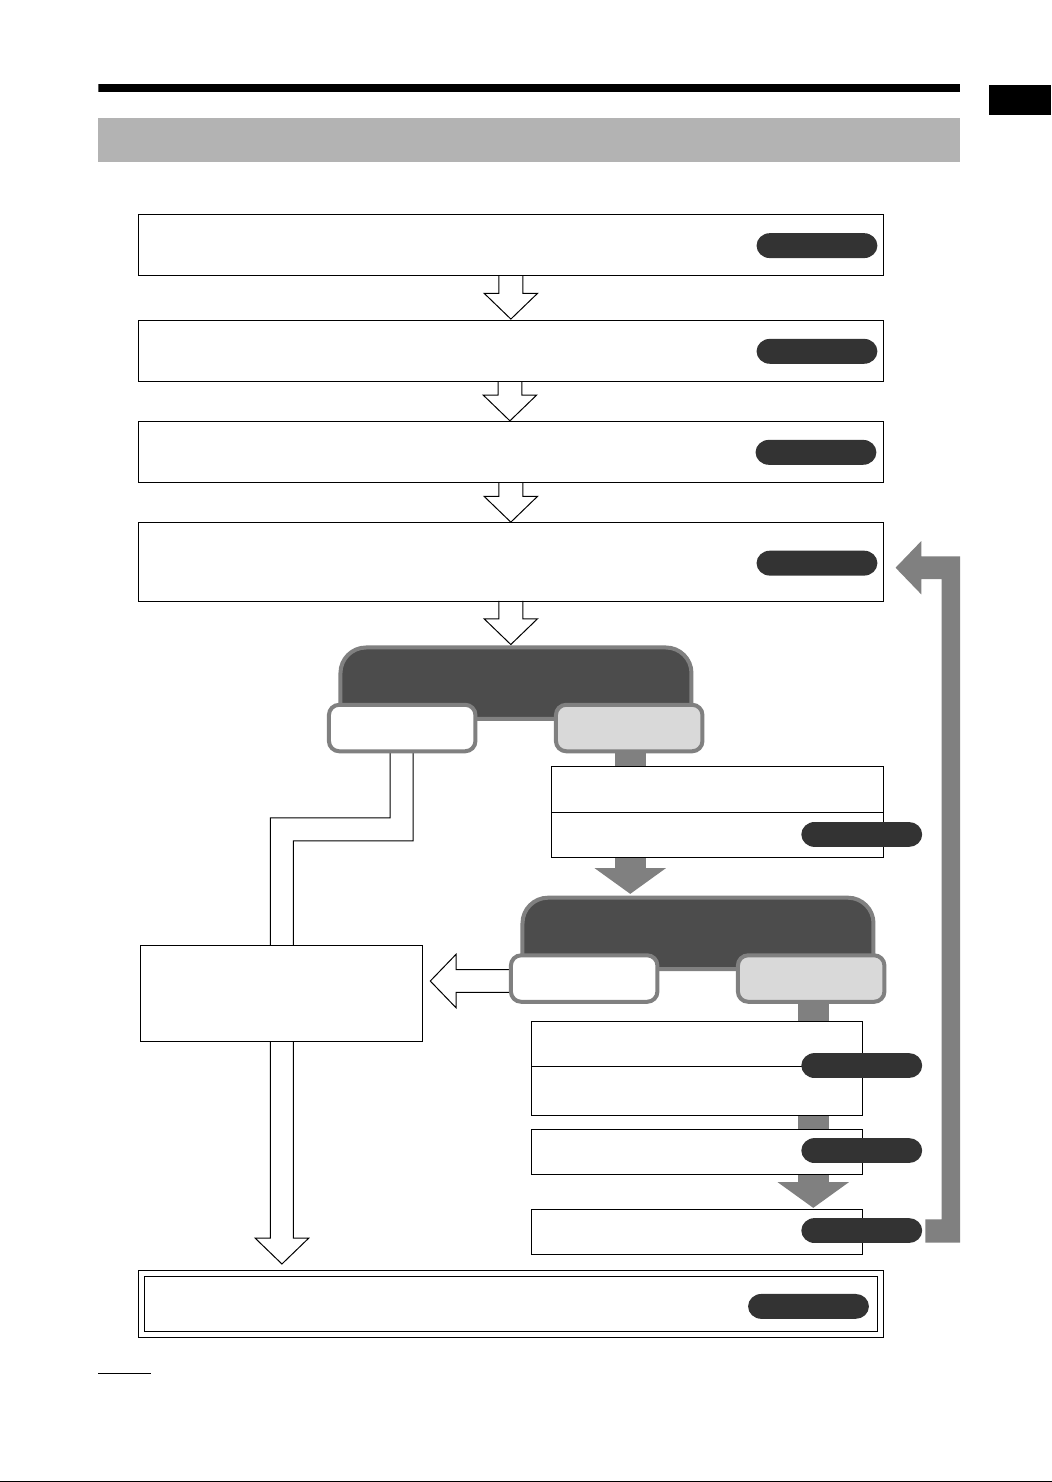
Set up the system following the flow chart shown below. The procedure for setting up the system differs
depending on your usage environment.
NOTE
• To connect the main unit to the computer directly, refer to “Connecting the main unit to the computer directly”
on page 19.
General flow chart for the network function
Page 6
Install CyberLink Media Server to your computer.
Connect the main unit to the router connected to your computer.
Page 7
Page 9
Page 10
Page 10
Page 11
Page 13
Page 16
Page 8
Start CyberLink Media Server, and then make sure that the main unit
recognizes CyberLink Media Server.
Make sure that the main unit
is turned on.
Check the cable connection.
The IP address has to be set up
manually.
Exit CyberLink Media Server.
Find out the IP address of your
computer.
Assign the IP address to the main
unit.
The setup is complete.
Now you can enjoy playback of files stored on the computer!
Specify the shared folders.
The IP address is assigned auto-
matically using the DHCP func-
tion of the router.
Does the main unit recognize
CyberLink Media Server?
Does the main unit recognize
CyberLink Media Server?
Yes
Yes
No
No
DD-83[B]-02.fm Page 4 Wednesday, August 23, 2006 3:41 PM
5
Preparation
Set up your computer and network environment as
follows.
You must install CyberLink Media Server from the
bundled CD-ROM to your computer for playing back
files stored on the computer with this system.
Operating system
• Requirement: Microsoft Windows XP Home Edi-
tion SP2, Windows XP Professional SP2, Win-
dows XP Media Center Edition SP2
Processor
• Requirement: A 800 MHz processor, such as an
Intel Pentium III or Advanced Micro Devices
(AMD) processor
• Recommendation: A 2.0 GHz processor or
faster
Random Access Memory (RAM)
• Requirement: 256 MB
• Recommendation: 512 MB
Free hard disk space
• Requirement: 50 MB
• Recommendation: 200 MB
Network Interface Card
• Requirement: Ethernet (802.3) or WiFi (802.11a
or 802.11g) network adapter
VGA
• Requirement: Intel, nVidia or ATI VGA card with
64 MB VRAM
Make sure that there is an available LAN terminal
on the router.
Also, make sure that there is an available Ethernet
cable (straight-through cable, not supplied). This
cable is used for connecting the router and the
main unit as shown on page 6.
NOTE
• To connect the main unit to the computer
directly, refer to “Connecting the main unit to the
computer directly” on page 19.
Computer
System Requirements
Networking device
Internet Modem Router
Environment in use
Computer
Preparation
DD-83[B]-03.fm Page 5 Wednesday, August 23, 2006 3:42 PM
6
Connection
This part explains the procedure for connecting the
main unit to the computer via a router with an
Ethernet cable and confirming that the connection
is completed properly.
NOTE
• Before following this procedure, connect the
main unit, speakers and a TV referring to the
main volume of the operation manual for this
system.
• To connect the main unit to the computer
directly, refer to “Connecting the main unit to the
computer directly” on page 19.
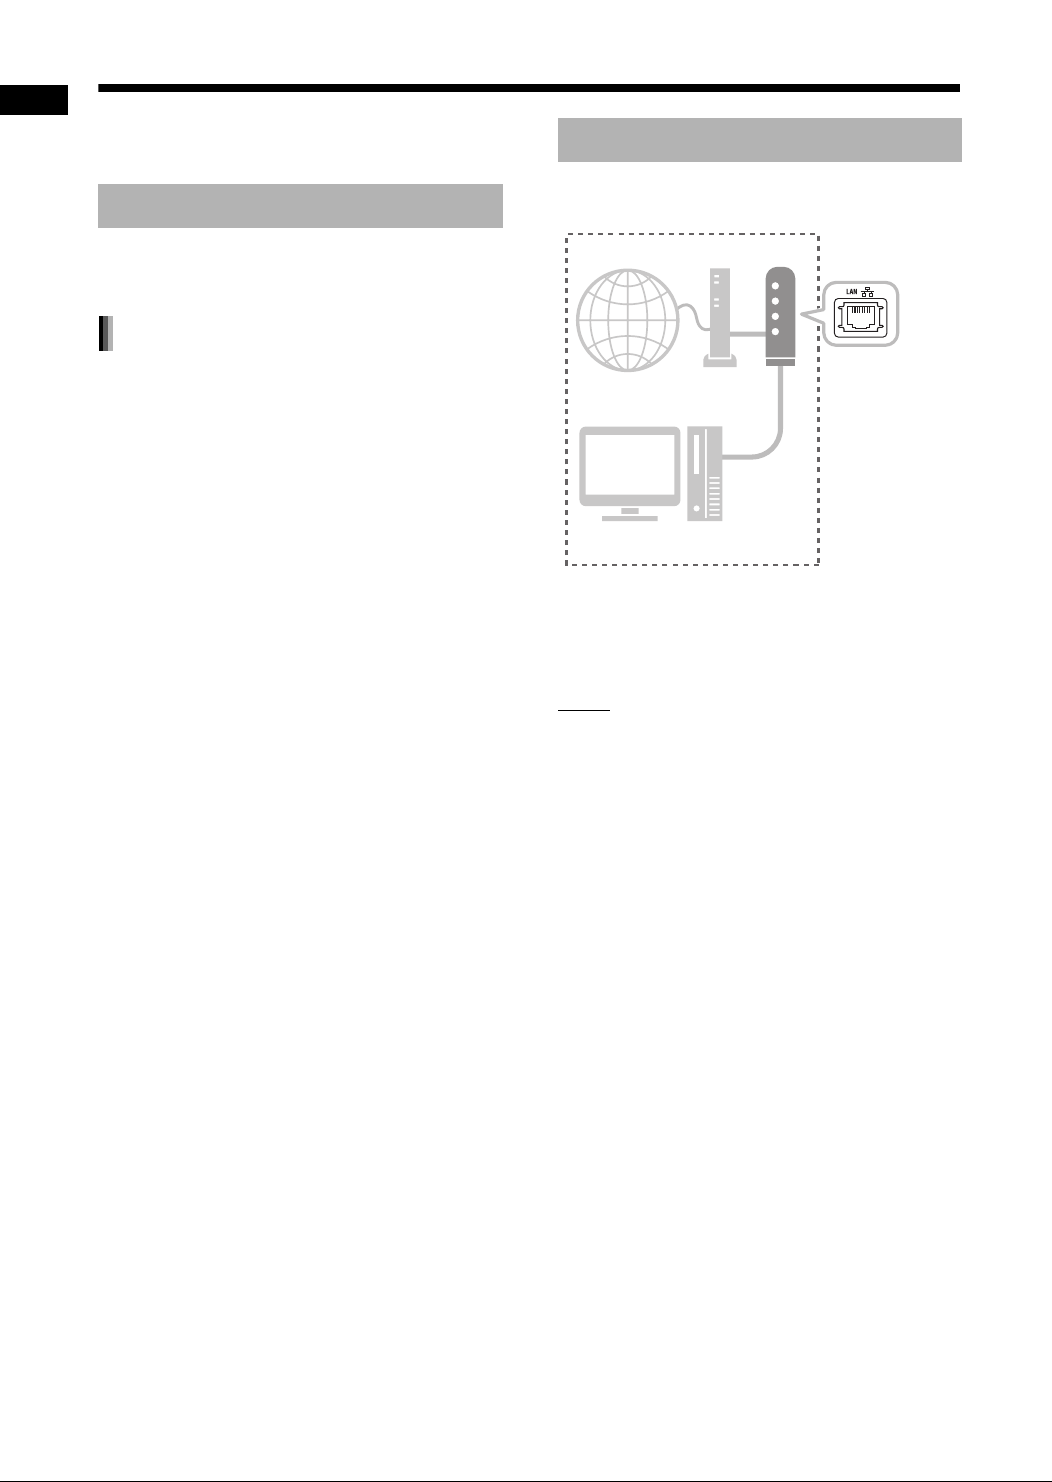
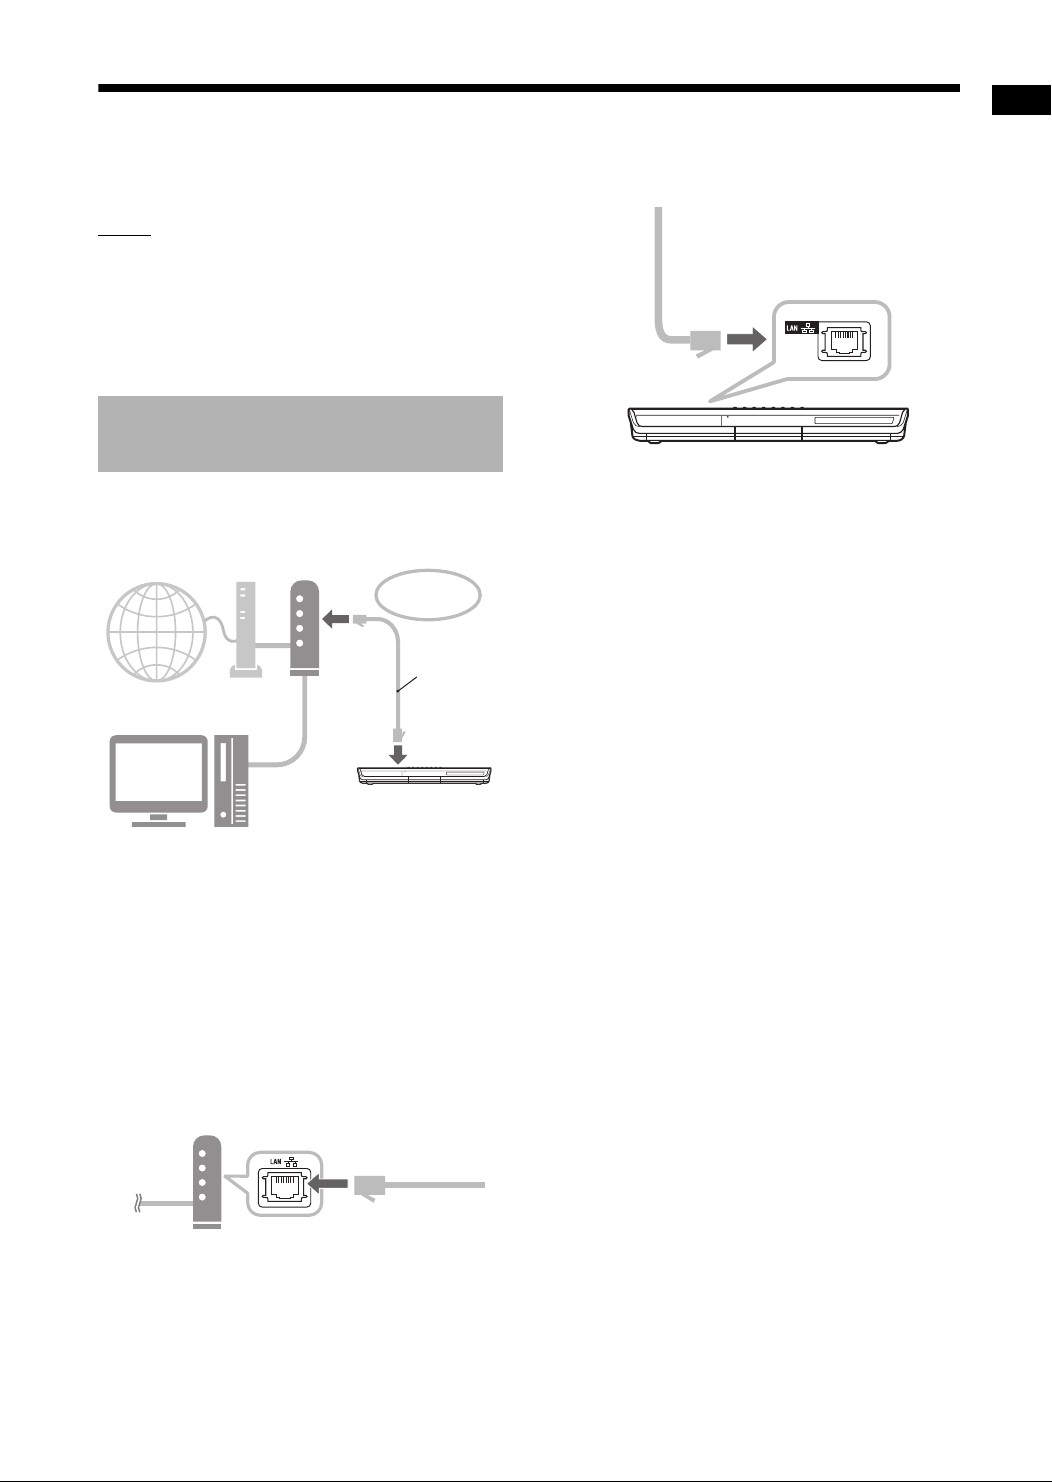
This part explains the procedure for connecting the
main unit to the computer linked to the Internet via
a router.
• The diagram shown above has been simplified
by omitting the connection of the main unit,
speakers and a TV. Refer to the main volume of
the operation manual for connecting the devices
shown above.
• The diagrams of the Internet and modem are
omitted in the later explanations.
1Connect one end of the Ethernet
cable (straight-through cable, not
supplied) to the LAN terminal on
the router.
2Connect the other end of the
Ethernet cable to the LAN terminal
on the main unit.
Connecting the main unit to
the router
Internet Modem Router
To the LAN
terminal on the
router
Computer
Ethernet cable
(straight-
through cable,
not supplied)
Connection
DD-83[B]-04.fm Page 6 Wednesday, August 23, 2006 3:42 PM
7
Installing CyberLink Media Server
The example TV and computer screenshots used
in this manual may differ from the actual screen
displays.
CyberLink Media Server is a software for sending
video, audio and still picture files stored on your
computer to the main unit.
This part explains the procedure for installing
CyberLink Media Server from the bundled CD-
ROM to the computer.
NOTE
• Make sure you close all anti-virus and other
applications running on your computer before
starting installation.
• This manual explains operations with the
English version of both Windows XP and Cyber-
Link Media Server as examples. Follow the
explanation referring to the actual operations of
your language version.
• Log onto the computer with administrative rights
(Administrators).
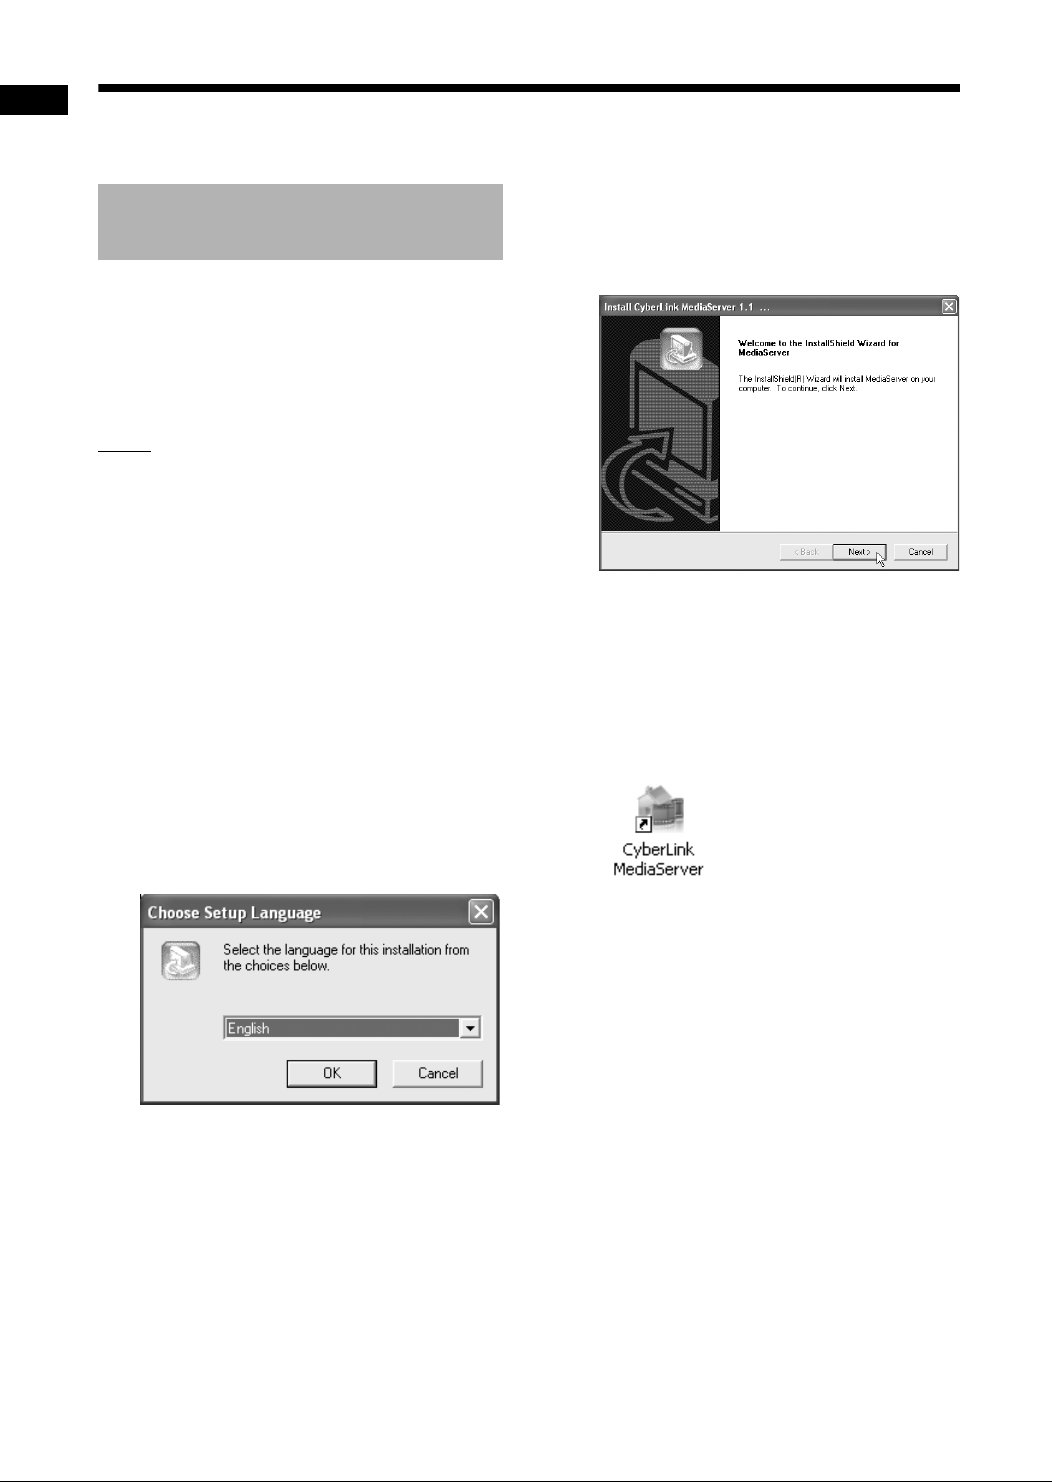
(On the computer)
1Start up Windows, and place the
CyberLink Media Server Software
CD-ROM into your computer’s CD-
ROM drive.
The installer should start up automatically,
and display the screen shown below.
2Select the language of the version
you want to install, and then click
[OK].
The program file runs and the “Install
CyberLink MediaServer” window is displayed.
3Click [Next >].
The license agreement is displayed.
• After finishing this step, install CyberLink
Media Server following the actual displayed
explanations.
4Confirm that the “CyberLink Medi-
aServer” icon is displayed on the
desktop.
You have finished installing CyberLink Media
Server.
Installing CyberLink Media
Server
Installing CyberLink Media Server
DD-83[B]-05.fm Page 7 Friday, August 25, 2006 9:38 AM
8
Installing CyberLink Media Server
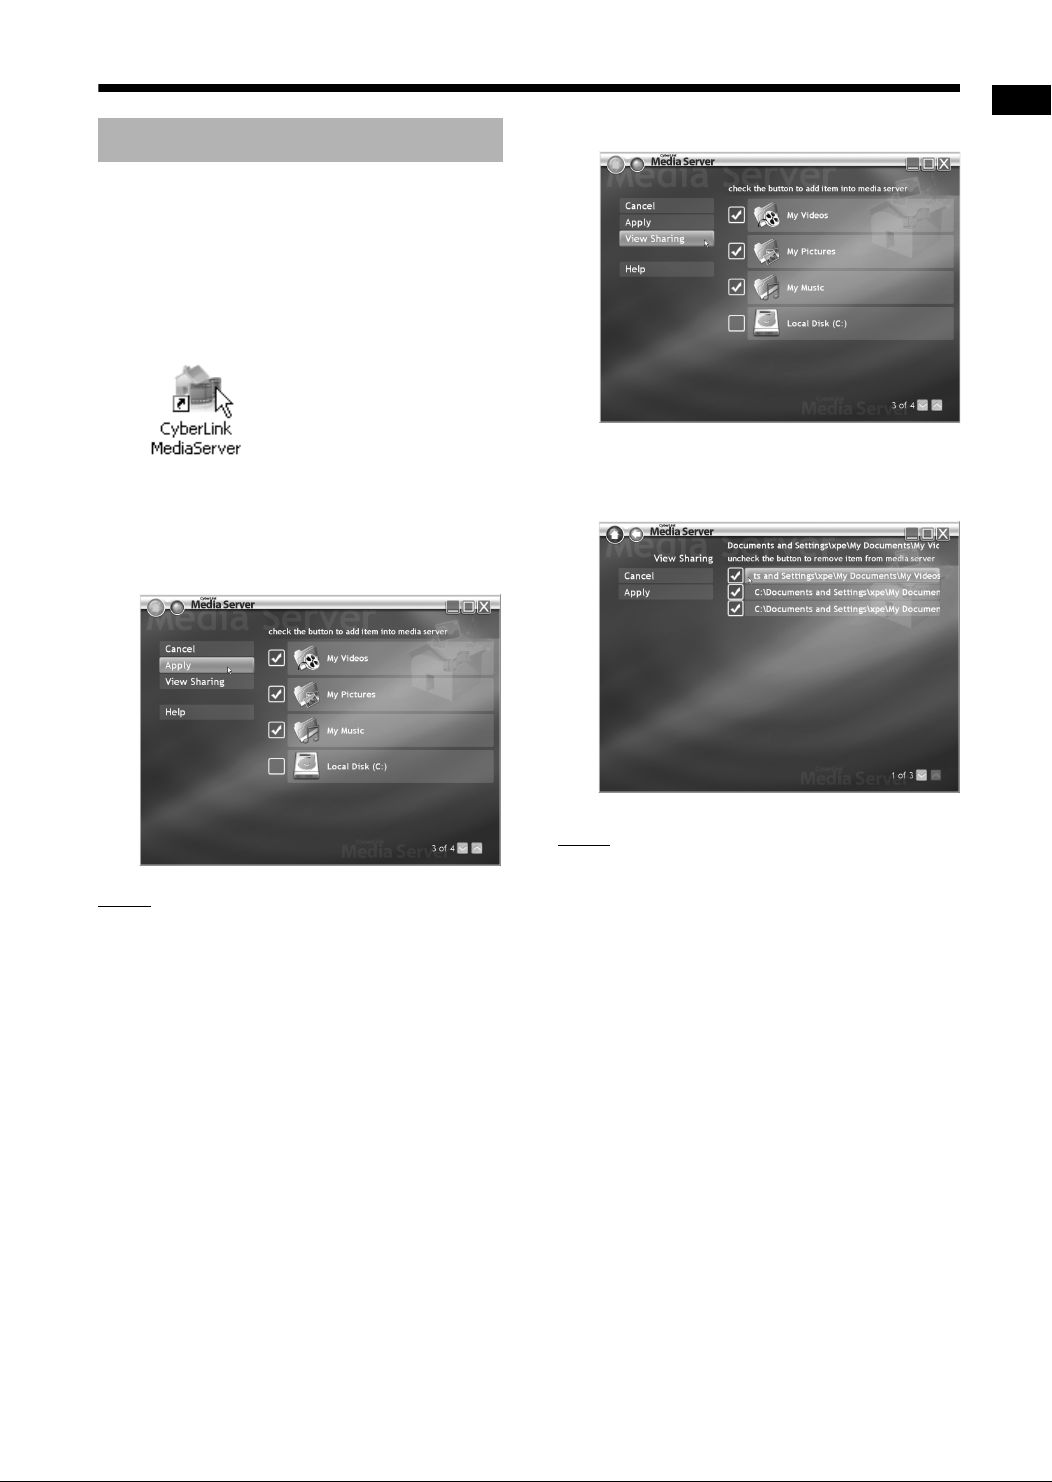
This part explains the procedure for selecting the
default folders (“My Videos”, “My Pictures” and “My
Music”) as examples.
(On the computer)
1Double-click the “CyberLink Medi-
aServer” icon on the desktop.
CyberLink Media Server starts.
2Select the check boxes next to
“My Videos”, “My Pictures” and
“My Music”, and click [Apply].
NOTE
• To select folders other than the default folders,
refer to “Adding shared folders” on page 18.
• You can store files of different types in one
folder. For example, even when video files and
still picture files are stored in the “My Music”
folder, you can play back those files.
3Click [View Sharing].
4Confirm that the names of the
shared folders are displayed on
the list.
NOTE
•To stop sharing a folder
Clear the check box next to it and click [Apply].
•To go back to the previous screen
Click [+] in the upper left portion of the screen.
•To exit CyberLink Media Server
Click [M] in the upper right portion of the screen.
Specifying the shared folders
DD-83[B]-05.fm Page 8 Wednesday, August 23, 2006 3:42 PM

9
Confirming the connection to the computer
This part explains how to start CyberLink Media
Server for the first time and how to perform the fol-
lowing.
• Confirming that the main unit recognizes the
computer. (On the remote control)
1Press [FAUDIO] to turn on the
main unit.
(On the computer)
2Double-click the “CyberLink Medi-
aServer” icon on the desktop.
CyberLink Media Server starts.
(On the remote control)
3Press [NETWORK 3].
4Confirm that “CyberLink Media
Server” is displayed on the TV
screen.
Proceed to “Playing back files stored on the
computer” on page 16.
Starting CyberLink Media
Server
TV
“CyberLink Media
Server”
Confirming the connection to the computer
DD-83[B]-05.fm Page 9 Friday, August 25, 2006 9:39 AM
Altri manuali per DD-8
2
Questo manuale è adatto per i seguenti modelli
1
Indice
Altri manuali JVC Impianto stereo

JVC
JVC NX-CDR7R Manuale utente

JVC
JVC UX-EP100 Manuale utente

JVC
JVC PC-X270 Manuale utente

JVC
JVC UX-G60 Manuale utente

JVC
JVC UX-D99R EN Manuale utente

JVC
JVC HX-D77J Manuale utente

JVC
JVC UX-V55R Manuale utente

JVC
JVC UX-G50J Manuale utente

JVC
JVC LVT2121-001A Manuale utente

JVC
JVC CA-D631T Manuale utente


