
König Electronic CMP-USBMICRO30 Manuale utente

CMP-USBMICRO30
MANUAL (p. 2)
USB Microscope
ANLEITUNG (S. 4)
USB-Mikroskop
MODE D’EMPLOI (p. 6)
Microscope USB GEBRUIKSAANWIJZING (p. 8)
USB-microscoop
MANUALE (p. 10)
Microscopio USB MANUAL DE USO (p. 12)
Microscopio USB
HASZNÁLATI ÚTMUTATÓ (o. 14.)
USB mikroszkóp KÄYTTÖOHJE (s. 16)
USB-mikroskooppi
BRUKSANVISNING (s. 18)
USB Mikroskop NÁVOD K POUŽITÍ (s. 20)
USB mikroskop
MANUAL DE UTILIZARE (p. 22)
Microscop USB ΕΓΧΕΙΡΙΔΙΟ XPHΣHΣ(σελ. 24)
Μικροσκόπιο USB 2.0
BRUGERVEJLEDNING (s. 26)
USB Mikroskop VEILEDNING (s. 28)
USB Mikroskop

ENGLISH
USB Microscope
1. Connecting the microscope
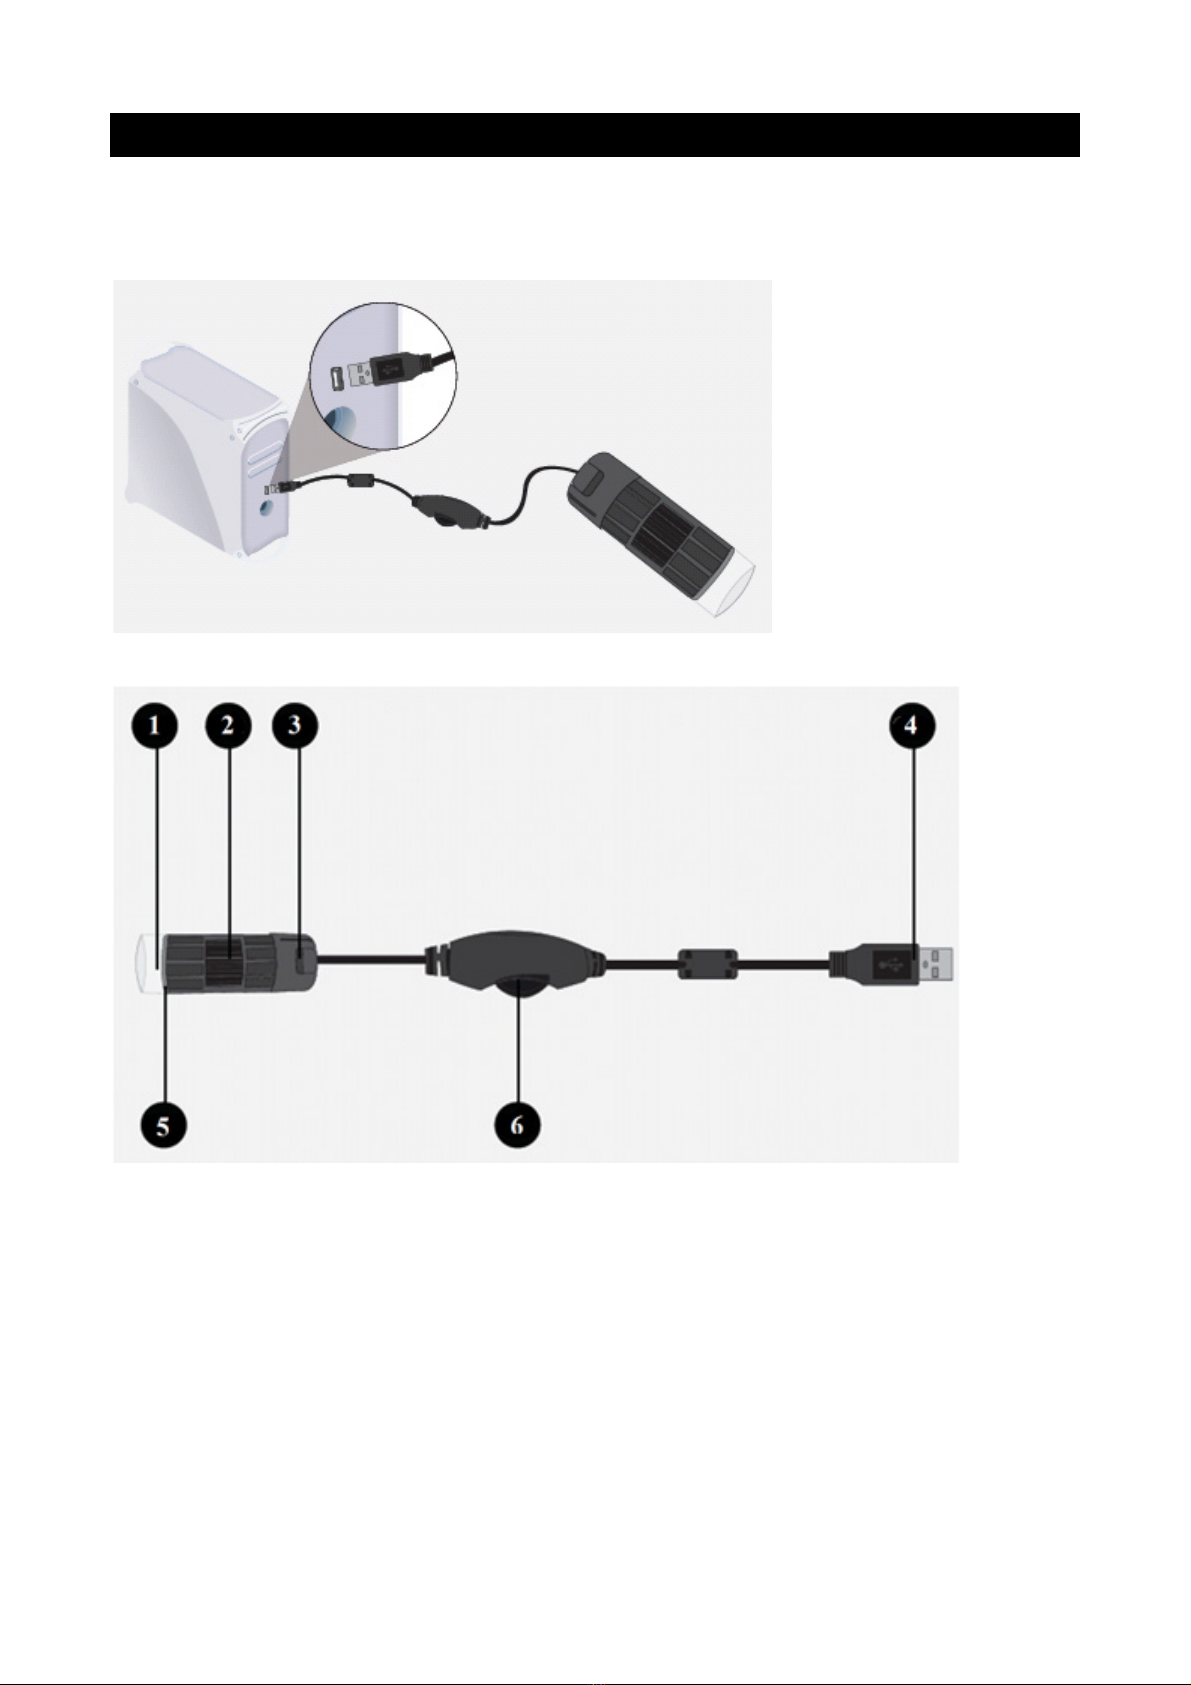
- Plug the USB cable into the computer. The device will be automatically detected in Windows® XP or later
versions.
- The device is compatible with any editing software.
1. Lens: Place over the desired object to watch
2. Focus: Turn left or right to set focus
3. Snapshot: Press to get a snapshot of the current image (does not work with some software
versions)
4. USB connector: Used to connect the microscope to the PC
5. LED lights: Turn on when needed
6. Light control: Move left or right to dim or turn the light on/off
3. Software installation
- The microscope has some viewing software, however you can also use other webcam software with
webcam functions (such as MSN messenger, Skype etcetera).
- To install the software, copy only the “amcap2a” software file to your desktop.
2
4. How to use the microscope
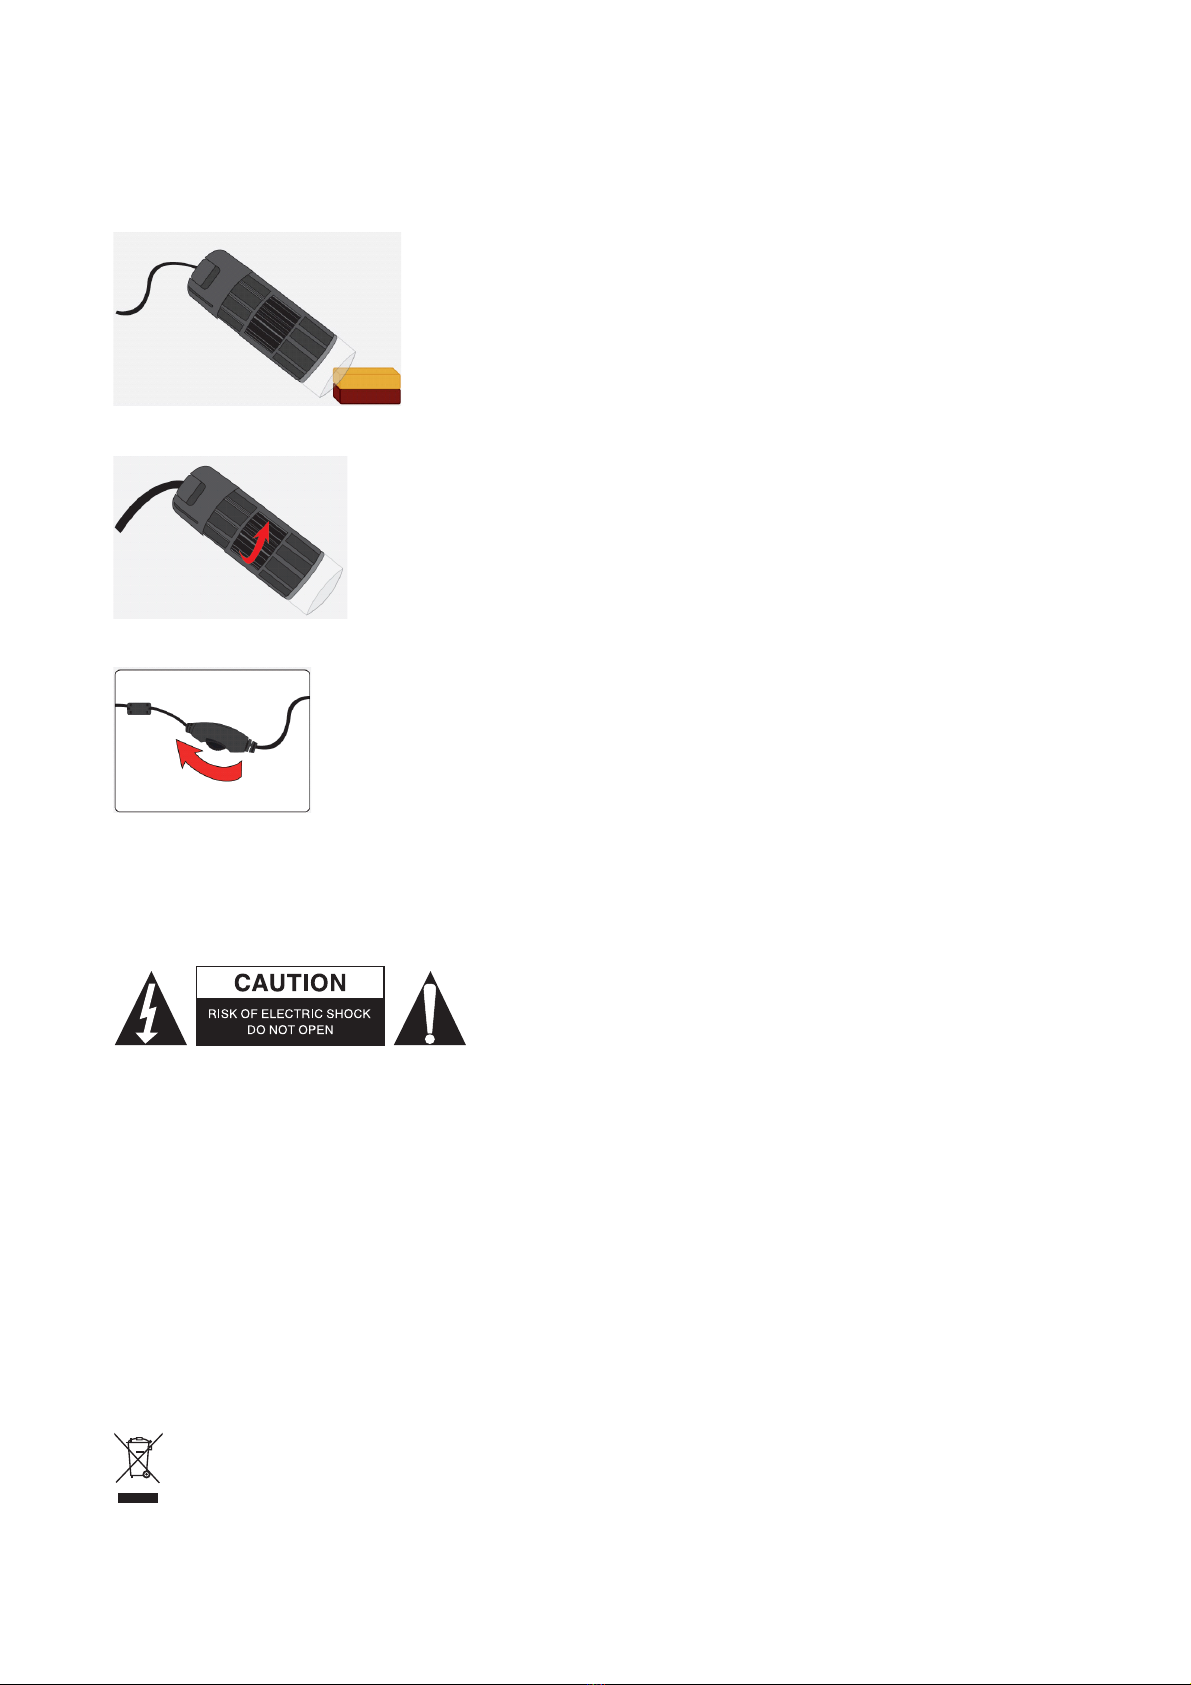
- After connecting the microscope to the computer, run the “amcap2a” software.
- A new window will appear showing the microscope image.
- Place the microscope over the desired viewing area.
- Set the focus.
- In case you need additional light, use the light control to turn the LED’s on.
- When the microscope is not in use, it is advisable to unplug it and re-connect it the next time.
If the image has not been displayed and another device is also in use (such as a webcam), you may need
to select the “Devices” menu and change the input to USB 2.0 camera.
Safety precautions:
To reduce risk of electric shock, this product should ONLY be
opened by an authorized technician when service is required.
Disconnect the product from mains and other equipment if a
problem should occur. Do not expose the product to water or
moisture.
Maintenance:
Clean only with a dry cloth. Do not use cleaning solvents or abrasives.
Warranty:
No guarantee or liability can be accepted for any changes and modifications of the product or damage caused
due to incorrect use of this product.
General:
Designs and specifications are subject to change without notice.
All logos brands and product names are trademarks or registered trademarks of their respective holders and
are hereby recognized as such.
Keep this manual and packaging for future reference.
Attention:
This product is marked with this symbol. It means that used electrical and electronic products should
not be mixed with general household waste. There is a separate collections system for these products.
3

DEUTSCH
USB-Mikroskop
1. Anschluss des Mikroskops
- Schließen Sie das USB-Kabel an den Computer an. Das Gerät wird von Windows® XP oder neueren
Versionen erkannt.
- Das Gerät ist mit allen Bearbeitungsprogrammen kompatibel.
1. Linse: Zum Anschauen über das gewünschte Objekt führen
2. Fokus: Zum Einstellen des Fokus nach links oder rechts drehen
3. Momentaufnahme: Für eine Momentaufnahme vom aktuellen Bild drücken (funktioniert nicht mit allen
Softwareversionen)
4. USB-Stecker: Für den Anschluss des Mikroskops an den PC
5. LEDs: Bei Bedarf einschalten
6. Lichtregler: Zum Dimmen oder Ein-/Ausschalten nach links oder rechts drehen
3. Installation der Software
- Das Mikroskop verfügt über eine Betrachtungssoftware; Sie können jedoch auch eine andere
Webkamera-Software mit Webkamera-Funktionen (z.B. MSN-Messenger, Skype, usw.) verwenden.
- Kopieren Sie zum Installieren der Software die Datei „amcap2a“ auf Ihren Desktop.
4. Gebrauch des Mikroskops
- Starten Sie nach dem Anschluss des Mikroskops an den Computer die Datei „amcap2a“.
- Es wird ein neues Fenster mit einer Abbildung des Mikroskops geöffnet.
- Führen Sie das Mikroskop über das gewünschte Betrachtungsfeld.
4

- Stellen Sie den Fokus entsprechend ein.
- Falls Sie zusätzliches Licht benötigen, schalten Sie die LEDs mit dem Lichtregler ein.
- Bei Nichtgebrauch des Mikroskops sollten Sie dieses vom Computer trennen und beim nächsten Gebrauch
erneut anschließen.
Falls kein Bild angezeigt und ein anderes Gerät (z.B. Webkamera) verwendet wird, dann sollten Sie im
Gerätemenü den Eingang auf USB2.0 Kamera stellen.
Sicherheitsvorkehrungen:
Um das Risiko eines elektrischen Schlags zu verringern, sollte
dieses Produkt AUSSCHLIESSLICH von einem autorisierten
Techniker geöffnet werden. Bei Problemen trennen Sie das Gerät
bitte von der Spannungsversorgung und von anderen Geräten ab.
Stellen Sie sicher, dass das Gerät nicht mit Wasser oder
Feuchtigkeit in Berührung kommt.
Wartung:
Nur mit einem trockenen Tuch säubern. Keine Reinigungs- oder Scheuermittel verwenden.
Garantie:
Es kann keine Garantie oder Haftung für irgendwelche Änderungen oder Modifikationen des Produkts oder
für Schäden übernommen werden, die aufgrund einer nicht ordnungsgemäßen Anwendung des Produkts
entstanden sind.
Allgemeines:
Design und technische Daten können ohne vorherige Ankündigung geändert werden.
Alle Logos, Marken und Produktnamen sind Marken oder eingetragene Marken ihrer jeweiligen Eigentümer
und werden hiermit als solche anerkannt.
Bitte bewahren Sie Bedienungsanleitung und Verpackung für spätere Verwendung auf.
Achtung:
Dieses Produkt ist mit diesem Symbol gekennzeichnet. Es bedeutet, dass die ausgedienten
elektrischen und elektronischen Produkte nicht mit dem allgemeinen Haushaltsmüll entsorgt werden
dürfen. Für diese Produkte stehen gesonderte Sammelsysteme zur Verfügung.
5

FRANÇAIS
Microscope USB
1. Connexion du microscope
- Branchez le câble USB à l’ordinateur. Le dispositif sera automatiquement détecté sous Windows® XP ou
versions postérieures.
- Le dispositif est compatible avec n’importe quel logiciel d’édition.
1. Lentille : Placez ici l’objet désiré pour l’observer
2. Mise au point (Réglage) : Tournez à gauche ou à droite pour régler la vue
3. Photo : Pressez pour obtenir un cliché de l’image visionnée (ne fonctionne pas avec
certaines versions du logiciel)
4. Connecteur USB : Utilisez pour connecter le microscope au PC
5. Lumière LED : Allumez quand nécessaire
6. Contrôle lumière : Tournez vers la gauche ou la droite afin de baisser ou d’éteindre et allumer la
lumière
3. Installation du logiciel
- Le microscope possède un logiciel de visionnement, toutefois vous pouvez également utiliser d’autre
logiciel de webcam ayant la fonction webcam (comme MSN Messenger, Skype …).
- Pour installer le logiciel, copiez seulement le dossier « amcap2a » sur votre bureau.
6

4. Comment utiliser le microscope
- Après avoir relié le microscope à l’ordinateur, ouvrez le logiciel « amcap2a ».
- Une nouvelle fenêtre apparaitra montrant l’image du microscope.
- Placez le microscope dans le secteur désiré.
- Mise au point.
- Au cas où vous auriez besoin de lumière additionnelle, employez la commande de lumière pour allumer les
LED.
- Quand le microscope n’est pas utilisé, il est recommandé de le débrancher et de le rebrancher quand c’est
nécessaire.
Si l’image n’apparait pas et qu’un autre périphérique est en cours d’utilisation (comme une webcam), vous
devez sélectionner le menu « périphérique » et changer l’entrée USB 2.0 de la caméra.
Consignes de sécurité :
Pour réduire le risque de choc électrique, ce produit ne doit être
ouvert que par un technicien qualifié si une réparation s’impose.
Débranchez l’appareil et les autres équipements du secteur s’il y a un
problème. Ne pas exposer l’appareil à l’eau ni à l’humidité.
Entretien :
Ne nettoyez l’appareil qu’avec un chiffon sec. N’utilisez pas de solvants ou de produits abrasifs.
Garantie :
Aucune garantie ou responsabilité ne sera acceptée en cas de modification et/ou de transformation du produit
ou en cas de dommages provoqués par une utilisation incorrecte de l’appareil.
Généralités :
Le design et les caractéristiques techniques sont sujets à modification sans notification préalable.
Tous les logos de marques et noms de produits sont des marques déposées ou immatriculées dont leurs
détenteurs sont les propriétaires et sont donc reconnues comme telles dans ce documents.
Conservez ce manuel et l’emballage pour toute référence ultérieure.
Attention :
Ce symbole figure sur l’appareil. Il signifie que les produits électriques et électroniques ne doivent pas
être jetés avec les déchets domestiques. Le système de collecte est différent pour ce genre de
produits.
7

NEDERLANDS
USB-microscoop
1. Aansluiten van de microscoop
- Sluit de USB kabel aan op de computer. Het apparaat wordt automatisch in Windows® XP of latere versies
herkend.
- Het apparaat is compatibel met alle editing-software.
1. Lens: Plaats over het gewenste object om naar te kijken
2. Scherpstellling: Draai naar links of rechts om scherp te stellen
3. Foto: Drukken om een momentopname van de huidige afbeelding te krijgen (werkt niet met
sommige software-versies)
4. USB-aansluiting: Gebruikt om de microscoop op de PC aan te sluiten
5. LED-verlichting: Aanzetten indien nodig
6. Verlichtingsregelaar: Verplaats naar links of rechts om te dimmen of het licht aan/uit te schakelen
3. Installatie van de software
- De microscoop heeft viewing-software, maar u kunt ook van andere webcam-software met
webcam-functies (zoals MSN Messenger, Skype etc.) gebruik maken.
- Om de software te installeren, kopieer alleen het “amcap2a”-softwarebestand naar uw bureaublad.
4. Hoe de microscoop te gebruiken
- Na het aansluiten van de microscoop op de computer, start de “amcap2a”-software.
- Een nieuw venster zal verschijnen met daarin het beeld van de microscoop.
- Plaats de microscoop over het gewenste weergavegebied.
8

- Stel de scherpte.
- In het geval u behoefte aan extra licht heeft, gebruik de verlichtingsregelaar om de LED’s in te schakelen.
- Wanneer de microscoop niet in gebruik is, is het raadzaam om deze te ontkoppelen en weer aan te sluiten
bij het volgende gebruik.
Als de afbeelding niet wordt weergegeven en een ander apparaat is ook in gebruik (zoals een webcam),
kan het nodig zijn om het “Devices” menu te selecteren en de ingang te veranderen naar USB
2.0-camera.
Veiligheidsvoorzorgsmaatregelen:
Om het risico op elektrische schokken te voorkomen mag dit
product ALLEEN worden geopend door een erkende technicus
wanneer er onderhoud nodig is. Koppel het product los van de
elektrische voeding en van andere apparatuur als zich problemen
voordoen. Stel het product niet bloot aan water of vocht.
Onderhoud:
Uitsluitend reinigen met een droge doek. Gebruik geen reinigingsmiddelen of schuurmiddelen.
Garantie:
Voor wijzigingen en veranderingen aan het product of schade veroorzaakt door een verkeerd gebruik van dit
product, kan geen aansprakelijkheid worden geaccepteerd. Tevens vervalt daardoor de garantie.
Algemeen:
Wijziging van ontwerp en specificaties zonder voorafgaande mededeling onder voorbehoud.
Alle logo’s, merken en productnamen zijn handelsmerken of geregistreerde handelsmerken van de
respectievelijke eigenaren en worden hierbij als zodanig erkend.
Bewaar deze gebruiksaanwijzing voor latere raadpleging.
Let op:
Dit product is voorzien van dit symbool. Dit symbool geeft aan dat afgedankte elektrische en
elektronische producten niet met het gewone huisafval verwijderd mogen worden. Voor dit soort
producten zijn er speciale inzamelingspunten.
9
ITALIANO
Microscopio USB
1. Collegare il microscopio
- Inserire il cavo USB nel computer. Il dispositivo verrà rilevato automaticamente da Windows® XP o versioni
successive.
- Il dispositivo è compatibile con qualsiasi software di editing.
1. Lenti: Posizionarle sull’oggetto che si vuole vedere
2. Fuoco: Ruotare a sinistra o destra per impostare il fuoco
3. Scatto: Premere per scattare una foto dell’immagine corrente (non funziona con alcune
versioni del software)
4. Connettore USB: Utilizzato per connettere il microscopio al PC
5. Luci LED: Accenderle quando necessarie
6. Controllo della luce: Muovere a sinistra o a destra per attenuare o accendere/spegnere la luce
3. Installazione del Software
- Il microscopo possiede un software di visualizzazione, comunque potete utilizzare altri software con
funzione webcam (come MSN Messenger, Skype ecc).
- Per installare il software, è sufficiente copiare sul proprio desktop il file “amcap2a”.
4. Come utilizzare il microscopio
- Dopo aver connesso il microscopio al computer, eseguire il software “amcap2a”.
- Una nuova finestra apparirà mostrando l’immagine del microscopio.
- Posizionare il microscopio sull’area desiderata.
10
Indice
Lingue:
Altri manuali König Electronic Microscopio


