KaZAM Thunder 345L Manuale utente

1
KAZAM Thunder 345L
User Manual

2
©2013 Kazam Mobile Ltd. All rights are reserved. Kazam, the Kazam logo and the
Kazam icon are trademarks of Kazam Mobile Ltd. No part of this document can be
reproduced without permission. All trademarks and brand names mentioned in this
publication are property of their respective owners.
While all the efforts have been made to ensure the accuracy of contents in this
manual, we presume no responsibility for errors or omissions or statements of any
kind, whether such errors are omissions or statements resulting from negligence,
accidents, or any other cause. We operate a policy of continuous development
and reserve the right to make changes, modifications and improvements to the
device, device features/specifications or any of its parts without prior notice.
Your device may have preinstalled bookmarks and links for third party internet sites
and may allow you to access third party sites. These are not affiliated with us, and
we do not endorse or assume liability for them. If you access such sites take
precautions for security or content.
The limited warranty does not cover user manuals or any third party software,
settings, content, data or links, whether included in, or downloaded to the product,
whether included during installation, assembly, shipping or any other time in the
delivery chain, or otherwise and in any way acquired by you. To the extent
permitted by applicable law(s), we do not warrant that any of our software will meet
your requirements, will work in combination with any hardware or software
applications provided by a third party, that the operations of the software will be
uninterrupted or error free or that any defects in the software are correctable or will
be corrected.
User Manual is provided to guide the user about the functionality of the device. It
does not constitute any certificate of technology. Some functions may vary due to
modifications and upgrades of software, or due to printing mistake.
Please read the following safety guidelines before using the device.
Do not use the mobile phone while you are driving.
Do not place magnetic storage media near your mobile phone, as the
magnetic force from the device may erase the information stored on it.
Keep your mobile phone and its accessories away from children.
ALL RIGHTS RESERVED
SAFETY PRECAUTIONS

3
Mobile phones can interfere with the functioning of medical devices such as
hearing aids or pacemakers. People with active medical implants should
keep their mobile phone at least 15 cm away from the implant.
Permanent hearing loss may occur if you use earphones or headphones at
high volume.
Use a wireless hands-free system (headphone/ headset) with a low power
Bluetooth emitter.
Make sure the mobile phone has a low SAR.
Keep your calls short or send a text message (SMS) instead. This advice
applies specially to children adolescents and pregnant women.
Use mobile phone when the signal quality is good.
Notice:
Warranty is invalidated if the mobile phone or accessories are dismantled, the
manufacturer will not be liable to pay for damages.
Only use original batteries and charging devices.
Back up important data regularly and store it properly. The manufacturer is
not liable for any loss of data due to mis-operation, poor signal or power cut,
etc.
All screen images in this manual are for reference only, content displayed
may depend on the pre-setting of the service provider, the network operator
or the SIM card. If any functions referred to in this manual are different from
those of your device, please follow your device.
Do not put use it in a place with flammable gas such as a petrol pumps. The
temperature recommended for using the device is 10-55℃. Do not touch the
charger, power cable or socket with wet hands. This may cause an electric
shock.
Our cellular phones are in accordance with the communication industry
standards of PRC,and also according in accordance with standards of
European,and are approved for GSM networks.
Your phone may be used internationally with various networks depending on your
roaming arrangements with your service provider.
Only use the chargers listed in the manufacturer’s catalogue should be used.
Using any other charger may be dangerous and would also invalidate your
warranty. Line voltage must be exactly the one indicated on the charger’s serial
plate.
Your phone is a radio transmitter which may interfere with electronic medical
equipment or implants, such as hearing aids, pacemakers, insulin pumps, etc. It is
recommended that a minimum separation of 15cm be maintained between the
phone and an implant.
If your mobile phone or any of its accessories do not function normally,
please contact Kazam customer support. The qualified personnel will assist
you, and if necessary will arrange for a repair.

4
ALL RIGHTS RESERVED 1
SAFETY PRECAUTIONS 2
TABLE OF CONTENTS 4
1. UNDERSTANDING YOUR DEVICE 5
1.1. GENERAL INFO 5
1.2. DEVICE OVERVIEW 5
2. GETTING STARTED 6
2.1. INSTALLING CARDS& BATTERY 7
2.2. POWERING ON/OFF THE DEVICE 7
3. BASIC OPERATIONS 7
3.1. Switch Main Menu style 7
3.2. Home screen 8
4. CAMERA 9
5. GPRS/WLAN NETWORK 9
6. U-DISK STORAGE 9
7. MUSIC 10
8. BLUETOOTH 10
9. CALL MENU 11
10. FUNCTION MENU 11
10.1. File management 12
10.2. Sending an Email 12
10.3. Dialing 12
10.4. Call 13
10.5. Calculator 13
10.6. Chrome 13
10.7. Voice Recorder 13
10.8. Calendar 14
10.9. Settings 14
10.10. Clock 15
10.11. FM Radio 15
10.12. Voice Search 16
10.13. Contacts 16
10.14. Gallery 16
10.15. Messaging 17
10.16. Notification menu 18
10.17. Download content 18
10.18. Call records 18
10.19. Widget 18
10.20. Selecting wallpaper source 19
11. SPECIFICATION 20
TABLE OF CONTENTS

5
1.1 GENERAL INFO
KAZAM Thunder 345L has a 4.5” FWVGA screen with 480*854 resolution. It has a fixed
focus camera, an 1800mAh battery and expandable memory. It supports MMS, SMS
and Bluetooth.
1.2 DEVICE OVERVIEW
1.UNDERSTANDING YOUR DEVICE

6
2.1 INSTALLING SIM CARDS & BATTERY
Please switch off your device before removing the battery,inserting a SIM or memory
card.
Installing Battery
To install the battery please follow the steps below:-
Remove the back cover of the device.
Hold the device with the front facing downwards.
Insert the battery ensuring it is the correct way round.
Replace the battery cover until it clicks into place.
Charging the Battery
The device prompts a warning tone and message indicating insufficient battery
when the battery power is low. Please follow the instructions below to charge your
device:-
Plug the connector of the charger into the micro USBport on the device.
Plug the charger into a standard AC wall outlet.
Charging……. Fully Charged…….
It is recommended to fully charge the battery before using the device for the first
time.
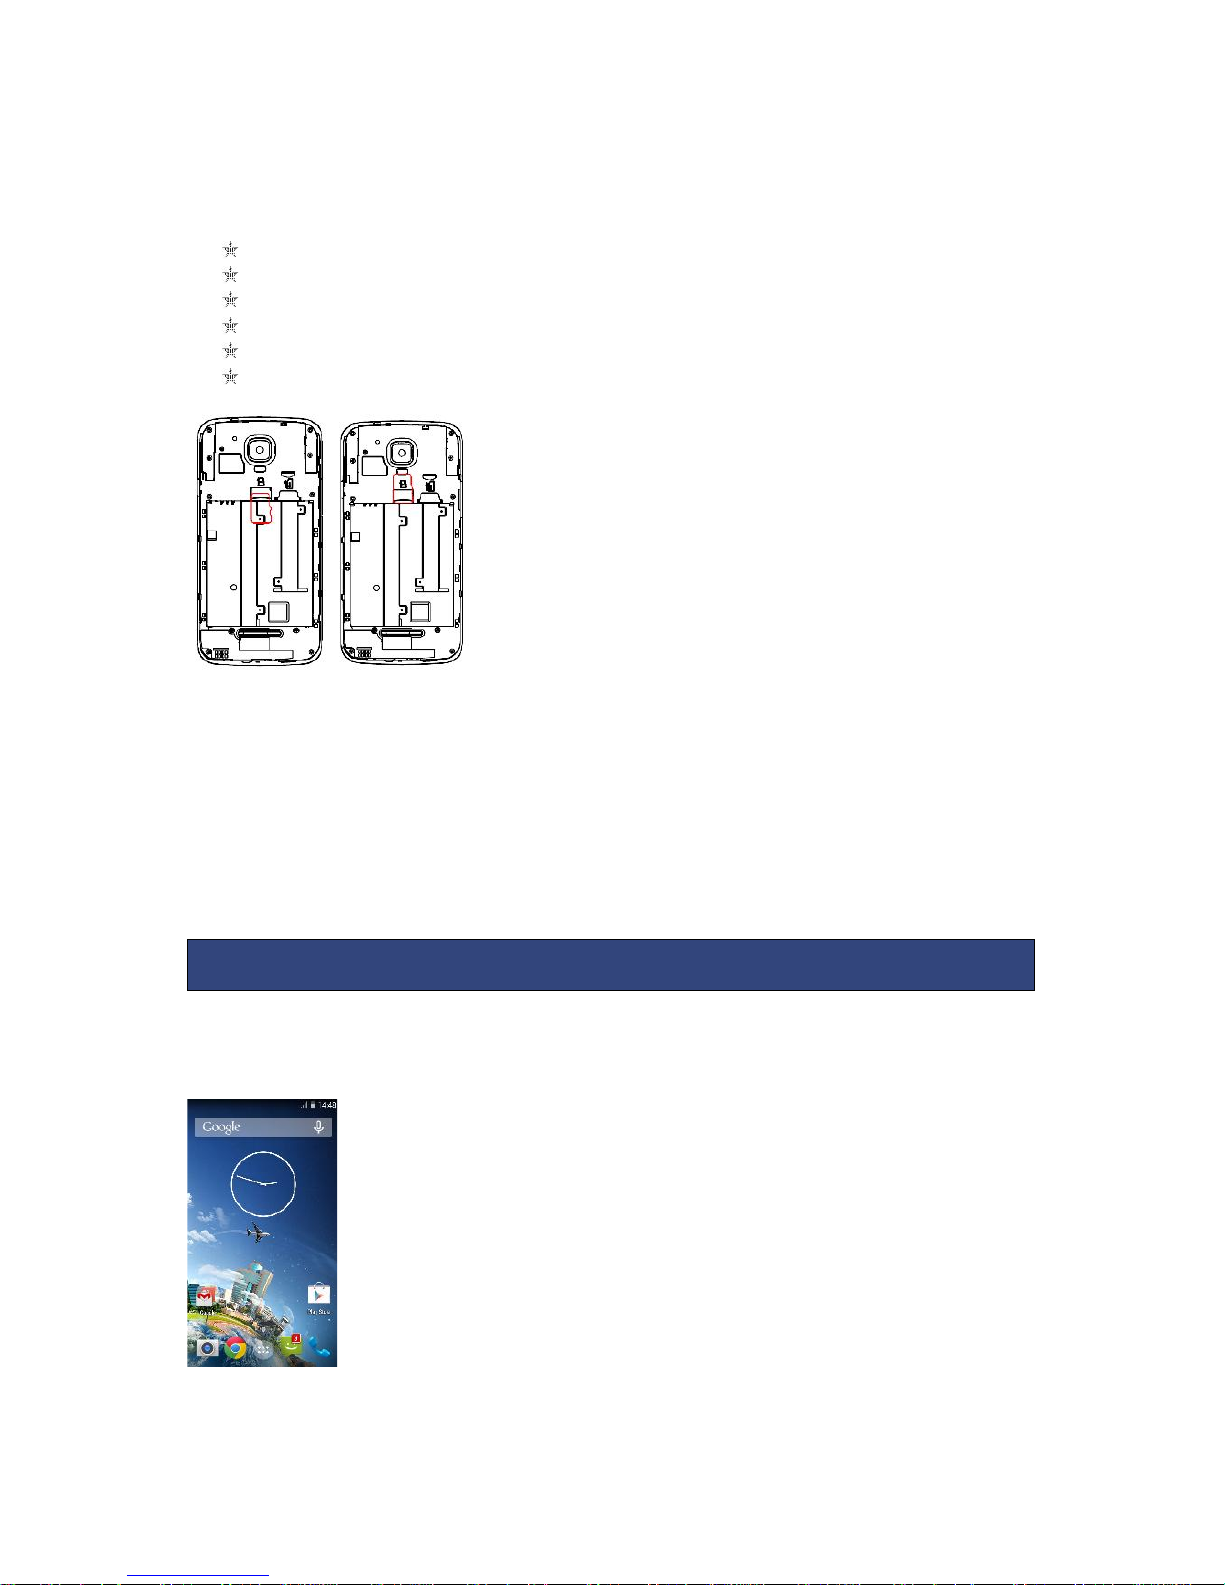
Installing SIM Card
In order to install you SIM card, follow the steps below:
Remove the back cover of the device.
Hold the device with the front facing downwards.
Remove the battery.
Insert the SIM cardinto the device as shown below.
Replace the battery.
Replace the battery cover until it clicks into place.
Installing Memory Card
2. GETTING STARTED
7
Your device supports micro SD card, which is a multimedia memory card used to
increase the memory of the device. The micro SD card is small and should be
installed carefully to avoid any kind of damage. Please follow the steps below to
install the memory card in the device:
Remove the back cover of the device.
Hold the device with the front facing downwards.
Remove the battery
Slot the micro SD card into the device as shown below.
Replace the battery.
Replace the battery cover until it clicks into place.
2.2 POWERING ON/OFF THE DEVICE
To power off your phone, press & hold POWER key. On release, the Phone options
menu opens. Select ‘Power off’and confirm.
To power on again, press & hold POWER key.
3.1 Switch Main Menu style
(1) In default Home screen, slide your fingertip left and right along the screen to
reveal more home screen.
(2) On Home screen, click icon on the bottom of the screen (Main menu
icon) to enter the main menu screen, slide your fingertip left and right
3. BASIC OPERATIONS

8
along the screen to reveal the more applications.
3.2. Home screen
(1) Read your notifications
When you see a notification in the status bar, touch the bar and slide your finger
down the screen to open the list of notifications displayed in the sliding window.
Ongoing notifications report activities such as call forwarding ON, current call status,
song playing.
Notifications report the arrival of new messages, calendar events, and alarms. You
can clear notifications list by selecting ‘Clear’ notifications at the top of the
notifications window.
To open the message, reminder or other notification, you can touch the items. To
close the notifications window, slide your finger up the screen.
(2) Create Home screen shortcuts and widgets:
From the Home screen, touch the main menu, and then click the WIDGETS. Touch &
hold to pick up a widget to select a shortcut to some of your saved information
(such as a play list), a widget (a clock) for your Home screen.
(3) Move objects on the Home screen
·To move an icon or other item on the Home screen, you must first touch & hold it
to enter move mode. The object will magnify when it’s ready to be moved.
·Without lifting your finger (or you’ll drop out of move mode), drag the object to
the new position. To move an item to a section of the Home screen not in view,
move it to the edge of the screen and hold it there for a moment. The screen view
will shift; position the object and release.

9
All the pictures you can capture or view on your phone are stored on a memory
card, which must be installed in your phone. Before you can use the Camera or view
pictures in Pictures, make sure you have a card installed.
Your device’s networking capabilities allow you to access the Internet or your
corporate network through WLAN, GPRS, EDGE (if available)
You can also add and set up a VPN or proxy connection.
To use WLAN on your device, you need access to a wireless access point
Note: The availability and range of your device’s WLAN signal depends on the
number, infrastructure, and other objects through which the signal passes.
To open the Browser you need to be connected to a network.
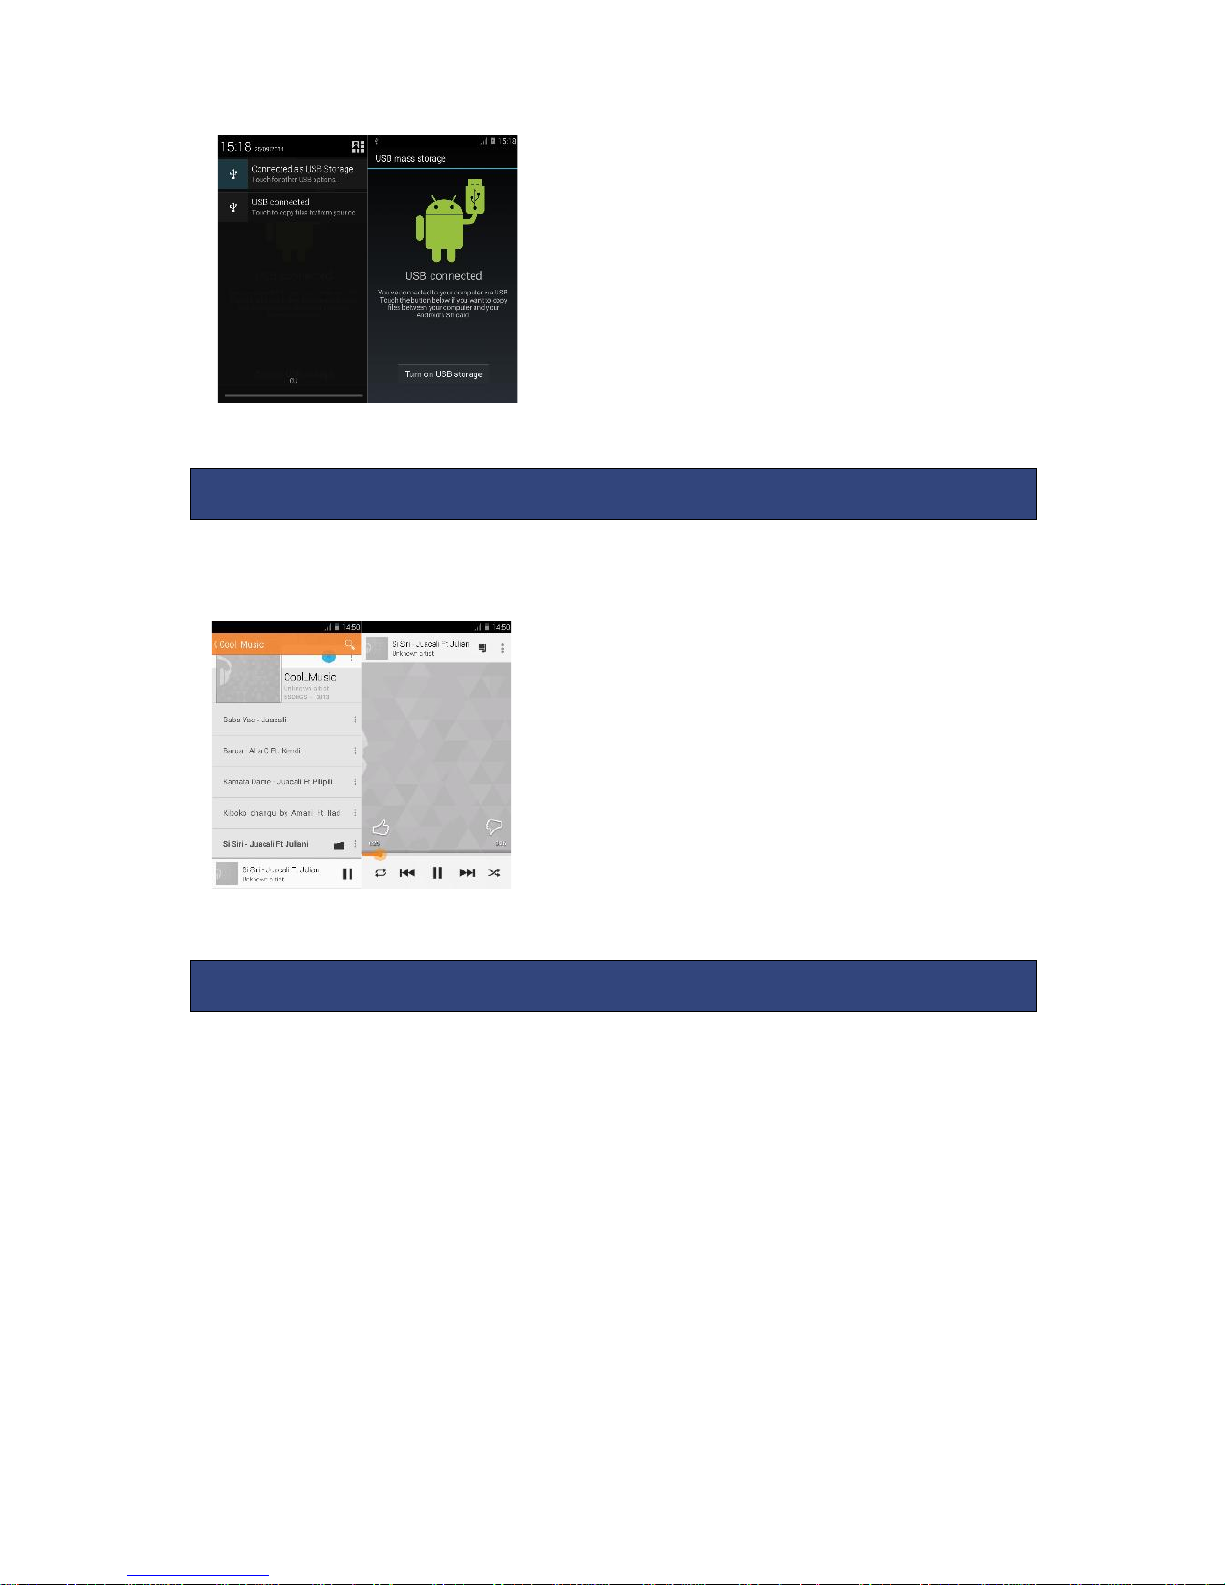
This phone supports movable storage, i.e., the U-disk function.
When the phone is switched on, you see the icon in the status bar on the top of the
screen when its connected to a PC by a data line. Touch the bar and slide your
finger down the screen to open the list of notifications displayed in the sliding
window. Select [USB connected] and touch [Turn on USB storage] to confirm, you
can use the phone as a U-disk.
4. CAMERA
5. GPRS/WLAN NETWORK
6. U-DISK STORAGE
10
Your music is organized into four categories: Artists, Albums, Songs, and Play lists.
Select a category to view the lists within each. Once in a category, keep selecting
until you reach the music you want to play.
The phone supports Bluetooth( BT) functions, you can establish a wireless connection
between the phone with other compatible devices, and data transmission, you can
establish a wireless connection between devices in the phone with a distance of up
to 10 meters. Bluetooth connection may be interference by obstacles, such as walls
or other electronic device.
1. Enter the setting menu, Touch the Bluetooth to open the function, idle screen will
display BT icon in the status bar.
2. Open the BT discoverable, and other devices can search the phone.
3. Before using the phone as a Bluetooth device, you need to pair the phone with
the target device as follows:
-Sure your phone has Bluetooth-enabled.
-Touch "Scan for devices." Bluetooth devices within the range of the phone will start
scanning.
-Touch the device you want to pair, to confirm password to complete the pairing.
7. MUSIC
8. Bluetooth
Indice
Altri manuali KaZAM Telefono cellulare

KaZAM
KaZAM Trooper X3.5 Manuale utente

KaZAM
KaZAM Life R5 Manuale utente

KaZAM
KaZAM Thunder Q4.5 Manuale utente

KaZAM
KaZAM Life B2 Manuale utente

KaZAM
KaZAM Thunder 350L Manuale utente

KaZAM
KaZAM Life B1 Manuale utente

KaZAM
KaZAM Life B5 Manuale utente

KaZAM
KaZAM Tornado 2 5.0 Manuale utente

KaZAM
KaZAM Thunder 340W Manuale utente

KaZAM
KaZAM Life C5 Manuale utente


