Kessil AP9X Manuale utente

USER MANUAL
210914A3

TABLE OF CONTENT
01 INSIDE THE BOX, PARTS DIAGRAM
02 INSTALLATION
03 CONNECTION
04 TOUCH PANEL
05 WI-FI INDICATOR STATES
06 MODE INDICATOR STATES
07 MOUNTING, CONTROLLING MULTIPLE K-LINK & 0-10V
FIXTURES, AP9X DAISY-CHAIN SCENARIO
08 CONTROLLED BY SPECTRAL CONTROLLER X,
MAINTENANCE, TROUBLESHOOTING GUIDE
09 SAFETY INSTRUCTIONS, INSTRUCTIONS DE SECURITE
10 FCC STATEMENT, SPECIFICATIONS
1
2
3
4
5
6
7
8
9
10

INSIDE THE BOX
AP9X
Power Adapter
Warranty Card
Kessil Sticker
Screw Hook &
Hanging Bracket x4
PARTS DIAGRAM
A Mode Indicator
B Wi-Fi Indicator
CTouch Panel - Touch once to activate
DPower - Turn the AP9X on or off.
EIntensity - Adjust the intensity of the light.
FColor - Adjust the color of the light.
GWi-Fi - Turn on/off the Wi-Fi signal.
H Fan (Air Inlet)
I Screw Holes - For AP9X Mounting Arm
/ Hanging Kit / Brackets
J K-Link Ports
K0-10V Output Ports
L LED Arrays + Reflectors
MVents (Air Outlet)
N Power Cord
AC Adapter Cable
(Plug type varies from
country to country)
INT
COLOR
Wi-Fi
Mode
K-Link0-10V(R) K-Link 0-10V(L)
C B ADEFGH
NL
L
K
I
M
J
QR Code Stickers
(This is for wireless
connection process, please
SAVE these stickers)
The AP9X requires up to 40 seconds to boot.
The Wi-Fi Indicator (B) will first show solid
purple light, and then disappear. The Mode
Indicator (A) will then show solid green light.
* The light will be turned on automatically. DO
NOT place the AP9X on any object.
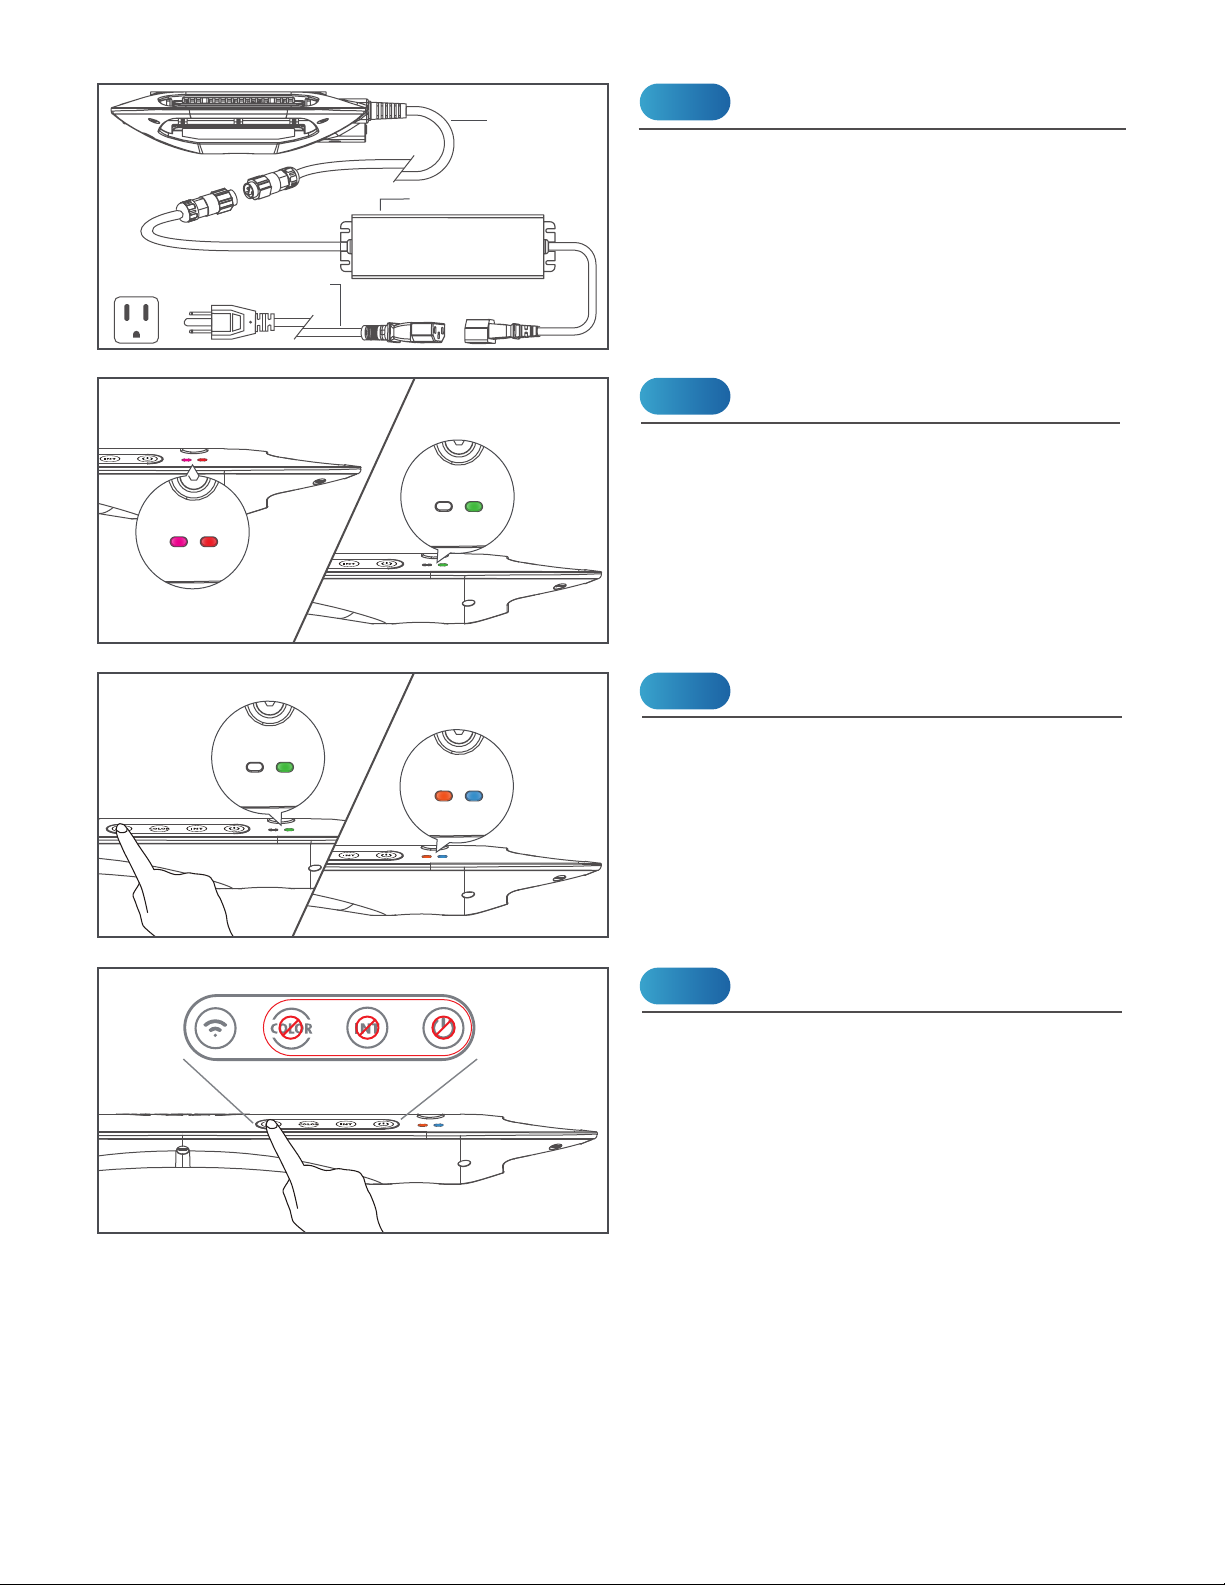
Connect the AP9X to the Power Adapter and
plug it into a wall outlet. The Wi-Fi Indicator
(B) will be solid purple to indicate booting
mode (it may take up to 40 seconds).
INSTALLATION
Power
Booting
Step 1
Power Cord
(9.2ft / 2.8m)
Power Adapter
Step 2
Adapter Cable (5.9ft / 1.8m)
(Plug type varies from country to country)
Touch and hold the Wi-Fi (G) button for 3
seconds to turn on Wi-Fi signal. Do the same
to turn off Wi-Fi signal.
Turn On Wi-Fi for App Connection
Step 3
When the Wi-Fi of AP9X is turned on (Wi-Fi
indicator is ON), control buttons are disabled.
Turn off Wi-Fi (press "Wi-Fi" (G) button for 3
seconds) for manual control on touch panel.
Control Buttons Disabled
NOTE
Wi-Fi Mode
INT
Wi-Fi Mode
Wi-Fi Mode
INT
COLOR
Wi-Fi Mode
Booting After booting
Wi-Fi Mode
Wi-Fi Mode
INT
COLOR
Wi-Fi Mode
Wi-Fi OFF Wi-Fi ON
INT
COLOR
Wi-Fi Mode
Wi-Fi Mode

If you have more AP9Xs, choose "Set up
Additional AP9X". Choose "Done" if you
complete the setup.
Set up More AP9X
Step 3
Download the “Kessil WiFi” app* in App Store
or Google Play Store.
* Only supports iOS 10.0 or above and Android 5.0
or above
Download “Kessil WiFi” App
Step 1
Open the “Kessil WiFi” app and follow the
instructions in the app to connect to AP9X.
You will need the QR Code Sticker provided
in the package. If you wish to enter the
password manually, the password is
reverse of the S/N of the AP9X (capital
letter matters).
Connection
Step 2
This is for wireless
connection process,
please SAVE these stickers.
***
CONNECTION

Wi-Fi Mode
Wi-Fi Mode
TOUCH PANEL
Manual Control
COLOR : 9 color modes
INTENSITY : 5 intensity levels
Touch the Power (D) button to turn on/off the
AP9X. When the AP9X is off, the Power (D),
Intensity (E), or Color (F) buttons can be
used to turn on the AP9X.
Turn On/Off the AP9X
1% / 25% /50% /75%/100%
Touch and hold the Wi-Fi (G) button for 3
seconds to turn on Wi-Fi signal. Do the same
to turn off Wi-Fi signal.
Turn On Wi-Fi for App Connection
Touch the Intensity (E) button and Color (F)
button to adjust the intensity and color of the
AP9X. Intensity levels and color modes are in
cycles.
Reset the AP9X Wi-Fi Configuration
Factory Reset the
AP9X
Wi-Fi Mode
INT
COLOR
Wi-Fi Mode
Wi-Fi Mode
INT
COLOR
Wi-Fi Mode
Touch and hold the Intensity (E) & Wi-Fi (G)
buttons simultaneously for 3 seconds to reset
the Wi-Fi configuration (i.e. to reconnect). The
Mode indicator (A) will first disappear and
then blink red at 3 seconds. User's settings
will not be deleted. The Wi-Fi Indicator (B) will
change to solid orange.
Touch and hold the Intensity (E), Color (F) &
Wi-Fi (G) buttons simultaneously for more
than 10 seconds to reset the AP9X. The Mode
indicator (A) will first disappear and then blink
red at 10 seconds. User's settings will be
deleted. The Wi-Fi indicator (B) will be solid
purple to indicate booting mode (may take up
to 40 seconds) - See INSTALLATION Step 2.
4
Touch the Touch Panel (C) once to activate
Wi-Fi Mode
Wi-Fi Mode
INT
COLOR
Wi-Fi Mode
Wi-Fi OFF Wi-Fi ON
INT
COLOR
Wi-Fi Mode
Booting
Wi-Fi ON
Wi-Fi OFF
Standby /
No Connection
Connected
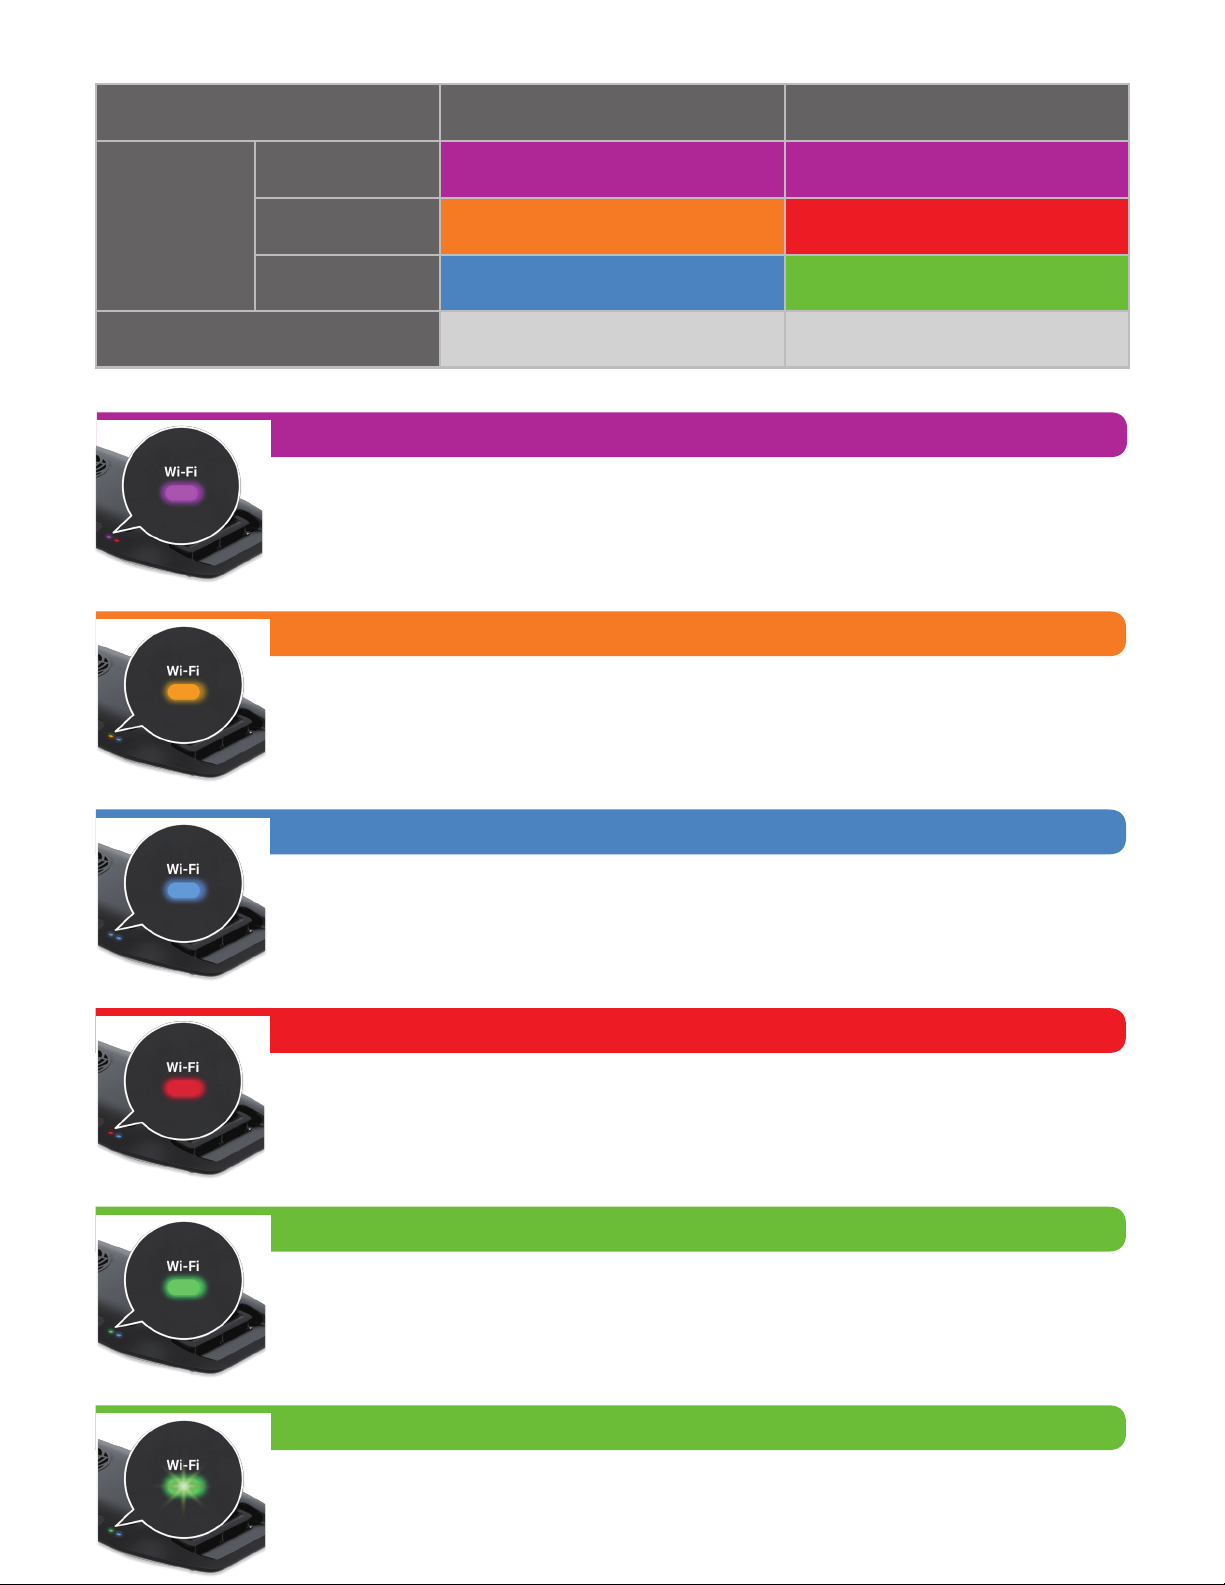
Solid Purple Solid Purple
Wi-Fi_AP Mode Wi-Fi_STA Mode
Solid Orange Solid Red
Solid Green
(Allow other Wi-Fi devices to connect to itself)
(To connect to a wireless router or master Kessil Wi-Fi enabled products)
Solid Blue
No Light No Light
Solid Orange
Standby mode, ready to be connected.
Solid Purple
The AP9X requires up to 40 seconds to boot. The AP9X Wi-Fi Indicator (B)
will show solid purple light.
Solid Red
Attempting to connect. If it stays for more than 3 minutes, reset AP9X's WiFi
configuration (Touch and hold the Intensity (E) & Wi-Fi (G) buttons simultane-
ously for 3 seconds) and add the AP9X in the app again.
Solid Blue
AP mode. Successfully connected to mobile device and act as the master
(through "Connect Directly Via Wi-Fi").
Blinking Green
When updating the AP9X’s firmware through Kessil WiFi app, the Wi-Fi Indi-
cator (B) will blink green light.
Solid Green
STA mode. Successfully connected to wireless router or to a master Kessil
Wi-Fi enabled product as slave.
WI-FI INDICATOR STATES

Solid Blue
Solid Blue
Control buttons disabled when the Wi-Fi of AP9X is turned on or when there
is a K-Link signal input (e.g. Spectral Controller X).
Solid Red
The AP9X requires up to 40 seconds to boot. The AP9X Mode Indicator (A)
will show solid red light.
Blinking Red
Error mode. One of the main causes is signal collision, touch and hold the
Wi-Fi (G) button for 3 seconds to turn off Wi-Fi signal.
Solid Green
Control buttons enabled. Able to control other K-Link daisy-chained fixtures.
MODE INDICATOR STATES
Booting
Control buttons enabled
Control buttons disabled
Mode
Solid Red
Solid Green

AP9X DAISY-CHAIN SCENARIO
CONTROLLING MULTIPLE K-LINK & 0-10V FIXTURES
MOUNTING
• Hang the light with the four Screw Hooks and the four Hanging Brackets.
• To install the Hanging Brackets, remove the screws on the AP9X, use the same screws
to secure the fasteners with triangular rings (Hanging Brackets) onto the light fixture.
0-10V(Output only) 0-10V(Output only)K-LinkK-Link
K-Link0-10V(R) K-Link 0-10V(L)
Multiple AP9X (up to 32 K-Link fixtures) can be connected using "Kessil WiFi" app and
K-Link Cables. Only the master AP9X should have Wi-Fi signal turned on (Wi-Fi indicator
(B) is ON), Wi-Fi signal on the other fixtures should be OFF.
Mode Indicator (A) will be solid blue and control buttons are disabled.
INT
COLOR
Wi-Fi Mode
INT
COLOR
Wi-Fi Mode
• Two K-Link ports (J): Connect and control multiple X-series K-Link fixtures using "Kessil
WiFi" app and K-Link Cables. When connecting Kessil Wi-Fi enabled products, make
sure to turn off the Wi-Fi signal of the slave fixtures. When controlling them (Tuna Blue
only) manually, tuning controls on any light control all other lights in chain.
• Two 0-10V Output ports (K): Connect and control multiple 0-10V fixtures using "Kessil
WiFi" app.
INT
COLOR
Wi-Fi Mode
INT
COLOR
Wi-Fi Mode
Wireless Router

CONTROLLED BY SPECTRAL CONTROLLER X
- AP9X can be connected and controlled through Kessil Spectral Controller X with a
K-Link Cable.
- The AP9X control buttons will be disabled.
INT
COLOR
Wi-Fi Mode
INT
COLOR
Wi-Fi Mode
MAINTENANCE
TROUBLESHOOTING GUIDE
Problem
Make sure the fan is operating properly.
Cause / Solution
Please make sure to perform maintenance before doing any troubeshooting.
Light doesn’t turn ON
Unit is flickering
1. Keep the Fan (Air Inlet) (H) and Vents (Air Outlet) (M) clear of dust. To clean the fan,
unplug the unit and insert the tip of a CO2 dust blower (or similar dust blower) in one
of the venting holes for the Fan (Air Inlet) (H). Hold and spray. You can also gently
vacuum out the dusts through the venting holes.
2. Keep the LED Arrays + Reflectors (L) clean. If the array lenses and reflectors become
contaminated with water, dust, or other particles, unplug the unit and clean them with
isopropyl alcohol. Wet a cotton swab or a napkin in isopropyl alcohol, gently wipe the
surface, and let it dry.
3. Keep plastic covers for K-Link Ports (J) and 0-10V Output Ports (K) plugged in when
the ports are not in use. Keep the ports clean all-time.
Make sure the unit is connected to the power adapter and the power adapter is plugged
into an outlet with the correct specifications.
Make sure the device is operating within the specified operating temperature range. If
unit overheats, it will automatically shut down.
Make sure the unit has not overheated by operating at a room temperature above
100°F/40°C.
Make sure the power adapter has the right specifications.
Make sure the power adapter has the right specifications.
Make sure electrical power is available to the AC outlet being used.
Slave: Control buttons (C)
are disabled
Altri manuali per AP9X
1
Indice
Altri manuali Kessil Acquario


Manuali Acquario popolari di altre marche


JBL
JBL PRO SILENT S-100 Manuale utente

Amtra
Amtra VEGA Manuale utente

JBL
JBL CRISTALPROFI i60 greenline Manuale utente

Aquatlantis
Aquatlantis Tecatlantis EASY LED UNIVERSAL 2.0 Manuale utente

Innovative Marine
Innovative Marine MightyJet 8500 Mini Istruzioni operative

SuperFish
SuperFish Planty 25 Guida all'installazione


