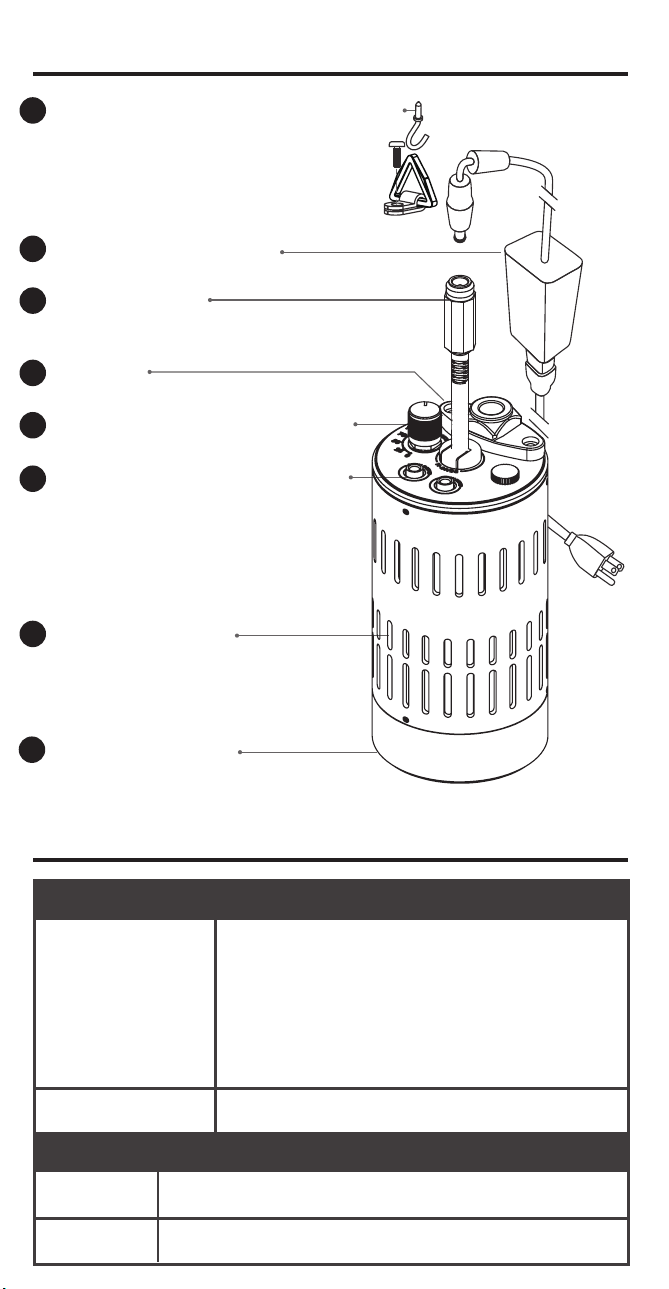
PARTS DIAGRAM
PR160L
Bracket & Hook & Screw x2
H
PRODUCT SPECIFICATIONS
Illuminator
370nm (max 43W)
390nm (max 52W)
427nm / 440nm (max 45W)
456nm (max 50W)
467nm (max 44W)
Power Supply
Input
Output
100-240 VAC 50-60 Hz
19 VDC, maximum 3.42A
SAFETY INSTRUCTIONSWARNING
1. DO NOT use a power supply that is
outside the specications. This is a re
hazard and may lead to unit failure.
2. DO NOT use outdoors. This unit is
intended for indoor use only.
3. DO NOT expose unit to an extremely
humid environment or submerse unit in
water. This may lead to unit failure.
4. DO NOT block Venting Holes (F). This may
cause unit to overheat.
5. KEEP Diuser / Lens (G) away from sharp
objects. This may break the Diuser / Lens
(G) and lead to unit failure.
6. DO NOT cover or place objects on the
power supply. Power supply should not be
contained in an airtight space.
7. The light source of this luminaire is not
replaceable; when the light source
reaches its end of life the whole luminaire
must be replaced.
INSTRUCTIONS DE SECURITE
1. N'UTILISEZ PAS une source d'alimentation
non conforme aux spécications. Ceci est
un risque d'incendie et peut entraîner une
panne de l'unité.
2. NE PAS utiliser à l'extérieur. Cet appareil est
conçu pour une utilisation en intérieur
uniquement.
3. NE PAS exposer l'appareil à un
environnement extrêmement humide ni
l'immerger dans l'eau. Cela peut entraîner
une défaillance de l'unité.
4. NE PAS bloquer les trous d’aération (F). Cela
pourrait provoquer une surchaue de
l'appareil.
5. GARDER le diuseur / objectif (G) à l’écart
des objets pointus. Cela pourrait casser le
diuseur / objectif (G) et entraîner une
panne de l'appareil.
6. NE couvrez pas et ne placez pas d'objets sur
l'alimentation. L'alimentation ne doit pas
être connée dans un espace étanche à
l'air.
7. La source lumineuse de ce luminaire n'est
pas remplaçable. lorsque la source de
lumière arrive en n de vie, il faut
remplacer tout le luminaire.
LED PhotoReaction Lighting
INSTALLATION GUIDE
Remove contents from package.
Install PR160L with optional mounting
accessories*
Connect Power Cord (B) to the specied
DC Power Supply (A).
Plug the Power Supply into an outlet
with the correct specications (see
PRODUCT SPECIFICATIONS for more
information).
Adjust the light Intensity Tuning Dial (D)
to the desired settings.
1.
2.
3.
4.
5.
PR160L-370 and PR160L-390 contain high
intensity UV light. PR160L-370 is classied as
Group 1 (low risk) in Standard:
Photobiological Safety of Lamps and Lamp
Systems (IEC/EN62471) dened risk group,
measured at 20cm. PR160L-390 is classied
as Group 2 (moderate risk), measured at
20cm. It is classied as Exempt risk group
when measured at >360cm.
AVOID EYE & SKIN EXPOSURE. WEAR PROPER
EYE & SKIN PROTECTION.
The PR160L can also be used with two brackets and
metal Hooks (H), and the optional PR160 Rig.
*
A
Power Cord
B
Intensity Tuning Dial
D
External Controller Port
E
Venting Holes
F
Diuser / Lens
G
DC Power Supply
Mount
C
USER MANUAL
Power
Consumption
19-24 VDC ± 5%
Input Voltage
220826A3