
Klarstein 10000502 Manuale utente

Please read before using this equipment
Klarstein
Metal Detector
Art.10000502
OWNER'S MANUAL

Quick Start
1.
Place the unit on top of a table/ flat surface, which doesn't
contain metal. Remove any jewelry you may be wearing.
2.
Install the batteries - 6 AA (not included).
3.
Power on
4.
Set the VOLUME about one - thirds. The power knob is also the
volume knob.
5.
Set the DISCRIMINATION to min - way point.
6.
Hold down the red button on the handle, and slowly rotate TUNE
left and right until the pointer on the view meter rests at or neat 0,
then release the red button.
7.
You have now tuned your Metal Detector and
are
ready to test it.
To test the detector, gather an item that contains iron, such as a nail.
Also, gather an item that does not contain iron such as a gold ring or a
silver bracelet. Now, slowly sweep the iron (ferrous) object over the
search coil. You will no longer hear the buzzing noise and see the needle
shift to the left (ferrous). Next, sweep a non-ferrous object over the
search coil. Watch as the needle shifts to the right of the meter
(non-ferrous)
Again, the noise will stop of change in tone, depending on what is found.
You have successfully tuned and tested your unit and are now ready to
use.
NOTE*
IT IS NORMAL TO HEAR A CONSTANT BUZZING
NOISE. THE NOISE WILL STOP OR CHANGE ITS TONE
WHEN THERE HAS BEEN DETECTION.
2

FEATURES
With your Metal Detector, you can hunt for
coins, relics, jewelry, gold, and silver just
about anywhere. This metal detector is very
versatile and easy to use.
The detector's features
include:
Earphone Jack —
lets you tonnett earphones
to the detector for privacy.
View Meter and Pointer —
shows the
probablc type of metal boing detceted.
Waterproof Search Coil —
lets you use the
detector's search coil even if you must put it
under water.
Note:
The search coil is waterproof, but the
control housing is not waterproof.
Adjustable stern —
lets you
adjust the
detector's length for comfortable use.
Note:
Your metal detector requires six AA
alkalinc batteries
TREASURE HUNTER' CODE
OF ETHICS
All treasure hunters might be judged by the
example you set. Here are a few basic rules
you should follow while using your detector.
•
Always
get
permission
bcforc
scarching any sitc.
•
Rcspect
the
rights and property of
others.
•
Observe all national, state, and local
laws wh
ile
treasure hunting.
•
Never
dcstroy
historical
or
archacological trcasures. If you are not
surr about an objcct you havc found,
contact a museum or historical society
in your arca.
•
Leave the land and vegetation as it was.
•
Fil I in any holes you dig.
•
Use your detector only in safe areas.
•
Dispose of any funk you find, only in
approved areas. Do not leave it for the
next treasure hunter to find.
3
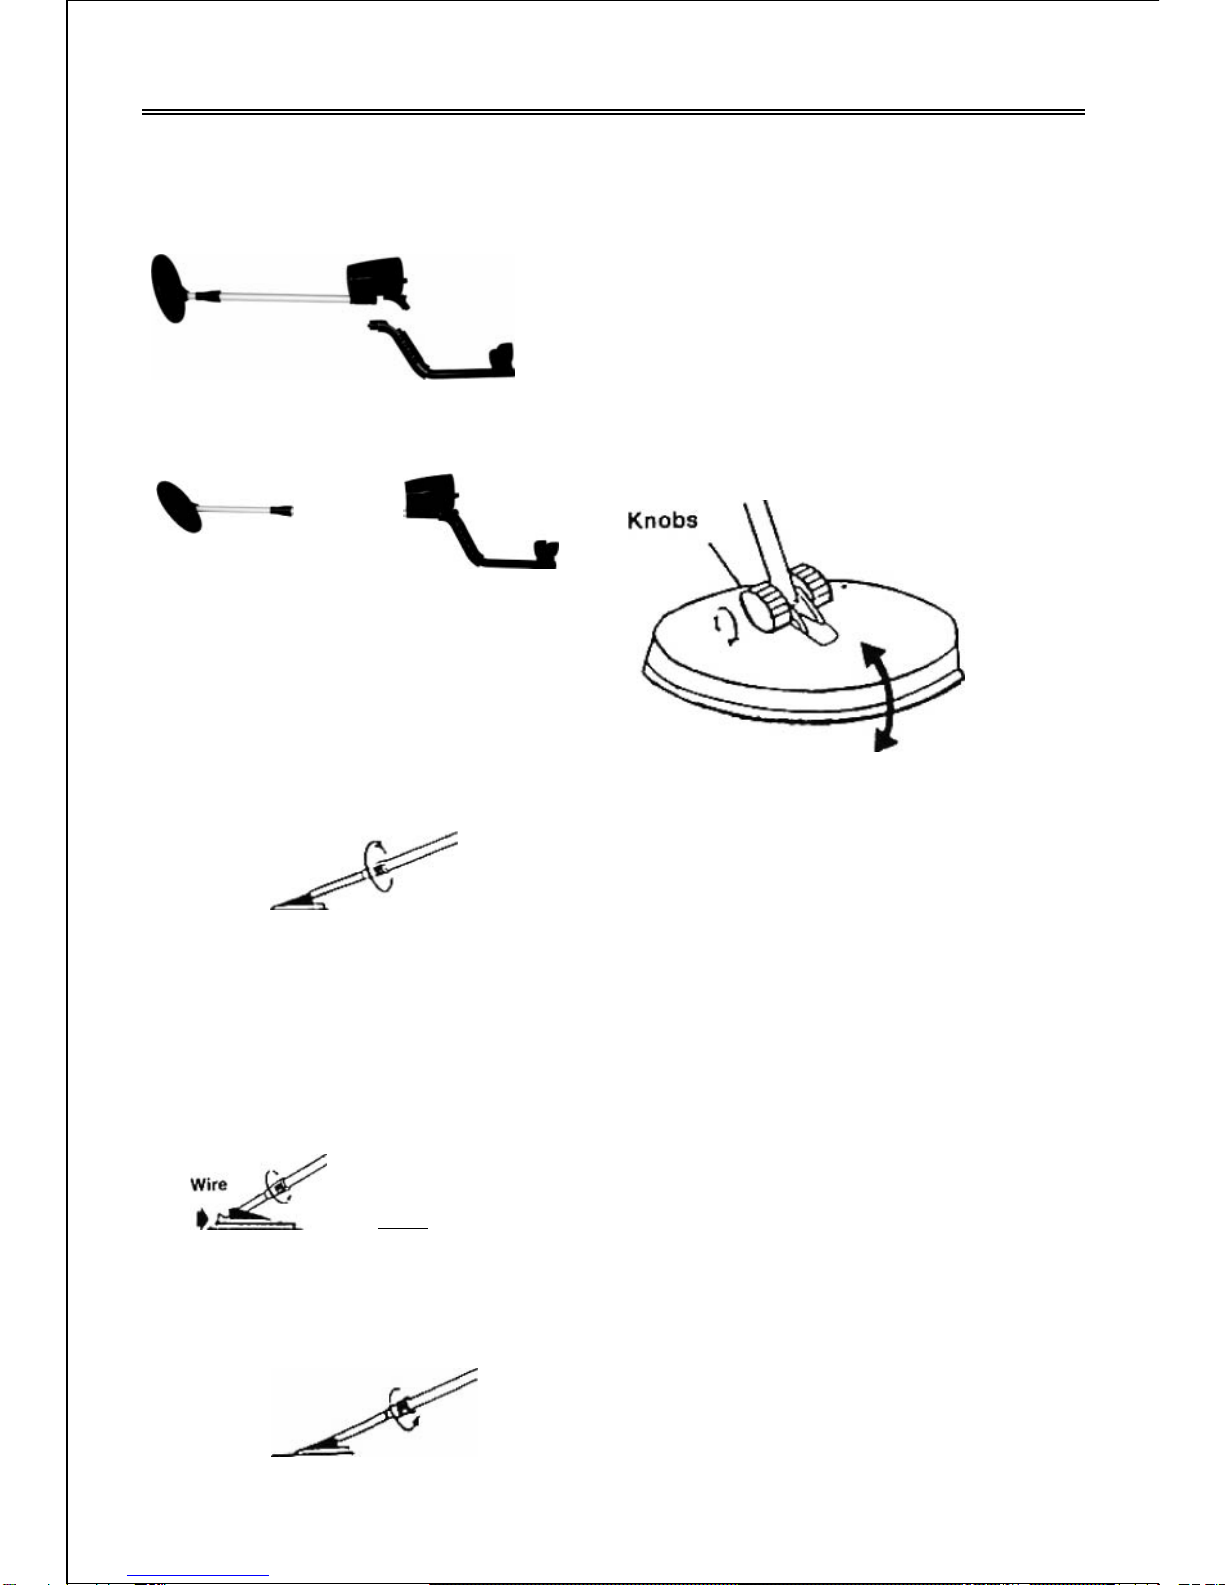
PREPARATION
INSTALLING STAY BAR
1.
Pull the trapeziform raised part at stay
bar, into the fillister at the housing
2. Screw the delta-bolt together
ADJUSTING THE STEM
Follow these steps to adjust the metal
detector's stem.
1. Turn the stem's lock nut clockwise until it
ADJUSTING THE SEARCH
COIL
Loosen the knobs at the search coil's end,
then adjust the search coil to the desired
angle. (The search coil should bc parallel
with the ground.) Tighten the knobs just
enough to keep the search coil from rotating
or wobbling.
loosens
INSTALLING BATTERIES
You need six AA batteries to power your
detector.
2. Lengthen or shorten the stem so when you
stand upright with the detector in your hand,
the search coil is level with and about 1/2 to
2 inches abovc the ground with your arm
relaxed at your side.
Wrong
3.Tum the stem's lock nut countcr clockwisc to
lock it in place.
Cautions:
•
Use only fresh batteries of the required
size and rccommendcd type.
•
Do not mix old and new batteries,
different typcs of batteries (standard,
alkalinc,
or rechargeable),
or
rechargeable batteries of different
capacities.
II
Wire
4

1.If the detector is on, turn VOLUME (on the
control housing) to OFF. (The control
clicks.)
2.
Open/close battery cover
Open: Press on the arrow, pull out the battery covcr
Close: The battery cover align the battery depot (the
UP-side is upon), then pull horizontally into the cover
0
Cautions:
•
Always remove old or wcak batteries;
batteries can leak chcmicals that can
destroy electronic parts.
•
If you do not plan to use the detector
for a week or more, remove the
batteries.
•
Dispose of old batteries promptly and
properly.
You can extend battery life by using
earphones, which require less power
than the built-in speakers. See "Using
Earphones"
Note:
When LOW BATT indicator
lights. you have to rcplacc the
batteries.
3. Insert the batteries into the compartment as
indicated by the polarity symbols (+ and -)
markcd insidc the compartmcnt.
4. Replace the cover.
5

USING
EARPHONES
You can connect a pair of stereo earphones
to the detector so you can listen to it privately.
Using earphones also saves battery power and
makes it easier to identify subtle changes in
the sounds you hear, for better detection
results. Your local electronics Store has a
wide selection
of
earphones.
To connect earphones to the detector, insert
the earphones'l /8-inch plug into the EAR
jack an the side of the control housing.
Note:
The detector's intcmal spcakcr
disconnects when you connect carphones.
Listening Safely
To protect your hearing, follow these
guidelines when you use earphones.
•
Set the volume to the lowest setting
before you begin listening. After you
begin listening, adjust the volume to a
comfortable level
•
Do not listen at extremely high volume
levels. Extcndcd high volumc listening
can lead to permanent hearing loss.
•
Once you set the volume, do not
increase it. Over time, your ears adapt
to the volume level, so a volume level
that does not cause discomfort might
still damage your hearing.
Trafik Safety
Do not wear earphones while operating your
detector near high-traffic areas.
Even though some earphones are designed to
let you hear some outside sounds when
listening at normal volume levels, they still
can prcsent a traffic hazard.
6
OPERATION
Your Metal Detector distinguishes between
ferrous and nonferrous metals. Ferrous metals
contain iron, while non-ferrous metals such as
gold, silver, copper, platinum, aluminum, lead,
and zinc do not.
When the detector senses a metallic object, the
meter reading changes.
PREPARING THE DETECTOR
Turning On the Detector
Hold the dctcctor in a comfortablc position,
then rotatc VOLUME away from OFF to the
dcsircd sound levet.
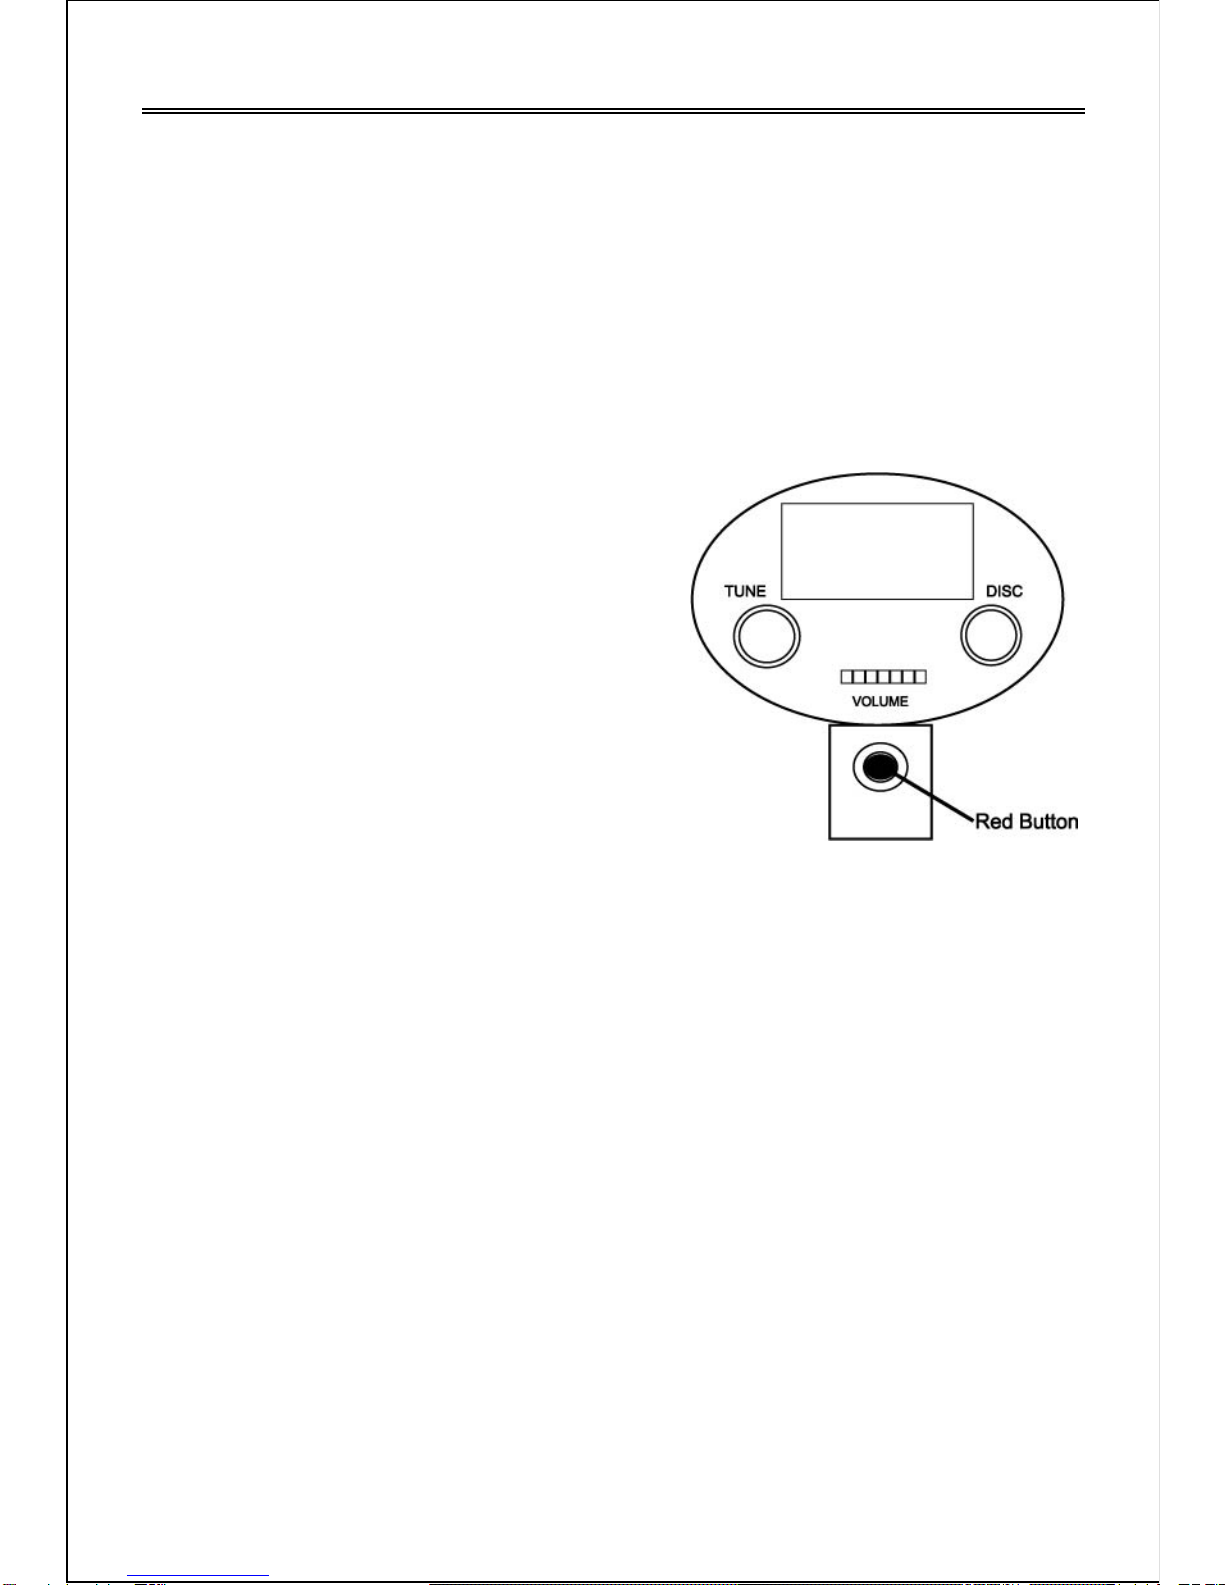
Tuning the Detector
TUNE fine-tunes the balance between the
detector's receiver and transmitter circuitry to
provide consistent pointer and tone indications.
Follow these steps to set TUNE.
1.
Rotate VOLUME about one-thirds
2.
Set DISCRIMINATION to its midpoint.
3.
Hold the search coil about 1 foot away
from the ground and any metal object,
hold down the red button on the handle,
and slowly rotate TUNE left and right
until the pointer on the view meter rests at
or near 0, then release the red button.
As you search, you can fine-tune the detector
using DISCRIMINATION (see "Fine-Tuning
the Detector" . )
Note: Press the red button on the handle at
any time during Operation to automatically
return the pointer to 0.
7

TESTING AND USING THE
DETECTOR
To lcam how thc detector rcacts to different
metals, you should test it beforc you usc it
thc Erst time. You can test the detector
indoors or outdoors.
Indoor Testing
1.
Remove any watchcs, rings, or other
metal jewelry you arc wcaring, thcn place
thc detector on a wooden or plastic tablc.
2.
Adjust the search coil's angle so the flat
part faces the cei ling.
Note: Never test the detector on a floor
inside a building. Most buildings have
metal of some kind in the floor, which
might interfere with the objects you are
testing or mask the Signal completely.
3.
Rotate VOLUME about one-thirds
4. Set DISCRIMINATION to its minpoint.
5.
Movc a sample of the material you want
thc detector to find (such as a gold ring or
a coin) about 2 inches above the search
coil.
Notes:
•
The scarch coil will not detect without
motion. You raust move the object
since you are not sweeping with the
detector at this time.
•
If you are using a coin, the dctcctor
dctects it more casily if you hold it so a
flat side is parallel with thc flat side of
the scarch coil (not the edge).
If the detector detects the material, it will
sound a tone. The pointer moves to the left
(ferrous) or to the right (non-ferrous) whilc
the detector determines the type of meal it is
detecting.
Forrous
Non-ferrous
I
s
2
1
46
I
I
I
SE SITIVITY
0
Low
BAU
If the detector does not detect the material,
check the battery power and verify that the
search coil is properly connected. Also, you
might need to fine-tune the detector (see
"Fine-Tuning the Detector" ).
8

Outdoor Testing and Use
Search Coil Sweeping Hints:
1.
Find an area on the ground outside where
there is no metal.
2.
Place a sample of the material you want
the detector to find (such as a gold ring or
a coin) on thc ground. (If you arc using
valuable mctal such as gold to test the
dctector, mark the arca where you placed
the item, to hclp you find it latcr. Do not
placc it in tall grass or wceds.)
3.
Rotatc
VOLUME about two-thirds
4.
Press and release the red button on the
handle. Slowly rotate TUNE until the
pointer is at or ncar 0. You should hear a
constant tone.
5.
Whilc holding the scarch coil lcvel and
about 1-2 inches above the ground, slowly
move the search coil over the area where
you placed the sample, sweeping the
search coil in a side-to-side motion.
•
Never sweep the search coil as if it were
a pendulum. Raising the search coil
while sweeping or at the end of a sweep
causes false readings.
Right
•
Sweep slowly — hurrying makes you
miss targets.
If thc detector &Mets the material, it sounds.
The pointer moves to the type of metal it has
dctected.
If the dctector does not deteet thc material,
makc surr you arc moving thc scarch coil
correctly or try re-tuning your unit.
Notes:
•
The detector responds with a strong
signal on the meter when it detects
most valuable metal objects. If a signal
does not repeat after you sweep the
search coil over the target a few times,
the target is probably junk metal.
9

False signals can be caused by trashy
ground, electrical interference, or large
irregular pieces of junk metal. False
signals are usually broken
omon-repeatable.
Try finding other metal in thc arca.
When you find a metal item, wait a few
scconds, to allow the detector time to
rcset (or, press the red button on the
handle to retum the pointer to the
center of the view meter).
FINE-TUNING THE DETECTOR
After you become familiar with how your
detector works, you can fine-tune it to make
it more selcctivc in what it finds.
Discrimination is the detectors' ability to
differentiate between types of metal. The
detector's
DISCRIMINATION setting
detennines whether the detector will
distinguish between different types of ferrous
and non-ferrous metals.
You can set DISCRIMINATION to minimum
(fully countcrclockwise), to maximum (fully
clockwise), or anywhere in between. As you
set DISCRIMINATION to higher levels, the
detector first does not detect small pieces of
silver paper, then thick foil, and finally metal
objects like pull tabs from aluminum cans.
Note:
Each time you use the detector in a
different
area, you must adjust
DISCRIMINATION. Each scarch location
presents ncw challenges.
FALSE SIGNALS
Because your detector is extremely sensitive,
trash-induced signals and other sources of
interference might sause signals that seem
confusing. The key to handling these types of
signals is to dig for only those targets that
generate a strong, repeatable signal. As you
sweep the search coil back and forth over the
ground, learn to recognize the difference
between signals that occur at random and
signals that are stable and repeatable.
To reduce false signals when searching very
trashy ground, scan only a small area at a
ti
me using slow, short overlapping sweeps.
DETECTION HINTS
No detector is 100 percent accuratc. Various
conditions influence metal detection. The
detector's reaction depends on a number of
things:
•
The angle at which the object rests in
the ground
1
0
Indice
Manuali Rilevatore di metalli popolari di altre marche


Steinberg Systems
Steinberg Systems SBS-MD-12 Manuale utente

GOLDEN MASK
GOLDEN MASK 5 Manuale utente

Grizzly
Grizzly YM 203 Manuale utente

Fisher Research Labs
Fisher Research Labs 1280-X Aquanaut Manuale utente

Treasure Cove
Treasure Cove Vibra-Probe 560 Manuale utente

Accurate Locators
Accurate Locators XL16 IMAGER Manuale utente