Kleenmaid OCCPB Guida del prodotto

Outdoor
Cooking Centres
Operating and assembly instructions
warranty details
Professional crossfire barbecue
and pedestal
Only to be used outdoors.
FOR YOUR SAFETY.
1. If you smell gas:
Shut off gas to the
appliance, if possible.
Extinguish any open flame.
Open hood.
If odour continues,
immediately call your gas
supplier or fire department.
2. Do not store or use
petrol or other flammable
vapours and liquids in the
vicinity of this or any other
appliance.
3. A gas cylinder not
connected for use must not
be stored in the vicinity of
this or any other appliance.
Model OCCPB / OCCPBNG

the best you can own.
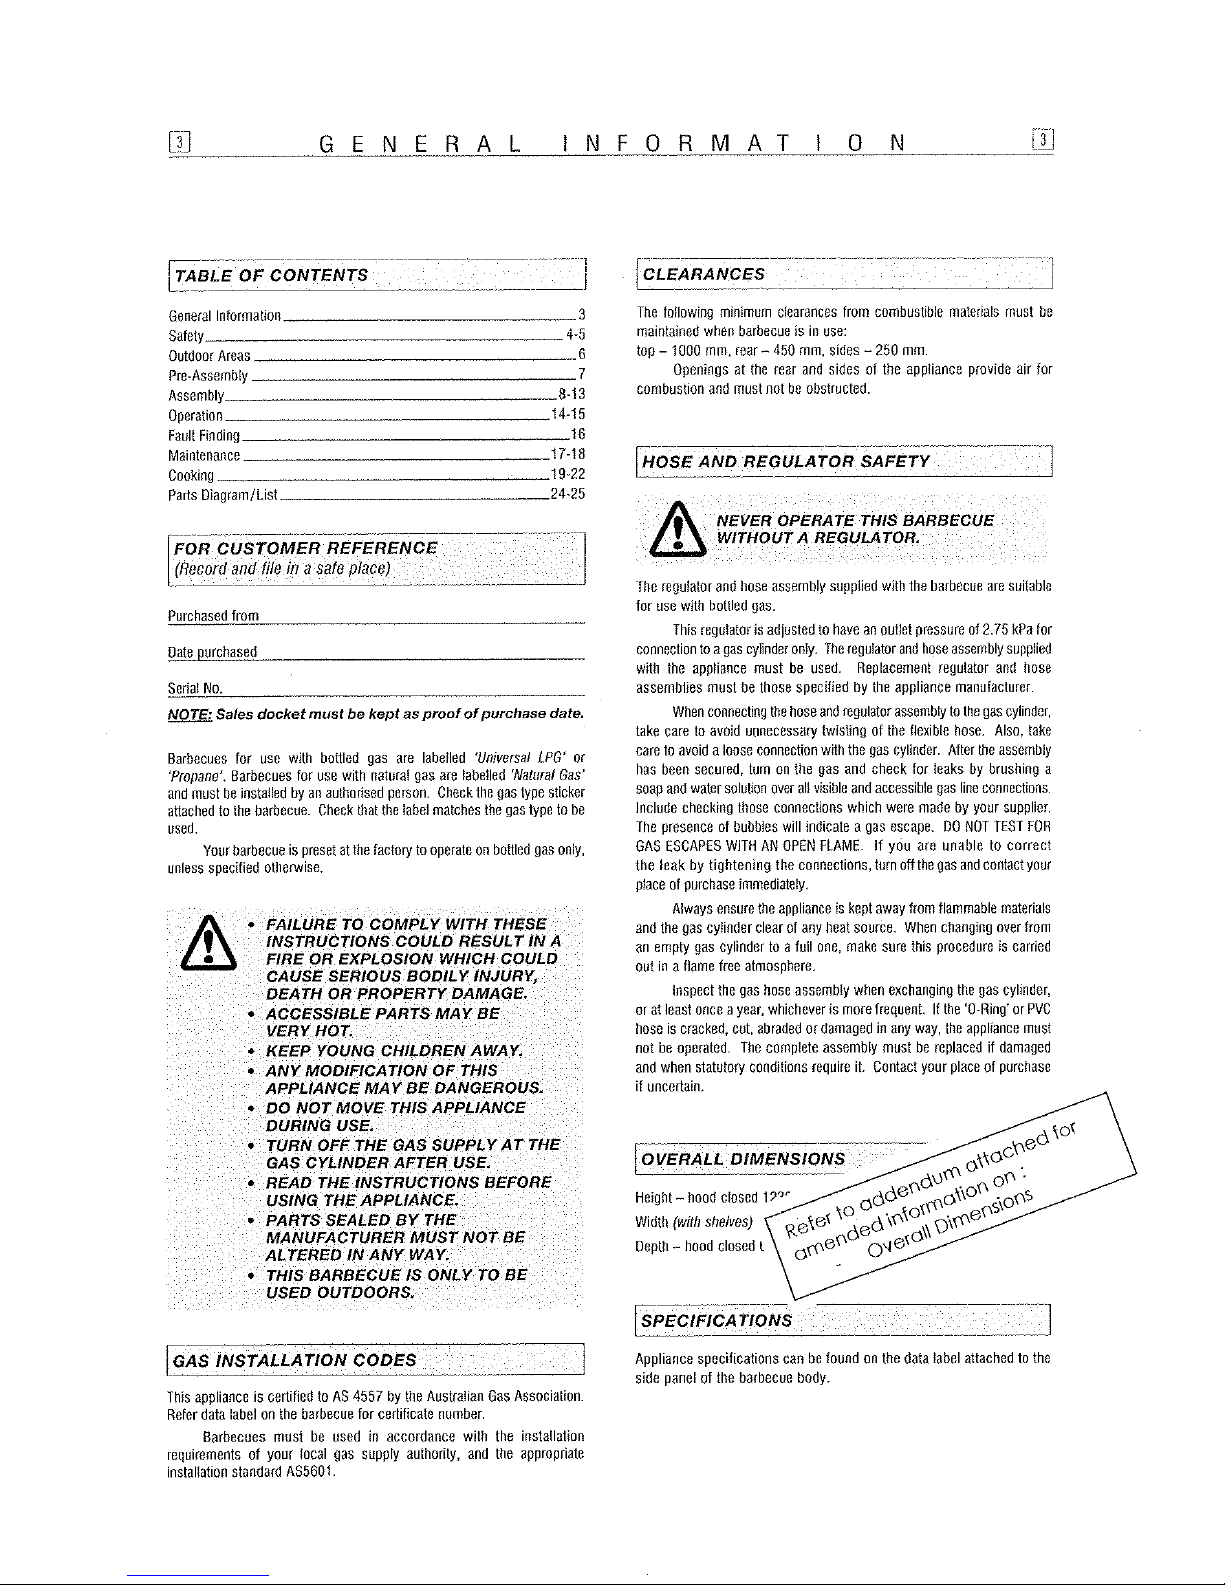
Congratulations on the purchase of your new Kleenmaid outdoor cooking centre. This
appliance has been designed and manufactured to give you years of reliable performance.
the kleenmaid story.
More than one million Australians enjoy using Kleenmaid appliances daily. Selected because of
their unique design, outstanding performance, excellent quality and unquestionable reliability,
each one is value-for-money, 100 per-cent guaranteed and at the top of its class.
attention to detail.
We are proud of our reputation for product innovation and service excellence. By dealing direct, we
can ensure that you consistently receive a high standard of customer service.
Free delivery, dedicated customer and after-sales service plus free kitchen design including
planning seminars are just a few of the ways we are setting new benchmarks for customer service
and experience.
satisfaction guaranteed.
Your new outdoor cooking centre is covered by a written five-year parts and labour warranty,
no lemon guarantee and a unique best value guarantee.
best results.
For best results, carefully read the enclosed instructions on how to assemble your new barbecue.
Correct assembly will avoid delays and unnecessary service calls.
This booklet provides you with comprehensive information to help you get to know the controls and
the features of your new outdoor cooking centre.
congratulations
SAFETY
44
FOR YOUR SAFETY:
•DO NOT STORE OR USE PETROL OR
OTHER FLAMMABLE VAPOURS AND
LIQUIDS IN THE VICINITY OF THIS OR ANY
OTHER APPLIANCE.
•DO NOT STORE EMPTY OR FULL SPARE
GAS CYLINDERS UNDER OR NEAR THIS
OR ANY OTHER APPLIANCE.
•KEEP THE GAS HOSE AWAY FROM HOT
SURFACES. PROTECT GAS HOSE FROM
DRIPPING GREASE.
AVOID UNNECESSARY TWISTING OF
HOSE. VISUALLY INSPECT HOSE PRIOR TO
EACH USE FOR CUTS, CRACKS, EXCESSIVE
WEAR OR OTHER DAMAGE. REPLACE
HOSE, IF NECESSARY.
•NEVER TEST FOR GAS LEAKS WITH A LIT
MATCH OR OPEN FLAME.
•NEVER LIGHT BARBECUE WITH LID ON OR
HOOD CLOSED.
•NEVER LEAN OVER COOKING
SURFACE WHILE LIGHTING BARBECUE.
•USE GOOD QUALITY INSULATED OVEN
MITTS WHEN OPERATING BARBECUE.
•NEVER ALTER OR MODIFY THE
REGULATOR OR GAS SUPPLY ASSEMBLY.
•THIS BARBECUE MUST NOT BE USED
INDOORS.
DANGER –IF YOU SMELL OR HEAR
THE HISS OF ESCAPING GAS FROM
THE GAS CYLINDER:
•KEEP CLEAR OF THE GAS CYLINDER.
•TURN ALL CONTROLS ON THE BARBECUE
TO ‘OFF’.
•EXTINGUISH ANY OPEN FLAME.
•REMOVE HOOD OR OPEN HOOD.
•IF ODOUR CONTINUES, IMMEDIATELY
CALL YOUR GAS SUPPLIER OR FIRE
DEPARTMENT.
READ CAREFULLY BEFORE
ASSEMBLING AND OPERATING
YOUR BARBECUE.
NEVER CONNECT AN UNREGULATED
GAS CYLINDER TO YOUR BARBECUE.
•NEVER STORE YOUR
GAS CYLINDER INDOORS.
•FOR STORAGE AND CYLINDER
EXCHANGE, DISCONNECT HOSE AT THE
CYLINDER ONLY –
DO NOT DISCONNECT HOSE FROM
THE APPLIANCE.
DO NOT use your barbecue in garages, porches, breezeways, sheds or
other enclosed areas. Your barbecue is to be used OUTDOORS ONLY.
Refer to page 6. The barbecue is not intended to be installed in or used
on recreational vehicles and/or boats and should not be placed under
any surface that will burn. Do not obstruct the flow of combustion and
ventilation air around the barbecue housing while in use.
LOCATION OF YOUR BARBECUE
Keep children away from barbecue during use and until barbecue has
cooled after you are finished. Do not allow children to operate barbecue
or to swing on handle.
PROTECT CHILDREN
The gas cylinder should be filled by a reputable gas dealer, or
exchanged at a reputable gas cylinder exchange outlet. Gas cylinders
should be visually inspected and re-qualified periodically.
Always keep gas cylinder in an upright position. Always close the
cylinder valve when the barbecue is not in use.
Do not subject the gas cylinder to excessive heat.
If you store your barbecue indoors, ALWAYS disconnect and remove gas
cylinder FIRST, and store gas cylinder safely outside. Gas cylinders
must be stored outdoors in a well ventilated area out of reach of children,
and must not be stored in a building, garage or any other enclosed area.
This is a low pressure barbecue and must only be used with the hose and
regulator supplied.
Your barbecue is designed for use with a 9 kg gas cylinder. Ensure
gas cylinder conforms to Australian Standards and is less than 10 years old.
DO NOT CONNECT YOUR BARBECUE TO A GAS
CYLINDER LESS THAN OR EXCEEDING THIS CAPACITY.
GAS CYLINDER USE AND SAFETY
SERVICING
ANY OF THE FOLLOWING SIGNS MAY
INDICATE THAT THE APPLIANCE IS NOT
OPERATING PROPERLY AND MAY NEED
SERVICING:
•EXCESSIVE YELLOW FLAME.
•IRREGULAR SIZE OF FLAME
ACROSS BURNER.
•‘POPPING’OF FLAME.
•SOOTING.
•ABNORMAL NOISE(S).
•HISSING SOUND.
NOTE: Before requesting service,
please refer to page 16 ‘Fault finding’.
NEVER TEST FOR LEAKS WITH A FLAME.
Prior to first use, and at the beginning of each new season (or, if using
bottled gas, whenever gas cylinder is changed), you must check for gas
leaks. Follow these steps:
1. Make soap solution by mixing one part liquid detergent and one
part water.
2. Turn burner control(s) to ‘OFF’, then turn on gas at source.
3. Apply the soap solution to all visible and accessible gas connections
including the gas cylinder. Bubbles will appear in the soap solution
if connections are not properly sealed. Tighten or rectify as necessary.
Refer to page 5 for further details.
4. If you have a gas leak you cannot rectify, turn off the gas at the
source. Contact the manufacturer for assistance. Refer to back cover.
CHECKING FOR GAS LEAKS

SAFETY
55
NEVER CHECK FOR LEAKS WITH
A FLAME.
IF YOU HAVE A GAS LEAK YOU
CANNOT RECTIFY, TURN OFF THE GAS
AT THE SOURCE. CONTACT THE
MANUFACTURER.
ALWAYS CHECK FOR GAS LEAKS
EACH TIME YOU USE YOUR BARBECUE.
1. Make liquid detergent solution by mixing one (1) part liquid
detergent and four (4) parts water.
2. Turn burner control knob(s) to ‘OFF’, then turn on gas at
source.
CHECKING FOR GAS LEAKS
You should follow this procedure after any of the following:
•Not having used the barbecue for an extended period of time,
•Initial assembly of barbecue,
•Any disconnection and reconnection of hose assembly,
•Changing gas cylinder,
•Upon re-connecting gas cylinder after it has been disconnected for storage.
4 parts water
Open
1 part liquid
detergent
3. Apply the liquid detergent solution to all visible and
accessible gas connections, including the connection to
the gas cylinder. Bubbles will appear in the liquid detergent
solution if connections are not properly sealed. Tighten
or rectify as necessary.
OFF
IGN HI
LO
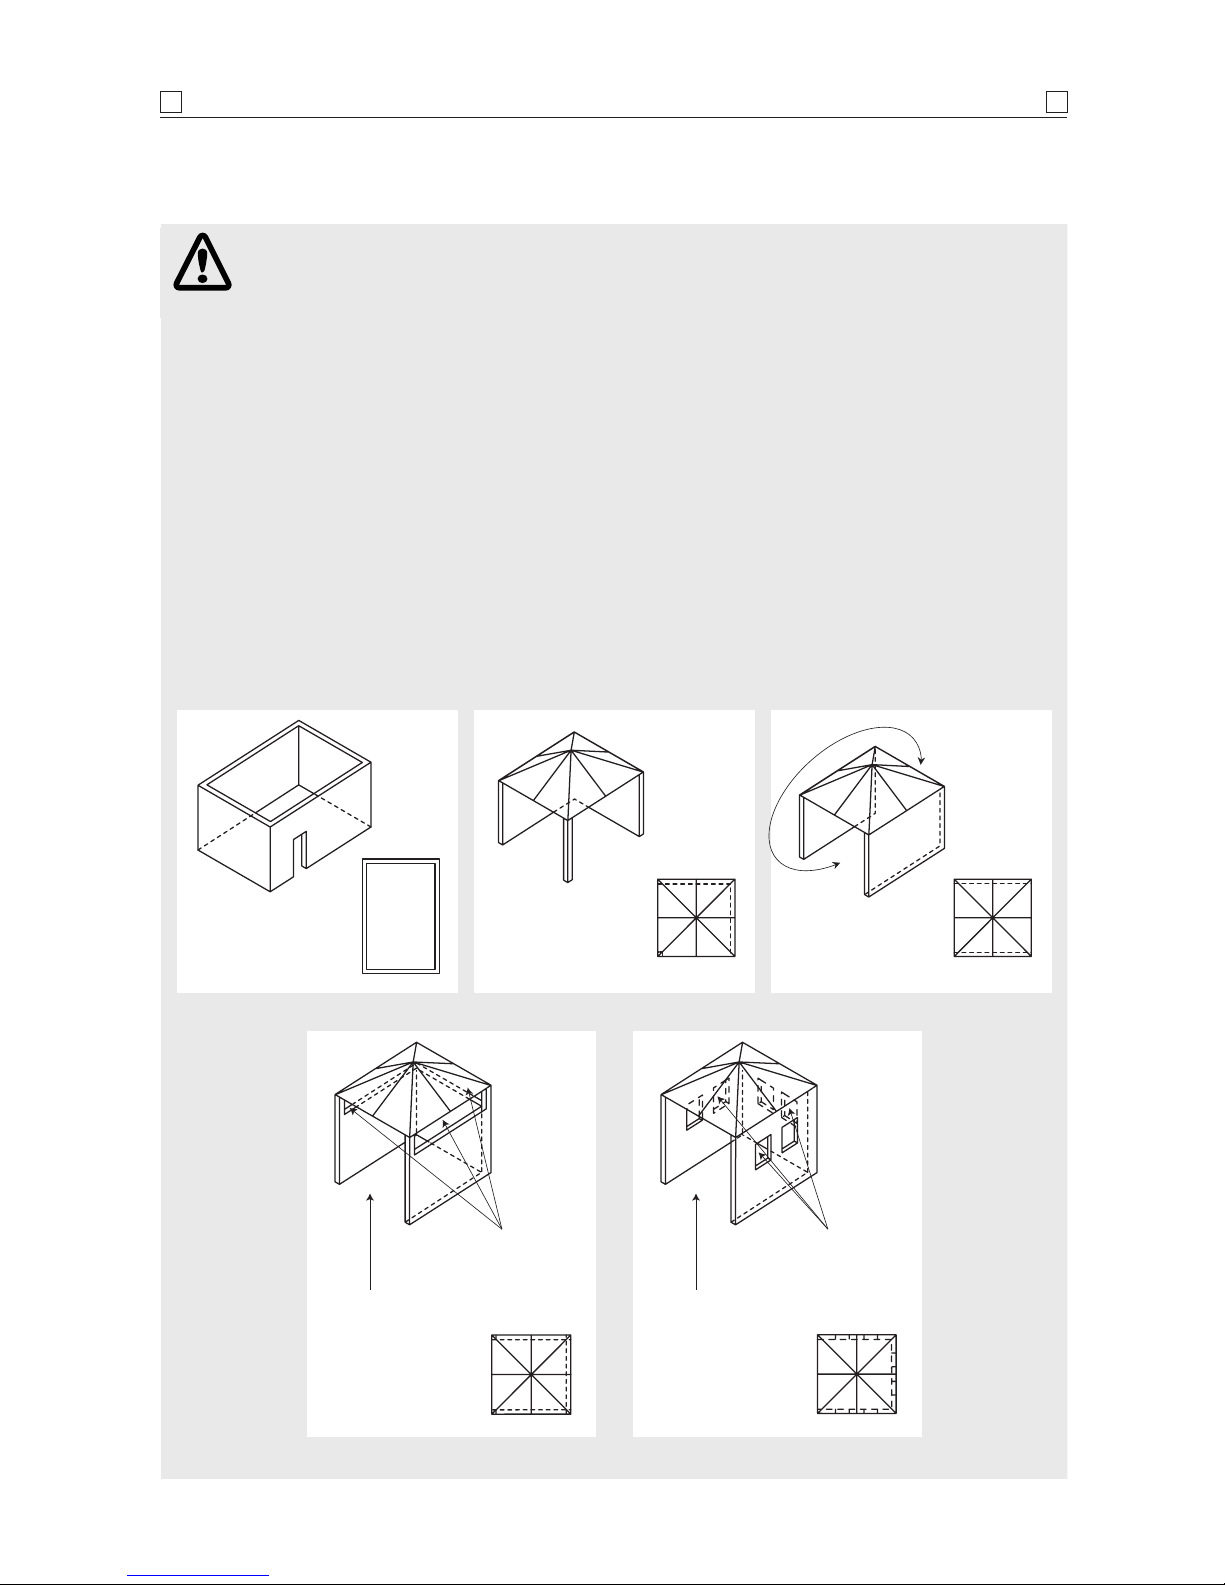
The following diagrams are examples of outdoor areas.
These same principles apply to canopy or shaded cloth areas.
THIS APPLIANCE SHALL ONLY BE USED IN AN ABOVE GROUND OPEN AIR SITUATION WITH NATURAL
VENTILATION, WITHOUT STAGNANT AREAS, WHERE GAS LEAKAGE AND PRODUCTS OF COMBUSTION
ARE RAPIDLY DISPERSED BY WIND AND NATURAL CONVECTION.
ANY ENCLOSURE IN WHICH THE APPLIANCE IS USED SHALL COMPLY WITH ONE OF THE FOLLOWING:
OUTDOOR AREAS
66
•AN ENCLOSURE WITH WALLS
ON ALL SIDES, BUT AT LEAST
ONE PERMANENT OPENING AT
GROUND LEVEL AND NO
OVERHEAD COVER
•WITHIN A PARTIAL
ENCLOSURE THAT INCLUDES
AN OVERHEAD COVER AND NO
MORE THAN TWO WALLS
•WITHIN A PARTIAL
ENCLOSURE THAT INCLUDES
AN OVERHEAD COVER AND
MORE THAN TWO WALLS, THE
FOLLOWING SHALL APPLY:
(i) AT LEAST 25% OF THE TOTAL
WALL AREA IS COMPLETELY
OPEN: AND
(ii) AT LEAST 30% OF THE
REMAINING WALL AREA IS
OPEN AND UNRESTRICTED
•IN THE CASE OF BALCONIES,
AT LEAST 20% OF THE TOTAL
OF THE SIDE, BACK AND FRONT
WALL AREAS SHALL BE AND
REMAIN OPEN AND
UNRESTRICTED
•DO NOT USE YOUR BARBECUE
IN GARAGES, PORCHES,
BREEZEWAYS, SHEDS OR
OTHER ENCLOSED AREAS.
YOUR BARBECUE IS TO BE
USED OUTDOORS ONLY.
Refer below.
•THE BARBECUE IS NOT
INTENDED TO BE INSTALLED IN
OR USED ON RECREATIONAL
VEHICLES AND/OR BOATS AND
SHOULD NOT BE PLACED
ADJACENT TO OR UNDER ANY
SURFACE THAT WILL BURN.
•DO NOT OBSTRUCT THE FLOW
OF COMBUSTION AND
VENTILATION AIR AROUND
THE BARBECUE HOUSING
WHILST IN USE.
Both ends
open
30% or more in total of
the remaining wall area
is open and unrestricted
30% or more in total of
the remaining wall area is
open and unrestricted
Open side at
least 25% of total
wall area
Open side at
least 25% of total
wall area
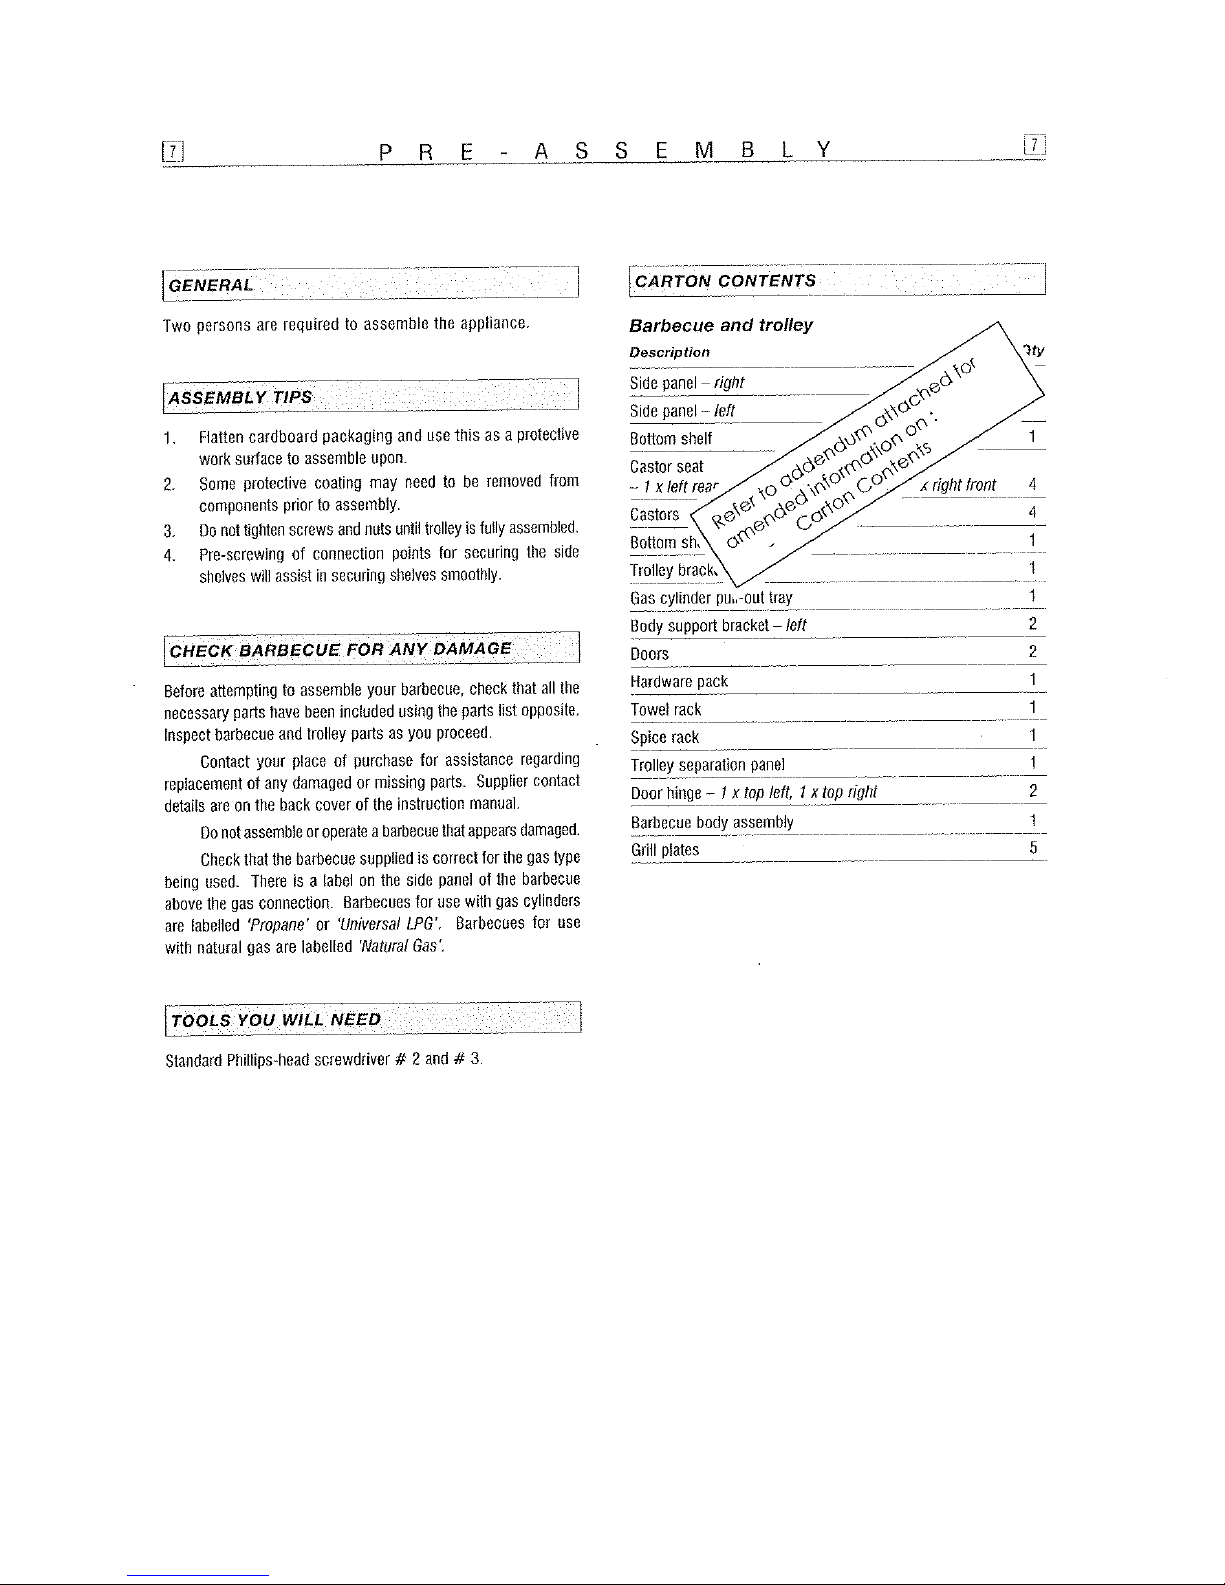
ASSEMBLY
88
LEFT
SIDE
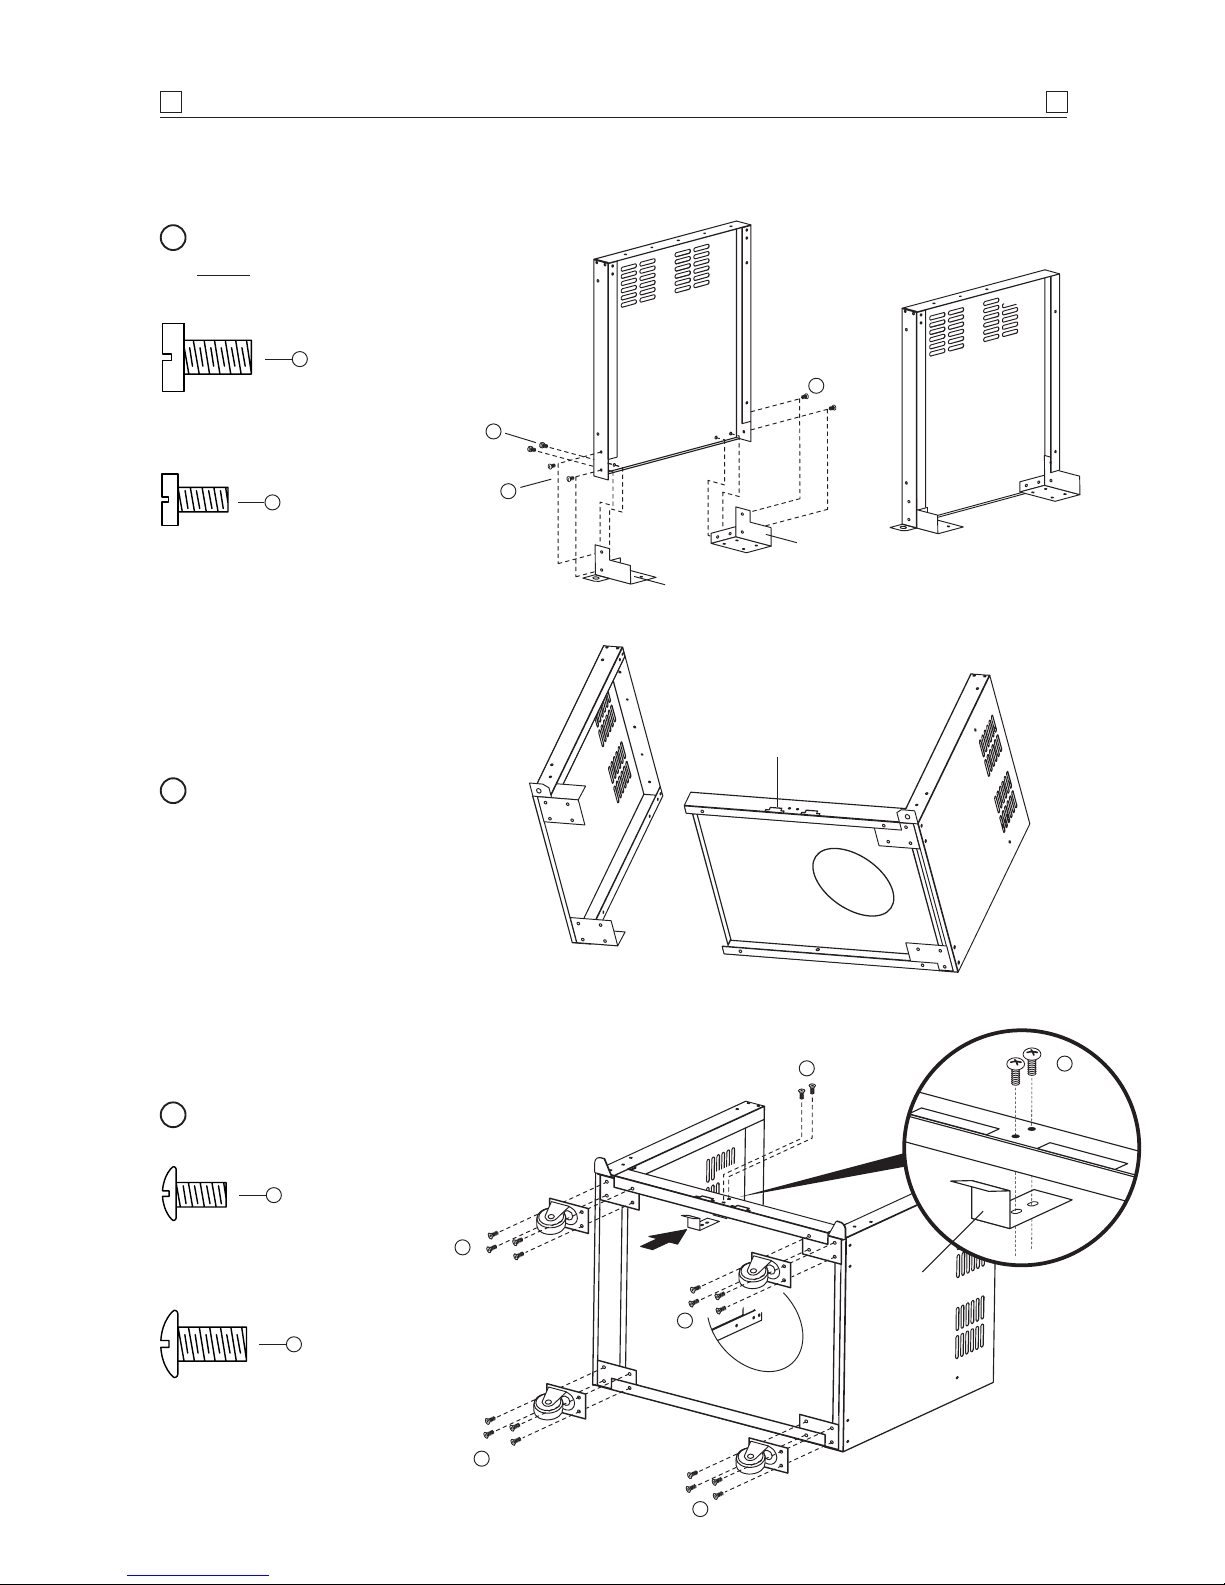
Phillips flat-head screw 1/4" x 1/2"
Qty: 4
Phillips flat-head screw 3/16" x 3/8"
Qty: 4
Attach side panels to bottom shelf.
2
Phillips-head screw 1/4" x 1/2"
Qty: 16
Attach castor seats to side panels.
NOTE: Castor seats are labelled for
correct location
Repeat for right side.
1
Door magnets
to front
LF
LR
Attach castor wheels to castor seat.
Attach door guide
3
Phillips-head screw 3/16" x 3/8"
Qty: 2
Door guide
A
B
A
B
B
B
B
B
AA
B
B
A

A S S E M B L Y
10 10
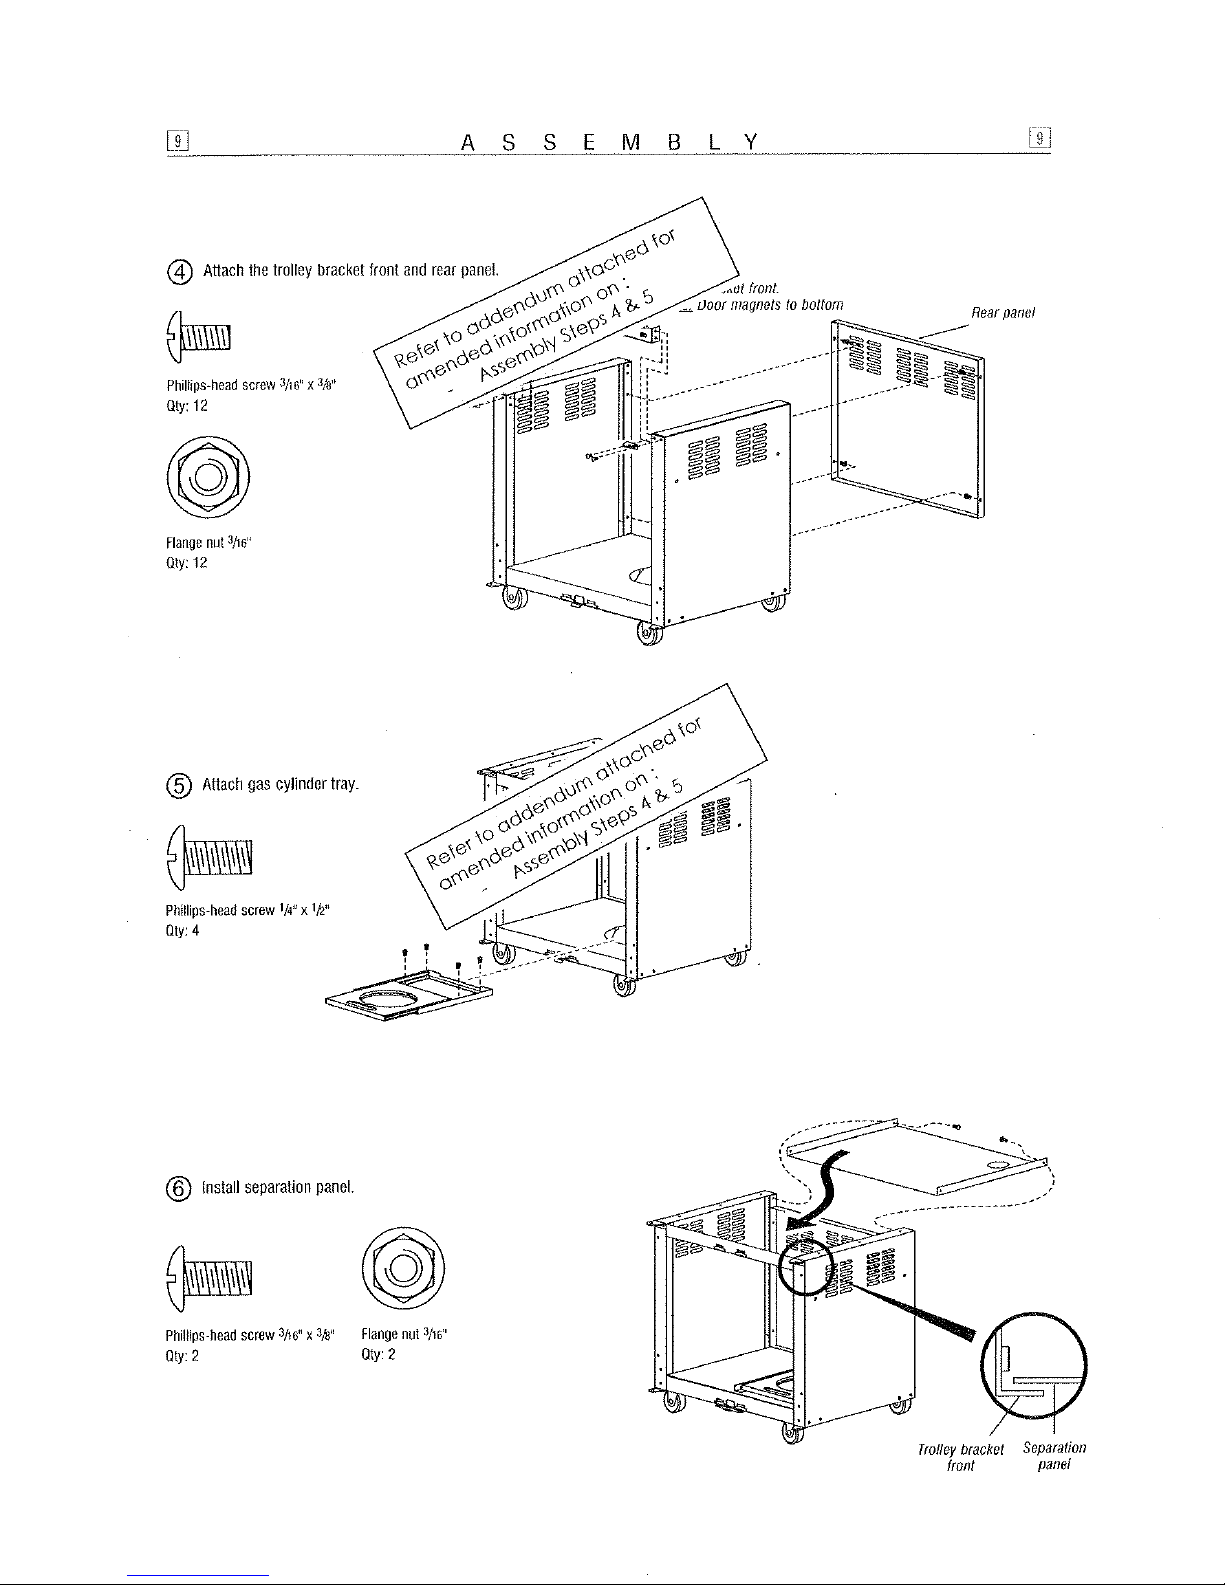
Attach body support brackets.
7
RIGHT
SIDE
Phillips-head screw
3/16" x 3/8"
Qty: 6
Flange nut
3/16"
Qty: 6
Screw
Nut x3
Phillips-head screw
3/16" x 1/4"
Qty: 4
Phillips-head screw
3/16" x 3/8"
Qty: 4
Insert the bottom door hinge pin into the lower door hinge
bracket holes. Depress the spring loaded top door hinge
pin and line up with the top hinge bracket holes, and release
the pin. Attach door handles and towel rack to the inside
panel of doors.
8
A
A
A
B
B
Towel rack
Locate spice rack into
slots inside left door
Note: Change of screws for securing Towel Rack:
4 x self tapping screws have been attached to original hardware
pack to replace original 4 x metal threaded 3/16”screws. Please
use self tappers to secure towel rack. Original screws may still
be enclosed in hardware pack and will remain after assembly.
Questo manuale è adatto per i seguenti modelli
1
Indice
Altri manuali Kleenmaid Griglia


