Konexx network adaptor Manuale utente

Data Port Anywhere
Setup Guide

Table of Contents
Contacting KONEXX Inside Cover
Pre-Installation 2
Data Port Anywhere Installation 3
Windows Connection Setup 5
Establishing Your Connection 9
Locating the Host Modem’s Phone Number 11
Level Switch Settings Table 14
Operating Tips & Troubleshooting 18
Warranty Information 22
Why Data Port Anywhere (DPA)?
As a mobile notebook user you need modem connectivity to send and
receive critical information when you are working at client sites and
hotels. The problem is that notebook modems are analog and virtually
all office and hotel phone systems are digital. Connectivity in this
environment can be impossible. Worse, connecting to a digital line
without protection can destroy your modem. The Konexx Data Port
Anywhere provides an analog data port to connect your modem to
virtually any office or hotel digital phone system. In addition, the DPA
has a 2-Port USB Hub to simultaneously operate other USB devices.
Contacting KONEXX
You may contact KONEXX using any of the following methods:
Voice: (858) 622-1400
Toll Free: (800) 275-6354
Fax: (858) 550-7330
Website: www.konexx.com
E-mail: sales@konexx.com
Address: KONEXX
5550 Oberlin Drive
San Diego, CA 92121

Pre-Installation
System Requirements - Windows 98 or later.
Compliant with USB 1.1 requirements for bus powered devices. USB
Hub supports low power or self powered USB devices (each USB port
provides 100 mA).
Pre-installation Guidelines - Before installing your DPA,
observe the following guidelines:
CONNECTION WARNING - Never connect the DPA directly to the
telephone line or telephone wall outlet. Use the procedures in
this User's Guide to avoid damaging your DPA.
USB DRIVERS - The DPA uses standard Microsoft drivers. When
installing the DPA for the first time you will be prompted by the
computer to install/load drivers. Follow the prompts to identify the DPA
to your operating system.
TELEPHONE LEVEL SWITCH - Set the Telephone Level switch on
the DPA for the telephone you are using (refer to the Level Switch
Setting Table on page 14). Switch setting #3 is used on the majority of
digital telephone systems.
TELEPHONE SET VOLUME CONTROL - The Telephone Set Volume
Control (handset and/or speakerphone volume) may impact your
connection speed. KONEXX recommends that the volume control be
set in the mid-range for most telephone sets. Some AT&T/Lucent /
Avaya sets may require the volume set at a lower level.
SPEAKERPHONES - If the attached telephone has speakerphone
capability, do not use speakerphone mode. Speakerphone mode
disconnects the handset jack used by the Modem Konnector to send
and receive data.
DIALING - Configure your modem for Tone Dialing (Go to
Start…Settings…Control Panel…Modems…Dialing Properties…click
on TONE DIAL ).
MODEM SPEAKER CONTROL AND VOLUME - The telephone
handset is deactivated when your modem is in use. You can use the
“M1” command to enable the modem speaker and the “L3” command
to set its volume. You can then "listen in" on dialed calls to monitor
their status. Refer to your modem manual for more information.
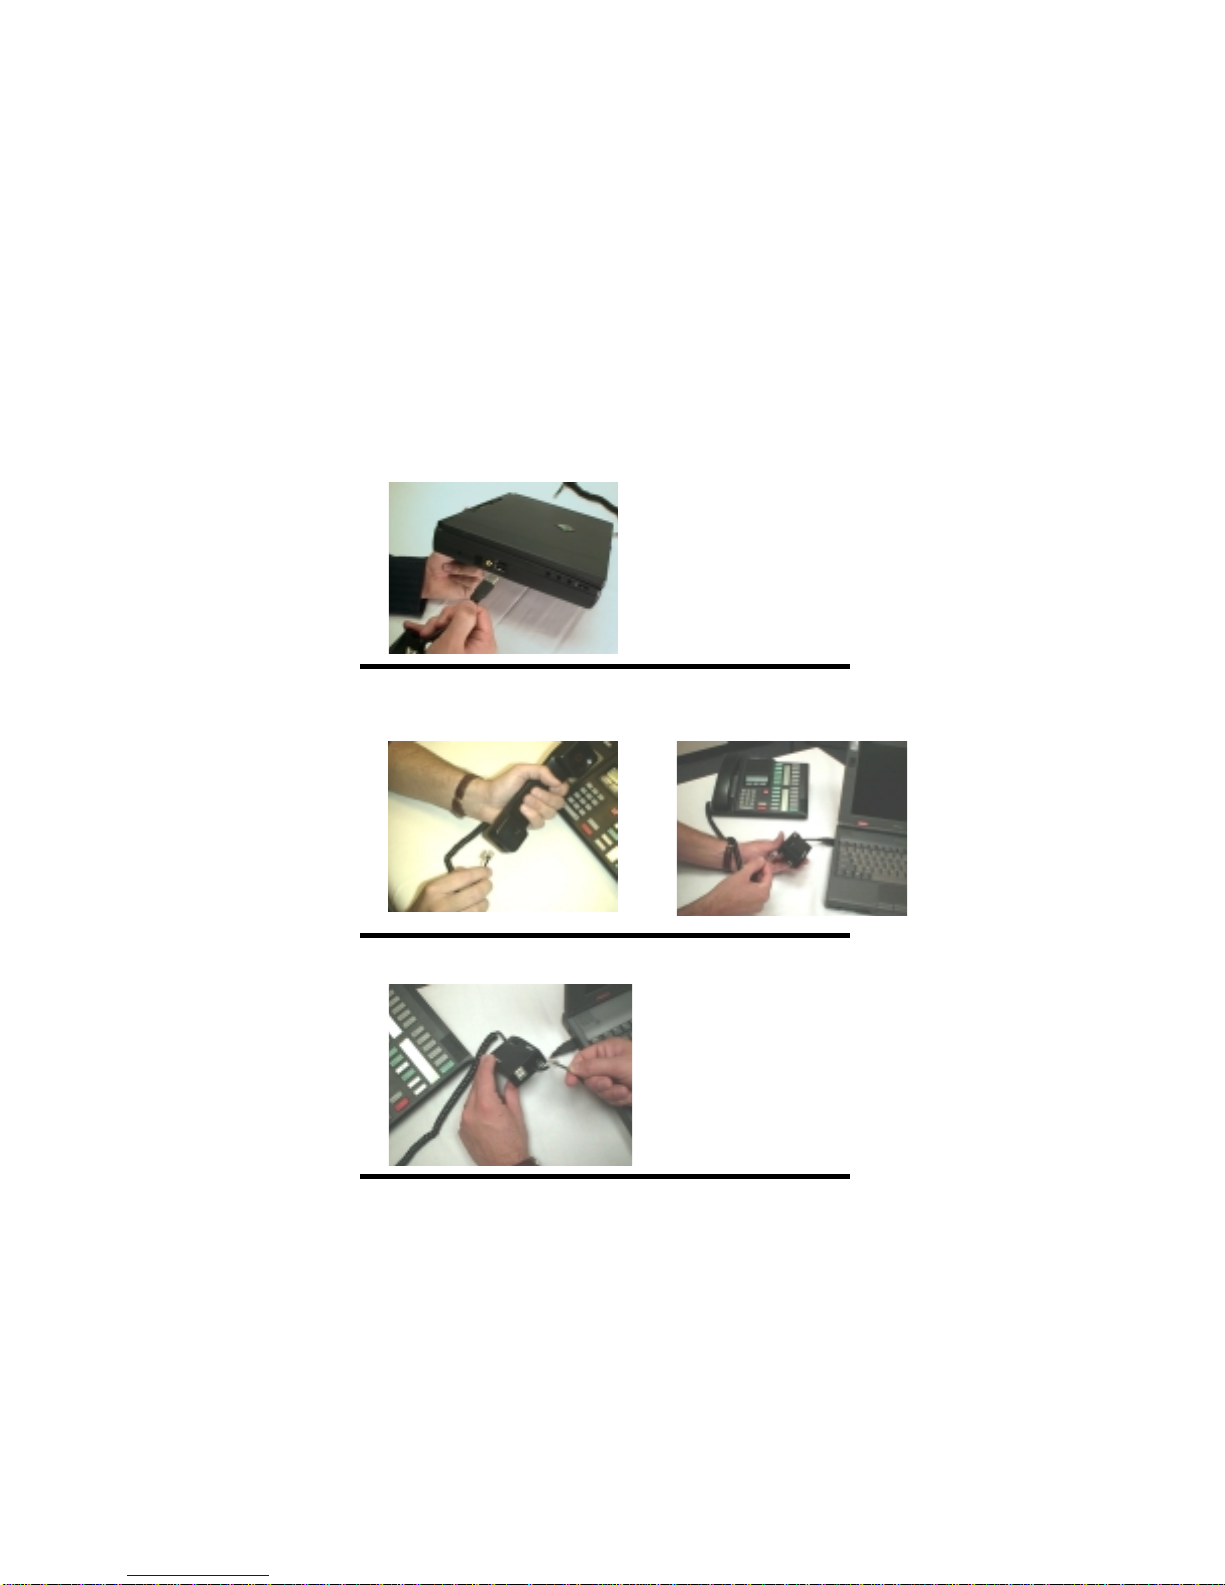
Data Port Anywhere Installation
Step 1. Connect the USB cable on the DPA to your computer USB
port. The first time you connect the DPA to your computer, you will be
prompted to install USB drivers, simply follow the prompts. The DPA
uses standard Microsoft drivers. Follow the prompts to identify the
DPA to your operating system.
Step 2. Remove the coiled handset cord from the telephone handset
(2A) and insert it into the DPA jack labeled PHONE (2B).
2A
Step 3. Connect your PC Card or internal modem cable to the DPA
jack labeled MODEM.
The DPA is now installed and ready for use. If you choose to use the
telephone handset for voice communications when your modem is not
in use see next page.
2B

Optional Connection: If you want to use the telephone for voice
communications while the modem is not in use, connect the included
coiled handset cord to the telephone handset and the DPA jack labeled
HANDSET.
If you have connected the telephone handset to the DPA lift the
telephone handset and listen for a dial tone. If you do not hear the dial
tone, check your connections to ensure they match those shown in the
diagram below.
Return the handset to the cradle until you are ready to go on-line using
your modem and the DPA.

Windows Connection Setup
If you use the DPA while traveling we recommend that you modify your
modem settings to setup your modem for manual dialing.
Why Manual Dial? Because most digital PBX systems, such as
Nortel Meridian, Rolm and others do not accept the analog dialing
tones generated by the modem. In order to connect with the host
modem you will have to manually dial the host modem’s number on the
telephone keypad.
Why x3? The x3 command makes the manual dial process easier.
Your modem normally requires dial tone in order to dial. By adding
“x3” to your modem initialization or setup string you are instructing the
modem to dial without requiring dial tone. Once the x3 is entered it
remains in the Windows default settings. This will not affect modem
use on an analog line.
To enter the “x3” in Windows 98
(Windows 2000 see page 7):
Step 1. Select START button
Step 2. Select SETTINGS
Step 3. Select CONTROL PANEL
Step 4. Double click the MODEMS icon
Continue to next page
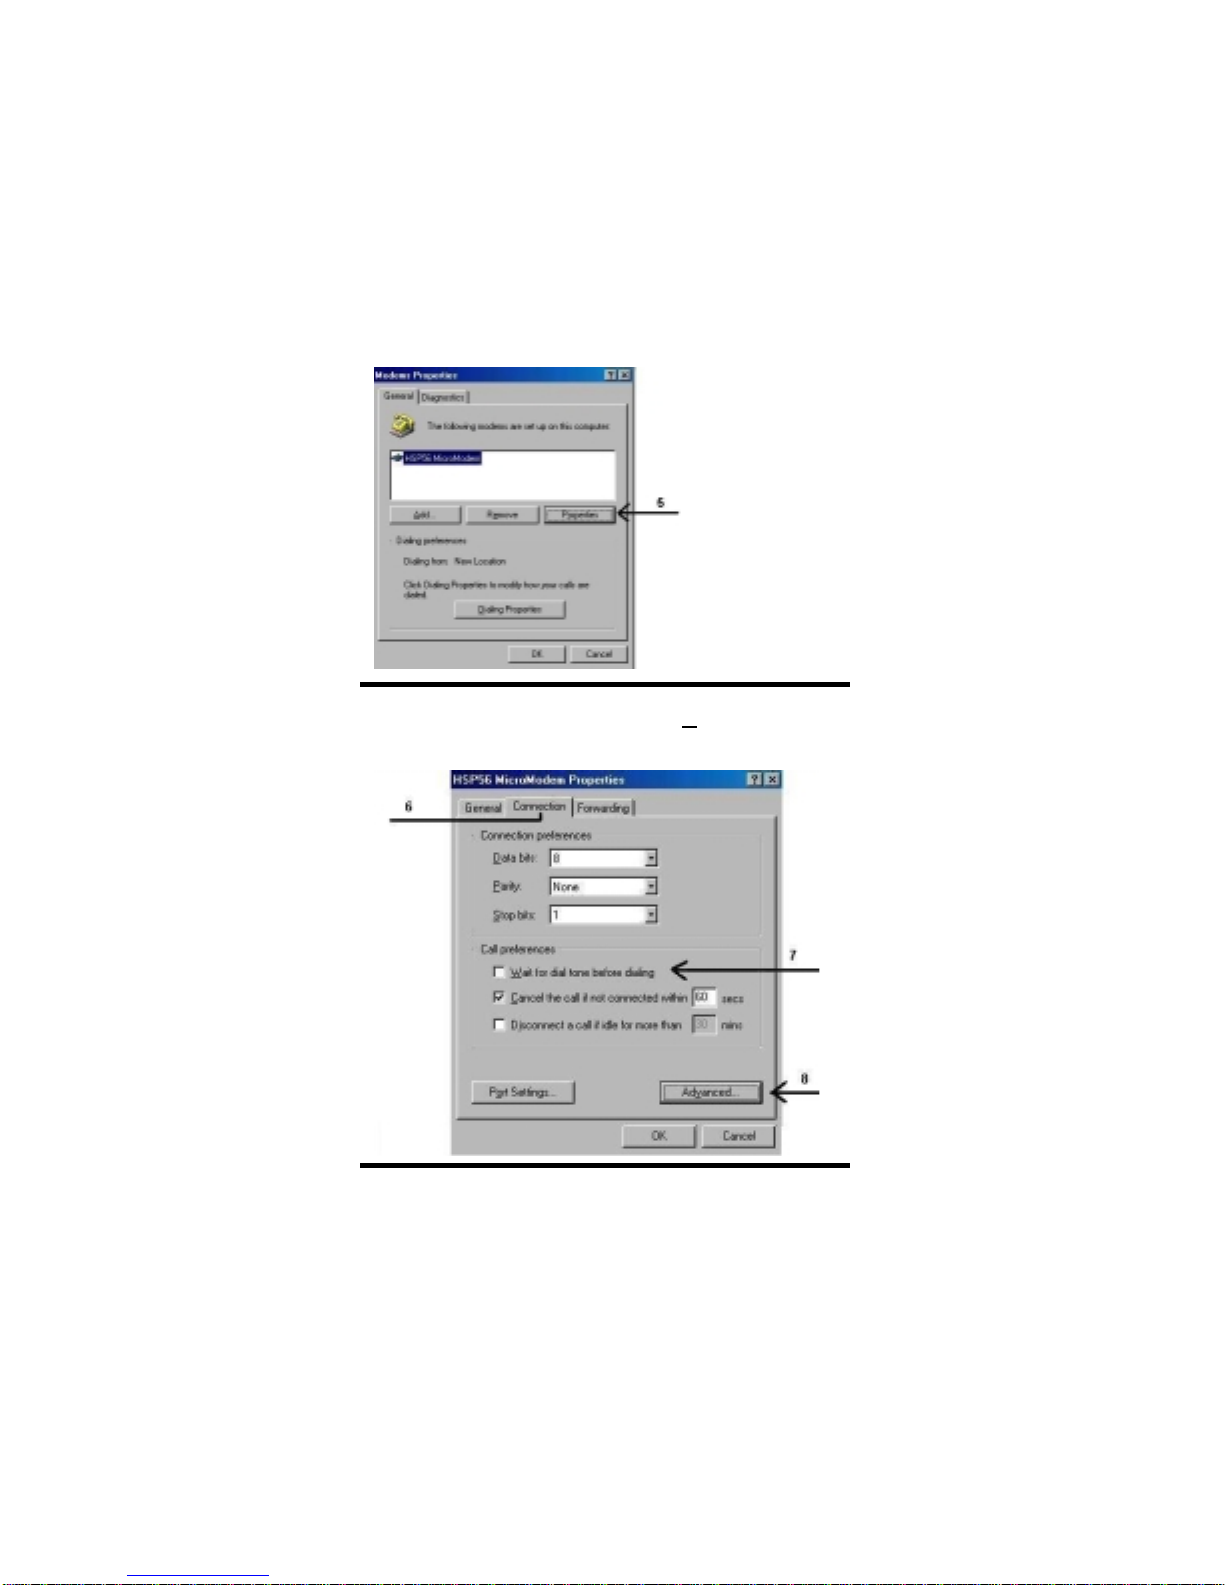
Step 5. In the General tab, highlight the modem to be used, then
Select PROPERTIES (not Dialing Properties)
Step 6. Select CONNECTION TAB
Step 7. Under Call preferences uncheck the “Wait for dial tone before
dialing” box
Step 8. Select ADVANCED in the same window
Continue to next page

Step 9. In the Extra Settings box type x3
Step 10. Click OK to exit Advanced Connection Settings screen
Step 11. Click OK to exit Modem Properties screen
Step 12. Click Close to exit Modems Properties screen
Step 13. Close Control Panel
Step 14. Reboot your computer and proceed to Establishing Your
Connection (Rebooting your computer is only necessary after
first installing x3).
To enter the “x3” in Windows 2000:
Step 1. Select START button
Step 2. Select SETTINGS
Step 3. Select CONTROL PANEL
Continue to next page

Step 4. Double click PHONE AND MODEM OPTIONS icon
Step 5. Click MODEMS tab
Step 6. Click PROPERTIES
Step 7. In the General Tab, Uncheck – Wait for dial tone before dialing
Step 8. Click the ADVANCED tab
Continue to next page

Step 9. In the Extra Initialization commands box type x3
Step 10. Click OK to enter the x3 into the Windows default settings
Step 11. Click OK to exit Phone and Modem Options screen
Step 12. Close Control Panel
Step 13. Reboot your computer and proceed to Establishing Your
Connection (Rebooting your computer is only necessary after
first installing x3).
Establishing Your Connection
Step 1. Write down the phone number (including area code if
necessary) of the host modem that you wish to call. If you do not
know how to find the host modem’s phone number in your computer
see page 11 for Windows 98 users or page 12 for Windows 2000
users.
NOTE: For proprietary software users see your Network Administrator
Step 2. Set the Level switch on the DPA to the proper setting for the
telephone system (see table on page 14). If the phone system is not
listed, please see page 18 section E.
Continue to next page
Indice
Altri manuali Konexx Adattatore


