KUKEN PTS-800 EX Manuale utente

KUKEN CO., LTD.
O
p
erationManual
ReadthisOperationManualthoroughlyandtheseparate"InstructionManual"beforeusing.

MainUnit:PartNameandFunction
s
Controller:PartNameandFunction
s
Uni
q
ueFunction
s
Pre
p
aration
(
1
)
Attachin
g
Accessor
y
Pre
p
aration
(
2
)
-
①
InitialSettin
g
(
Descri
p
tion
)
Pre
p
aration
(
2
)
-
②
InitialSettin
g
(
O
p
eration
)
Pre
p
aration
(
3
)
HowtoSetTheTor
q
u
e
HowtoFasten
(
Industrial
[
Ind
]
Mode
)
HowtoLoosen
(
Industrial
[
Ind
]
Mode
)
HowtoFastenWheelNut
s
(
Automotive
[
Aut
]
Mode
)
HowtoLoosenWheelNuts
(
Automotive
[
Aut
]
Mode
)
Troubleshootin
g
(
1
)
Troubleshootin
g
(
2
)
Descri
p
tionofErrorCod
e
Troubleshootin
g
(
3
)
-
①
(
CH1
)
Troubleshootin
g
(
3
)
-
②
(
CH1
)
CautionsforO
p
eratio
n
O
p
tion
MainUnit&ControllerUnitS
p
ecification
s
TableofContents

MainUnit:PartNameandFunctions
ThrottleButton
Starts/stopsthemachine.
ReverseLever
Switchestherotationdirection
[right(R)/left(L)].
BatteryBox
Stores4AA
batteriestooperate
thecontrollerunit.
TheController
Toseethetorqueand
tosetthetorque.
ReactionForceAbsorber(Option)
Toabsorbthereactionforce.
Ensuretoplacethereaction
ForceAbsorbernexttothe
reactionpoint.

ControllerUnit:PartNameAndFunctions
JUDGMENTLAMP
OK(GREEN):Lightswhenthefasteningiscompletedsuccessfully.
NG(RED):Lightswhenthesettorquecannotbeobtainedduetointerruptionorerror.
+and-keys
Usestochange
thetorque.
DisplayPanel
Displaysthetorque
Pre-setkeys
Usestoselectthe
pre-settorque.
SETUPLamp(Red)
Lightswhenchangingthepre-
settorqueorthepre-setkey.
PowerKey
Usestoturnonmanually
whenthepowerisoff.

① PRE-SETFUNCTIONS
4differenttorquescanbesetandstored(Pre-settorques).
Incaseofpre-tighteningandfinal-tighteningworks,thetoolcanbeusedforvariousworks.
② AUTO-STARTandAUTO-POWEROFF
Bypressingthethrottlelever,theCPUactivatesautomatically.
Ifnotoperatingforacertainperiodoftime,thepowerwillbeturnedoffautomatically.
③ REALTIMEDISPLAY
Thetorquecanbeshownonthepanelinrealtimeandeasytounderstandthesituation.
④ LOOSENINGFUNCTION
AUTOMOTIVEMODE[Aut]andINDUSTRIALMODE[Ind]canbeselectedforlooseningoperations.
⑤ JUDGMENTLAMP
Thefasteningresultcanbejudgediftheoperationissuccessfulornot.
Iftheoperationissuccessfullycompleted,thejudgmentlampturnsgreen.
Iftheoperationissuspendedorstopped,theNGlampturnsandalertsitsunder-torque.
⑥ AUTOSHUTOFF
Thesolenoidvalveshutsoffandstopsthemachinewhentheoperationiscompletedsuccessfully
andthejudgmentlampturnsgreen.
① FailSafeFunction
Incasebatteriesareexhaustedorverylow,theCPUwillnotbeactivatedbutthespindleturns
veryslowlytoreversedirection.
Operatorscaneasilyrecognizethebatteryproblem.
② ErrorDetectionFunction,AbnormalFasteningDetection[CH1]
Thisfunctiondetectsboltstretchingbeforehandandforcestostopthemachine.
Thisfunctioncanbeturnedon/offdependingonworks.
③ FunctiontoPreventOperationalError
Thisfunctionistopreventanoperationalerror.Thekeywhichisset[---]andselectedby
mistakewillneverbeoperated.
① PowerSource
CPUisoperatedbybatteries.
Use6ofAAdrycellbatteries.Alkaline(recommended)andalsoNi-MHisavailable.
② DataTransmission(Option)
PTScanbeconnectedtoacomputerortheprinter(option)withtheKUKENoriginal
transmissioncable(option)totransferresults.
PTSmustbethetransmissionmodel(option)inordertotransferdata.
UniqueFunctions
AdditionalFunctions
SafetyFunctions
OtherFunctions

Checktomakesurethatallthecomponentsarepresentandthatnothingisdamagedinshipping.
Ifanyproblems,pleasecontactyourdealer.
●CouplingPlug20PM・・・・・・・・・・・・・・・・・・・・
・
1
●SpiralRetainerRing・・・・・・・・・・・・・・・・・・・
・
1
●AADryCellAlkalineBattery・・・・・・・・・・・・ 6
Makesuretoattachtheimpactsocket.
・Makesurethattheairsupplyisdisconnectedwhenattachingthereactionforceabsorber.
・Makesurethatthespiralretainerringandthe"O"ringisproperlyattachedtoavoidthe
reactionforceabsorberorthesockettobecomeoff.
・OperatingPTS-800EX/PTS-800EXLwithoutareactionforceabsorbermaycauseinjuries.
PleasedonotoperatePTS-800EX/PTS-800EXLwithoutareactionforceabsorber.
Warning
Preparation(1)AttachingAccessories
Attachthecouplingplug.
InsertbatteriesintoPTS.
Unscrewandopenthebatteryhousingcoverand
insertbatteries.
Besuretoinsertcorrectdirectionsofbatteries.
(Ifnotusinglong,removebatteries)
Attachthereactionforceabsorber(option).
"O"Ring
Attachthereactionforceabsorberandthenattachthespiral
retainerringforPTS-800EX,theo-ringforPTS-800EXL.
WARNING
Donotinsertbatteriesopposite
directions.Insertingbatteries
oppositedirectionswilldamage
theCPU.
SpiralRetainerRing
"O"Ring
Attachthesocket.

BeforeusingPTS,followingmodesmustbeselected.
(1) SelectionofTransmissionMode(TransmissionModelisoptional).
Thereare2typesofPTSmodels.Transmissionmodelandnon-transmissionmodel.
Ifnon-transmissionmodel,eithermodebelowmaybeselected.
① PRINTERMODE[Prn] ・・・・・・
・
Connecttheprinter(option)tooutputtheresultonthermalpaper.
② PCMODE [PC] ・・・・・・
・
Connectacomputertotransferresults
(2) Selectionof[Loosening]Mode
[Automotive]and[Industrial]mustbeselecteddependingonusage.
application AutomotiveMode IndustrialMode
PanelDisplay Aut Ind
Direction Right/Lefthandedscrews Righthandedscrewsonly
MaximumTorque Uptothepre-settorque Uptothepre-settorque
selectedcurrently selectedcurrently
MaximumTorque Uptothepre-settorque Upto800Nm
forLoosening selectedcurrently
Press④ofthedisplaypanel
HowtoSet [-L-]willbeshown. TurnthereverselevertoLEFT.
LooseningMode Tocontinuelooseningworks, TheLooseningModeisautomaticallyset.
pleasepress④again. (Toturnthereverselever,FasteningMode
(Thislooseningfunctiononlyworks again)
1bolt/nut)
(3) On/Offoftheabnormalfasteningdetection[CH1]**
Select[CH1]onoroff.
◎ Thisfunctionisforfasteningwheelnuts.
Itmaydetect[CH1]evenafterfasteninggeneralboltsornutsiftheautomotive[Aut]modeisselected.
**Pleaseseepage17forfurtherinformationof[CH1].
Preparation(2)-①InitialSetting(Description)

Thissectiondescribeshowtoselectandseteachmode.
Pleasefollowtheinstructionbelow.
① Makesurethemachineisturnedoff.
Press③forafewsecondandpressthepower
switchwhilepressing③.
② Press①keyoncetochangethemodefromthe[Prn].
Andpress①againtochangethemodebackto[PC]
IfthePTSisnon-transmissionmodel,eithercanbeselected.
③ Press②tocompletetheselection.
Thentheselectionwillmovetothenextsetting.
④ Press①keyoncetochangethemodefromthe[Aut].
Andpress①againtochangethemodebackto[Ind].
⑤ Press②tocompletetheselection.
Thentheselectionwillmovetothenextsetting.
⑥ Press①keyoncetochangethemodefromthe[CH1]on.
Andpress①againtochangethemodebackto[CH-]off.
⑦ Press②tocompletetheselection.
Aftertheselectionof[CH1],thepowerwillbeturnedoff.
Preparation(2)-②InitialSetting(Operation)
ToselectTransmissionMode
ToselectLooseningMode
Toselect[CH1]Mode
keeponpressing
Presstoturnon

Thissectiondescribeshowtopre-setthetorqueforkeys①through④.
Forexample,topre-set①with600Nm.
① Turnonthepowerswitchandmakesurethedisplayblinks.
Press①keyfor3seconds.
② SETUPLamplightsupandthedisplayindicates
thepre-setkeyandthentheprevioustorque.
(Thisfigureshows500Nmastheprevioustorque).
Assoonasthetorqueisdisplayed,releasethe
fingerfromthekey.
③ Press[+]or[-]keytochangethevalueto600.
Pressing[+]forafewsecondsincreases
thevaluequickly.
Pressing[-]forafewsecondsdecreases
thevaluequickly.
④ Tocompletethesetting,press[SET]②key.
● Pleasemakesurethedisplayblinks[0]aftersetting.
To
p
re-setotherke
y
s
,
re
p
eatabovemethod
①
throu
g
h
④.
Once
p
re-setthetor
q
ue
,
thevalueisstoreduntilre-setthetor
q
ue
.
(Caution) Thetorquerangeis400to800Nm.Thetorquecannotbesetbeyondtherange.
① Selectthepre-setkeyandpress[-]untilthelowestlimit.
② When[---]isdisplayed,thepre-setkeyissettopreventoperationalerror.
Eventhoughthepre-setkeywhichisset[---]isselectedbymistake,thetoolwillnotbeabletooperated.
TheCPUwillbeturnedoffafter10seconds
,
butthetor
q
uevaluewillbefixed
.
Preparation(3)HowtoSetTheTorque
FunctiontoPreventOperationalError
Lightsup
Release
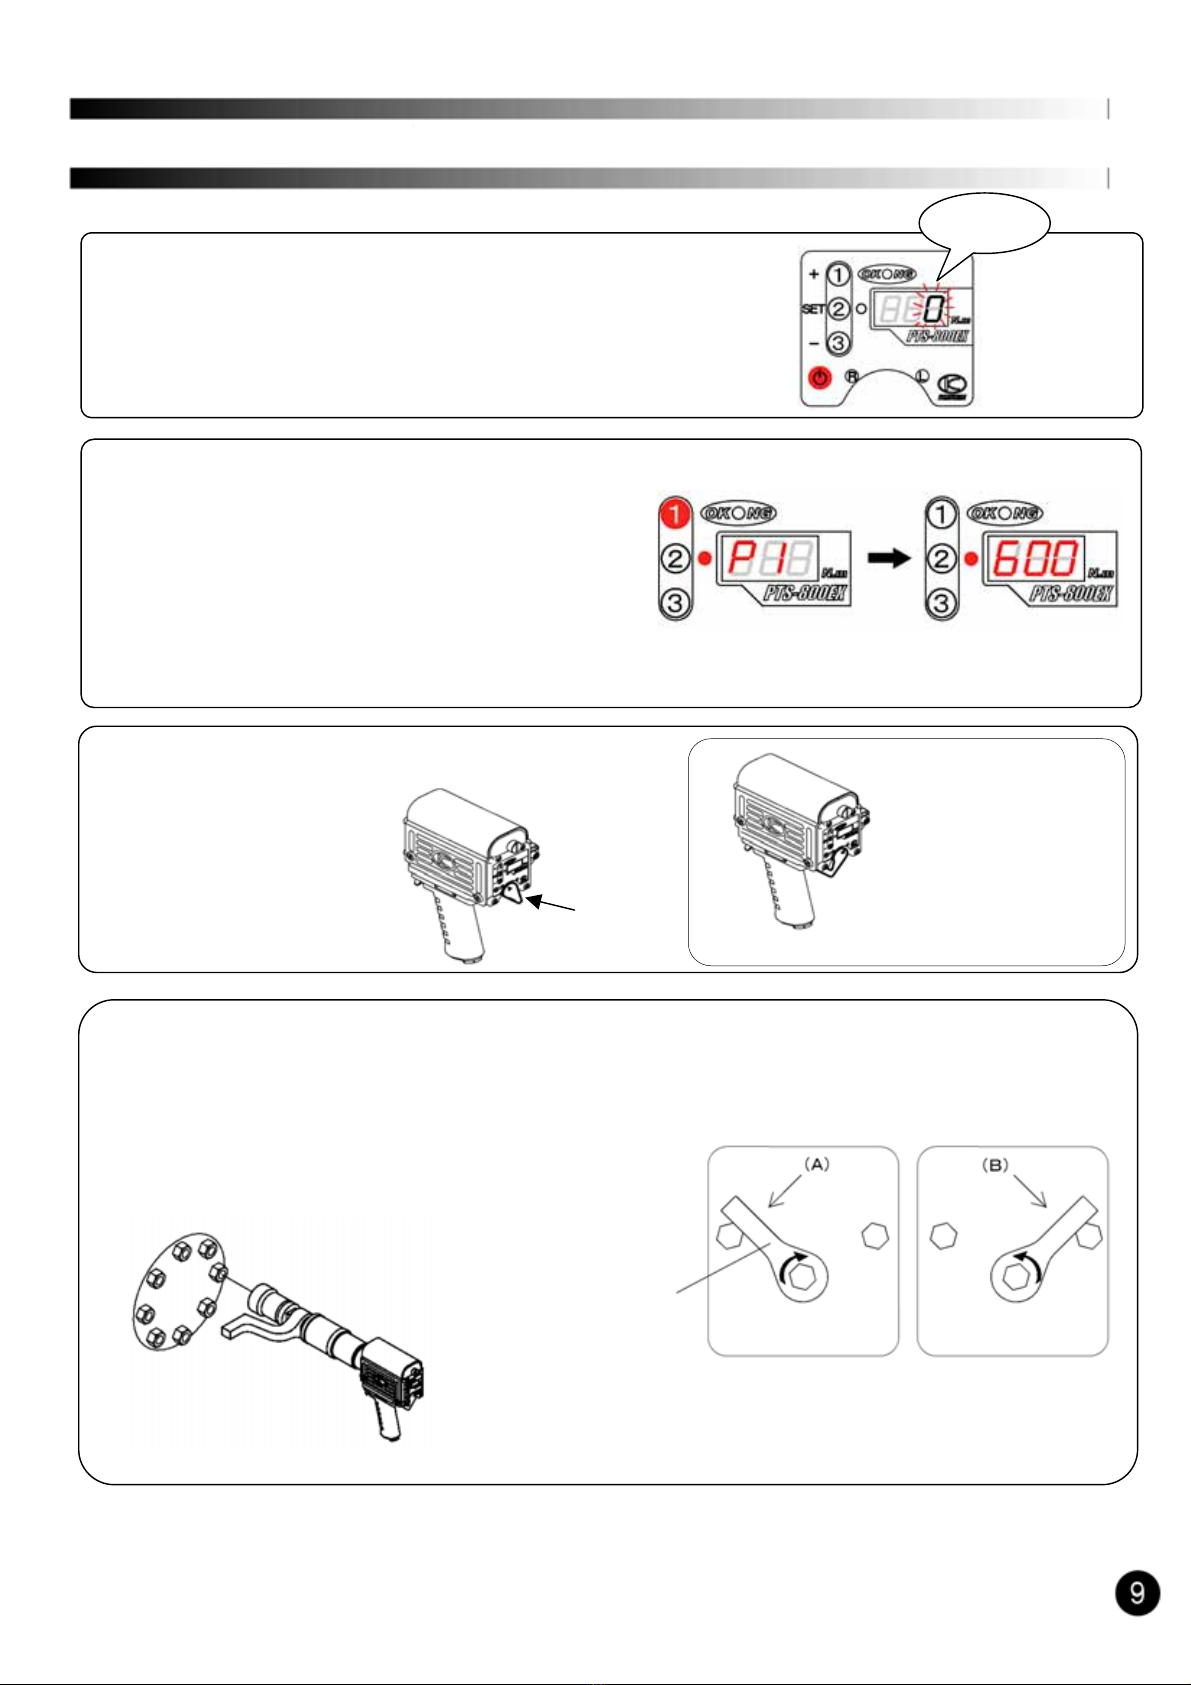
Selectingthepre-setnumber(forexample,thepre-setnumber①and600Nm)
① Pressthepowerswitch.Thedisplayshows[0]blinking.
② Press①forafewseconds.Thepre-set①isset600Nm.
Whenthedisplayindicates①[P.1],releasethekey.
Soonafterindicating[P.1],thedisplayalsoindicate
thetorquevalue[600]Nm.
Atthismoment,thepre-setkey①isselected.
Selectedpre-setkeyisvaliduntilchangingtootherpre-setkey.
③ Checktherotativedirection(ReverseLever).
R:RightRotation L:LeftRotation
(Fasteningtheright (Fasteningthe
handedscrew) lefthandedscrew
for[Aut]mode)
④ Afterplacingthereactionforceabsorbernexttothefasteningbolt/nut,insertthesockettothefastening
bolt/nutandpressthethrottlelever.
(Caution)
・ Incaseofrighthandedscrew,thereactionforceabsorber
rotatestothedirection(A).
・ Incaseoflefthandedscrew,direction(B)
HowtoFastenIndustrialMode[Ind]
Incaseoffasteningthe
lefthandedscrew.
([Aut]modeonly)
Incaseoffastening
therighthanded
screw
ReactionForceAbsorber
Blinking
Reverse
Lever
Questo manuale è adatto per i seguenti modelli
1
Indice
