Kumio 1.5CU.FT Manuale utente

INSTRUCTION MANUAL
1.5CU.FT

Contents
Suggestions
Name of all components
Accessories
Laying the machine
Connection of the inlet/drain hose
Power Cord Connection
Operation
Safety warning
Maintenance
Troubleshooting
2
3
3
Control panel 7
4
5
6
8
8
10
11
Specifications 13
Installation instructions
Operating instructions
Maintenance
Specification
Name of all components
Warranty
warranty 14

statement may result in extensive product damage,
APPLIANCE SAFETY
Your safety and the safety of others are very important.
We have provided many important safety messages in this manual and on your appliance. Always read
and obey all safety messages.
This is the Safety Alert Symbol. This symbol alerts
you to potential hazards that can kill or injure you
and others.
All safety messages will follow the Safety Alert
Symbol and either the wards” DANGER”,
“WARNING” or “CAUTION”.
Danger means that failure to heed this safety
statement may result in severe personal injury or
death.
Warning means that failure to heed this safety
serious personal injury, or death.
Caution means that failure to heed this safety
statement may result in minor or moderate
personal injury, or property or equipment damage.
All safety messages will alert you to what the potential hazard is, tell you how to reduce the chance of
injury, and let you know what can happen if the instructions are not followed.
PROP. 65 WARNING FOR CALIFORNIA RESIDENTS
WARNING:
Cancer And Reproductive Harm
www.p65warnings.ca.gov

Suggestions
1. Low foam detergent powder is recommended.
2 . Please operate it under 0 ~ 40 , as extra-high or
extra-low ambient temperature may cause malfunction.
3 . If the washing machine has been stored under 0 , it can
be used after being placed under room temperature for
about 4 hours to avoid machine damage due to residual
ice in the washing machine.
4 . The washing and spinning capacity refers to the maximum
weight of standard laundry during two operating fashions,
which is different from that of the actual laundries. The
cloth thickness, size and category of the laundries will
impact the washing capacity. The volume of washing items
should be appropriate for the normal turning of washing
items within the washing machine.
5 . High water level should not be selected for washing volume
below1.0kg to avoid water splashing during washing.
- 2-

Name of all components
Accessories
Drain pipe joint
Up drain
pipe
Cover for
drain pump
Water
inlet valve
Handle
Back cover
Drain
pipe hook
Power cord
Control panel
Body
Base
Adjustable foot
Filter
Pulsator
Top lid
Detergent box
Frame
Inner tub
Bleach injection
- 3 -
<0.9m
UP
Instruction manual (1)
Inlet hose (1)
Washing machine (1)
Self screw (2)
Drain hose (1)
Installed for some modesNot exist for some modes
Cover for drain hose (1)
Noise and mice- proof
plate (1)

Laying the machine
Place the washing machine at
least 5cm away from the wall.
Alteration of adjustable foot
In order to prevent vibration during wash
operation, you can loosen level adjustment
knob and change the height of the adjustable
foot until the washing machine is stable, and
then tighten it.
Place the washing machine on a firm and level surface, use the level adjustable
knob to adjust the washing machine to be stable.
1. Remove the plastic accessory
as below picture from the bottom
of washing machine before use.
Insert the mice-proof plate into the washing machine base
adjustable foot
downward upward
2. Take out the mice-proof plate
at the top of the machine.
3. Lay down the washing machine
gently on the soft object. And
insert the noise-proof plate into
the base.
soft object
at least
5cm
4. Fasten up the noise-proof
plate with two screws.
plate
screws
- 4 -
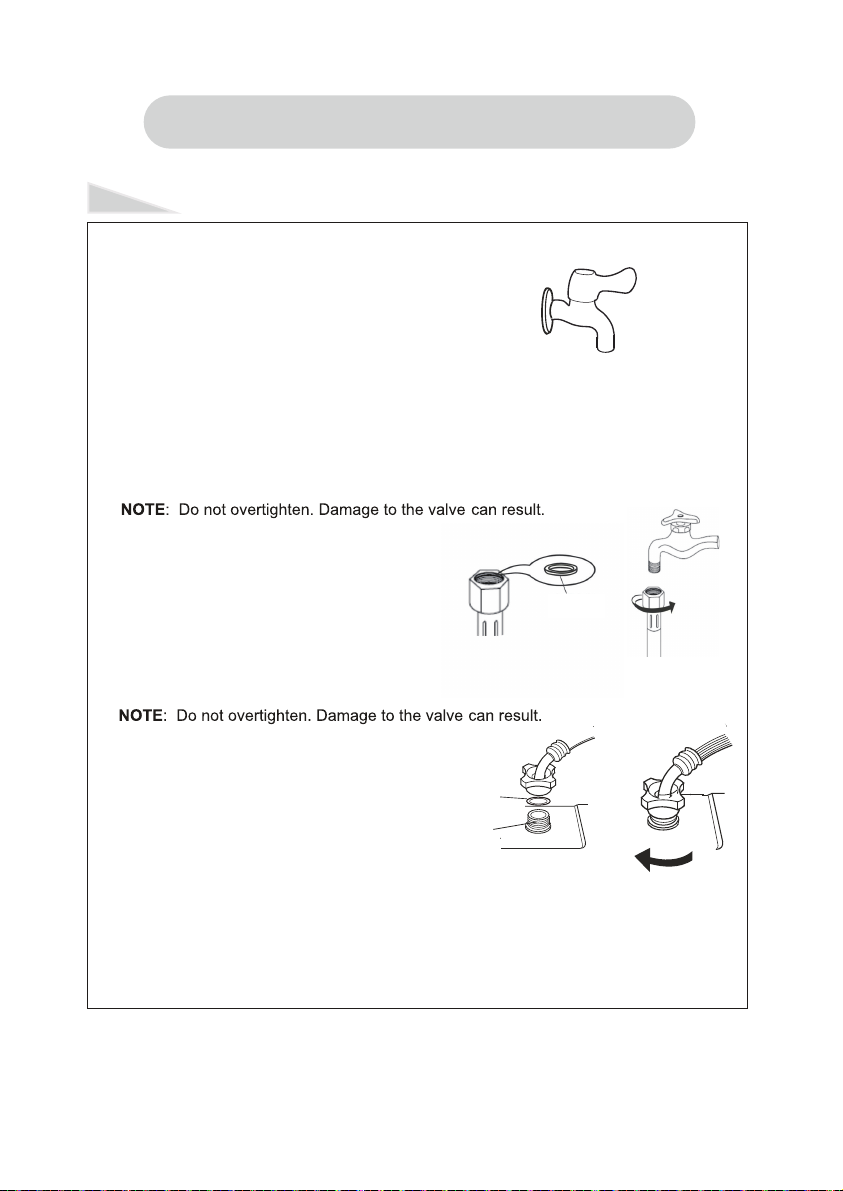
Connection of the inlet/drain hose
Connection of the inlet hose
1. Select the appropriate type of outlet as shown in the figure.
5.Check for leak
(1).Swing the water inlet hose gently to confirm if it’s suitable.
(2).Turn on the water faucet and check for leak.A small amount of water might
enter the machine.You will drain this later.
2. Before installation, run water through both faucet and inlet hose, to get rid of
particles in the water line that might clog the inlet valve screen.
3. Make sure a seal washer seating at the joint of inlet hose, then connect
the inlet hose to the fauct.
seal washer
4. Make sure a seal washer seating at the joint of inlet hose, then connect
the inlet hose to the water inlet valve.
seal washer
joint water inlet valve
- 5 -

Power Cord Connection
Never try to connect the earthing of the
washing machine together with that of gas
pipe or water pipe, telephone cord or lightening
rod.
Do not use the damaged cord because it could
cause electricity leakage and fire.
In case cord is damaged, please contact the
local service company, because it is removed
and replaced with special tools.
NOTE:
The grounding wire is indicated by the yellow and green color.
It must be firmly connected to a grounded outlet. Please call a
technician for any assembly assistance.
- 6 -
Connection of the drain hose (some modes have been connected)
1. Press down the fix ring, 2. Press down the fix ring, and 3. This machine equips with upper drainage,
it can drain even if drain hose is hung up,
but the hose should not be positioned over
0.9m.
and hitch it over the drain
hose.
then push it to the drain outlet.
Clasping the fix ring to make
sure they are connected well.
<0.9m
The socket should include a 3A fuse.

PROCESS CODE
Control panel
Program CodeProcess Code
Program
Child lock Water level Start/Pause
Power On/Off
01.
Set the water level automatically
according to the load of laundry.
05.Soak&Wash
Soak for certain time before
washing.
Use this button to turn the
washing machine on and off.
02. Heavy
To wash the coverlet, jeans and
other big clothes.
06. Single Wash
Only for washing.
07. Single Spin
Only for spinning.
08. Air Dry
To dry the tub.
03. Gentle
For washing of wool or underwear.
04
A small amount of lightly stained
laundry.
Press and hold the two buttons
( Water level & Program)simultaneously
for 1.5 second to activate and deactivate
the safety lock.
Press this button to choose right
water level according to the load
of clothing,so as to avoid wasting
water. At Normal mode, the machine
can set the right water level
automatically.
Press this button to begin a
wash program, or to pause /
resume a program that is
currently in progress
- 7 -
Intelligent
. Speedy

PROCESS CODE
Operation
Install the water inlet hose
and turn on the tap.
When the preset operation finishes,
the machine will power off automatically.
Plug-in power. Press POWER ON/OFF
to turn on the machine
Press PROGRAM to select
the desired program.
Press WATER LEVEL to set
the water level.
Press START/PAUSE to start.
The drain pipe should be
put down or hung up
below 0.9m.
- 8 -
Safety warning
Warning Forbidden
Make sure the voltage in your living area
corresponding to the one shown on the rating
label of the appliance. And the wall socket is
properly grounded.
The power cord must be unplugged when the
unit is idle or you are moving it or cleaning it,
or there is a power failure.
Grounded
If the supply cord is damaged, it must be replaced by the manufacturer or its service agent or a
qualified technician in order to avoid a shock hazard.
Indice


