Legamaster e-SCREEN ETX Manuale utente

TABLE OF CONTENTS
LANGUAGES
1. Precautions....................................................................................................................... 2
2. Environmental Protection .................................................................................................. 2
3. Turning the screen on or off.............................................................................................. 2
4. The first time installation................................................................................................... 2
5. Identification of Controls .................................................................................................. 3
6. Remote Control ................................................................................................................ 4
7. Precautions Before Connecting ......................................................................................... 5
8. Operating the Float menu................................................................................................. 7
9. Home Menu Overview ...................................................................................................... 7
10. Device Settings ............................................................................................................... 8
11. Network Settings ............................................................................................................ 8
12. Wired Network Setting .................................................................................................. 9
13. Wireless Network Setting ............................................................................................. 10
14. Wireless Network Setting ............................................................................................. 11
GB ENGLISH 1
DE GERMAN DEUTSCH 12
FR FRENCH FRANÇAIS 22
NL DUTCH NEDERLANDS 32
1
e-Screen ETX – QUICK START GUIDE – ENGLISH

2
e-SCREEN ETX – QUICK START GUIDE
e-Screen ETX – QUICK START GUIDE – ENGLISH
15
14 16
8
AUDIO
TOUCH
OUT 2
29 10
11
12
13
78
PC O UT
VG A OUT AUD IO
OU T
US B USB H D M I
Y
W
R
Y
W
R
VGA OUT A UDI O
OUT
US B USB H D M I
AV OU T
VIDEO AUDIO
Y
W
R
PC O UT
1
2
3
4
5
6
7
AC I N
AUDIO
TOUCH
OUT 2
2
3
4
5
6
7
3
1
3.0
2.0
1. PRECAUTIONS
2. ENVIRONMENTAL PROTECTION
3. TURNING THE SCREEN ON OR OFF
4. THE FIRST TIME INSTALLATION
Caution: high risk, in order to prevent user from electric shock, please be careful when you insert the plug into the
socket.
Incorrect method of operation may result in electric shock or fire.
1. Before use, you must read and understand all instructions.
2. Keep manual for future needs.
3. Comply with all instructions during operation.
4. Do not use accessories the manufacturer does not recommend. Inappropriate nearby devices may cause accidents.
5. Do not exert pressure or tie the cord. Damaged power cord can cause electric shock or fire.
6. Do not attempt to repair the product, due to the high voltage inside the machine, devices and other components
may easily be damaged. When the product has a malfunction, the user must contact the supplier.
7. Please use accessories specified by the manufacturer or equivalent in terms of performance as the original parts
whenever replacing product parts. Improper accessories may cause a fire and risk of electric shock.
8. If the product needs to be wall mounted, please follow the manufacturer‘s recommended installation method.
9. Before cleaning the product, turn off and unplug it. Use a soft, slightly damp cloth to clean the product. Do not use
liquid cleaners or cleaning spray cleaners.
10. Please turn off and unplug whenever the product is not in use.
11. Please ensure air flow around the product, it can not be covered or blocked.
12. Please ensure to clean the covers on the infrared boards to avoid touch screen failure.
13. Do not place the product in direct sunlight or near heat sources such as radiators, heating equipment and other heat
sources.
Waste electrical products should not be disposed of with household waste. Please recycle
where facilities exist. Check with your local authority or retailer for recycling advice.
Connect to power source and turn on the screen, the installation menu page below will be displayed on the screen.
Select desired menu
language, then press
START and go to
next page.
Select location and go
to next page.
1. Plug the power cord into an AC Power outlet. Press Power Switch on the screen.
2. Now the screen is in standby mode. Wait briefly until the power indicator lights up, then press POWER to
turn on the screen. (Be sure to wait for a few seconds before pressing POWER button. If you press the POWER
button too soon, the screen may not respond or may not work properly.)
3. Press button again to turn off the screen and put the screen in standby mode.
To completely disconnect the power, press Power Switch on the screen.
Note: If the screen does not receive a displaying signal for a certain time, the screen will go into
standby mode.
3
e-Screen ETX – QUICK START GUIDE – ENGLISH
15
14 16
8
AUDIO
TOUCH
OUT 2
29 10
11
12
13
78
PC O UT
VG A OUT AUD IO
OU T
US B USB H D M I
Y
W
R
Y
W
R
VGA OUT A UDI O
OUT
US B USB H D M I
AV OU T
VIDEO AUDIO
Y
W
R
PC O UT
1
2
3
4
5
6
7
AC I N
AUDIO
TOUCH
OUT 2
2
3
4
5
6
7
3
1
3.0
2.0
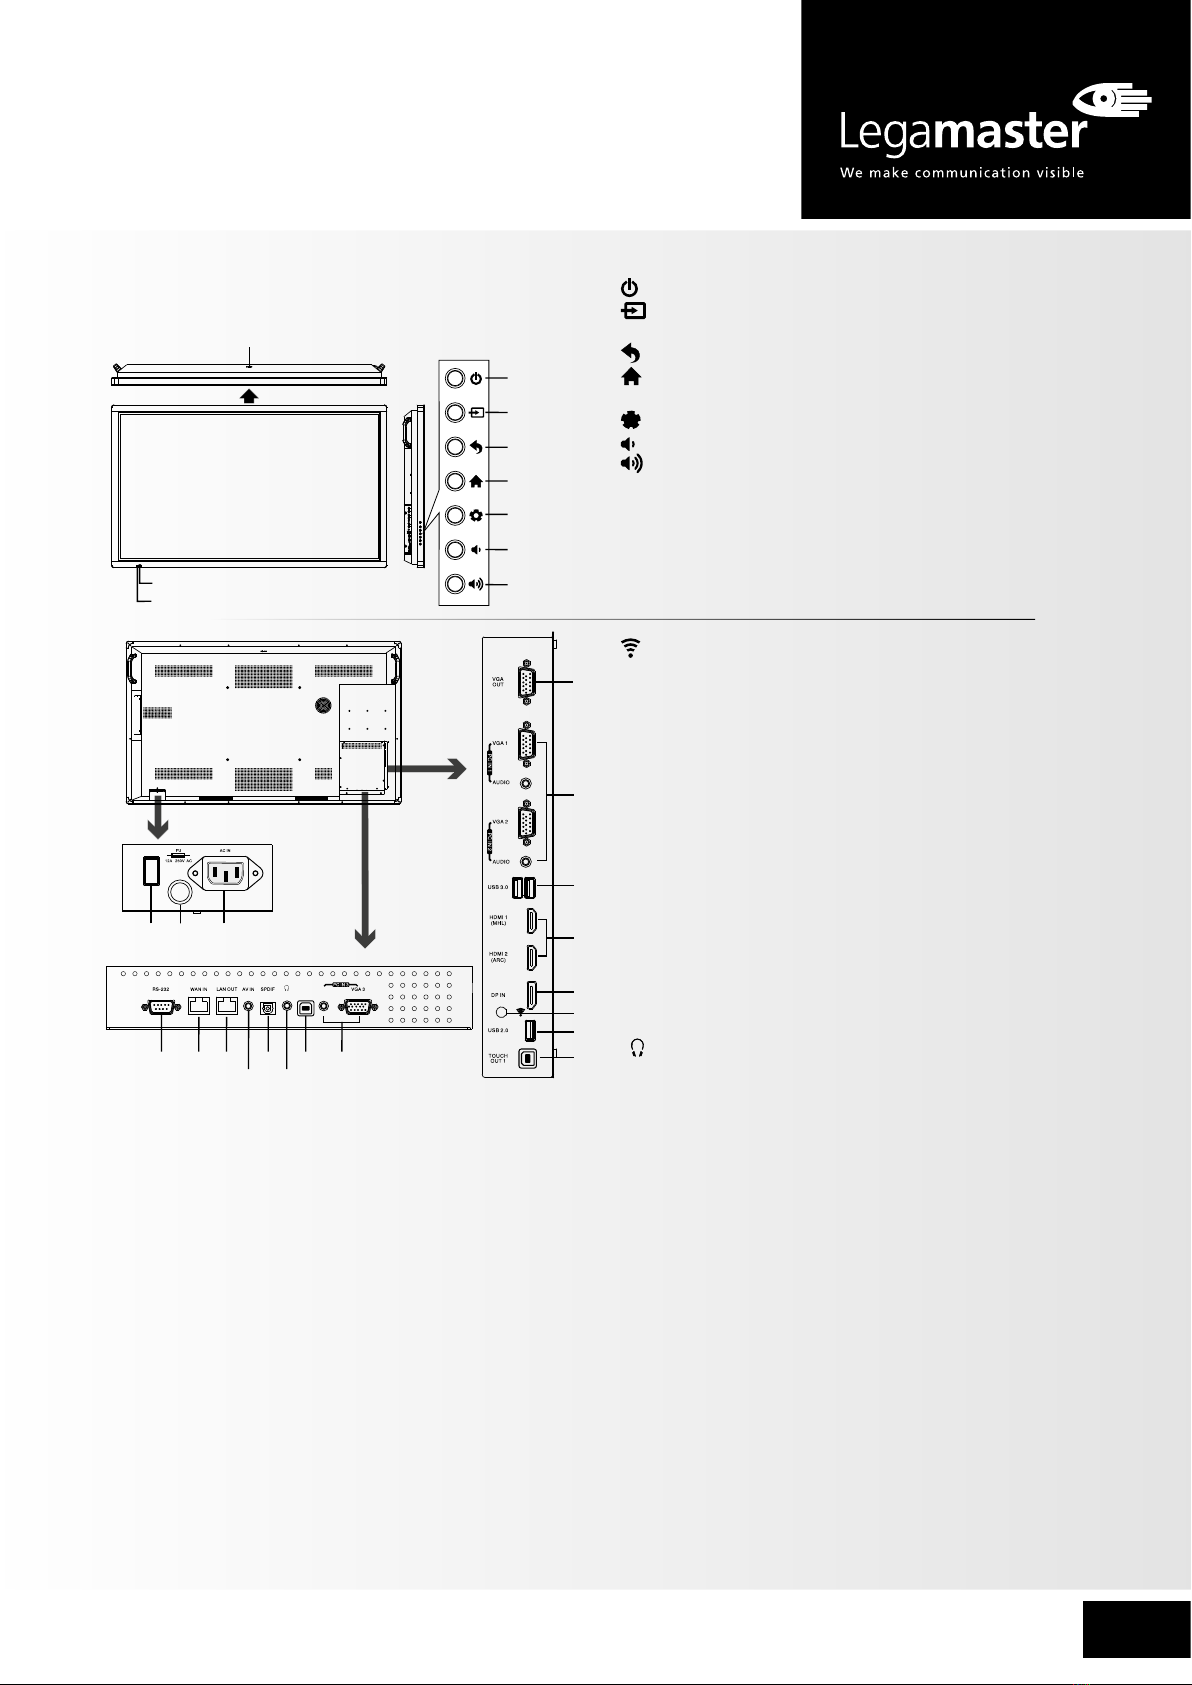
5. IDENTIFICATION OF CONTROLS
1. : Switches the screen power on or standby.
2. : Press the button to display input source menu or exit
the menu screen.
3. : Press the button to return to previous menu.
4. : Press the button to display desktop (Home page) on
the screen.
5. : Press the button to open the setting menu.
6. : Press the button to turn down the volume.
7. : Press the button to turn up the volume.
8.USB(2.0)(for camera): This port is connected to the
integrated PC, but switches to Android if current
source is AV, USB or in Home page.
Notes: 1. Please open the dust cover before using.
2. It can perfectly support up to the 720p of camera.
1. VGA OUT
The currently selected PC IN 1/2/3 signal output.
2. PC IN1/2/3
Enable connection to PC or other external devices with
VGA/AUDIO ports.
3. USB2.0/3.0
Connect USB devices to these ports.
4. HDMI1/2 Input
To connect with such equipments via HDMI or DVI
interface.
HDMI1(MHL): Connect an MHL - enabled device such as a
cell phone to this jack to view the external device’s screen
on your screen.
HDMI2(ARC): Connect an ARC-enabled home theater
receiver to this jack.
5. DP(DisplayPort) Input
Connect an external device to DP out jack.
Remote Sensor
Power Indicator
6. : WiFi antenna.
7. TOUCH1/2 OUT
Touch output for external devices connected to PCx or
HDMIx port which support touch system.
Note: TOUCH OUT 2 takes precedence over TOUCH OUT 1
in default. You can define it under Lock menu.
8. RS232
For service, software upgrades and other uses.
9. WAN IN
The built-in router input port. Connect to the external
network.
10. LAN OUT
The built-in router output port. For connection to another
computer or other Internet enabled devices.
11. AV IN
Connect an AV device to this jack.
12. S/PDIF digital audio output
Connect a digital sound system to this jack.
13.
Connect headphones to this jack. The screen shows the
current audio output.
14. Power Switch
Push to ( I ) to connect the power, push to (O) to
disconnect.
Note: Do not cover the Power switch, it should be
kept free from obstructions so that it can be operated easily
and conveniently.
15. Fuse (12A 250V)
16. AC IN
Plug the AC cord into this jack and into a power outlet.
(~100-240V 50Hz/60Hz)

4e-Screen ETX – QUICK START GUIDE – ENGLISH
e-SCREEN ETX – QUICK START GUIDE
15
14 16
8
AUDIO
TOUCH
OUT 2
29 10
11
12
13
78
PC O UT
VG A OUT AUD IO
OU T
US B USB H D M I
Y
W
R
Y
W
R
VGA OUT A UDI O
OUT
US B USB H D M I
AV OU T
VIDEO AUDIO
Y
W
R
PC O UT
1
2
3
4
5
6
7
AC I N
AUDIO
TOUCH
OUT 2
2
3
4
5
6
7
3
1
3.0
2.0
Switches the screen power on or Standby
Switches to VGA mode
Switches to HDMI mode
Displays or exits the current program information
Selects sound mode
Returns to the previous channel
Returns to previous menu
or exit the on-screen menu
To confirm or enter a sub-menu or toggle between
options during MENU operation. Use Arrow buttons to
navigate in onscreen menu.
Displays integrated PC on the screen
Note: If there is no integrated PC, this button has no
function.
Mutes the sound
VOLUME UP/DOWN
Freezes the content displayed on the screen
Coloured buttons(RED/GREEN/YELLOW/BLUE)
Red: Screen off /on.
Blue: Call or exit recent application list.
Control buttons for USB/DVD Multi Media Player
: Play/Pause button
: STOP button
: Fast forward/fast reverse
: Previous/next
Takes a screenshot and stores the
data onto your connected USB
storage device.
If there is no USB storage, the
screenshot will be stored on the built-
in storage.
Notes:
• This operation manual provides a description based on operating functions using the remote control.
• In different mode, some buttons may have different function.
Switches to AV mode
Switches to analog mode
Note: If no analogue mode available, this button has no function.
Selects picture mode
Selects aspect ratio
0-9 number buttons
Displays or exits input source menu
Displays or exits the setting menu screen
Displays desktop (Home page)on the screen
Sets up the sleep timer
Goes to USB multi media player
Goes to DVD multi media player
Press to enter or exit the disc tray
Note: If there is no DVD, this button has no
function.
CHANNEL UP/DOWN
6. REMOTE CONTROL

5
e-Screen ETX – QUICK START GUIDE – ENGLISH
15
14 16
8
AUDIO
TOUCH
OUT 2
29 10
11
12
13
78
PC O UT
VG A OUT AUD IO
OU T
US B USB H D M I
Y
W
R
Y
W
R
VGA OUT A UDI O
OUT
US B USB H D M I
AV OU T
VIDEO AUDIO
Y
W
R
PC O UT
1
2
3
4
5
6
7
AC I N
AUDIO
TOUCH
OUT 2
2
3
4
5
6
7
3
1
3.0
2.0
7. PRECAUTIONS BEFORE CONNECTING
• When connecting an external device to the screen, make sure that the screen and the device are turned off.
• Check the plugs at the ends of cables to make sure that they are the correct type before you try plugging them into jacks on
the screen.
• Make sure that all plugs are securely inserted into the jacks. Loose connections can result in image or colour problems.
• The illustration of the external device may be different depending on your model.
• Please refer also to the operating manual of the external device.
Notes:
• This product should be operated only from
the type of power source indicated on the
marking label.
• Always unplug the AC cord from power
outlet when not using for a long period of
time.
1. Connect the female plug to the AC socket on the unit.
2. Connect the male plug to the wall outlet as illustrated.
Serial port cable
Network cable
Network cable
Audio cable
VGA cable
S/PDIF cable
Headphone cable
AV adapter
Network connection
Computer, etc.
Internet devices
AV devices
Digital sound system
Audio input devices
Computer, etc.
Computer
PC, etc.
VGA devices
Camcorder
Set top box
DVD/VCD
Satellite signal receiver
Notes: Before using headphones, adjust the device volume so as to
avoid excessive levels, as hearing damage may result.
Connect TOUCH OUT with USB cable to
PC USB port.
Connect PC with VGA cable or HDMI
cable. Please choose the proper method
of connection based on your device.
Notes:
After installation of the driver, it can
control the external computer by native
touch control. (Only for PC, HDMI signal)
TOUCH OUT 2 takes precedence
over TOUCH OUT 1 in default. You can
define it in Lock menu.
USB cable

6e-Screen ETX – QUICK START GUIDE – ENGLISH
e-SCREEN ETX – QUICK START GUIDE
15
14 16
8
AUDIO
TOUCH
OUT 2
29 10
11
12
13
78
PC O UT
VG A OUT AUD IO
OU T
US B USB H D M I
Y
W
R
Y
W
R
VGA OUT A UDI O
OUT
US B USB H D M I
AV OU T
VIDEO AUDIO
Y
W
R
PC O UT
1
2
3
4
5
6
7
AC I N
AUDIO
TOUCH
OUT 2
2
3
4
5
6
7
3
1
3.0
2.0
VGA cable
VGA cable
VGA cable
Audio cable
Audio cable
USB cable
USB cable
USB cable
USB cable
HDMI cable
HDMI cable
DP cable
PC, etc.
VGA devices
USB devices
USB devices
Monitor
HDMI devices
DP devices
Computer
Notes: 1. The screen is designed with multiple USB ports (3.0, 2.0), when connecting with
USB device, please select the appropriate port.
2. The VGA output signals what is currently selected from PC1/2/3.
Connect TOUCH OUT with USB cable to PC USB port.
Connect PC with VGA cable or HDMI cable. Please choose the proper
method of connection based on your device.
Note: After installation of the driver, it can control the external
computer by native touch control. (Only for PC, HDMI signal)
TOUCH OUT 2 takes precedence over TOUCH OUT 1 in default.
You can define it to in Lock menu
Tighten the WiFi antenna in clockwise direction. The WiFi
antenna is able to access WiFi network.
When network cable is plugged in WAN port, the antenna
will generate WiFi network.

7
e-Screen ETX – QUICK START GUIDE – ENGLISH
Call the annotation
Back to previous
Call the Home page (Android Interface)
Call the Volume bar
Shortcuts you created on Home page
Long press on the screen will
call the wallpapers and widgets
menu.
Show all applications
Go to your web Browser
Switch to the display menu screen
Switch to different input source, i.e.
HDMI, VGA, etc.
For all applications, press
and drag the icon on the
Home page to create the
shortcut, press and drag
the shortcut on Xto
delete it.
Turn off the screen
Call the application history
Call the input source menu
ES File Explorer
Call the device Settings menu
Go to your USB Drive
Note: Design and specifications are subject to change without notice.
Note: When using the app Camera, store the data
onto your connected USB device. If USB device is not
connected , store the data onto the built-in storage.
1. Slide up from bottom of the screen center by two or more fingers
to call .
Press and drag to any place of the screen.
2. Press 2 seconds to be activated in VGA/HDMI/DP/PC mode.
3. When displaying at USB interface, touch once at the lower part of
the screen, the display control menu will appear.
8. OPERATING THE FLOAT MENU
9. HOME MENU OVERVIEW

8e-Screen ETX – QUICK START GUIDE – ENGLISH
e-SCREEN ETX – QUICK START GUIDE
Show all apps
Network Setting
Internal routing setting
Display information of the unit
Display system Storage
Daydream setting
To set default input method
To set Android keyboard(AOSP) To set Security and Restrictions
Allow installation of apps from sources
other than the Play Store
Ethernet setting
Set the built-in WiFi
IP settings Proxy settings
To set on-screen language
To set Date and time
Note: To manually set date and time, you should toggle “Automatic Date & time” to OFF.
Automatic search for Bluetooth devices
Input the default UserName:
admin, skip the default password
setting as there is no default
password and then press login
button.
Reset internal router by hardware.
Password is required for this
operation and is the same password
to access Lock menu. (the default
password is 0000)
10. DEVICE SETTINGS
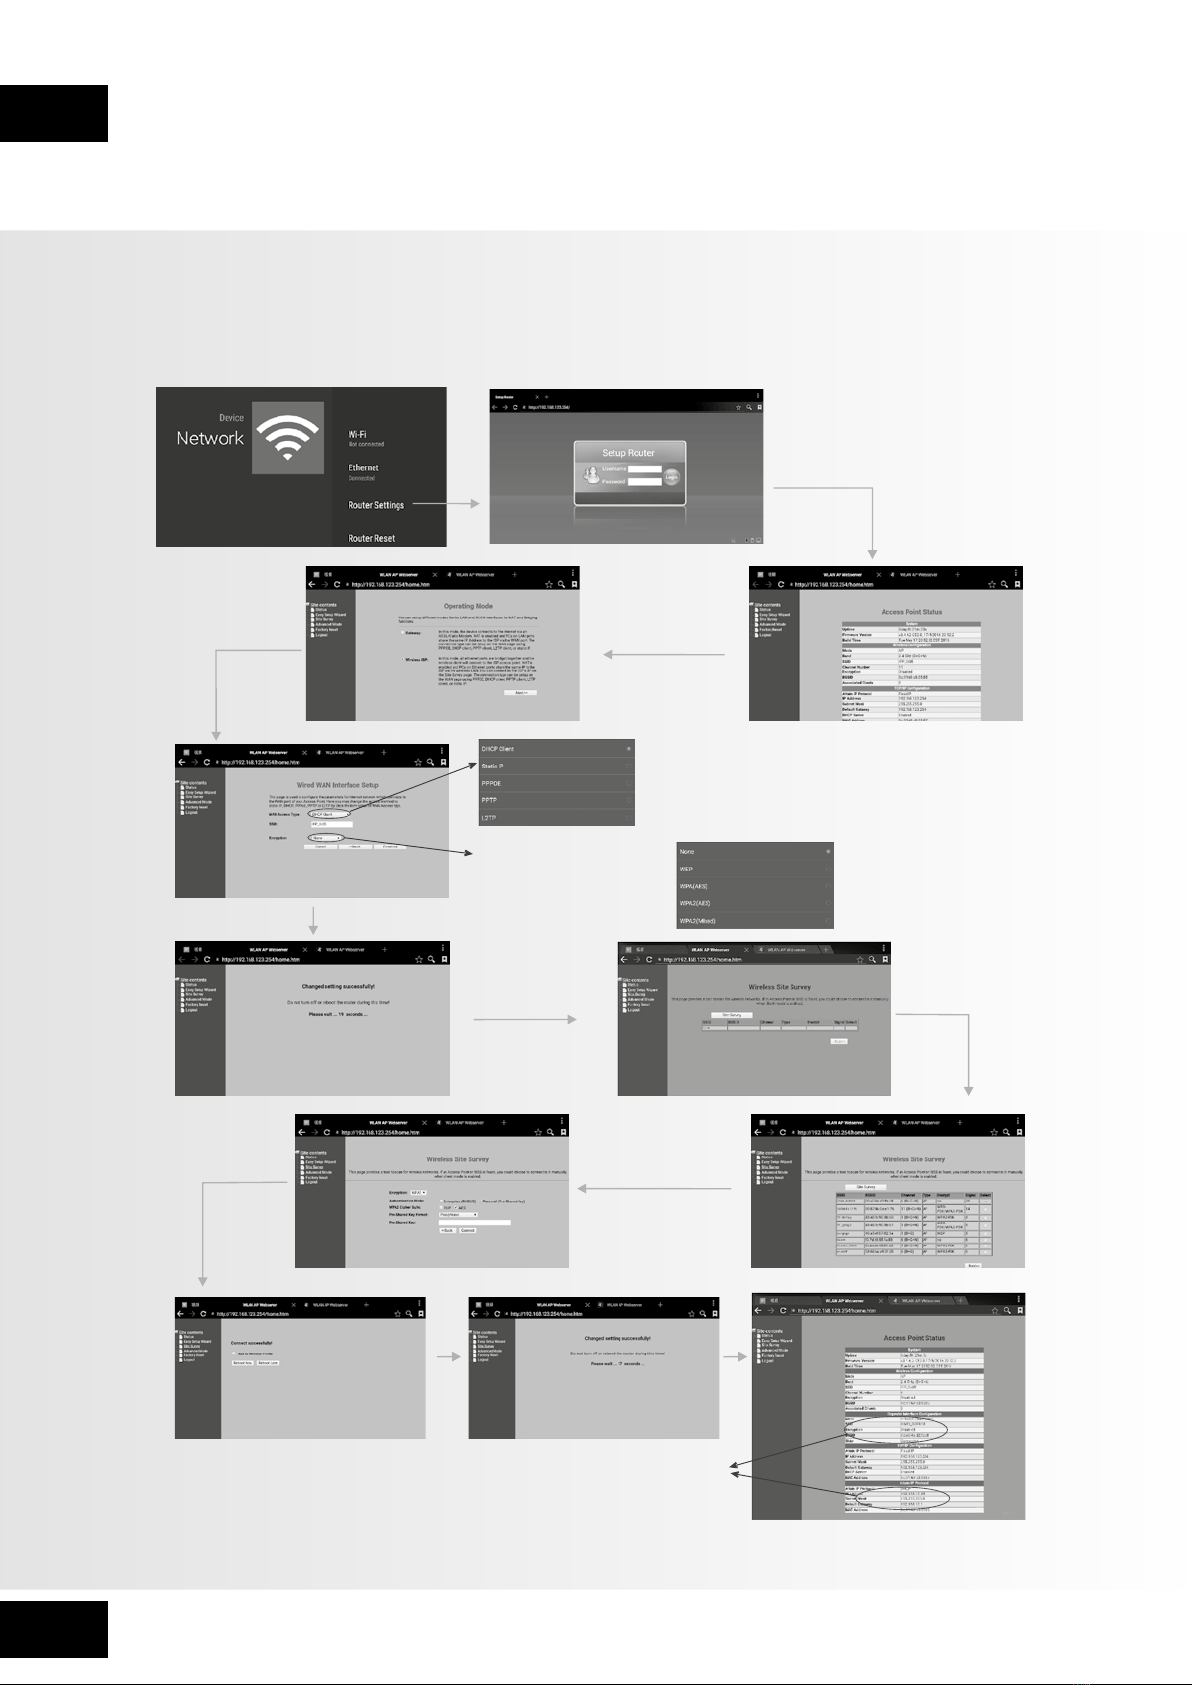
11. NETWORK SETTINGS
Change the UserName and Password:
Select MANAGEMENT and then
PASSWORD.

9
e-Screen ETX – QUICK START GUIDE – ENGLISH
12. WIRED NETWORK SETTING (Internal router)
There are two ways to set up wired network: Easy Setup Wizard, Advanced mode.
Input the default UserName: admin,
skip the default password setting as
there is no default password and then
press login button.
Select
Easy Setup
Wizard
Password Setting Format
WiFi Password of Internal
Router in the screen
(Password should be set at
least 8 characters.)
There are five methods to connect with
network, choose your preferred option.
Recommended to select the DHCP
Client connection. Automatically obtain
IP information from your ISP.
DHCP Client: Automatically obtain IP
information from your ISP. If your ISP
doesn’t provide a designated IP for you,
then choose DHCP Client.
Static IP: If all Internet IP information is
provided by your ISP, then choose Static
I P.
PPPOE: Ethernet Point to Protocol.
Your ISP will provide you with Login
ID and password. Usually this option is
applicable to DSL service.
PPTP: Point to Point Tunneling Protocol.
Your ISP will provide you with Login ID
and password.
L2TP: Layer 2 Tunneling Protocol.
Your ISP will provide you with Login
ID and password. Usually this option is
applicable to DSL service.
Get IP address
Setting successfully
Finished
Next
Select Gateway
10
e-SCREEN ETX – QUICK START GUIDE
e-Screen ETX – QUICK START GUIDE – ENGLISH
13. WIRELESS NETWORK SETTING (Internal router)
There are two ways to set up wireless network: Easy Setup Wizard, Advanced mode.
Input the default UserName: admin,
skip the default password setting as
there is no default password and then
press login button.
Select
Easy Setup
Wizard
Password Setting
Format
WiFi Password of Internal
Router in the screen.
(Password should be set
at least 8 characters.)
Confirm
Site Survey
Select
Site Survey
Select your desired
WiFi signal
Next
There are five methods to connect with network,
choose your preferred one.
Recommended to select the DHCP Client connection.
Automatically obtain IP information from your ISP.
Get IP address
Setting successfully
Finished
Input Password
Connect
Next
Select
Wireless ISP
Indice
Lingue:
Altri manuali Legamaster Lavagna interattiva

Manuali Lavagna interattiva popolari di altre marche


Dukane
Dukane ITP84 Manuale utente

Bretford
Bretford EDUIMS Guida alla configurazione

Panasonic
Panasonic Panaboard UB-5315 Manuale utente

Plus
Plus M-11S Manuale utente

TRIUMPH BOARD
TRIUMPH BOARD ULTRA SLIM Manuale utente

Returnstar Interactive Tech
Returnstar Interactive Tech IQBoard DVT V7.0 Manuale utente