LENCO Sportcam-500 Manuale utente

Sportcam-500 Wifi Camera User Manual
www.lenco.com

1
Thank you for purchasing our Wi-Fi Camera. Please read this User’s
Manual carefully in order to obtain the best performance of the product
and extend its service life.
Key Features
WIFI, Photos, Video Recording,1080P HD Videos ( 30fps )
1000mah External Power Supply
Micro USB port + Micro SD card slot +HDMI Port
PC Camera
888 Digital Screen /1.8inch Removable Screen
4X Digital Zoom
Infrared Remote Control
120º Wide-angle lens
Appearance
Appearance &
&Buttons
Buttons

2
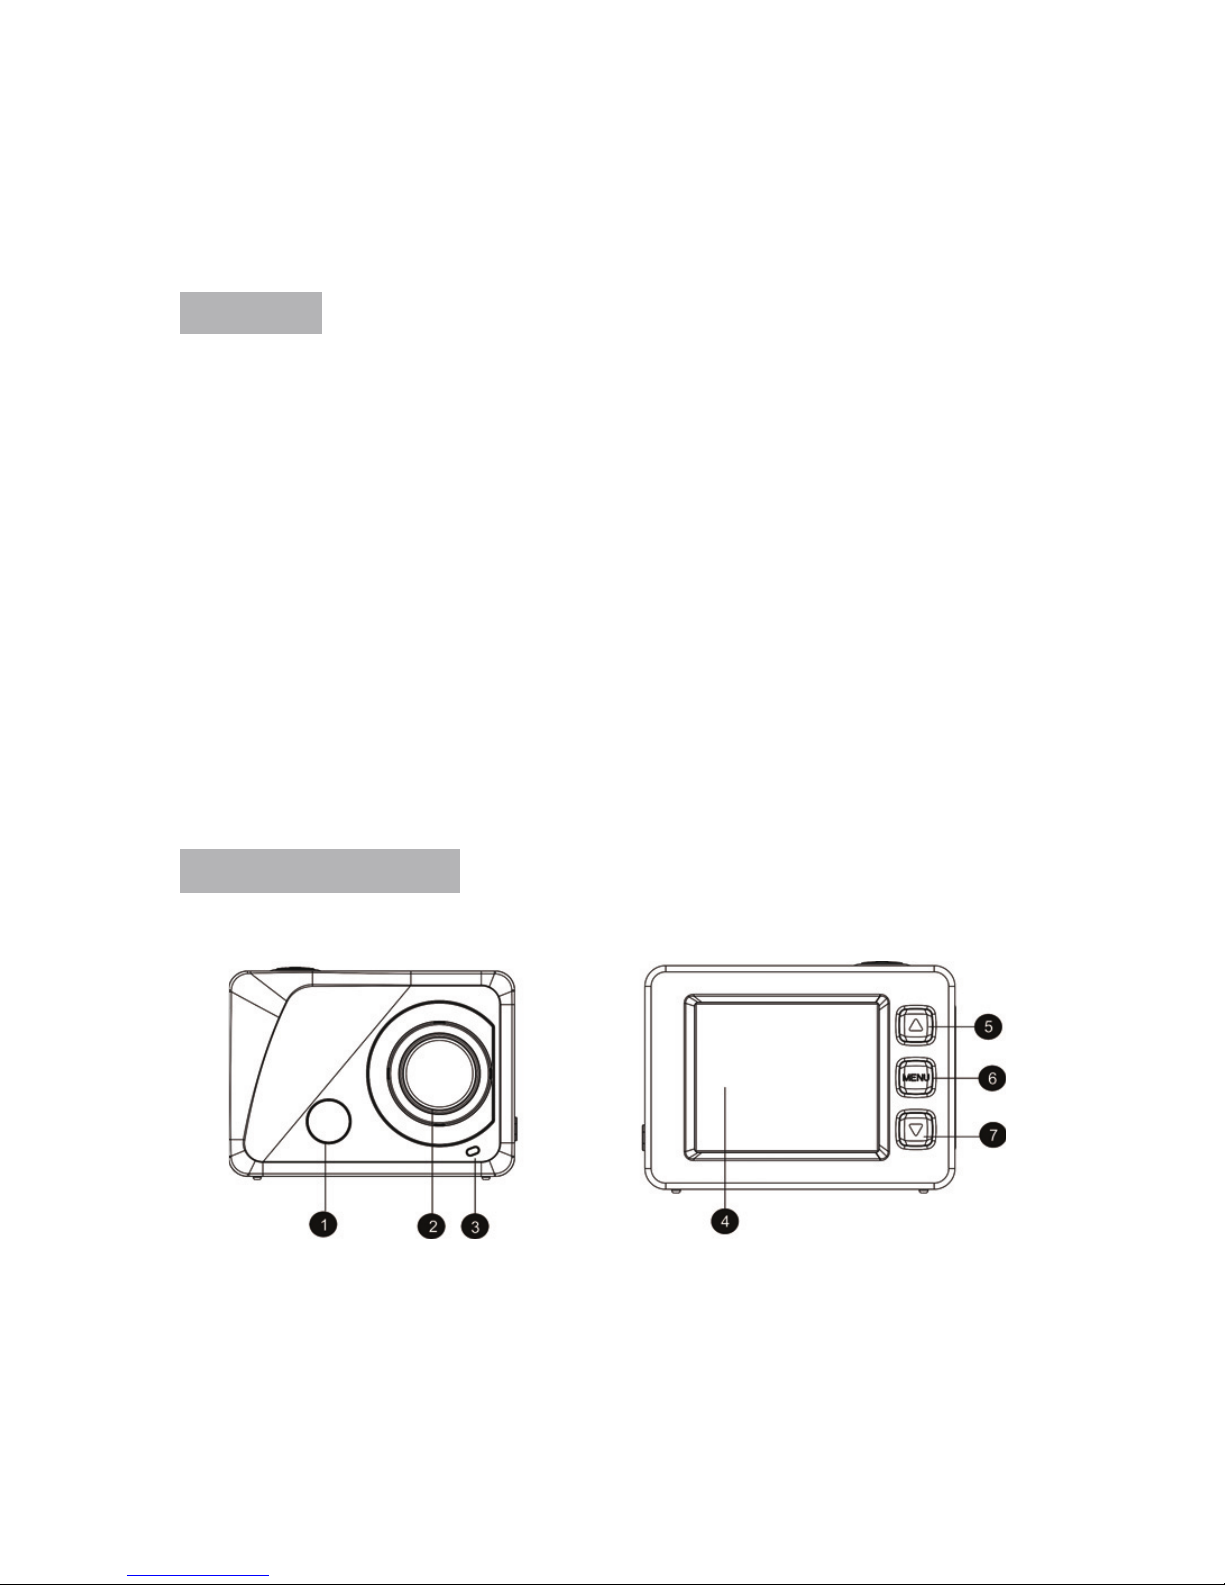
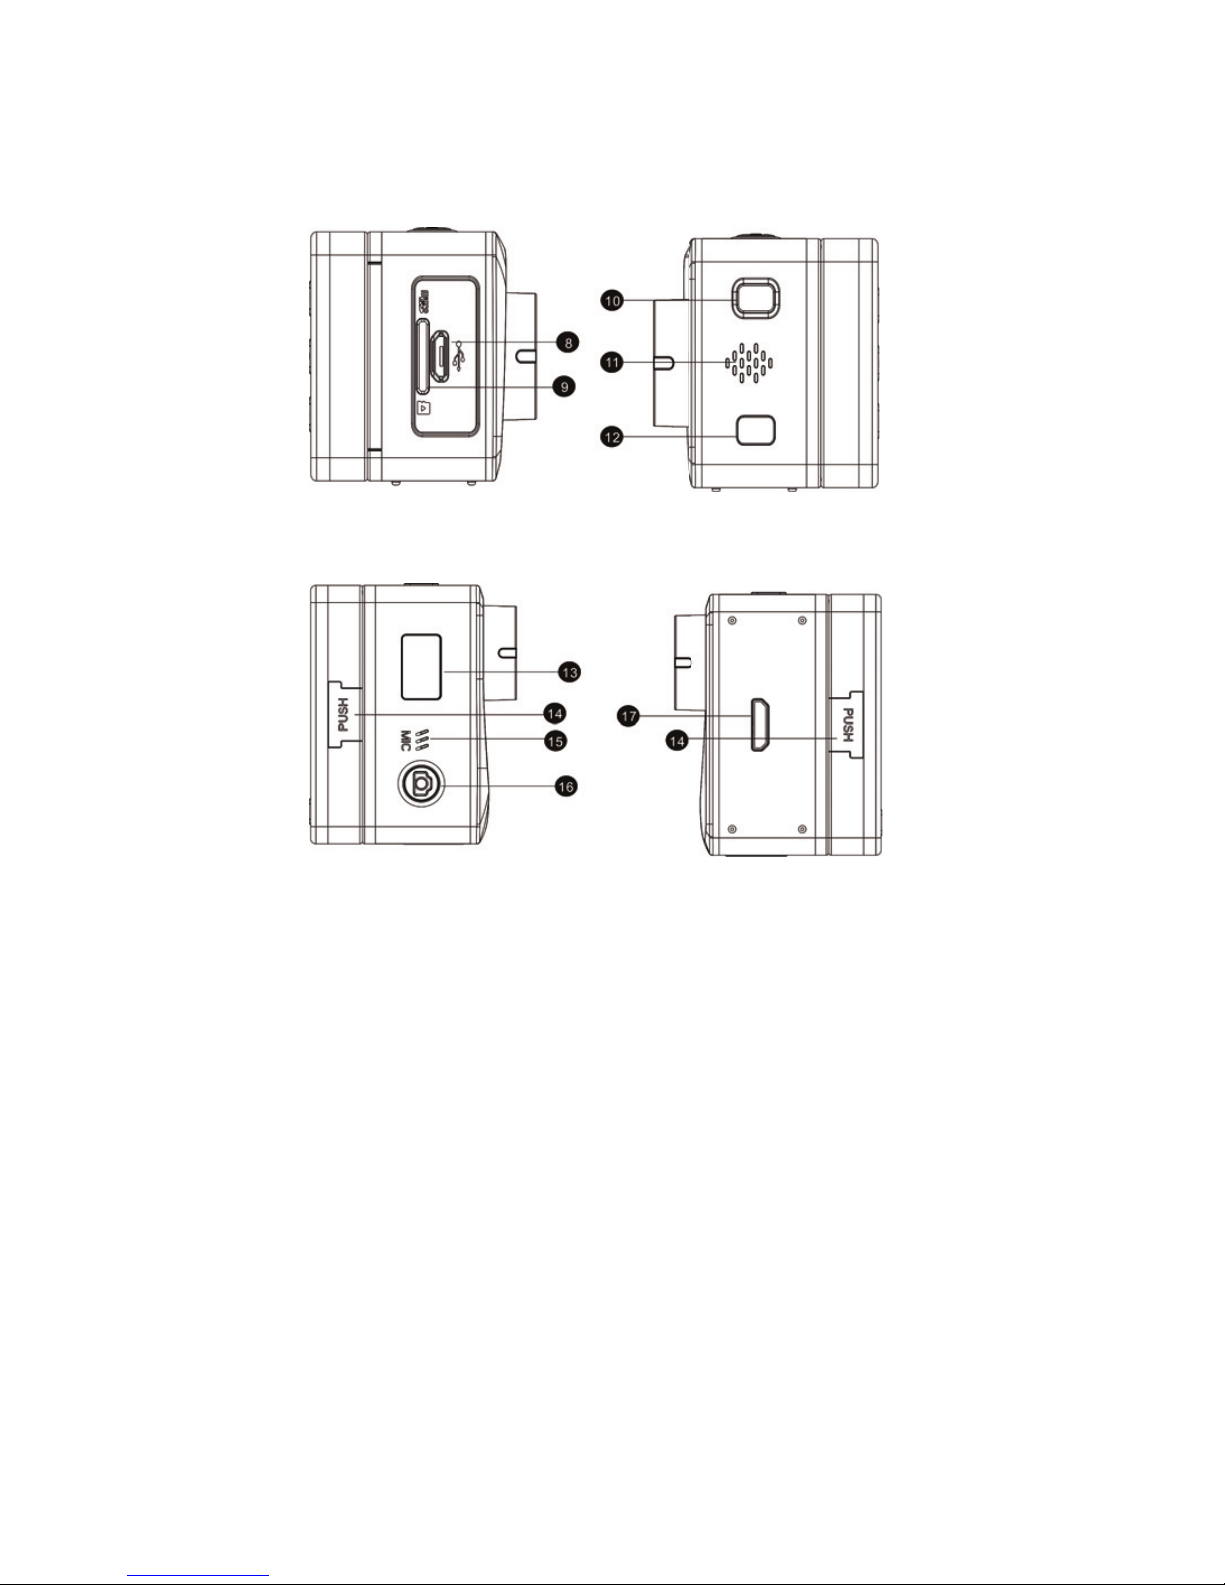
1. Infrared remote control lamp 10. Power / Mode button
2. Lens 11. Speaker
3. Indicator light 12. WIFI key
4. 1.8’’ LCD display 13. 888 Digital Screen
5. Up key 14. Double Push key
6. Menu key 15. Microphone
7. Down key 16. Shutter/OK button
8. Micro USB port 17. HDMI port
9. Micro SD card slot

3
Introduction of Local LCD Status
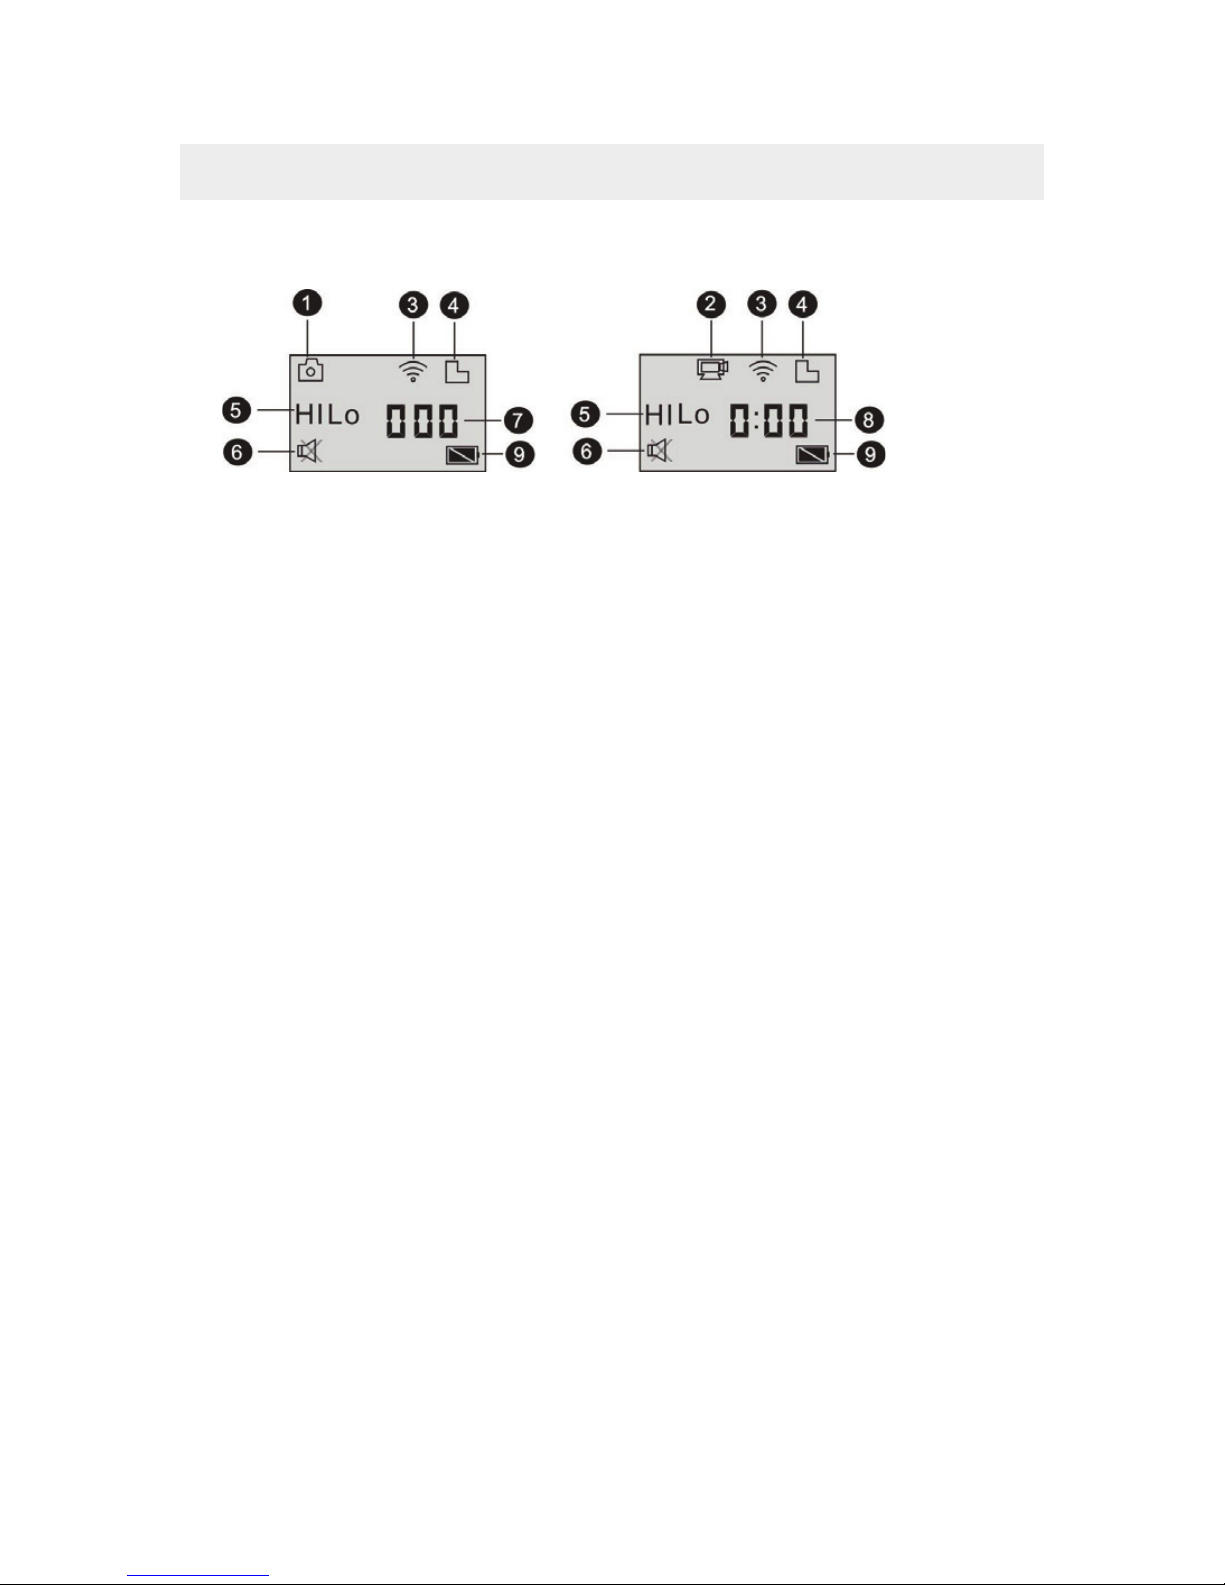
When the Camera starts up, LCD will show the following information:
1. Photo Mode
2. Video Mode (by default)
3. Wi-Fi Icon (it appears upon the start-up)
4. TF Card Icon (it appears upon loading)
5. Resolution Icon:
Under the photo mode, HI means 10 Million Pixels (3648x2736); under the video mode, it means
Full HD videos (1920x1080,30fps);
Under the photo mode, LO means 0.3 Million Pixels (640x480); under the video mode, it means
720P videos (1280x720, 30fps);
Under the photo mode, HILO means 3 Million Pixels (2048x1536)/ 5 Million Pixels (2592x1944)
/ 8 Million Pixels (3264x2448);under the video mode can HILO appear, indicating 720P videos
(1280x720, 60fps).
6. Silent Mode: When the Camera is under the Silent Mode, it will appear; the Silent Mode is not
enabled by default;
7. Photo Counter: When the number of photos exceeds 999, it will only reveal 999;
8. Video Timer: It will merely show hours and minutes;
9. Power Icon: It will indicate the current power status.
Note:
1. Above icons will change according to your Camera’s status. Operating Mode Diagram
2. Photo mode, the default 5 M and 8 M. If need to change pixel, please enter the menu
Settings to select it. When the mode scroll one cycle, the set of pixels will be restored to default
pixels.

4
When the Camera starts up, press the Power/Mode Key to enter the following modes in turn:
Under the Video Mode, press the Shutter Button to start recording, and the Indicator Light will turn
green and flicker; press the Shutter Button again to stop recording; (under the Video Mode, press the
Shutter Button for a while to Turn On/Off the Silent Mode);
Under the Photo Mode, press the Shutter Button to start taking photos. press the Shutter Button for a
while to Turn On/Off the Silent Mode);
Usage of the Wi-Fi Camera
I. Before you start to use the Camera for the first time, please:
1. Firstly insert one micro SD card or micro SDHC card as follow;
Class 4 or above SDHC card is recommended; under the professional video recording mode, Class
10 Card is recommended. Please shut down the Camera before your insert or pull out any card.
Note: The first if camera can’t power on,please reinstalling battery, Check whether the battery
is well connected or if the wrong battery.
Video Preview Mode (1080P by default) Video Mode (720P,30fps) Video Mode (720P,60fps)
Photo Mode (5 Million Pixels)
Photo Mode (8 Million Pixels)
Playback Mode
Preview
Mode
(1080P
by
d
efault
)
Video
Mode
(720P,30fps)
V
ideo
M
ode (720P,6
0fps)

5
2. Assemble the Battery
Please firstly press the “PUSH Key” of the external screen on the two sides at the same time, and
then take down the external screen.
Step 1: Remove the battery cover to the unlocking position, and then take down it;
Step 2: Please insert the battery into the case towards the indicated direction;
Step 3: Assemble the battery cover in its original position to fasten the battery.
3. Charge the Battery
The rechargeable lithium battery is removable. When the Camera is powered off, it can be charged
through connecting it with the computer via the USB cable; during the charging process, the
Indicator Light will turn red, and it will be off when the Camera is fully charged. The charging
process may last for 2 to 4 hours.
II. Video Mode:
1. Start-up: press the Power key for 3s and then release it; LCD (Black & White Screen)will
show “ON”. The Buzzer will sound for once.
2. Video Recording
Before you conduct video recording, please verify whether the Camera is under the Video Mode; if
the icon does not show itself on the screen, please keep pressing the icon till it appears on
the screen.
Start: Press and release the Shutter Button, and the icon will appear on the screen; the Icon
REC and the green indicator light will flicker, meaning that video recording begins;
Stop: Press and release the Shutter Button, and the icon will appear on the screen; the indicator
light will be off, and video recording stops.
Note: Above icons will change according to your Camera’s status.
The maximum size for a video is about 4GB.
III. Video Mode and Photo Mode of the External Screen
1. Under the Video Mode, press the Shutter Button to start recording, and the LED Light will turn
green and flicker; press the Shutter Button again to stop recording;
Under the Photo Mode, press the Shutter Button to start taking photos.
2. Advanced Operation
Video Mode and Photo Mode
Press the Shutter Button to start recording, and press it again to stop;
Press the Shutter Button to take a photo;
When an external screen has been connected, press the Up Key and Down Key to conduct digital
zoom under the Video Mode and the Photo Mode.

6
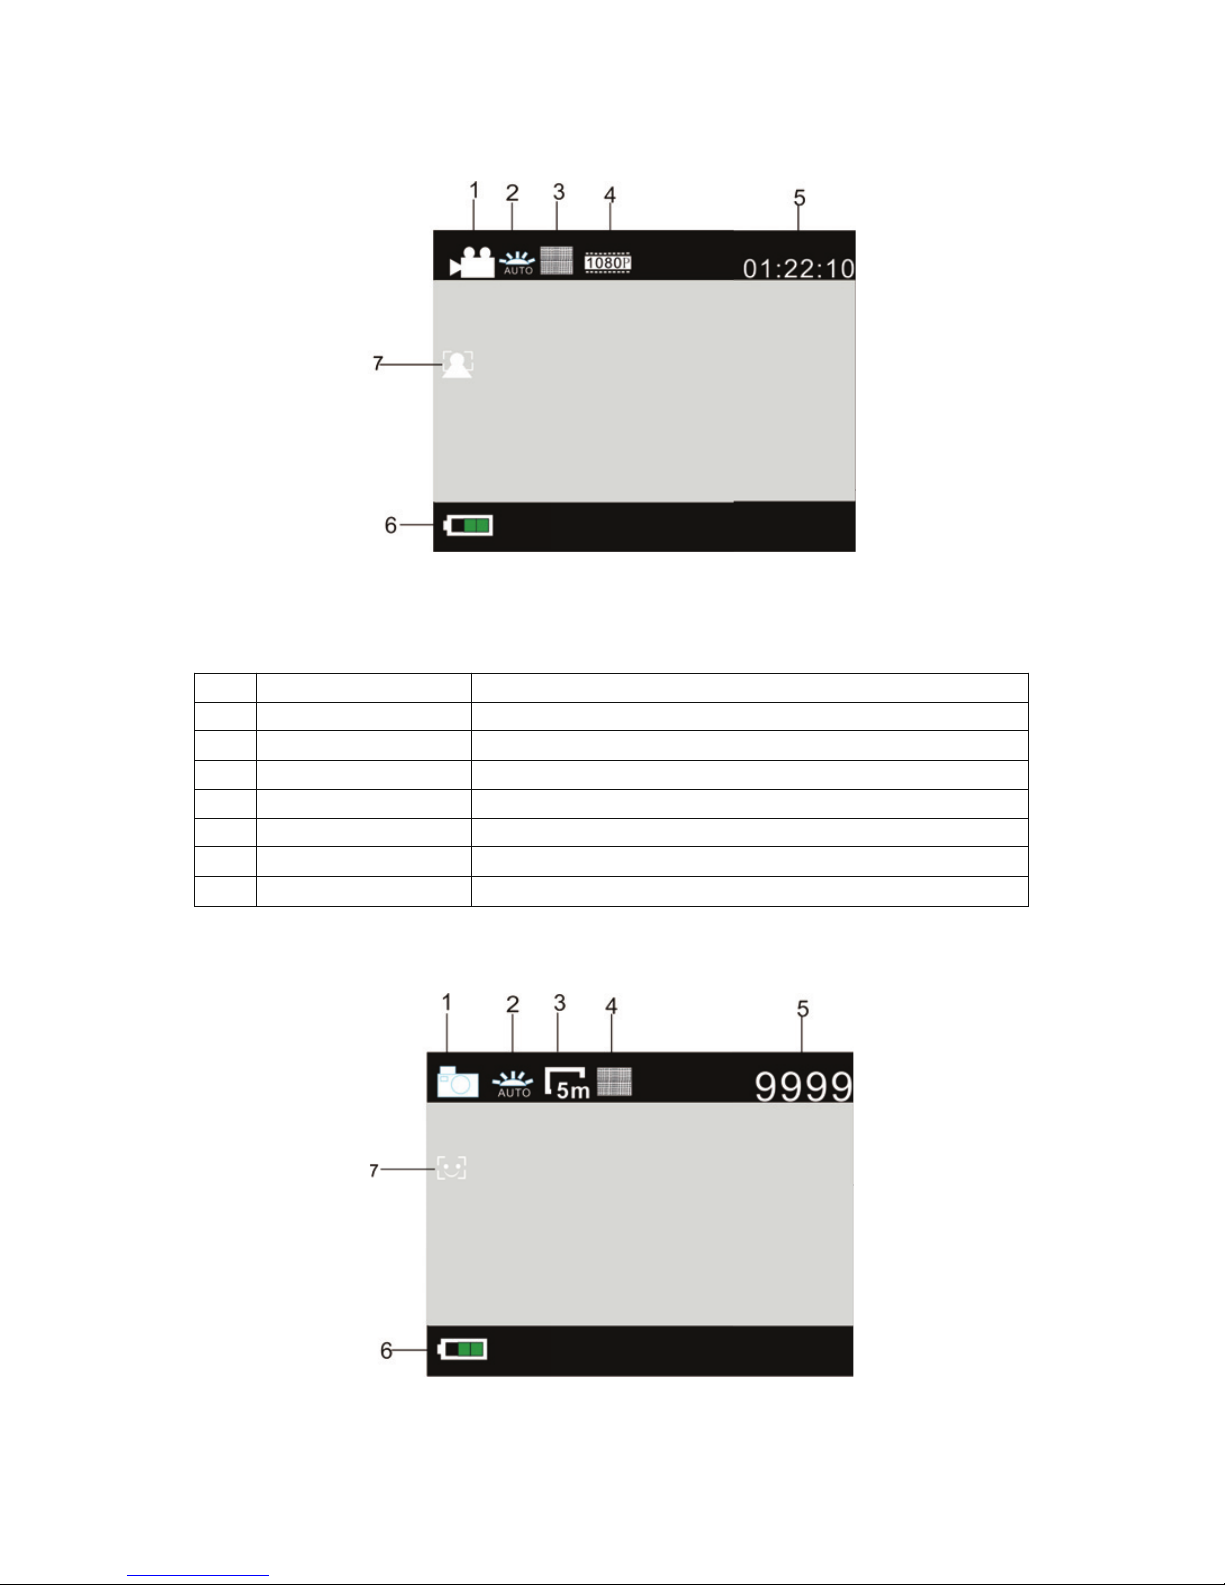
3. Video Recording Display Screen
No. Name of the Icon Remark
1 Video Mode The Camera is under the Video Mode.
2 White Balance The Camera is currently under the Auto White Balance Mode.
3 Quality The current video is of the best quality.
4 1080P It means the current Resolution.
5 Time for Recording It means the time left for video recording.
6 Power Status It shows the current power status.
7 Face detection According to the current open face detection
4. Photo Display Screen

7
No. Name of the Icon Remark
1 Photo Mode The Camera is under the Photo Mode.
2 White Balance The Camera is currently under the Auto White Balance
Mode.
3 Picture Size It means the current Resolution.
4 Quality The current video is of the best quality.
5 Limit of Photos It means the limit of photos which can be successfully taken.
6 Power Status It shows the current power status.
7 Smile Detect According to the current open smile detection
IV. Menu Mode Settings when An External Screen is Connected
1. Menu Settings
Under the Photo Mode, Video Mode or Playback Mode, press the Menu Key to open the Menu; then
press the Up Key or the Down Key to select the Menu; press the Shutter Button to enter the
Submenu; the chosen option will be highlighted with the background color; press the Up Key or the
Down Key again to select the secondary Submenu, and press the Shutter Button for Confirmation;
press the Menu Key to quit.
Video Mode Photo Mode
1.1 In video mode menu, setting Seamless menu can be used for driving record function
This seamless function can be started and sto
pp
ed manuall
y
b
y
selectin
g
Seamless in camera mode,
select the desired file len
g
th and
p
ush record button.
When connect camera with char
g
er the camera will
p
ower on automaticall
y
and start recordin
g
(
Please make sure Micro SD card is inserted
)
, accordin
g
to settin
g
time it will save a video se
g
ment,
then start to record the next video se
g
ment.
When the stora
g
e card is full, the earliest se
g
ment of video will be deleted to release the
corres
p
ondin
g
s
p
ace for continuous/loo
p
recordin
g
.
Note: Seamless time can choose 1 minute, 3 minutes, 5 minutes.

8
2. System Menu Settings
Press the Menu Key to open the Menu; press the Power Key to enter Main Menu Settings. Then,
please press the Up Key or the Down Key to select the Menu, and press the Shutter Button to enter
the Submenu; press the Up Key or the Down Key again to select the secondary Submenu, and press
the Shutter Button for Confirmation; to leave the system menu, press the Menu Key.
System Mode
3. Playback Mode Settings
Press the Power Key to switch to the Playback Mode; you can view Photos/video, and play the
recorded videos.
View Photos: Press the Up Key or the Down Key to select a photo/video;
View Videos: Press the Up Key or the Down Key to select a photo/video; press the Shutter Button to
play the recorded file, and press it again to stop playing.
4. Menus Settings under the Playback Mode
Press the Menu Key to open the Playback Main Menu; press the Up Key or the Down Key to select
the Menu; press the Shutter Button to enter the Submenu, and then press the Up Key or the Down
Key again to select the secondary Sub-menu; finally, press the Shutter Button for Confirmation;
Playback Mode

9
V. Connection with the HDTV
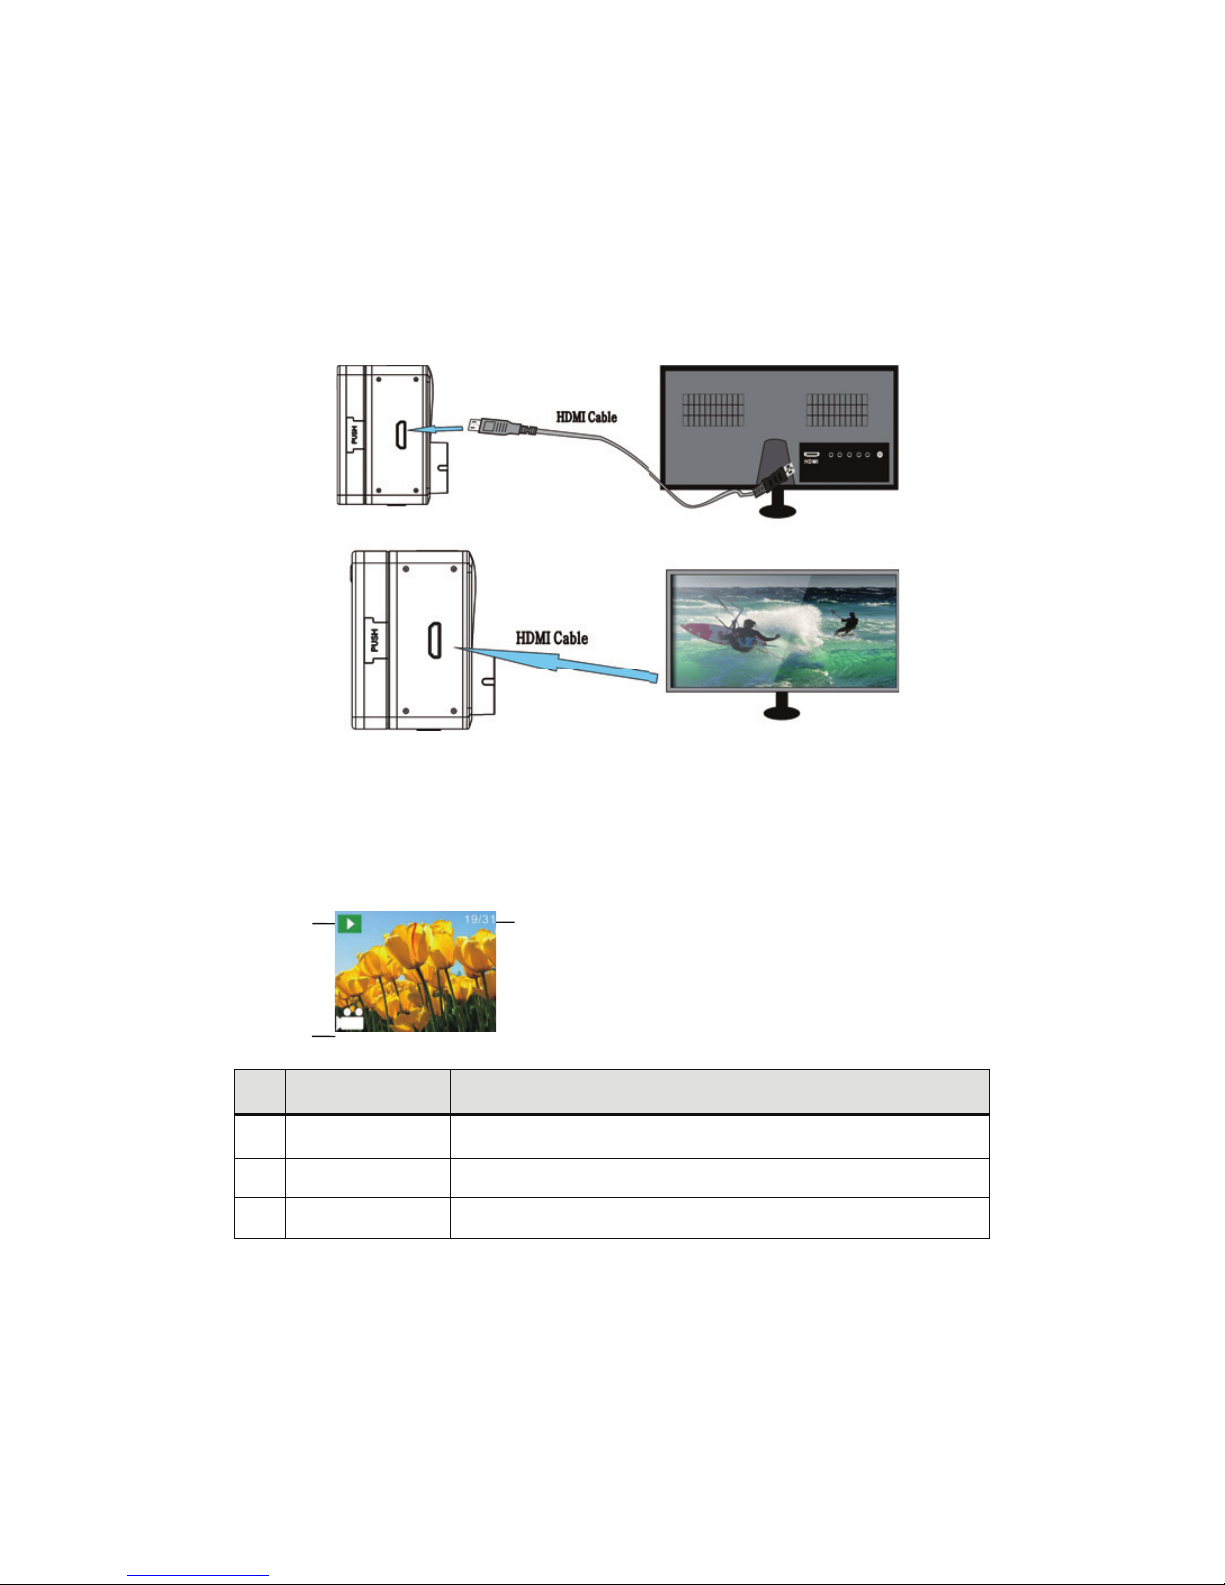
1. Connect the Camera with the HDTV through a HDMI cable (optional)
If you need transfer photos and voices from the Camera to the HDTV, please insert the universal
terminal of the HDMI cable into the HDMI port of the Camera, and the other terminal (output
terminal) into the HD input port of the HDTV as follow:
Note: Please firstly stop recording videos before you insert/pull out the HDMI cable.
2. When the Camera is connected with the HDTV, it will enter the Playback Mode, and the Display
Screen will play videos as follow:
3. Under the Playback Mode, please press the Up Key and the Down Ket to select a photo or video;
then press the Shutter Button to play the photo or video; press it again to stop.
4. Under the Playback Mode, press the Menu Key to lock a picture and delete the picture. Press the
Up Key and the Down Key to choose between Delete and Format; press the Shutter Button for
confirmation, and then enter the Submenu; press the Up Key and the Down Key to choose YES or
NO; press the Shutter Button for confirmation to quit.
No. Name of the
Icon Remark
1Pla
y
back Mode The Camera is under the Pla
y
back Mode.
2 Number of Files You are watchin
g
the 19th video file out of the total 31 files.
3 Video Icon It means that the current file is a recorded video file.
12
3
Altri manuali per Sportcam-500
1
Indice
Lingue:
Altri manuali LENCO Fotocamera d'azione