LF Style Selections 261347 Manuale utente

ITEM #1694068
ATTACH YOUR RECEIPT HERE
Serial Number Purchase Date
MODEL #261347
1
UTILITY SINK, STORAGE
CABINET, FAUCET
Style SelectionsTM is a registered
trademark of LF, LLC. All Rights Reserved.
AR19010
Questions, problems, missing parts? Before returning to your retailer, call our customer
service department at 1-877-888-8225, 8 a.m. - 8 p.m., EST, Monday - Sunday.

2
TABLE OF CONTENTS
Package Contents ..................................................................................................................................2
Package Contents ................................................................................................................................3
Hardware Contents ................................................................................................................................3
Safety Information ..................................................................................................................................4
Warning ..................................................................................................................................................4
Preparation .............................................................................................................................................4
Tools Required (Not included) ................................................................................................................4
Installation Instrucions .....................................................................................................................5-8
Care and Maintenance ........................................................................................................................9
Warranty ...............................................................................................................................................10
Replacement Parts List ........................................................................................................................11
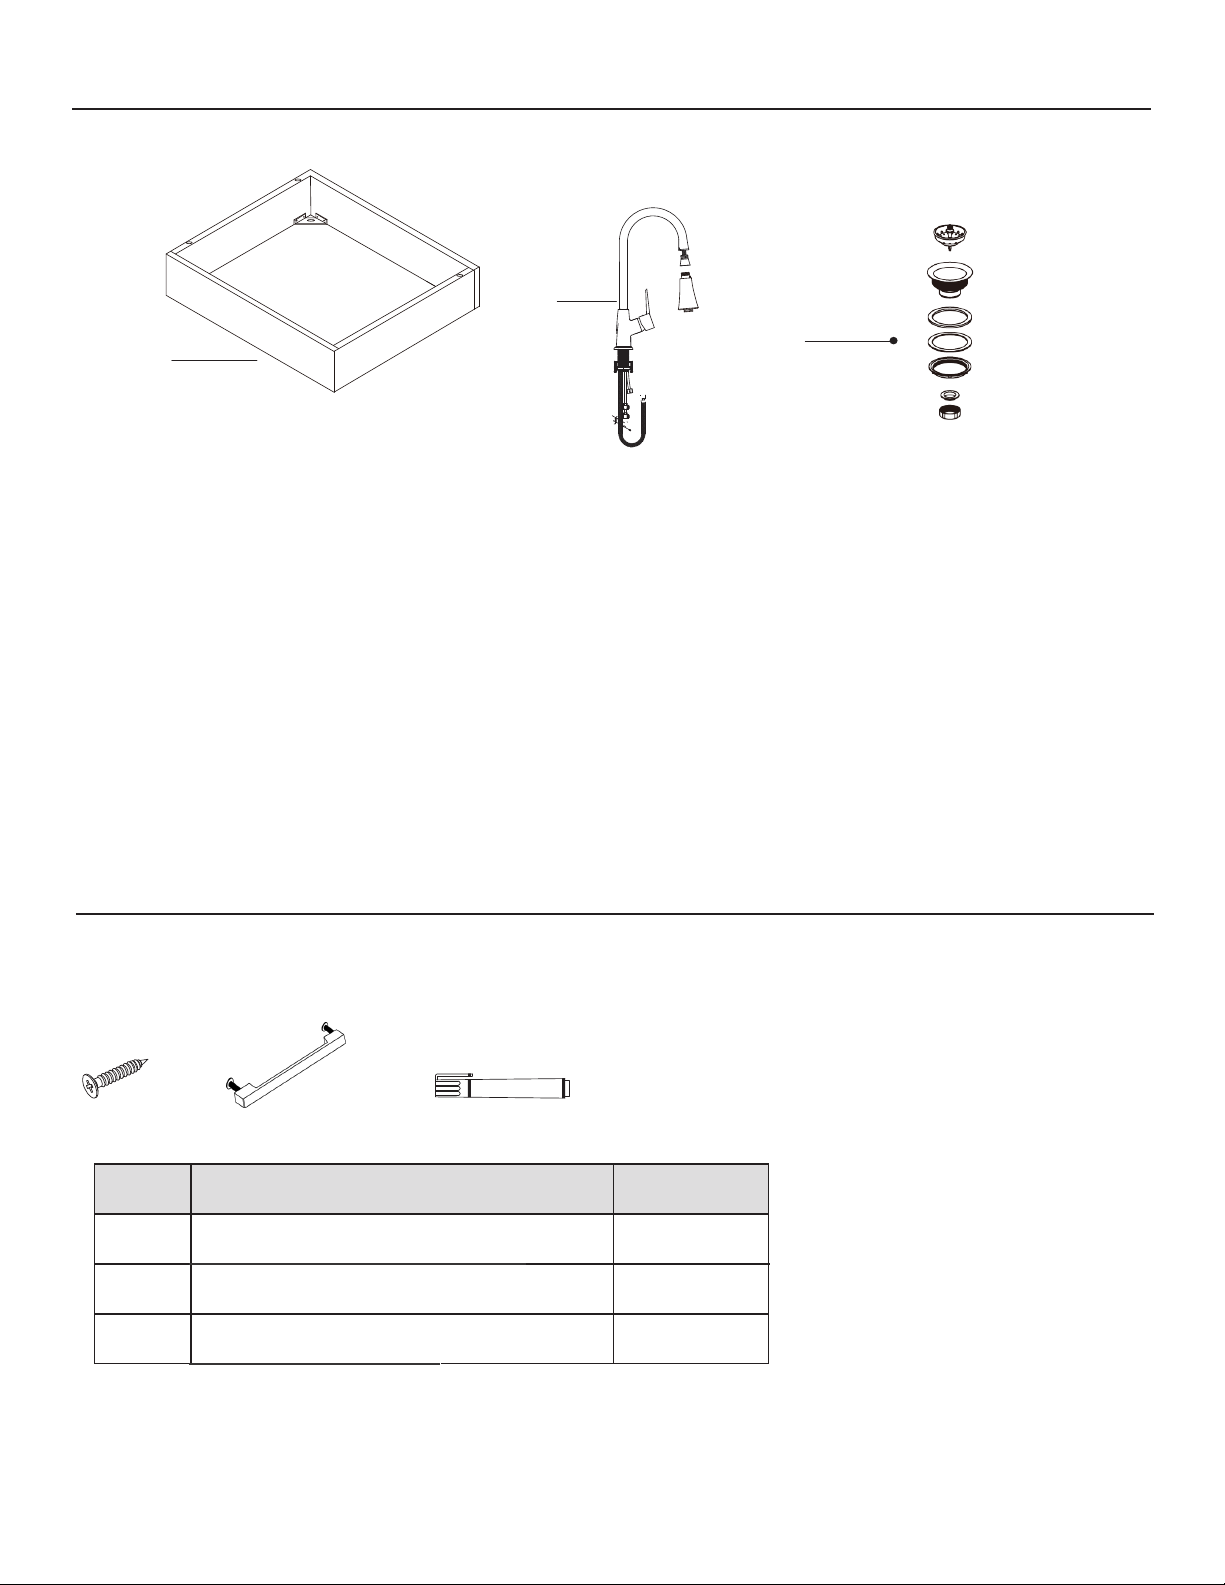
PACKAGE CONTENTS
Carefully check all components for damages and/or missing parts prior to installation. If there are any
damages or if you are missing parts, do not proceed with the installation. Report damages and/or
missing parts immediately to the manufacturer. Do not dispose of packaging before you are satisfied
with your new utility sink.
A
B
3
PACKAGE CONTENTS
C
D
II
Note: Hardware not shown to size.
HARDWARE CONTENTS
BB
AA CC
Part Description Quantity
AA Cabinet Base Screw 2
BB Door Pull 2
CC Touch-up Pen 1
4
SAFETY INFORMATION
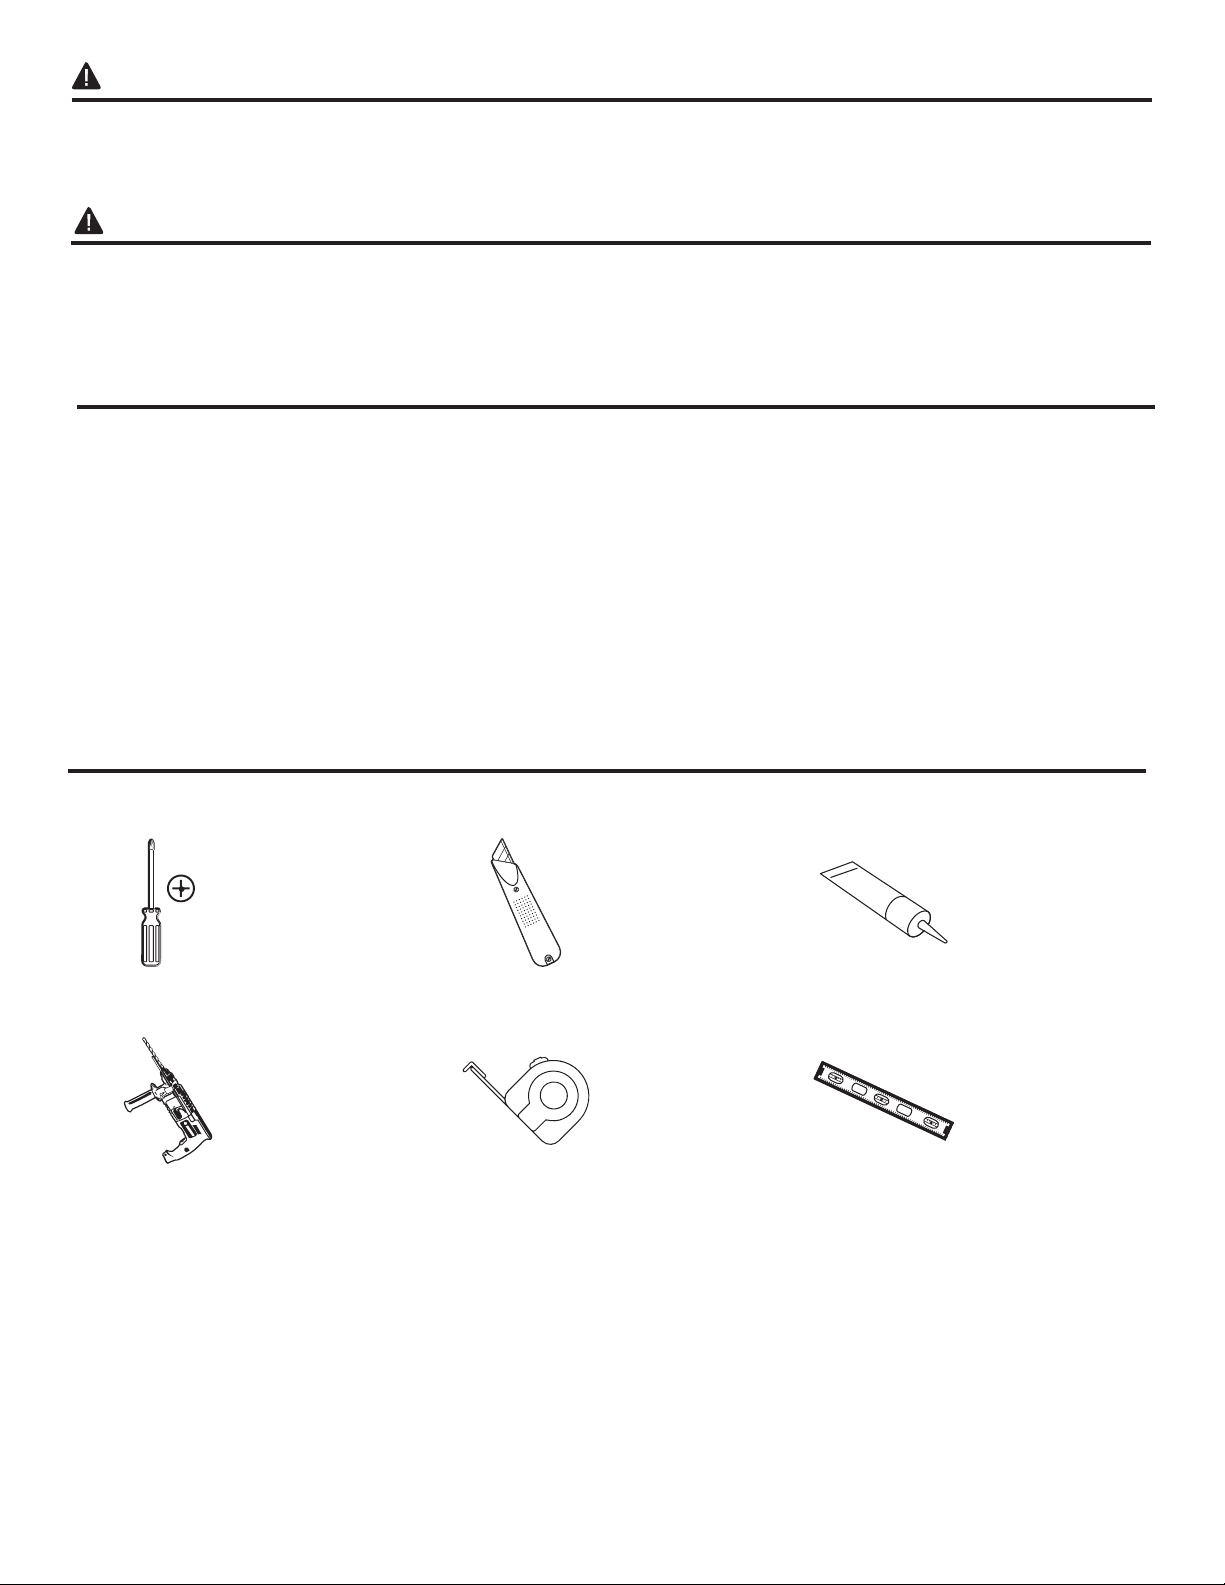
TOOLS REQUIRED (NOT INCLUDED)
• Keep small parts away from children.
• Installing the item will require more than one person.
WARNING
Before beginning assembly of product, make sure all parts are present. Compare parts with package
contents list and hardware contents list. If any part is missing or damaged, do not attempt to assemble
the product.
Estimated Installation Time: 60 minutes
Tools and materials recommended for installation (not included): saw, hammer, variable speed drill,
tape measure, level, adjustable wrench, stud finder, lag bolts, screwdrivers (Phillips and flathead),
socket and ratchet (for lag bolts), toggle bolts (optional), clear silicone caulk/sealant (do not use
plumber’s putty).
PREPARATION
Please read and understand this entire manual before attempting to assemble, operate or install the
product.
Phillips
Screwdriver Utility Knife Adhesive
Power Drill
With Drill Bit Measuring Tape Level
5
INSTALLATION INSTRUCTIONS
A thorough inspection must be made before
installation and any damages or missing parts must
be promptly reported. Do not proceed with the
installation. Do not dispose of packaging before you
are satisfied with your new sink.
1a. Unpack the unit and place the sink (B) on a
blanket or cardboard to protect the surface.
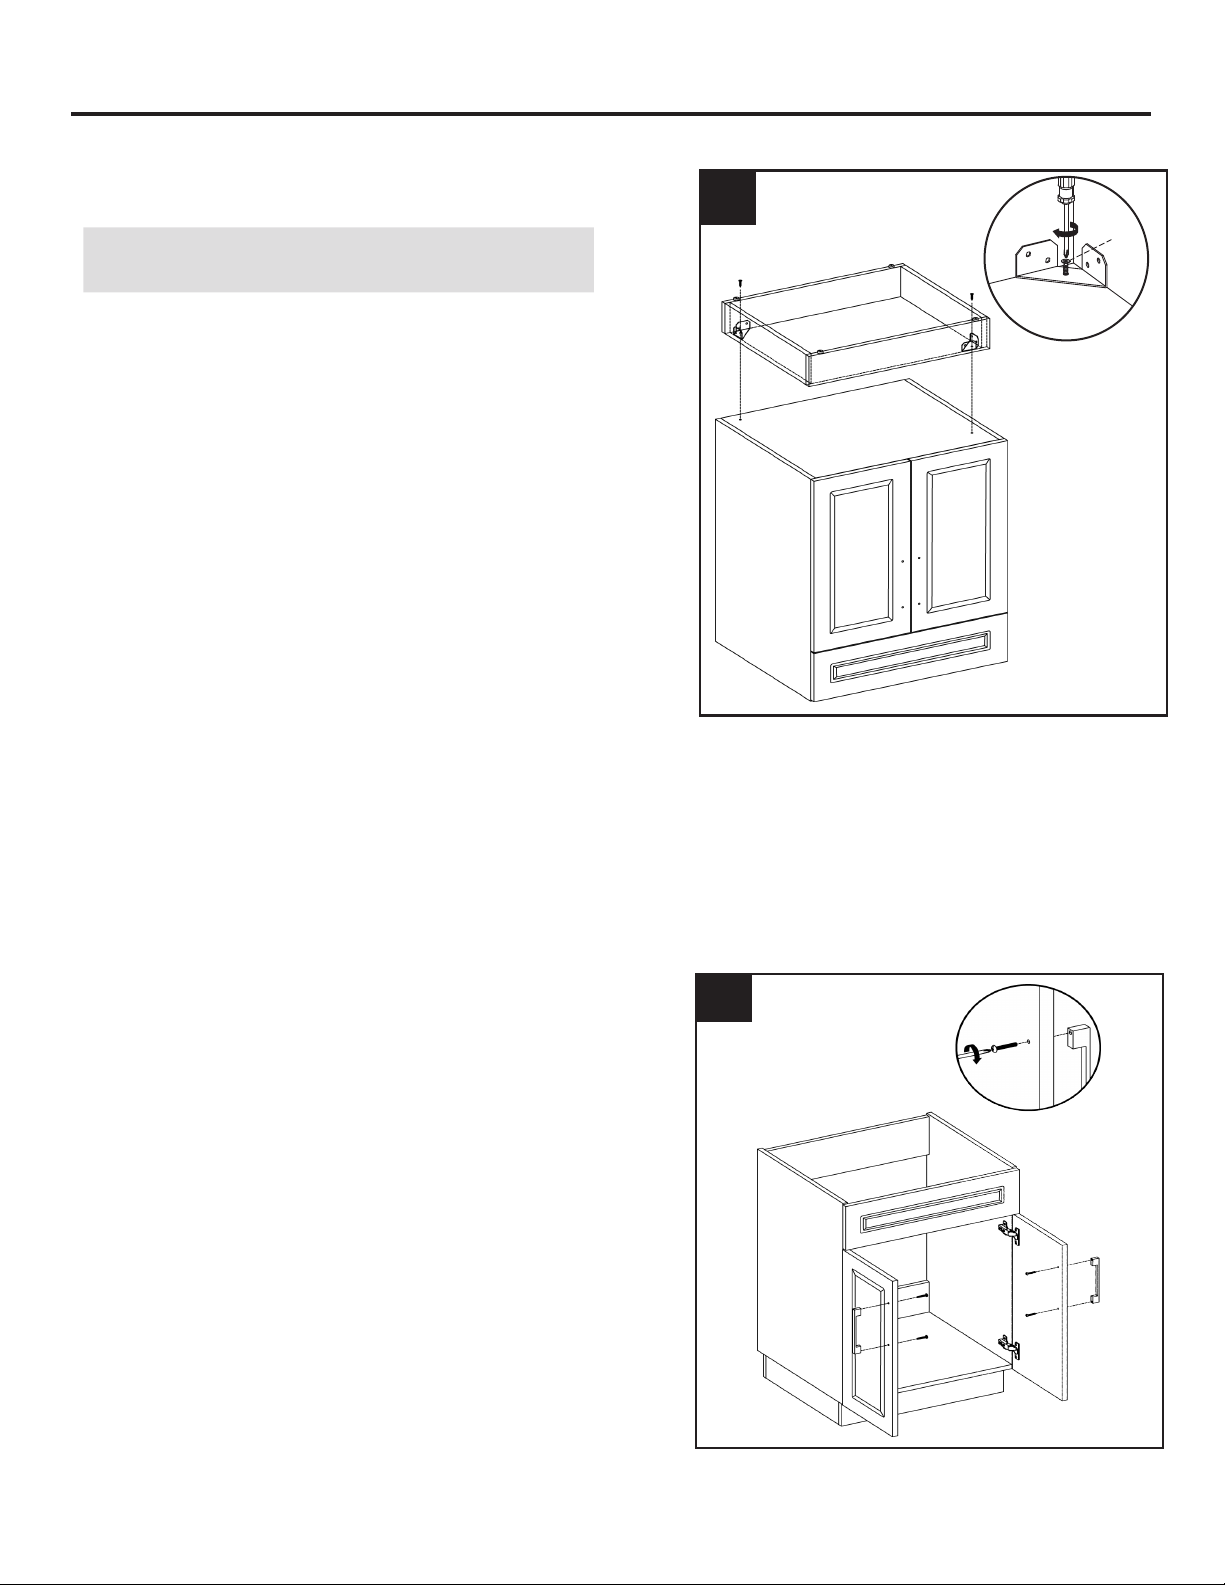
1b. Turn the cabinet (A) upside down onto the
protective surface.
1c. Gently attach the cabinet base (C) onto its proper
location. Using the supplied cabinet base screws
(AA), attach the base (C) to the cabinet (A).
1d. Gently place the cabinet upright.
CAUTION: Do not place side load onto
feet when righting the cabinet.
AA
C
A
2a. Place a door pull (BB) over the pre-drilled holes
on the right door and secure to the door using the
included bolts.
2b. Repeat for remaining door pull (BB).
BB
Step 1: Installingthe Base
Step 2: InstallingThe Door Pulls
1
2

6
INSTALLATION INSTRUCTIONS
3a. Take the faucet out of the packing box and fit the
faucet to the mounting hole on the sink, as shown
in diagram 1.
3b. Slide the rubber washer first, the metal gasket
second, and then the mounting nut over the hoses
onto the shank and hand tighten them firmly. Use a
cross screwdriver to thread the two screws, as
shown in diagram 2.
3c. Connect the hot & cold supply lines onto the
matching water valves and secure the connection
with an adjustable wrench, as shown in diagram 3.
3d. Connect the spray hose to the quick connection just
by a simple push .Install the counterweight on the
pull-down hose at the marked position (It should be
placed on the line), as shown in diagram 4.
3e. Turn on the hot and cold water valves then the
faucet. Run the water flow for 15 seconds to clean
up the lines and check for any leaks, as shown in
diagram 5.
3f. Turn off the faucet. Attach and secure the spray
head to the spray hose. Pull out or pull down the
spray head and get it return for a few times to
check if the pull-out hose is properly, as shown in
diagram 6.
3g. Test the water running, and make sure the faucet
sprayer changes between stream and spray
properly, as shown in diagram 6.
3h. After the installation completed, turn on the faucet
and run the water flow, check for any leaks again,
as shown in diagram 7.
Step 3: Installingthe Faucet
3
5
7
6
1
2
3
4
7
INSTALLATION INSTRUCTIONS
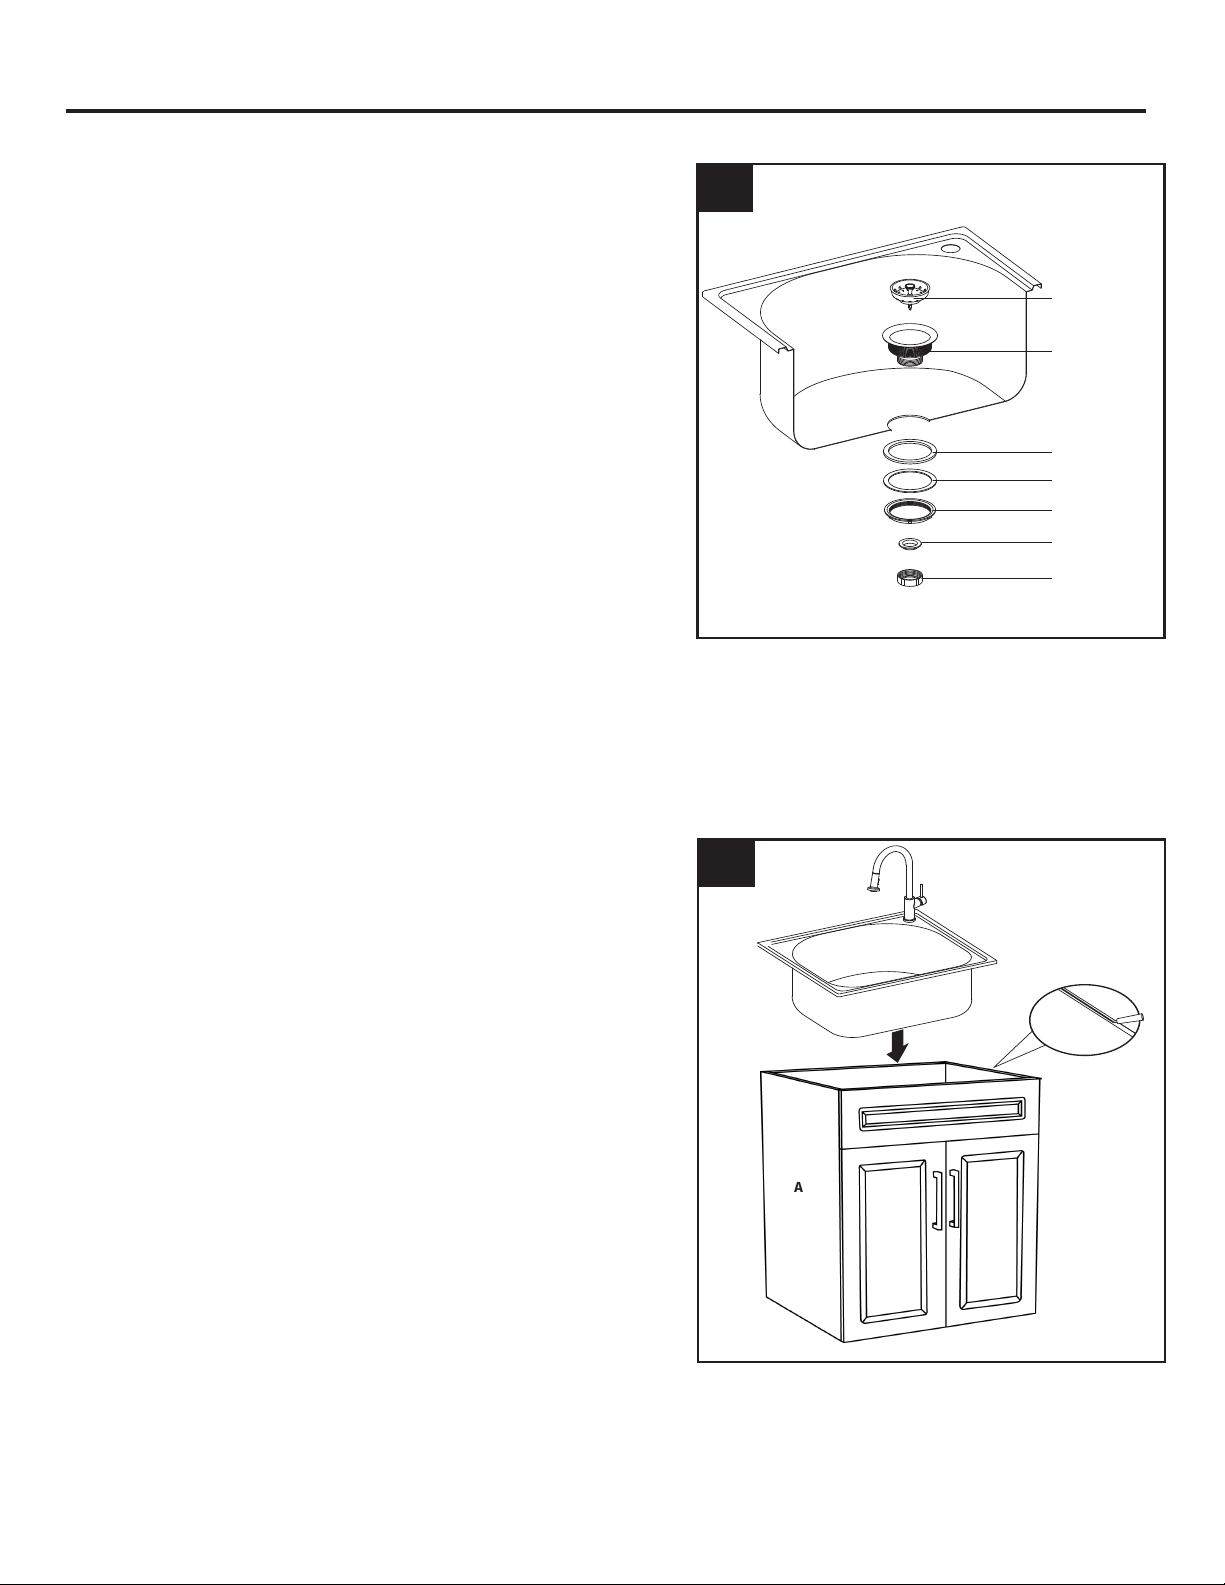
5a. Carefully place a bead of adhesive all around the
top of the cabinet (A).
5b. Ease the sink (B) into the cabinet (A), ensuring that
it is placed evenly and is centered on the cabinet.
Wipe off any excess adhesive. Use masking tape to
hold the sink in place until the adhesive dries.
5c. Following enclosed assembly instructions, install
the faucet to the sink (B).
1
2
A
B
Step 5: Mounting the Sink
5
4a. Insert the strainer body (2) into the sink.
4b. Assemble the rubber washer (3), the paper washer
(4) and locknut (5) onto the strainer body (2) from
underneath the sink.
4c. Hand tighten the locknut (5). Do not over tighten the
locknut as it may split or deform the strainer body.
4d. Assemble the plastic joint (6) and connecting nut (7)
onto the strainer body (2) from underneath the sink.
4e. Insert the screener (1) into the strainer.
Step 4: Installing the Strainer
4
4
1. Screener
2. Strainer Body
3. Rubber Washer
4. Paper Washer
5. Locknut
6. Plastic Joint
7. Connecting Nut
8
INSTALLATION INSTRUCTIONS
NOTE: Clean area where the cabinet will be
permanently located prior to beginning installation,
ensuring the cabinet will not interfere with any water
supply and drain lines once mounted.
6a. With the help of another adult, carefully place
cabinet against the wall in its final location.
6b. Find and mark locations of wall studs behind the
permanent location of cabinet.
6c. From inside cabinet, drill hole through cabinet
mounting area into wall studs.
6d. Using mounting hardware (not included)
appropriate for your installation site, secure cabinet
to wall stud. If possible, secure cabinet to two wall
studs for increased stability.
WARNING:
Cabinet MUST be secured to wall studs.
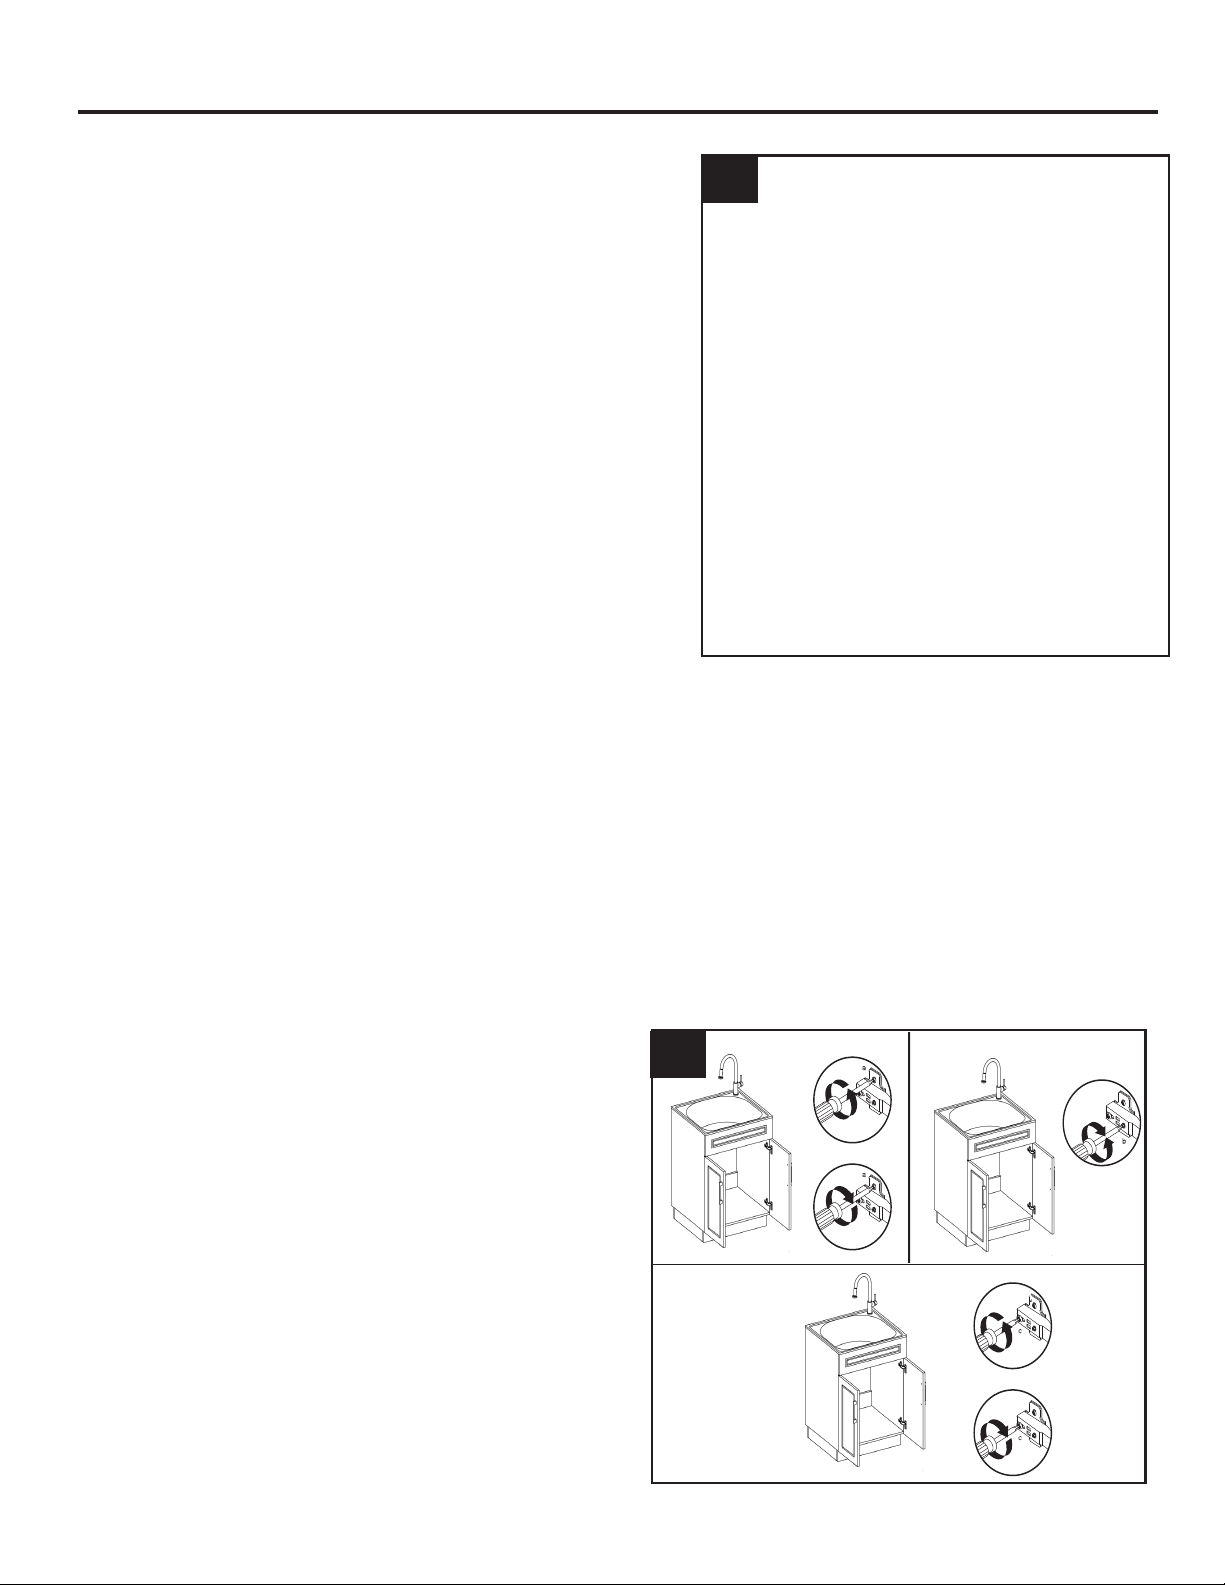
Step 6: Adjusting the Levelers
6
If you need to adjust the doors, do so in the
following manner.
7a. To adjust the door up or down, loosen screws
(a) on both hinges, adjust door, and retighten
screws.
7b. To adjust the door left or right, turn screws(b)
on both hinges, in or out.
7c. To adjust the door in or out, loosen screws (c)
on both hinges, adjust door, and retighten screws.
Step 7: Aligning the Doors
NOTE: Use preassembled levelers on feet of cabinet base to level the item. Twisting the levelers
counterclockwise will increase the height of cabinet base, twisting them clockwise will decrease it.
3
1
3
1
1
1
3
7

9
CARE AND MAINTENANCE
SINK
Do
• After use, always rinse your sink with tap water to
dilute and remove deposits.
• Towel dry after use whenever possible to prevent
water spots. Should water spots occur, clean with
a mild solution of vinegar and water followed by a
thorough rinse.
• Use liquid soap, a general household cleaner, or a
weak solution of vinegar and water for regular
cleaning.
• Only use plastic scouring pads recommended for
use in stainless steel sinks, and only use them in
the bowl of the sink. Scrub in the direction of the
satin finish lines.
Do not
• Do not allow any food, detergent, soap or grease
to dry or sit for extended periods of time on the
surface of the sink.
• Never use abrasive cleaning products, as they
will dull and scratch the finish.
• Do not use scouring pads on the deck, as they
will dull the mirror finish.
• Never use steel wool pads, as they will leave iron
particles on the sink, which will cause corrosion.
• Never leave steel or cast iron pans in your sink
for extended periods of time, as this can cause
corrosion.
CABINET
Do
•Remove dust and dry dirt with a soft, damp cloth.
• Clean grease, oil, paint and ink stains with
isopropyl (rubbing alcohol). Immediately rinse with
water after stain removal.
Do not
• Do not allow your cabinet surface to come into
contact with products such as acetone (nail polish
remover), nail polish, dry cleaning solution,
lacquer thinners, gasoline, pine oil, etc.
• Use caution when using sharp instruments that
may fall and scratch the surface.
This sink is manufactured with the highest grade stainless steel and will provide you many years of
enjoyment with the proper care.

10
WARRANTY
ONE YEAR LIMITED WARRANTY
A thorough inspection must be made before installation and any damage must be promptly reported.
We will not be liable for failures or damage that could have been discovered or avoided by proper
inspection and testing prior to installation. The manufacturer warrants this product to be free from
defects in materials or workmanship for one (1) year from the date of purchase. Proof of purchase
(original sales receipt) from the original consumer purchaser must be made available to the
manufacturer for all warranty claims. This warranty is non-transferable and shall be voided if the unit is
removed from its initial installation or if it is not installed following the manufacturer’s instructions. It
does not apply in the event of product damage due to the use of other than genuine Conglom Kitchen
& Bath replacement parts (replacement parts may be obtained by calling 1-877-888-8225, 8 a.m. - 8
p.m., EST, Monday -Sunday), installation error, abuse, misuse or improper care and maintenance
(whether performed by a plumber, contractor, service provider or member of the purchaser’s
household). The warranty excludes damage due to aggressive air or water conditions, harsh or
abrasive cleaners and/or materials. Under no circumstance shall we be held liable for personal injury or
property damage resulting from improper installation or use of this product. We will not be held liable
for inconvenience caused by loss of use of this product, costs incurred for labor or materials, removal
and installation of replacement units, or any other incidental or consequential damages. Costs relating
to obtaining access for repair or replacement are the responsibility of the user. Our obligation shall be
limited to the repair or replacement of a unit (at our discretion) that may prove, by our sole examination,
to be defective under normal use and service during the warranty period. Any failure of this product that
is not traceable to a defect in material or workmanship is not covered by this warranty. These non-
warrantable items include, but are not limited to:
WARRANTY CLAIM PROCEDURE
If a claimable defect occurs or replacement parts are needed, please contact our customer service
team at 1-877-888-8225, 8 a.m. - 8 p.m., EST, Monday - Sunday.
Before you make your call, please ensure that you have:
• Model number or description.
• Proof of sale.
• Details regarding the defect and/or part number.
• Name(s) and address(es) of the owner and/or installer.
• Improper installation not in accordance with manufacturer’s instructions.
• Dents and/or scratches incurred during shipping, handling, or installation.
• Change in colour or finish due to chemical usage.
• Damage caused by failure to follow care and cleaning guidelines, including damage caused by the use
of abrasive cleaners.
• Alterations made to the unit by the purchaser or installer.
• Damage caused by accidental impact, fire, flood, freezing, and normal wear.
• Bends and warping caused by forced connections, over-tightened fittings, and inadequate support
during installation.
Questo manuale è adatto per i seguenti modelli
1
Indice
Lingue:
Altri manuali LF Apparecchio per il bagno

LF
LF ORIGIN 21 FW0AC015CP Manuale utente

LF
LF allen + roth ML-20524 Manuale utente

LF
LF Style Selections 2058NNMV Manuale utente

LF
LF Style Selections 2619KKMV Manuale utente

LF
LF STYLE SELECTIONS VANITY WITH TOP AND MIRROR ... Manuale di istruzioni

LF
LF allen + roth FSI 1600 BGLD Istruzioni operative originali

LF
LF style selections LW153C14-W Manuale utente

LF
LF Style SELECTION 1678VA-49-292-934 Manuale utente

LF
LF allen+roth Roveland 2026VA-36-200 Manuale utente

LF
LF Allen + Roth SHLSNC01SN Manuale utente


