LF UTILETECH CYWE08-7 Manuale utente
8 a.m - 8 p.m., EST, Monday - Sunday.
You could also contact us at [email protected] or visit www.lowespartsplus.com.
Utilitech and logo design are trademarks or registered
trademarks of LF, LLC. All rights reserved.
3764035
CYWE08-7
OIL FILLED RADIATOR
VR21026
8

Package Contents...................................................................................1
Safety Information. .................................................................................2
Safety Information. .................................................................................3
Preparation .............................................................................................4
Assembly Instructions ............................................................................4
Operating Instructions ............................................................................5
Care and Maintenance ...........................................................................5
Troubleshooting ......................................................................................6
Warranty .................................................................................................7
Replacement Parts List ..........................................................................7
TABLE OF CONTENTS
.
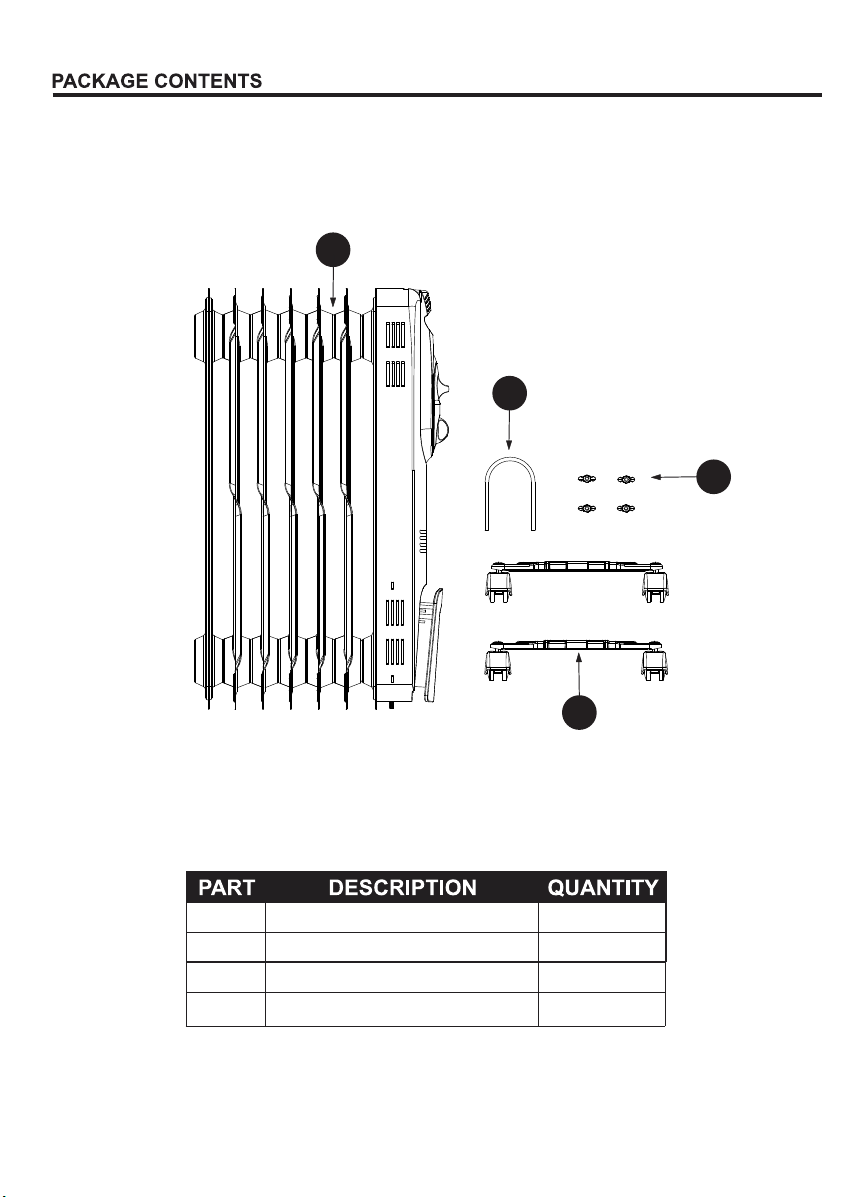
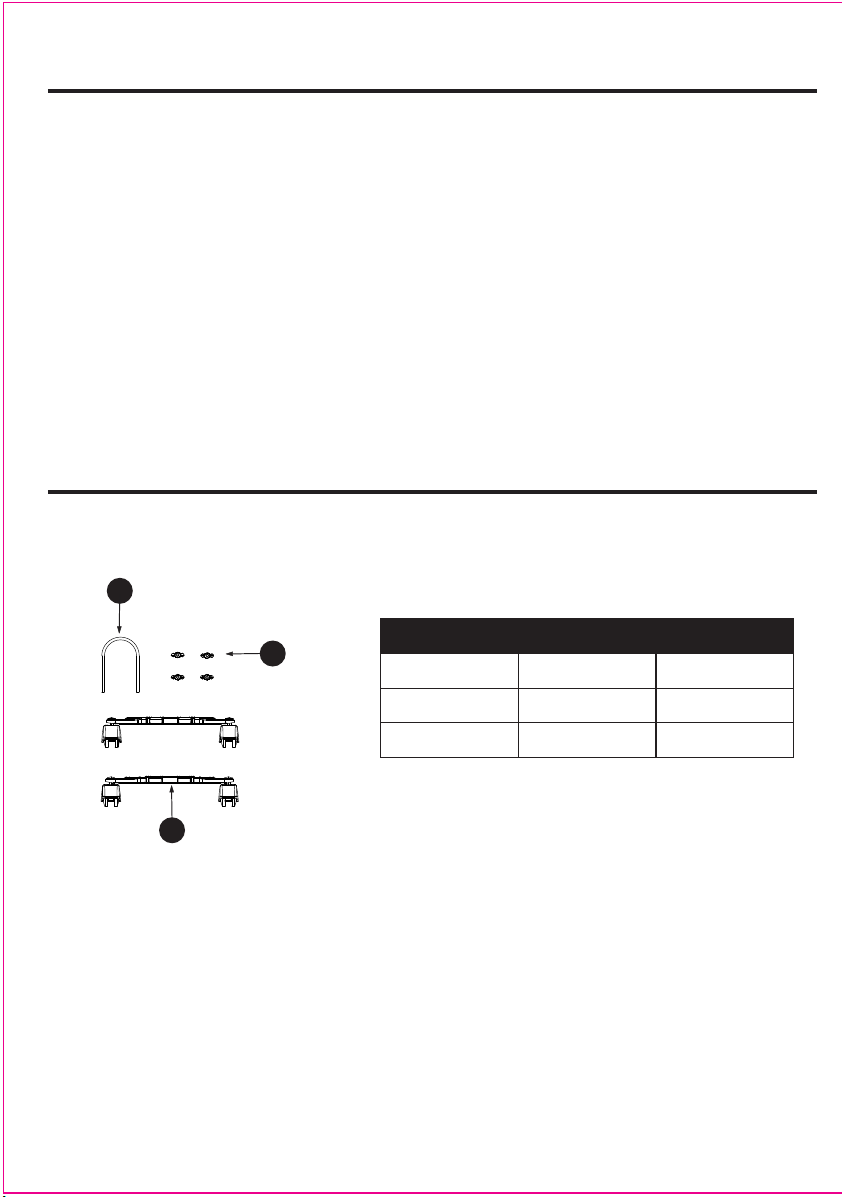
A
C
B
Radiator Body
Wing nut
C
1
4
1
A
B
U-bolt
1
D
DCastor assembly 2
IMPORTANT INSTRUCTIONS
When using electrical appliances, basic safety precautions should always be followed to
reduce the risk of fire, electric shock, and injury to persons, including the following:
1. Read all instructions before using this heater.
2. This heater is hot when in use. To avoid burns, DO NOT let bare skin touch hot surfaces.
If provided, use handles when moving this heater. Keep combustible materials, such as
furniture, pillows, bedding, papers, clothes, and curtains at least 3 feet (0.9 m) from the
front of the heater and keep them away from the sides and rear.
3. Extreme caution is necessary when any heater is used by or near children or invalids
and whenever the heater is left operating and unattended.
4. Always unplug heater when not in use.
5. DO NOT operate any heater with a damaged cord or plug or after the heater malfunctions,
has been dropped or damaged in any manner. Discard heater, or return to authorized
service facility for examination and/or repair.
6. DO NOT run cord under carpeting. Do not cover cord with throw rugs, runners, or similar
coverings. DO NOT route cord under furniture or appliances. Arrange cord away from
traffic area and where it will not be tripped over.
7. A heater has hot and arcing or sparking parts inside. DO NOT use it in areas where
gasoline, paint, or flammable liquids are used or stored.
8. DO NOT insert or allow foreign objects to enter any ventilation or exhaust opening as this
may cause an electric shock or fire, or damage the heater.
9. Use this heater only as described in this manual. Any other use not recommended by the
manufacturer may cause fire, electric shock, or injury to persons.
10. Always plug heaters directly into a wall outlet/ receptacle. Never use with an extension
cord or relocatable power tap (outlet/power strip).
11. If the heater will not operate, see specific instructions on Auto Safety Shut-off.
12. DO NOT attempt to repair or adjust any electrical or mechanical functions on this unit.
Doing so will void your warranty. The inside of the unit contains no user serviceable
parts. All servicing should be performed by qualified personnel only.
13. Discontinue use if plug or outlet is hot. It is recommended that the outlet be replaced if
plug or outlet is hot to touch.
14. The heater must not be located immediately below a socket-outlet. DO NOT use this
heater in the immediate surroundings of a bath, a shower or a swimming pool.
15. DO NOT use with wireless plug adapter or outlet that allows control remotely.
2
16.This appliance is not intended for use by persons (included children) with reduced physical,
sensory or mental capability, or lack of experience and knowledge, unless they have been
given supervision or instruction concerning use of the appliance by a person responsible
for their safety.

1.To prevent a possible fire, DO NOT block air intakes or exhaust in any manner. Do not
use on soft surfaces, like a bed, where openings may become blocked.
2.Turn the power off when servicing this appliance. First turn the main power switch to the
“OFF”position. Then remove the electrical plug from the wall outlet.
3.DO NOT use outdoors.
4.This heater is not intended for use in bathrooms, laundry areas and similar indoor
locations. NEVER locate heater where it may fall into a bathtub or other water container.
5.DO NOT operate any heater with a damaged cord or plug or after the heater malfunctions,
has been dropped or damaged in any manner. Discard heater, or return to authorized
service facility for examination and/or repair.
6.This heater draws 12.5 amps during operation. To prevent overloading a circuit, DO NOT
Plug heater into a circuit that already has other appliances working.
CAUTION
Electrical Connection
SPECIFICATIONS
Voltage Amps Watts (max.)
120 VAC, 60 Hz 12.5 Amps 1500 Watts
SAVE THESE INSTRUCTIONS
This heater is for use on 120 Volts. The power
cord has a polarized plug as show below. (one
blade is wider than the other). To reduce the
risk of electric shock, this plug is intended to fit
in a polarized outlet only one way. If the plug
does not fit fully in the outlet, reverse the plug.
If it still does not fit, contact a qualified electrician
to install the proper outlet. DO NOT attempt
to modify this plug or defeat this safety feature in any way. Never use with an extension cord
or relocatable power tap (outlet/power strip).
3
7.DO NOT operate the product continuously. Portable electric heaters are designed for
finite space heating or as a supplementary heat source. They are not intended to be main
sources of heat during the normal heating season.
8.DO NOT hang or wall-mount the product.
9.Place the product upright on a flat, level, stable, heat-resistant surface.
34
2
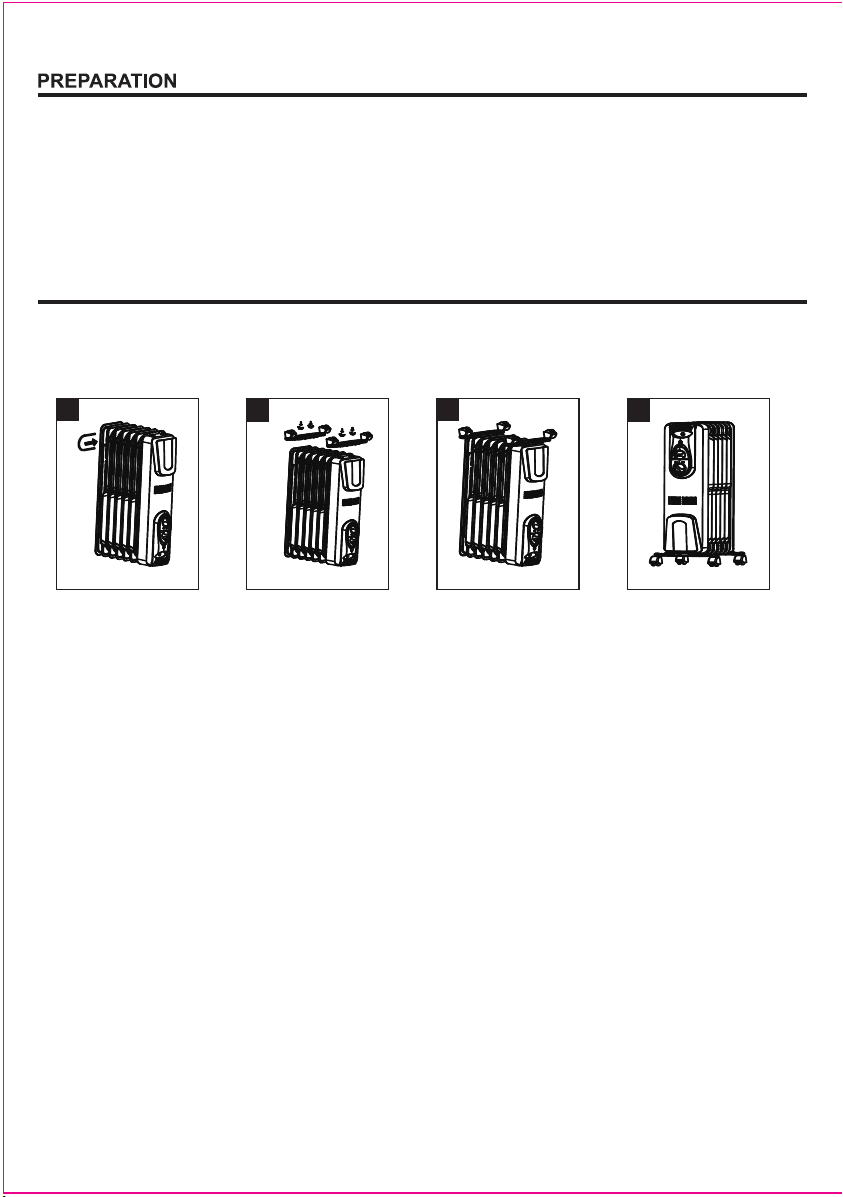
Attach the castor assembly under the front cover then secure the castor assembly with
Before beginning assembly of product, make sure all parts are present. Compare parts with package
contents list. If any part is missing or damaged, do not attempt to assemble the product.
Estimated Assembly Time: 5 minutes
ASSEMBLY INSTRUCTIONS
CAUTION:DO NOT OPERATE THIS HEATER WITHOUT CASTORS ATTACHED
NOTE: It is normal for the oil to move inside the radiator when moving the product.
4
1
1. Place the unit upside down on a flat, stable surface, ensuring it will not tip over.
NOTICE: Do not over-tighten the wing nuts.
2. Front castor assembly installation: Remove the wing nuts from the U-bolts.
wing nuts to the U-bolt (refer to step 2-3).
3. Rear castor assembly installation: attach the U-bolt between the rear two fins then secure
the castor assembly with wing nuts to the U-bolt (refer to step 2-3).
4. Put the unit on flat surface and ensure that it can move freely and smoothly (refer to step 4).
5. Set the unit upright and wait at least three minutes for the oil to settle before turning on.

Always unplug the heater before cleaning and allow the heater to cool down.
1. Clean the unit with a soft cloth moistened with a mild soap and water solution.
2. Never use abrasive or flammable solvents to clean the unit.
3. After cleaning, be sure to completely dry the unit with a cloth or towel.
4. Store heater unit with cord in a cool, dry location. We recommend storing the unit and
cord in the original package.
Figure 1
OPERATING INSTRUCTIONS
CARE AND MAINTENANCE
5
0
Ⅰ
PPPPOOOOWWWWEEEERRRR
Ⅱ
Ⅲ
cord, removing it completely from the cord storage spool.
NOTE: The product may emit an odor during first use; this is normal. Ventilate the area as needed.
1. Place the product upright on a flat, level, stable,heat-resistant surface, and then uncoil the power
"Ⅰ" – Low heat setting (600 watts)
5. Turn off the product by rotating the Main Control Knob
4. When the desired ambient temperature is reached, slowly turn the thermostat knob back
toward MIN until it clicks. The product will cycle on and off to maintain that setting.
2. Turn the thermostat control knob clockwise to its maximum range.
"Ⅲ" – High heat setting (1500 watts)
"Ⅱ" – Medium heat setting (900 watts)
WARNING: Do not operate the product until fully assembled (including castors )
3. Main Control Knob (Figure 1): Use this knob to set the heat setting:
The power indicator will illuminate after being plugged in.
A.
E
B.
F
C.
G
E. Power light
F. Selector
G. Thermostat Control
WARNING: Operate the product in an upright position only.

TROUBLESHOOTING
PROBLEM POSSIBLE CAUSE CORRECTIVE ACTIONS
The thermal cut-off has
been activated.
Heater is not plugged
into a 120V polarized
outlet/receptacle.
.
The Heater will
not power on
Unplug and turn the heater off; allow
it to cool for 30 minutes. Once the
heater has cooled off, check to make
sure that there is no objects on or
adjacent to the unit. To resume
operation, plug the unit back in.
Ensure unit is OFF position. Plug in
unit and attempt to turn on again.
Breaker/Fuse has been
tripped.
Plug in unit and attempt to turn on
again.
Check your electrical box to confirm
the breaker has not been blown. This
may occur if the receptacle is shared
between other High consumption
appliances.
Attempt to plug unit into another
receptacle in the house.
Ensure unit is in the OFF position.
Power light is on,
but no heat is
emitting from the
unit.
setting.
warmed up to thermostat
Room temperature has To increase the room temperature,
adjust the thermostat control knob
to a higher setting by turning
clockwise.
The heating elements
inside the unit have not
warmed up yet.
has been turned on for the oil
Allow 20 minutes after the unit
fins to heat.
The Heater is
burning smell
creating a
3’ (0.9m)Surrounding
the heater.
Check & ensure there are
no combustible material
Remove the combustible units
adjacent to the heater.
The heater feet have not
been properly installed
on the unit.
Follow assembly instructions on
legs to the unit.
how to attach front and hind
The heater is
making smell
cracking sound
It is normal for the heater
to emit small crackling
sounds as it heats
the oil inside the fins.
Allow heater to operate for
a period of time.
After the heater has warmed up,
the crackling sounds should
stop. Do not be alarmed. It will
go away after approximately
15 minutes.
6
ONE-YEAR WARRANTY.This product is warranted for the original purchaser to be free from
defects in material and workmanship. This guarantee does not cover damage due to misuse
or abuse, normal wear, improper maintenance, neglect, unauthorized repair/alteration,
or expendable parts and accessories expected to become unusable after a reasonable period
of use. If you think your product meets the above guarantee criteria, please return it to the
place of purchase with valid proof of purchase and the defective product will be repaired or
replaced at no charge. Maximum liability will be limited to the purchase price paid.
This warranty does not apply to the finish on any portion of the product. Servicing performed
by an authorized person shall render the warranty invalid. For warranty service, contact
Customer Service at 1-866-994-4148, 8 a.m-8 p.m., EST, Monday - Sunday.
limitations and exclusions may not apply to you. This warranty gives the consumer specific
rights, and you may also have other rights, which vary from state to state.
WARRANTY
REPLACEMENT PARTS LIST
For replacement parts, call our customer service department at1-866-994-4148,8 a.m - 8 p.m., EST,
Monday - Sunday.You could also contact us at [email protected] or visit www.lowespartsplus.com.
DESCRIPTION
PART#
PART
B Wing nut CYWE08-001
CU-bolt CYWE08-002
Printed in China
C
B
D
DCastor assembly CYWE08-003
7
You could also contact us at [email protected] or visit www.lowespartsplus.com.

Fecha de compraNúmero de serie
ADJUNTE SU RECIBO AQUÍ
ARTÍCULO # 3764035
MODELO # CYWE08-7
RADIADOR DE ACEITE
Utilitech y el diseño del logotipo son marcas
comerciales o marcas registradas de LF, LLC.
Todos los derechos reservados.
¿Preguntas, problemas, piezas faltantes? Antes de volver a la tienda, llame a nuestro
Departamento de Servicio al Cliente al 1-866-994-4148, de lunes a domingo de 8 a.m. a
8 p.m., hora estándar del Este. También puede comunicarse con nosotros a través de
Questo manuale è adatto per i seguenti modelli
1
Indice
Lingue:
Manuali Stufa popolari di altre marche


Empire Heating Systems
Empire Heating Systems WCC65 Manuale utente

Wetekom
Wetekom 92 86 43 Manuale utente

Desa
Desa SPC170-F Manuale utente

Watlow
Watlow Watrod Electric Tubular Heaters Manuale utente

Haverland
Haverland ECO-DRY GPS Series Manuale elenco delle parti

Stelpro
Stelpro ASILVC2060 Series Manuale utente