LF Portfolio Outdoor 00944 Manuale utente
ITEM #0329342
1
Questions, problems, missing parts? Before returning to your retailer, call our customer
service department at 1-800-643-0067, 8 a.m. - 6 p.m., EST, Monday - Thursday, 8 a.m. -
5 p.m., EST, Friday.
ATTACH YOUR RECEIPT HERE
Serial Number Purchase Date
Portfolio Outdoor® is a registered trademark
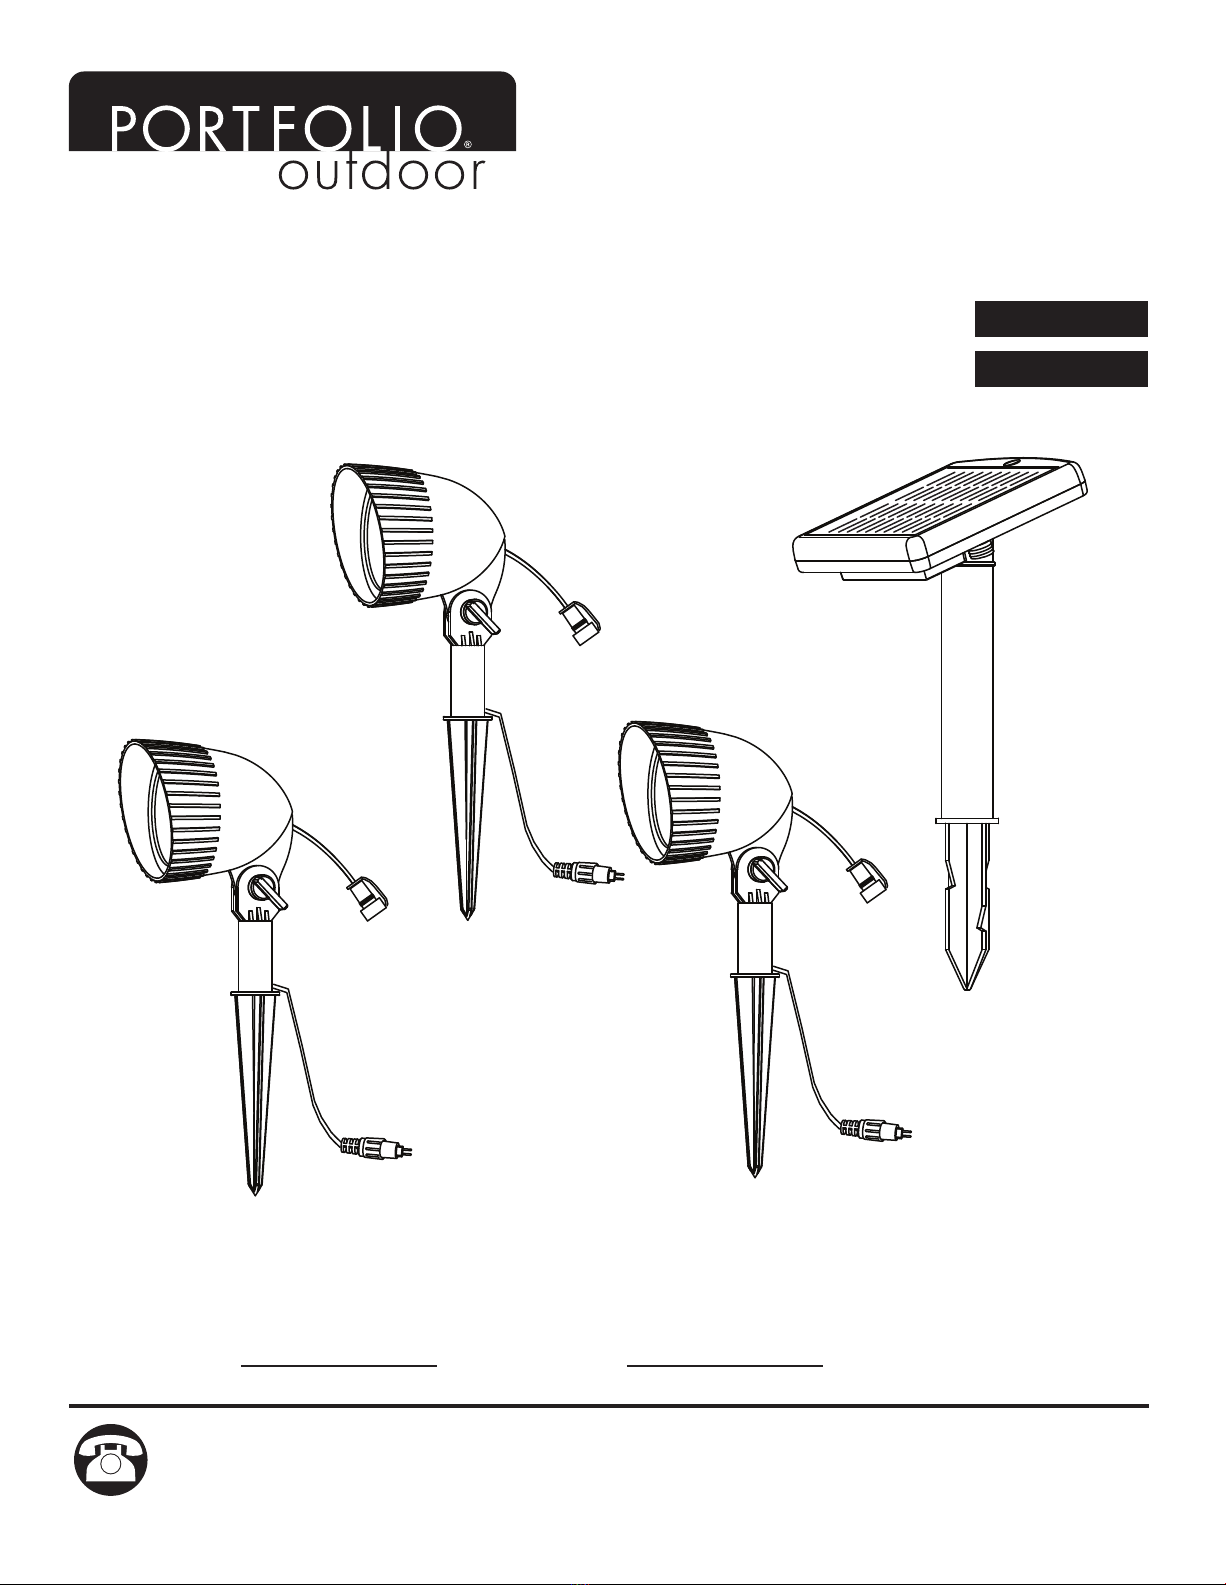
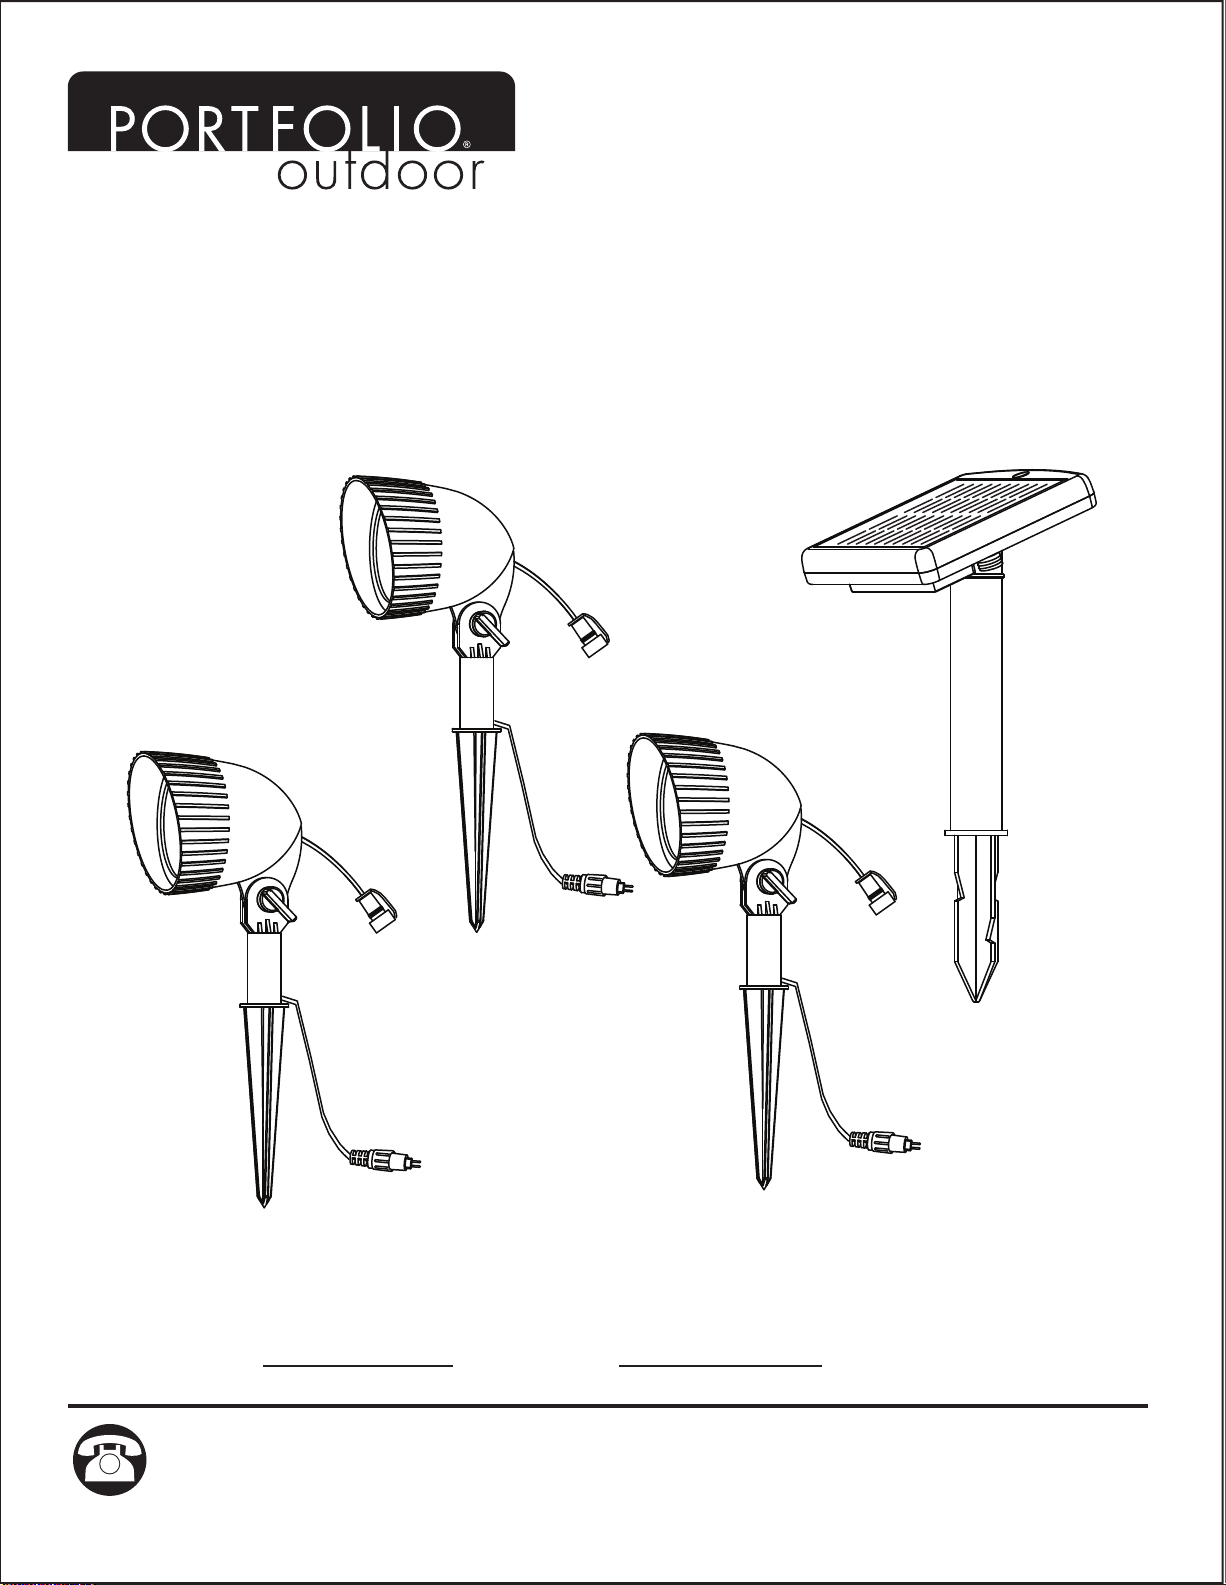
of LF, LLC. All Rights Reserved. MODEL #00944
HIGH OUTPUT SOLAR
SPOTLIGHTS (Set of 3)
Français p. XX
Español p. XX
Français p. 8
Español p. 15
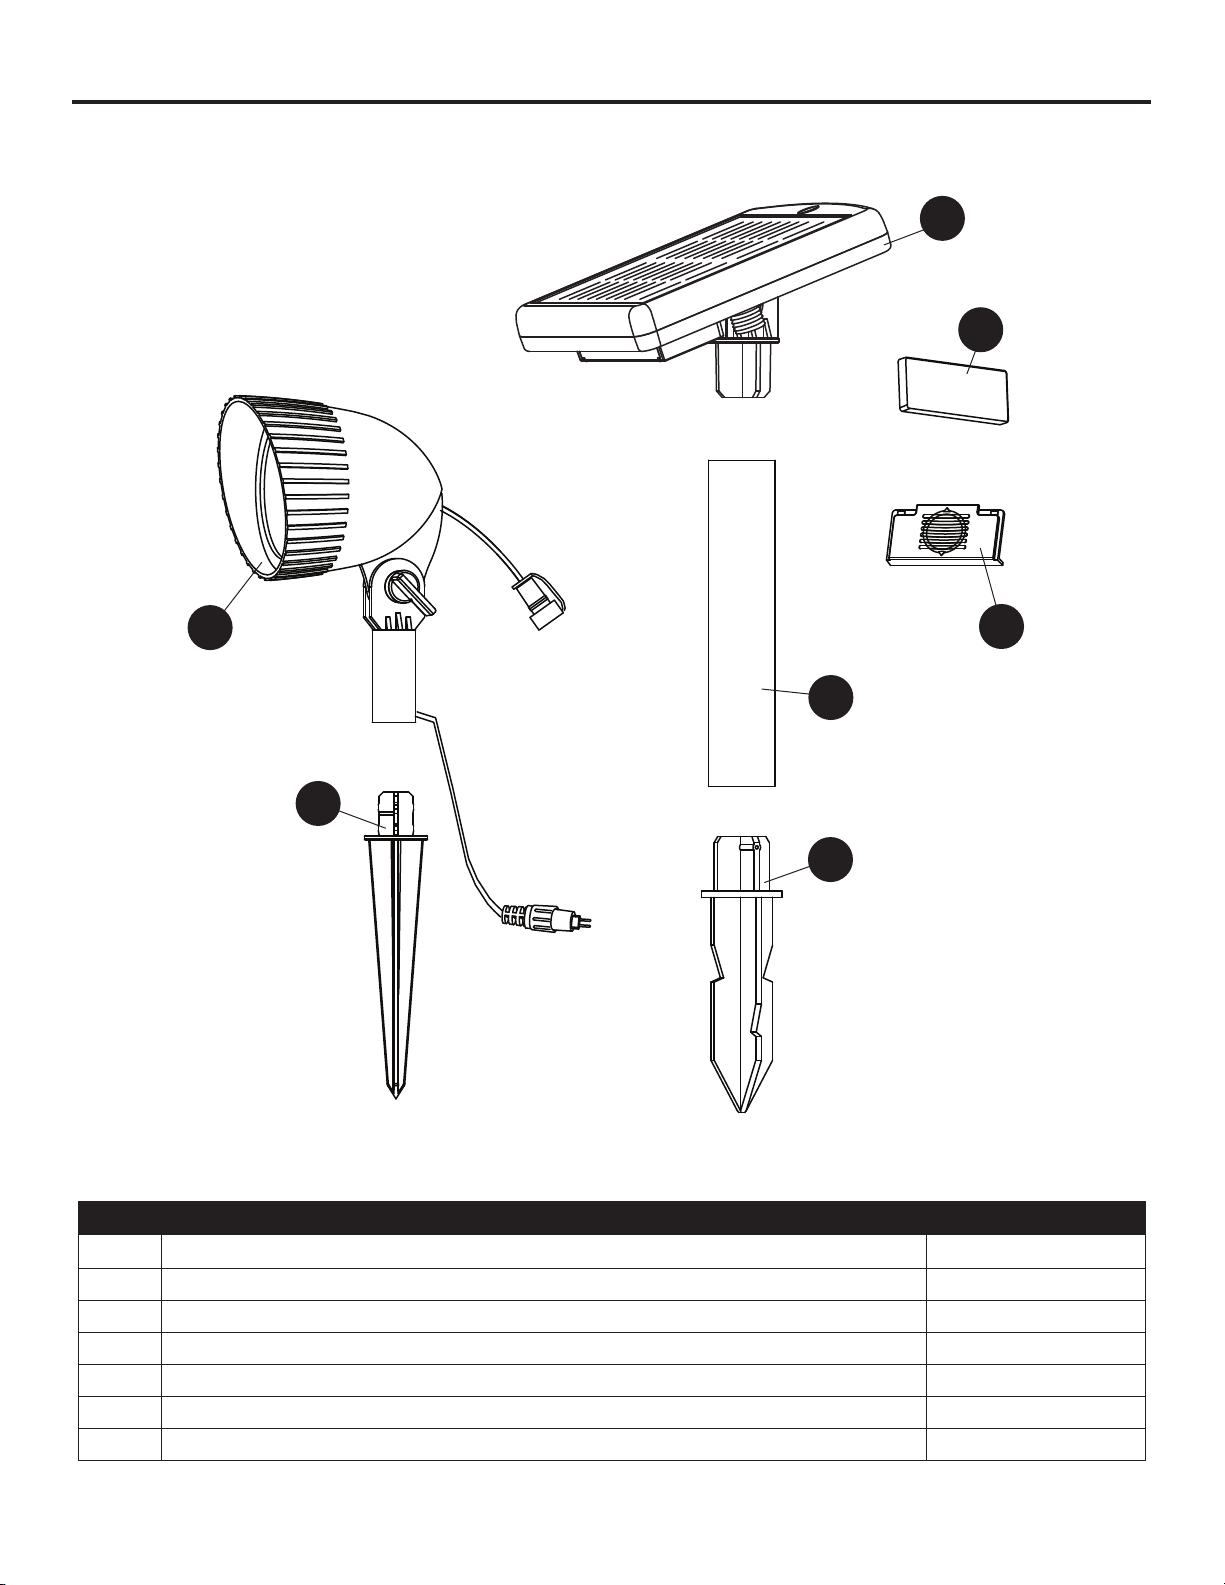
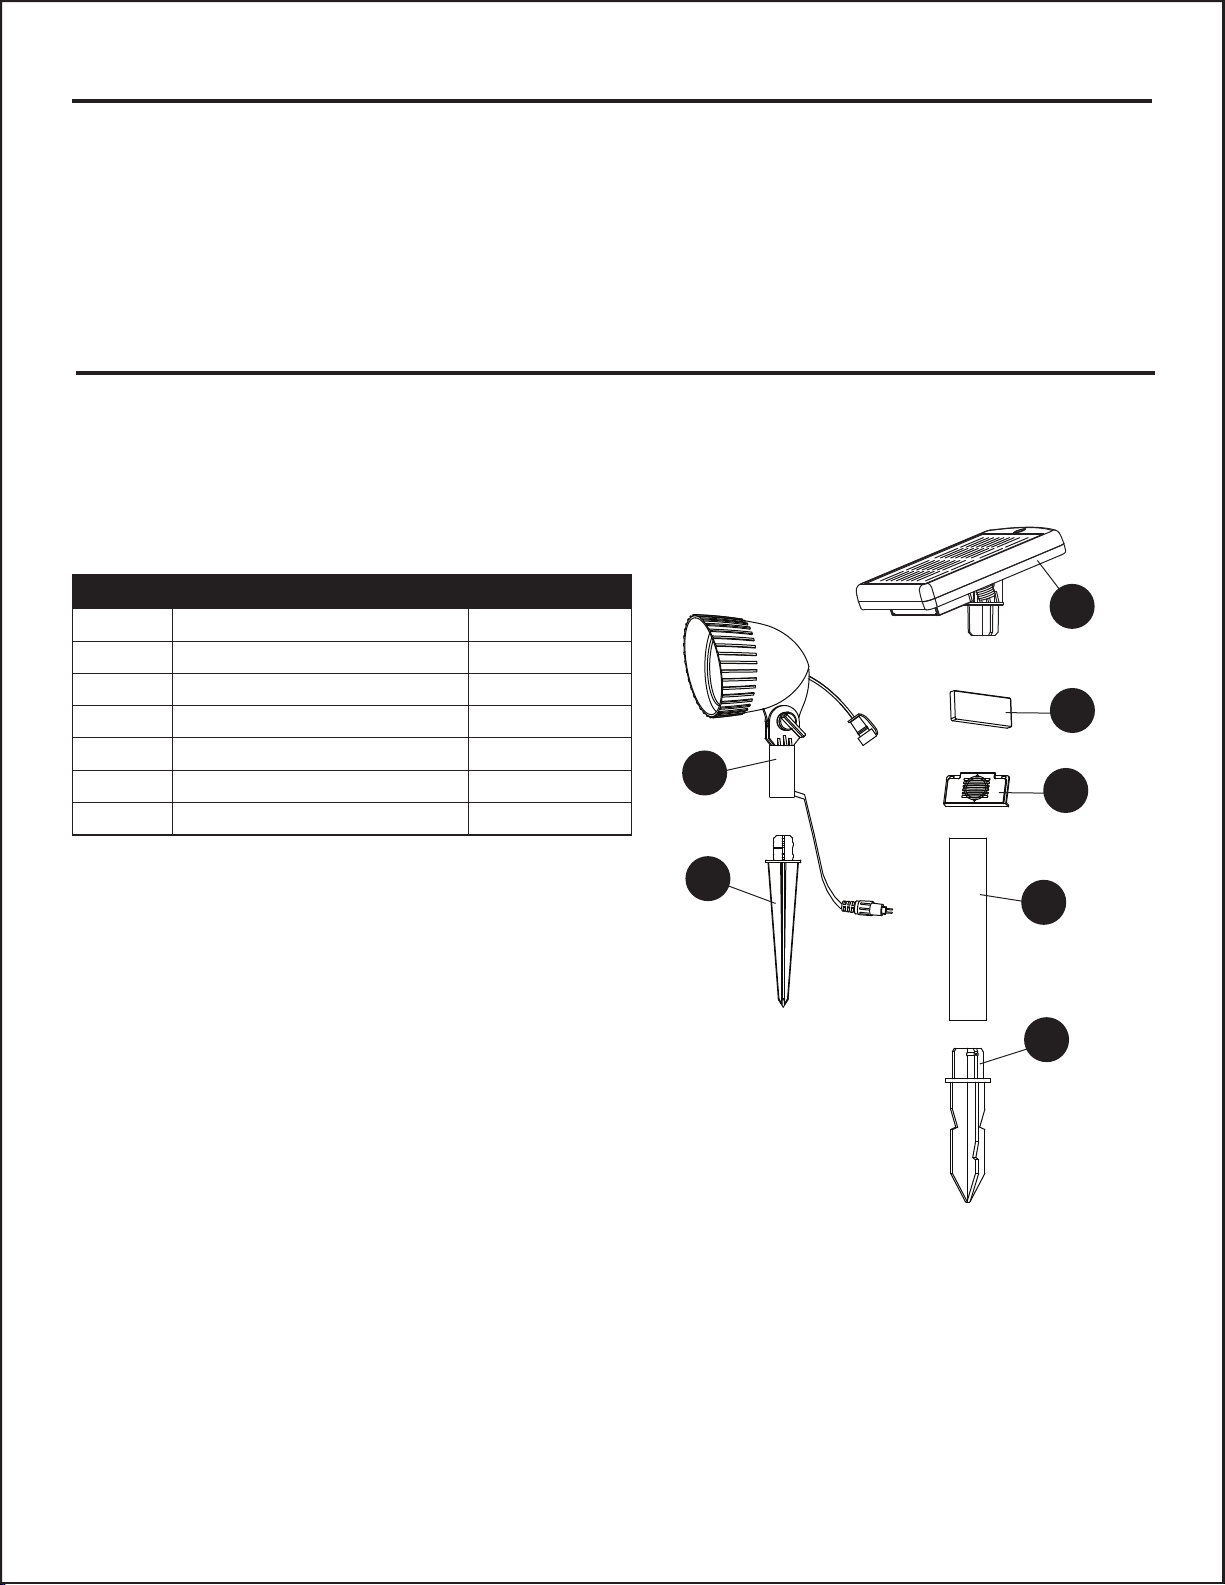
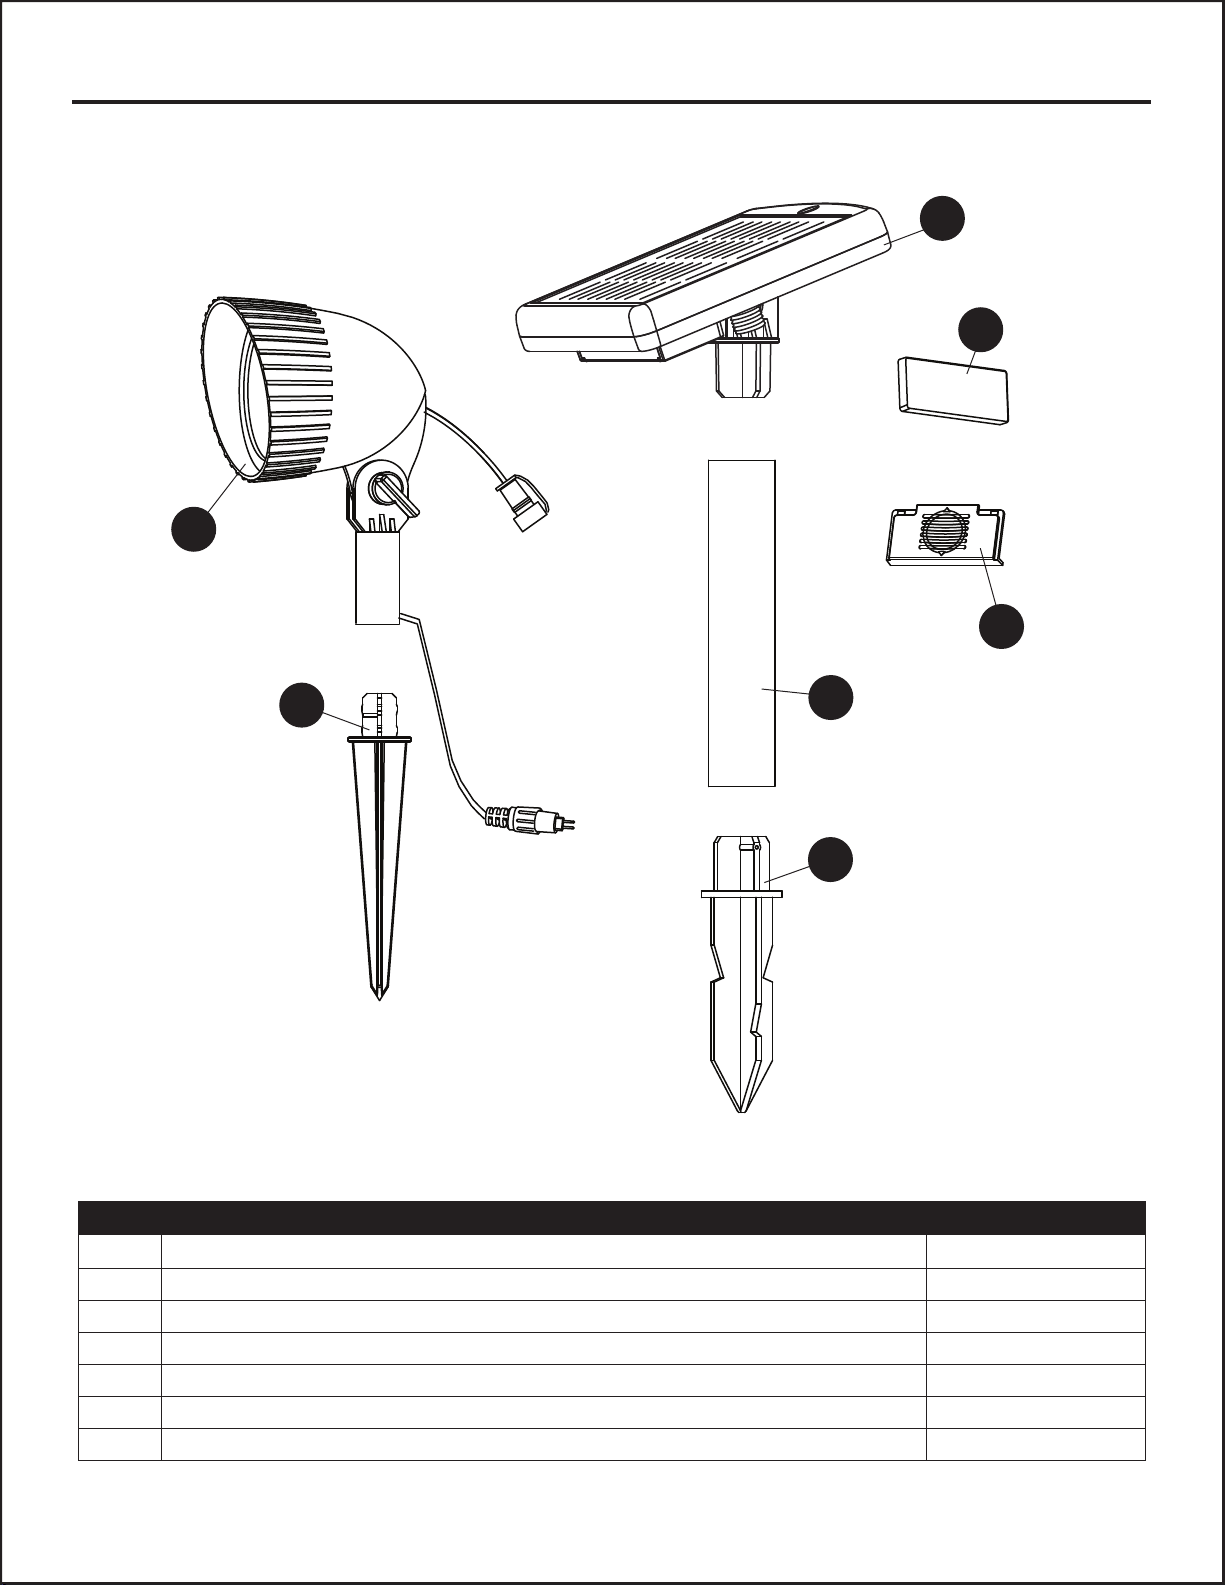
PACKAGE CONTENTS
2
C
D
E
F
G
A
B
PART DESCRIPTION QUANTITY
A Spot Head 3
B Spot Head Stake
C Solar Panel
1
D Waterproof Cover (preassembled to Solar Panel (C))
1
E Battery Cover (preassembled to Solar Panel (C))
1
F Post
G Solar Panel Stake
3
1
1

HARDWARE CONTENTS
Battery
Qty. 1
3
AA
SAFETY INFORMATION
PREPARATION
Please read and understand this entire manual before attempting to assemble, operate or install
the product.
Before beginning assembly of product, make sure all parts are present. Compare parts with
package contents list and hardware contents above. If any part is missing or damaged, do not
attempt to assemble the product. Contact customer service for replacement parts.
Estimated Assembly Time: 2 minutes
Helpful Tools (not included): Trowel
WARNING
• Use rechargeable battery only.
• Do not open, short circuit, or mutilate batteries as injury may occur.
CAUTION
• Do not dispose of batteries in the regular trash, municipal waste, stream or by fire as batteries
may leak or explode.
• Preserve our environment by recycling batteries or disposing of them in accordance with Local,
State, and Federal regulations.
• Do not mix old and new batteries.
• Do not mix alkaline or standard (Carbon-Zinc) batteries.
(not shown to size)
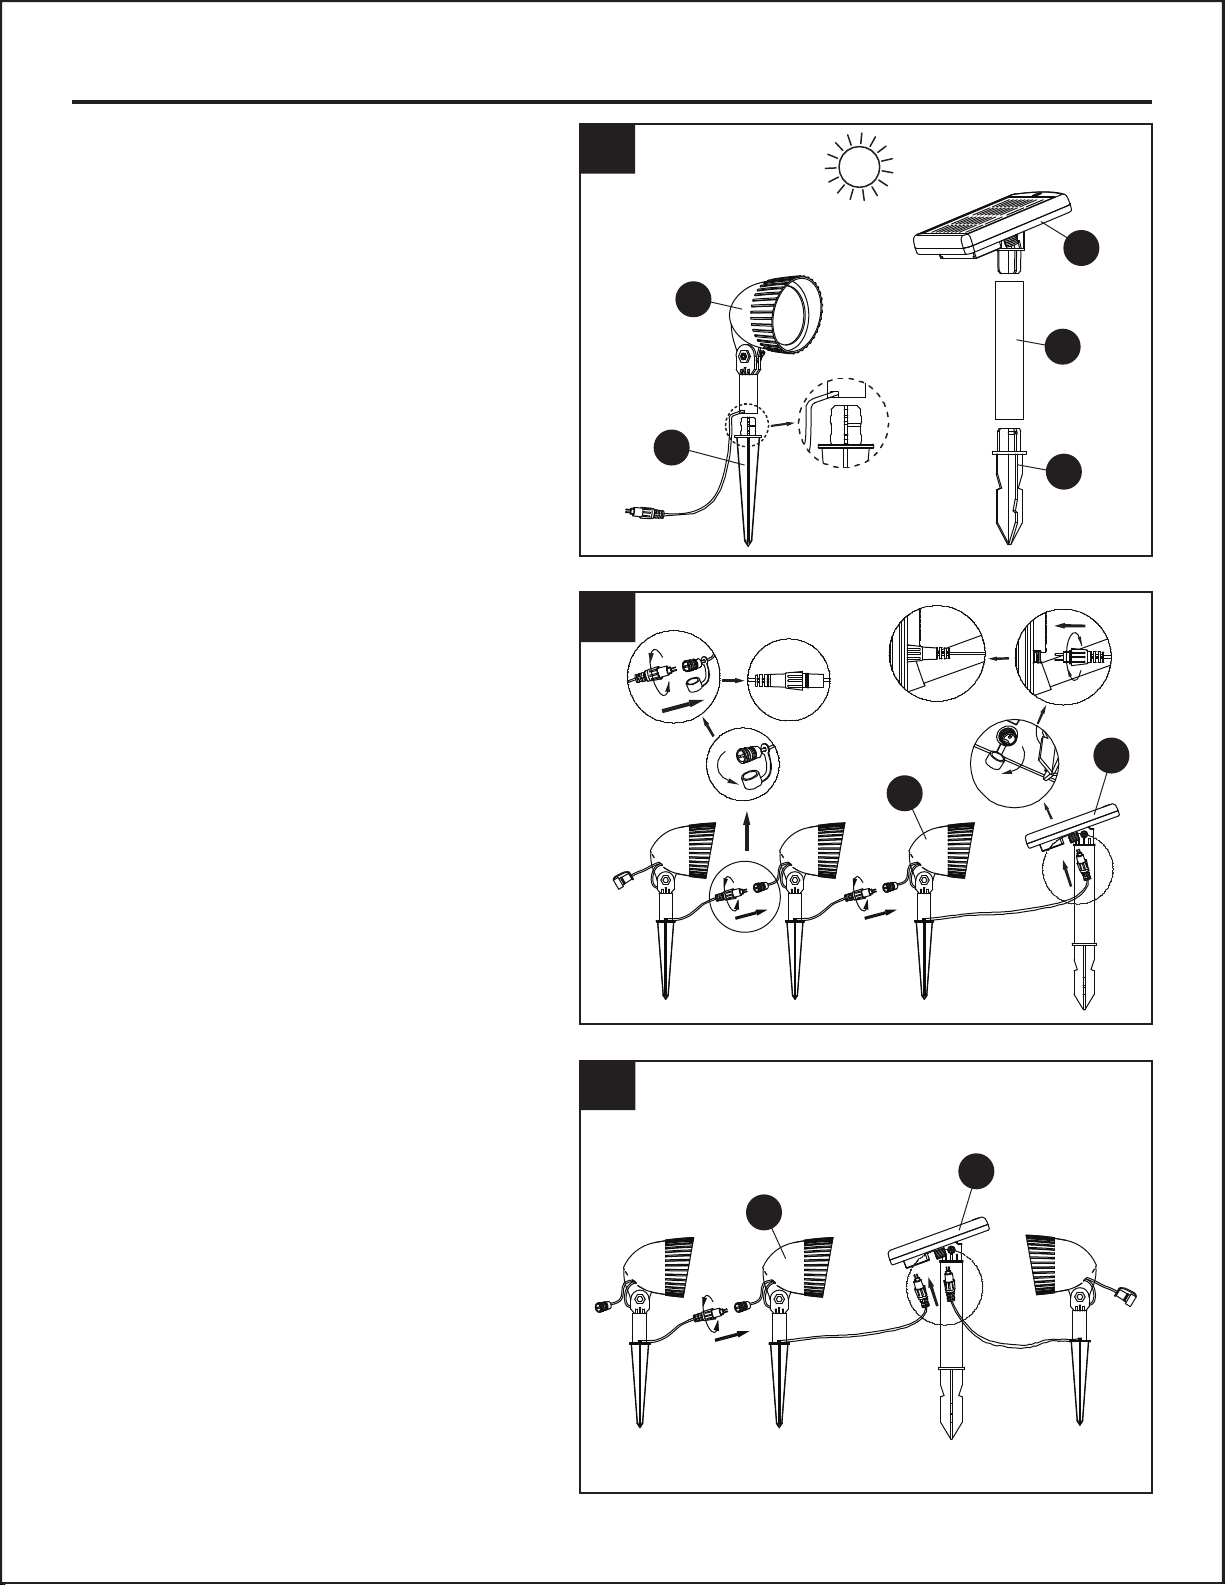
ASSEMBLY INSTRUCTIONS
4
FOR FIRST TIME USE: assemble the battery
attached referring to replacing battery
instructions on Page5.
1. Slide the solar panel (C) into post (F).
Attach the post (F) to solar panel
stake (G). Push the assembly firmly into
the ground. Attach the spot head (A) to
spot head stake (B). Push the assembly
firmly into ground.
CAUTION: DO NOT use a hammer. For
ground with hard soil, use a trowel (not
included) to loosen soil to prevent
breaking the stakes.
2A. Connect the spot heads (A) to the
solar panel (C) by one outlet.
2B. Connect the spot heads (A) to the
solar panel (C) by two outlets.
1
2A
2B
A
B
C
F
G
C
A
C
A
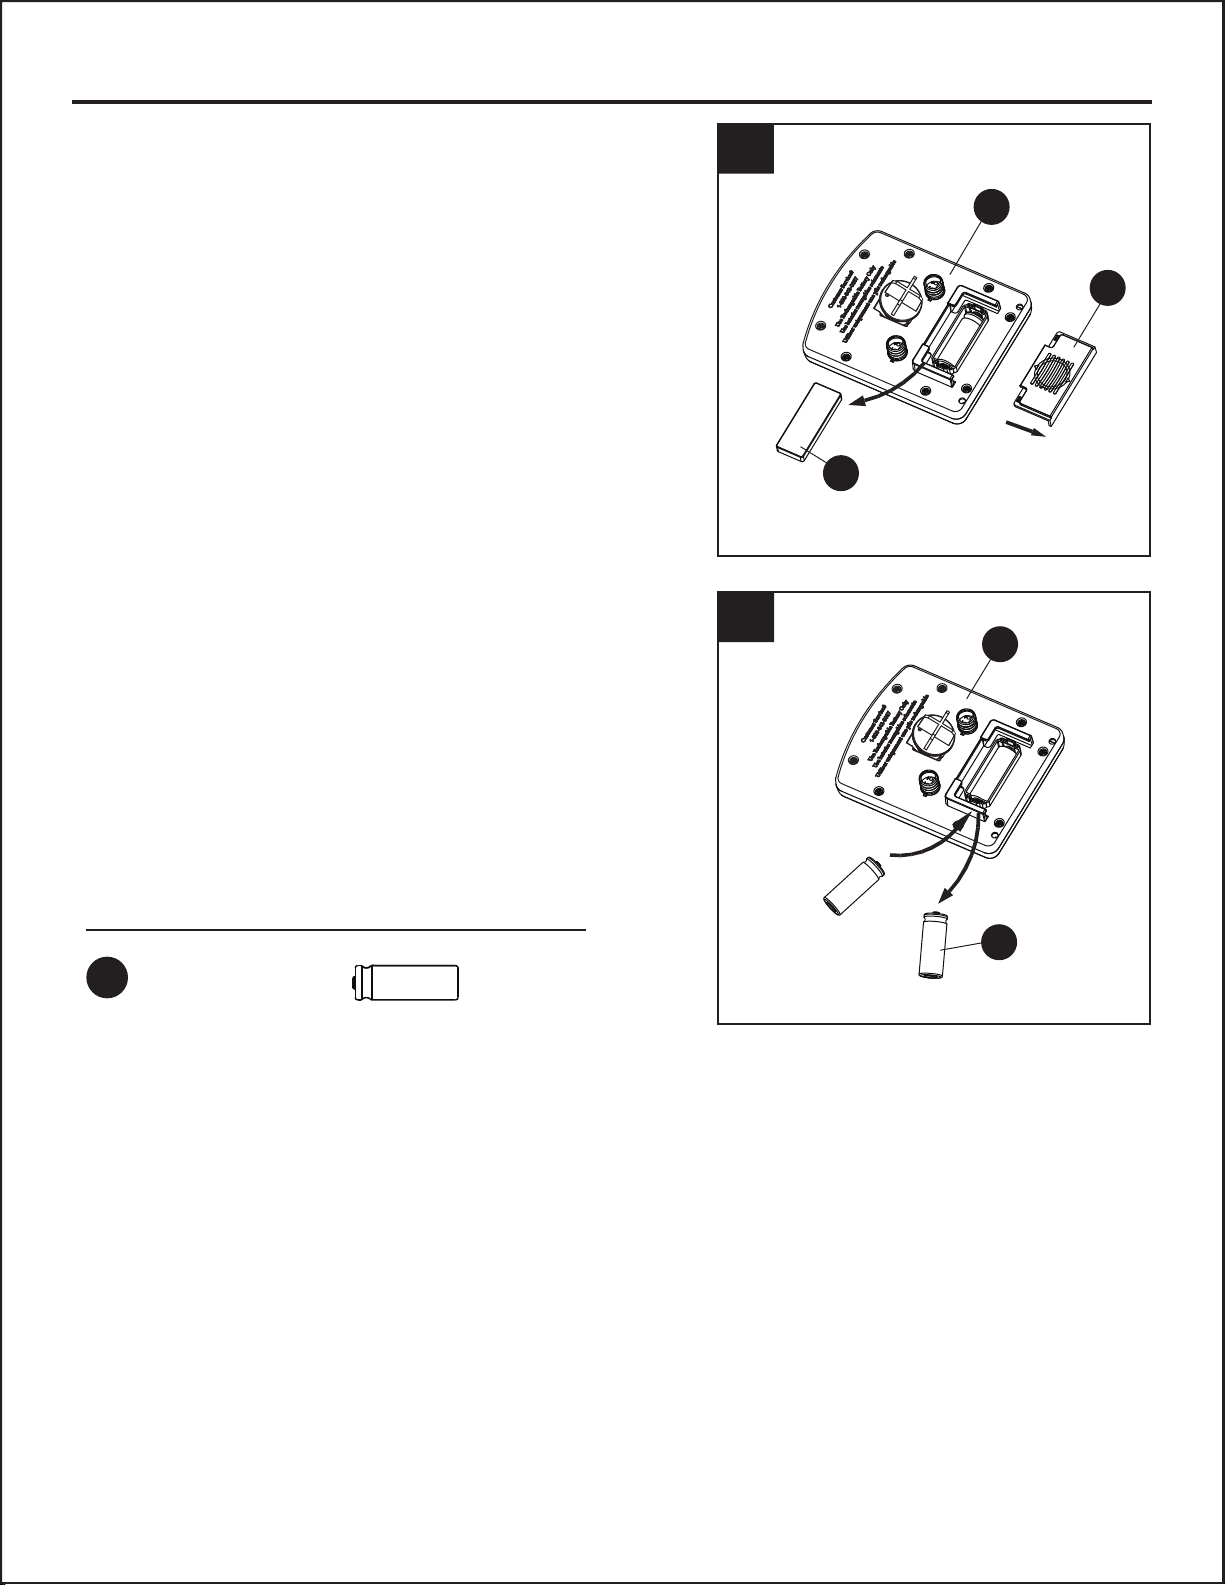
REPLACING BATTERY
5
For best performance, replace with rechargeable 3.2V
Lithium (LiFePO4) battery every 3 years or when
performance diminishes.
1. Remove the battery cover (E) and waterproof
cover (D) from solar panel (C).
Hardware Used
AA x 1
Battery
DD
2. Replace battery (AA) with a new rechargeable
battery. Replace the waterproof cover (D) and
battery cover (E).
FOR FIRST TIME USE:
Please remove the plastic battery wrap before
inserting battery into the back of the solar panel.
Allow the light to run 8-12 charging and discharging
cycles to reach battery's maximum capacity.
2
1
C
D
E
C
AA
6
CARE AND MAINTENANCE
• For optimum performance, it is best to install the solar lights in full sunlight and charge for 10-12
hours. Allow the light to run at least 8-12 entire charging and discharging cycles to reach battery’s
maximum capacity.
• Keep debris and snow off the solar panel to allow the battery to recharge.
• If lights have been covered by snow for a long time, allow batteries to recharge in full, direct
sunlight for at least 10-12 hours so they can maintain maximum capacity.
TROUBLESHOOTING
PROBLEM POSSIBLE CAUSE CORRECTIVE ACTION
The nightly run time
is shorter.
1. Battery is not fully charged.
2. Battery is reaching the end of its
life.
1. Place the solar light in an area
where it can receive the
maxiumum amount of full, direct
sunlight everyday.
2. Replace the old battery with a
fresh one.
Solar light does not
turn on at night.
1. Solar light is installed close to other
light sources.
1. Relocate the solar light or
eliminate other light sources.
WARRANTY
7
The manufacturer warrants this product against defects in material or workshop for a period from the
date of original purchase. The manufacturer agrees to either repair the product or replace it. Only the
original purchaser of this product is extended this warranty. No warranty work will be provided under
this warranty without purchaser’s receipt or other proof of the date of original purchase acceptable to
us. Purchasing this product from a third party vendor negates all warranties (expressed or implied) in
this warranty.
REPLACEMENT PARTS LIST
For replacement parts, call our customer service department at 1-800-643-0067, 8 a.m. - 6 p.m., EST,
Monday - Thursday, 8 a.m. - 5 p.m., EST, Friday.
Printed in China
A
B
C
D
E
F
G
PART DESCRIPTION PART #
A Spot Head 307000-0228IR
B Spot Head Stake 303003-0032BK
C Solar Panel 307000-0227IR
D Waterproof Cover 990599-0065BK
E
Battery Cover
301004-1019IR
F
Post
303002-0046IR
G Solar Panel Stake 303003-0022BK
Portfolio Outdoor® est une marque de commerce déposée
de LF, LLC. Tous droits réservés.
ARTICLE #0329342
8
Des questions, des problèmes, des pièces manquantes? Avant de retourner l’article au
détaillant, appelez notre service à la clientèle au 1 800 643-0067, entre 8 h et 18 h (HNE),
du lundi au jeudi, ou entre 8 h et 17 h (HNE) le vendredi.
JOIGNEZ VOTRE REÇU ICI
Numéro de série Date d’achat
MODÈLE #00944
PROJECTEURS SOLAIRES
À RENDEMENT
ÉLEVÉ
(ensemble de 3)
CONTENU DE L’EMBALLAGE
9
C
D
E
F
G
PIÈCE DESCRIPTION QUANTITÉ
A Projecteur 3
B Piquet de projecteur 3
C Panneau solaire
1
D Couvercle étanche (préassemblé au panneau solaire [C])
1
E Couvercle du compartiment à piles (préassemblé au panneau solaire [C])
1
F Tige
G Piquet de panneau solaire
1
1
A
B
QUINCAILLERIE INCLUSE
Pile
Qté. 1
10
AA
CONSIGNES DE SÉCURITÉ
PRÉPARATION
Assurez-vous de lire et de comprendre l’intégralité de ce manuel avant de tenter d’assembler,
d’utiliser ou d’installer le produit.
Avant de commencer l’assemblage du produit, assurez-vous d’avoir toutes les pièces. Comparez les
pièces avec la liste du contenu de l’emballage et celle de la quincaillerie ci-dessus. S’il y a des pièces
manquantes ou endommagées, ne tentez pas d’assembler le produit. Communiquez avec le service
à la clientèle pour obtenir des pièces de rechange.
Temps d’assemblage approximatif : 2 minutes
Outils utiles (non inclus) : Truelle
AVERTISSEMENT
• N’utilisez que des piles rechargeables.
• Évitez d’ouvrir, de court-circuiter ou d’endommager les piles; vous risqueriez de vous blesser.
MISE EN GARDE
• Ne jetez pas les piles avec les déchets courants ou les ordures ménagères et ne les jetez pas au
feu; elles pourraient couler ou exploser.
• Recyclez les piles ou jetez-les conformément aux règlements locaux, provinciaux ou fédéraux afin
de préserver l’environnement.
• Ne combinez pas des piles usagées avec des piles neuves.
• Ne combinez pas des piles alcalines avec des piles ordinaires (carbone-zinc).
(grandeur non réelle)
Questo manuale è adatto per i seguenti modelli
1
Indice
Lingue:
Altri manuali LF Riflettore


Manuali Riflettore popolari di altre marche

Guangzhou Yinhe Lighting&Sound Equipment Factory
Guangzhou Yinhe Lighting&Sound Equipment Factory NE-204 Manuale utente

LIVARNO home
LIVARNO home 375304 2101 Istruzioni originali

Cameo
Cameo CLQS40WW Manuale utente

Leviton
Leviton Ellipsoid 5/50 Manuale utente

Monacor
Monacor img Stage Line PARL-56PDX/CR Manuale utente

Vector
Vector SL3AKV Manuale utente


EuroLite
EuroLite Akku flat light 1 Manuale utente

Commercial Electric
Commercial Electric SPTM-1401 Manuale utente

Vision & Control
Vision & Control SLB-500-W5K7-P-SL Manuale utente

Teknik
Teknik FLEXI Manuale utente

Craftsman
Craftsman CMXLSB10 Manuale utente

EuroLite
EuroLite LED SLS-144 UV Floor Spot Manuale utente