LG L1918S-BN Manuale utente

Make sure to read the Important Precautions before using this product.
Keep the User's Guide(CD) in an accessible place for furture reference.
Have the model and serial number ready hen calling for support.
L1918S
LCD Computer Monitor
User’s Guide

A1
This unit has been engineered and manufactured to ensure your personal
safety, however improper use may result in potential eletrical shock or fire
hazards. In order to allow the proper operation of all safeguards
incorporated in this display, observe the following basic rules for its
installation, use, and servicing.
On Safety
Only use the power cord supplied with the unit. The power cord used must have
an equivalent certification by the applicable national standards as the original.
If the power cable is faulty in any way, please contact customer service or the
nearest authorized repair service provider for a replacement.
The power supply cord is used as the main disconnection device. Ensure that the
power outlet used is easily accessible.
Operate the display only from a power source indicated in the specifications of
this manual or listed on the display. If you are not sure what type of power supply
you have in your home, consult with your dealer.
Overloaded AC outlets and extension cords are dangerous. So are frayed power
cords and broken plugs. They may result in a shock or fire hazard. Call your service
technician for replacement.
Do not Open the Display.
There are no user serviceable components inside.
There are Dangerous High Voltages inside, even when the power is OFF.
Contact your dealer if the display is not operating properly.
To Avoid Personal Injury :
Do not place the display on a sloping shelf unless properly secured.
Use only a stand recommended by the manufacturer.
To Prevent Fire or Hazards:
Always turn the display OFF if you leave the room for more than a short period
of time. Never leave the display ON when leaving the house.
Keep children from dropping or pushing objects into the display's cabinet
openings. Some internal parts carry hazardous voltages.
Do not add accessories that have not been designed for this display.
During a lightning storm or when the display is to be left unattended for an
extended period of time, unplug it from the wall outlet.
Important Precautions

A2
Important Precautions
On Installation
Do not allow anything to rest upon or roll over the power cord, and do not place
the display where the power cord is subject to damage.
Do not use this display near water such as near a bathtub, washbowl, kitchen
sink, laundry tub, in a wet basement, or near a swimming pool.
Displays are provided with ventilation openings in the cabinet to allow the release
of heat generated during operation. If these openings are blocked, built-up heat
can cause failures which may result in a fire hazard. Therefore, NEVER:
Block the bottom ventilation slots by placing the display on a bed, sofa, rug, etc.
Place the display in a built-in enclosure unless proper ventilation is provided.
Cover the openings with cloth or other material.
Place the display near or over a radiator or heat source.
Do not rub or strike the LCD Screen with anything hard as this may scratch, mar,
or damage the LCD Screen permanently.
Do not press the LCD screen with your finger for a long time as this may cause
some afterimages.
Some dot defects may appear as Red, Green or Blue spots on the screen.
However, this will have no impact or effect on the display's performance.
If possible, use the recommended resolution to obtain the best image quality for
your LCD display. If used under any mode except the recommended resolution,
some scaled or processed images may appear on the screen. However, this is
characteristic of the fixed-resolution LCD panel.
On Cleaning
Unplug the display before cleaning the face of the display screen.
Use a slightly damp (not wet) cloth. Do not use an aerosol directly on the display
screen because over-spraying may cause electrical shock.
On Repacking
Do not throw away the carton and packing materials. They make an ideal
container in which to transport the unit. When shipping the unit to another
location, repack it in its original material.
On Disposal
The fluorescent lamp used in this product contains a small amount of mercury.
Do not dispose of this product with general household waste.
Disposal of this product must be carried out in accordance to the regulations of
your local authority.

Connecting the Display
A3
Important
Do not remove and re-install the stand frequently, it could damage the stand.
Do not carry the product upside down holding only the stand base. The product may
fall and get damaged or in ure your foot.
Before setting up the monitor, ensure that the power to the monitor, the computer
system, and other attached devices is turned off.
Connecting the stand
1. Place the monitor with its front facing downwardon a soft cloth.
.Assemble the Stand Body into the product in the correct direction as shown in the picture.
Makesureyoupushituntilyouhearit“click”.
3.Assemble the Stand Base(Front, Rear) into the Stand Body in the correct direction.
REAR
REAR
REAR REAR
FRONT FRONT
4.Once assembled take the monitor up carefully and face the front side

A4
Connecting the Display
1. Put a cushion or soft cloth on a flat surface.
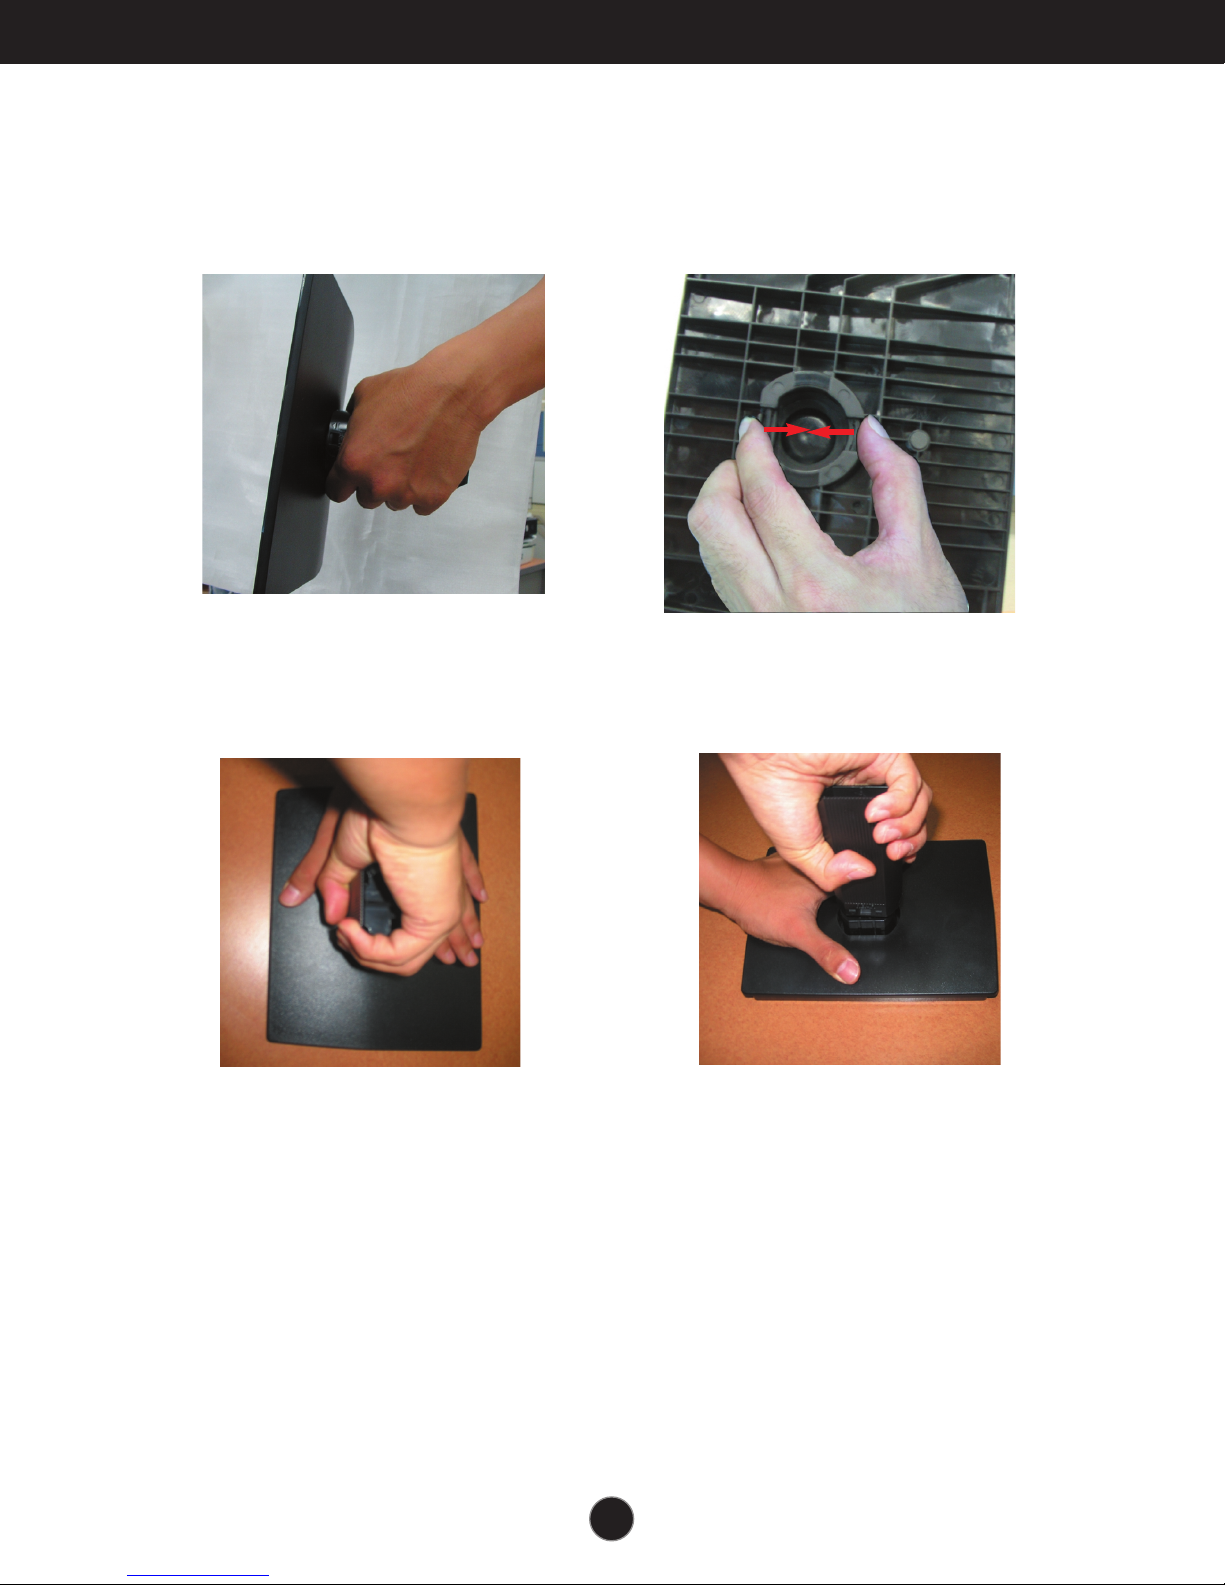
To remove the Stand:
. Place the monitor face down on
the cushion or soft cloth.
3. Hold the product as it follows and lift up the Stand slightly.
4. Change your hold on the product as it follows and turn the Stand Base in the arrow
direction until you hear a "click."
5. Pull out the Stand to remove.
The Head part
The Stand
base part

Connecting the Display
A5
To remove the Stand Base:
1.Hold the body of the Stand as it follows. . Press the two latches at the same time
as it follows.
4. The body of the Stand and the Stand
Base are successfully separated.
3. Pull up the body of the Stand while
holding the Stand Base with the other
hand.

A6
Connecting the Display
20
Before setting up the monitor, ensure that the power to the monitor, the computer
system, and other attached devices is turned off.
Positioning your display
1. Adjust the position of the panel in various ways for maximum comfort.
Tilt Range : -5˚~20˚
Ergonomic
It is recommended that in order to maintain an ergonomic and comfortable viewing
position, the forward tilt angle of the monitor should not exceed 5 degrees.
When adjusting the angle of the screen, do not put your finger(s) in
between the head of the monitor and the stand body .
You can hurt your finger(s).
Warning:

2
1
A7
Connecting the Display
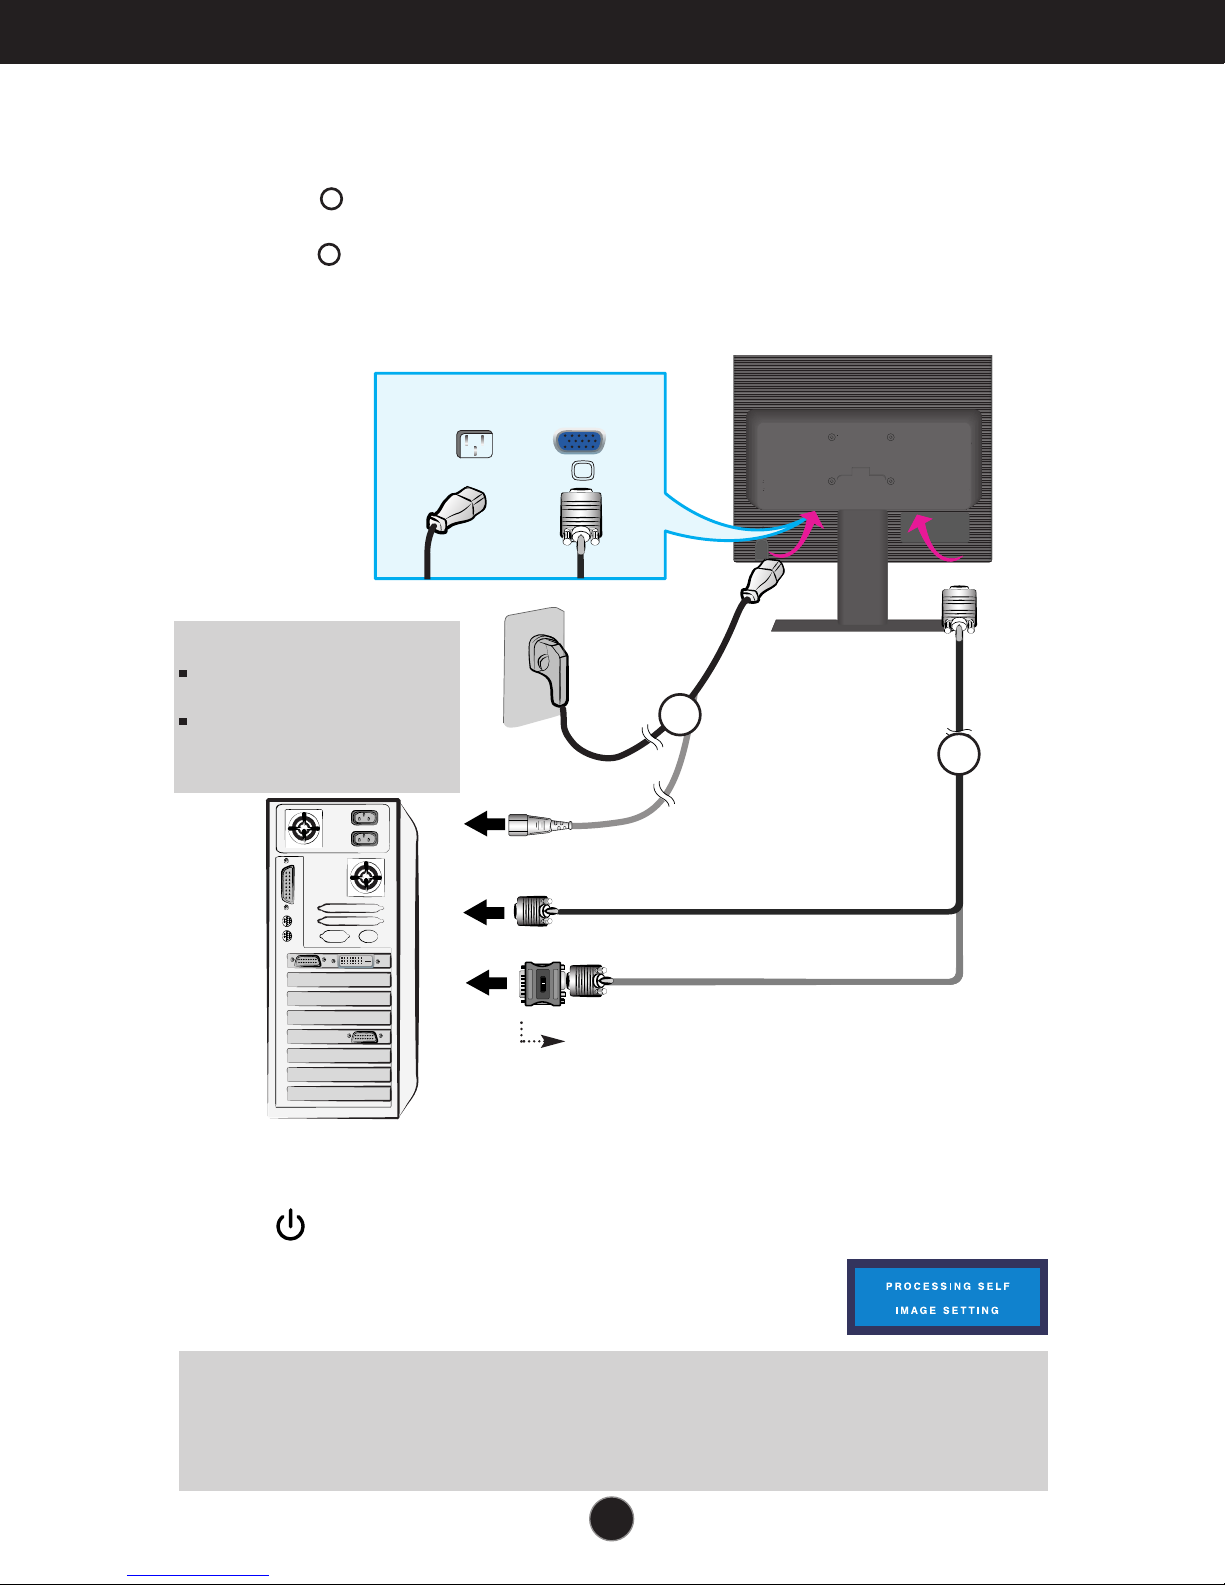
1. Place the monitor in a convenient, well-ventilated location near your computer.
. Connect the signal cable. When attached, tighten the thumbscrews to secure the
connection.
3. Connect the power cord into a proper power outlet that is easily accessible and close to
the display.
Wall-outlet type
C-outlet type
MAC
ower Cord Signal Cable
Varies according to model.
1
2
Mac adapter
For Apple Macintosh use, a separate plug adapter is needed to change
the 15 pin high density (3 row) D-sub V A connector on the supplied
cable to a 15 pin 2 row connector.
4. Press button on the side switch panel to turn the power on.
When monitor power is turned on, the 'Self Image Setting
Function' is executed automatically.
NOTE
The 'Self Image Setting Function' provides the user with optimal display settings. When the user connects the
monitor for the first time, this function automatically ad usts the display to optimal settings for individual input signals.
If you want to ad ust the monitor while in use, or wish to manually run this function once again, push the ‘AUTO/SET’
button on the side panel of the monitor. Otherwise, you may execute the ‘ Factory reset’ option on the OSD
ad ustment menu. However, be aware that this option initializes all the menu items except ‘Language’.
NOTE
This is a simplified representation
of the rear view.
This rear view represents a
general model; your display may
differ from the view as shown.
C
C

A8
Control Panel Functions
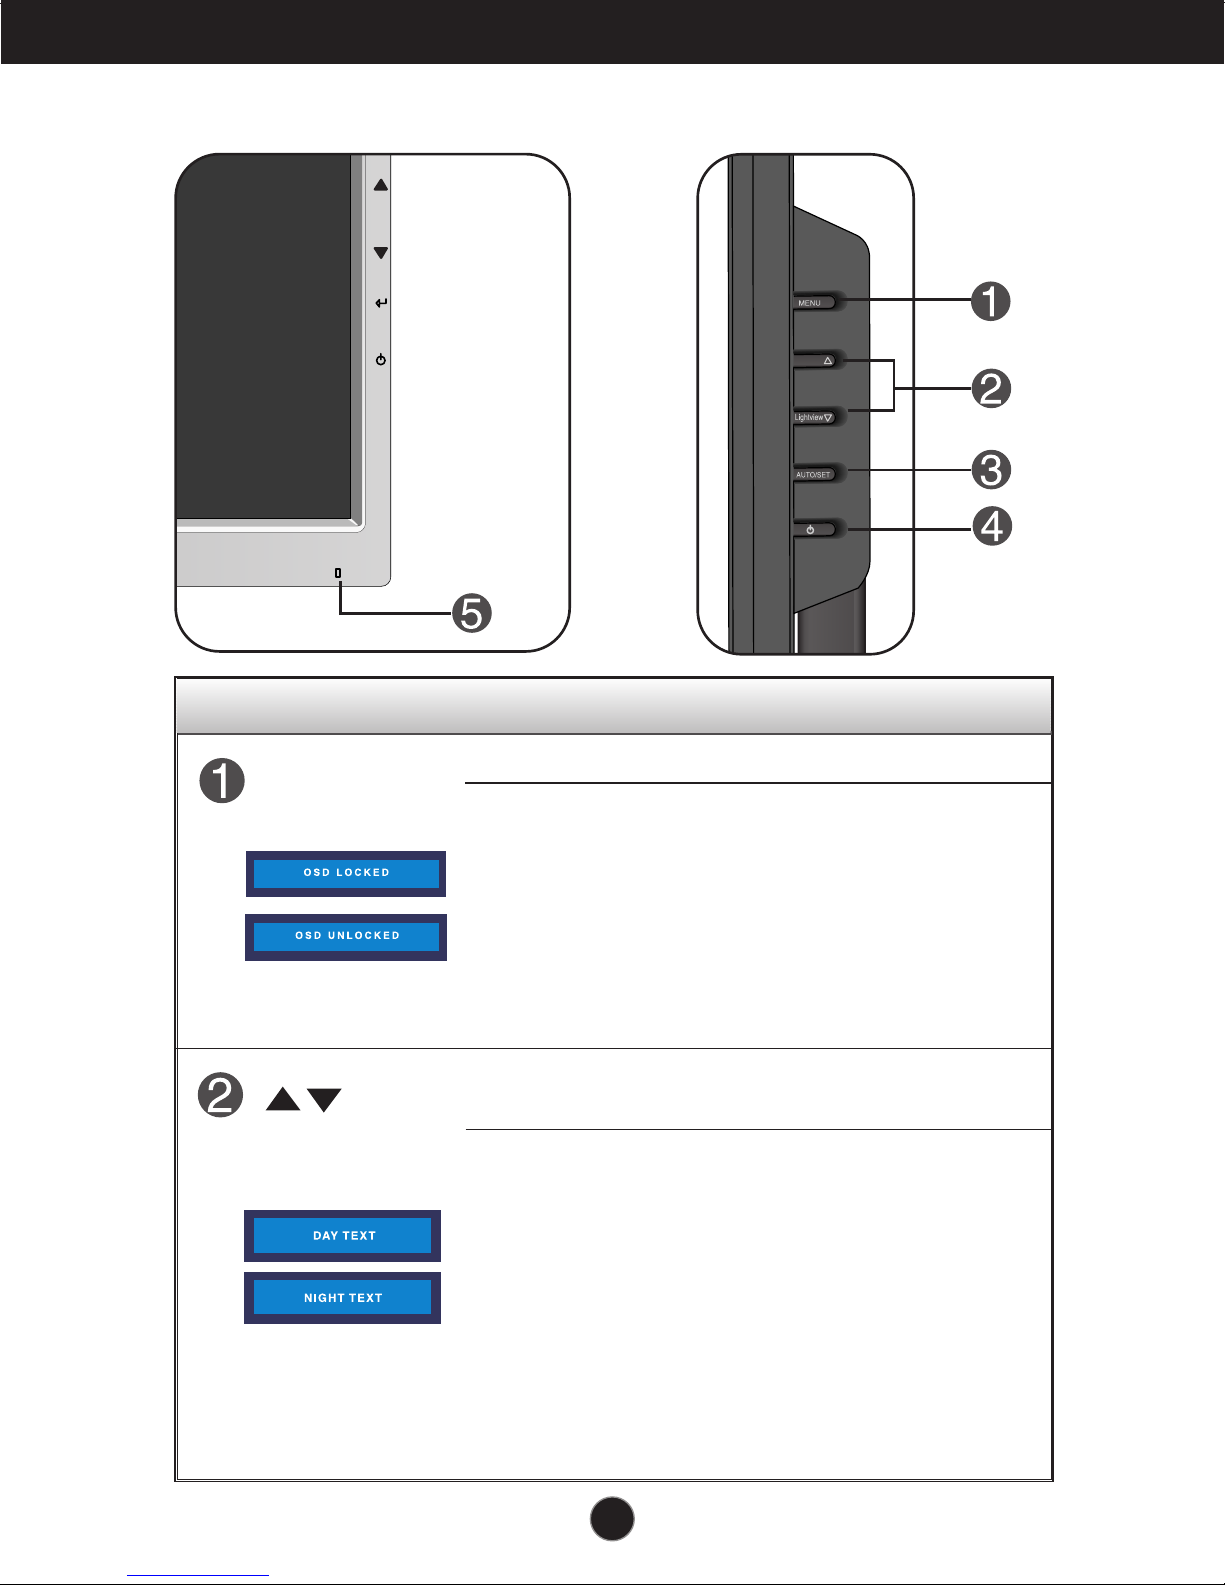
MENU Button
Use this button to enter or exit the On Screen Display.
Control Function
OSD LOCKED/UNLOCKED
This function allows you to lock the current control
settings, so that they cannot be inadvertently changed.
Press and hold the MENU button for several seconds.
The message "OSD LOCKED" should appear.
You can unlock the OSD controls at any time by pushing
the MENU button for several seconds. The message
"OSD UNLOCKED" should appear.
Buttons
Use these buttons to select or ad ust functions in the On
Screen Display.
LightView hot key
Front Panel Controls Side
DAY
NIGHT
This feature lets you easily select the best desired
image condition optimized to the environment
(ambient illumination, image types etc).
• DAY : Bright ambient illumination
• NIGHT : Dark ambient illumination
• TEXT : For text images (Word processing etc.)
• MOVIE : For animation images in videos
or movies
• HOTO : For pictures or drawings
•
NORMAL
: This is under normal operating
conditions

A9
Control Panel Functions
This Indicator lights up green when the display
operates normally(On Mode). If the display is in Sleep
Mode (Energy Saving), this indicator color changes
to amber.
Use this button to turn the display on or off.
ower Button
ower Indicator
Use this button to enter a selection in the On Screen
Display.
AUTO/SET
Button
AUTO IMAGE ADJUSTMENT
When ad usting your display settings, always press
the AUTO/SET button before entering the On Screen
Display(OSD). This will automatically ad ust your
display image to the ideal settings for the current
screen resolution size (display mode).
The best display mode is
19 inch monitor : 1280 x 1024
Control Function
Questo manuale è adatto per i seguenti modelli
2
Indice
Altri manuali LG Monitor