LG SPQ7-W Manuale utente

OWNER’S MANUAL
WIRELESS
SOUND BAR
Please read this manual carefully before operating your set and retain it for future
reference.
Model
S75QR (S75QR, SPQ7-W), SPQ8-S (SPQ8-S, S78S2-S)
2304_Rev02
www.lg.com
Copyright © 2022-2023 LG Electronics Inc. All Rights Reserved.

2
Sound Bar Quick Guide
Installing and using the Product
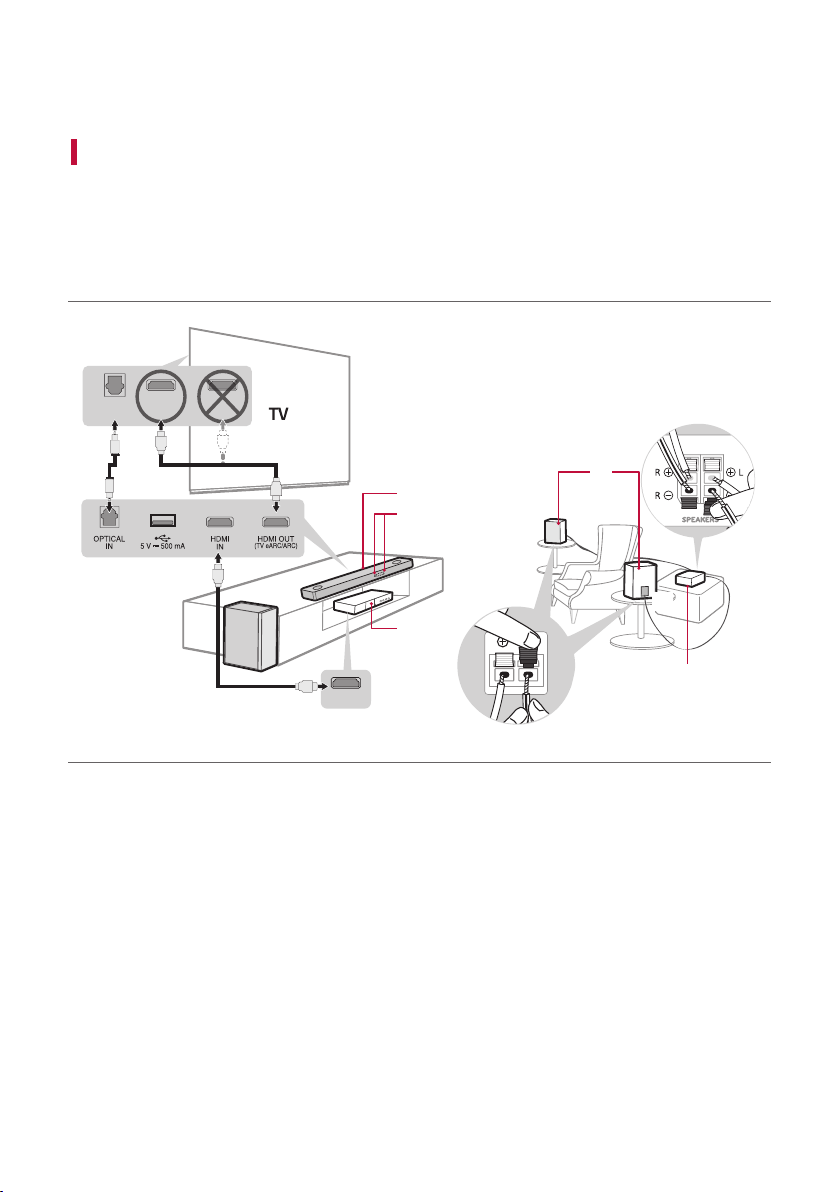
a Connect the sound bar to your TV via an optical cable or an HDMI
cable.
HDMI OUT
aa
b
HDMI IN
(ARC)
OPTICAL
OUT
HDMI IN
c
c
c
D
E
C
B
A
C
A Sound bar
B Remote Control Receiver / Status Display
C Rear Speakers / Wireless Receiver
D Wireless Subwoofer - Install it close to the sound bar.
E External Device - (Blu-ray player, game console, etc.)
Soundbar Quick Guide

3
b If you are using an external device (ex. Blu-ray player, game console, etc.), connect it to the sound bar via an
HDMI cable.
c Connect to power in the following order: wireless subwoofer [wireless receiver [sound bar. Then, turn on
the sound bar. When the connection is automatically established with the sound bar, the LEDs on the wireless
subwoofer and the wireless receiver will light up in green. ([See “Connecting the Product” on page 6.)
d Using the product with your TV ([See “Connecting with an
Optical Cable”, “Connecting with LG Sound Sync (Wireless)”,
“Connecting with an HDMI Cable” on page 32, 34, 35.)
A Press the Function button repeatedly until “OPT/HDMI ARC” appears on the status display.
B On your TV's settings, set the output speaker to [HDMI ARC], [Optical], or [External Speaker].
C When the TV is properly connected to the product, “OPT”, “ ARC”, or “E-ARC” will appear on the status display
with a sound.
e Connecting the product to your smartphone via Bluetooth ([
See “Connecting via Bluetooth” on page 40.)
A Tap the Settings button on your smartphone and select Bluetooth. Turn on the Bluetooth function.
( Off > On)
B Press the Bluetooth pair button. After a moment, you will see “BT READY” on the status display.
C Find and tap the product on your smartphone. The product appears as “LG S75QR (XX).”
D When the product is connected to your smartphone via Bluetooth, you can see the status display change
from “PAIRED” [“Connected Bluetooth device name” [“BT”.
f Connecting to the LG Sound Bar app ([See “Connecting with a
Smartphone via LG Sound Bar app” on page 43.)
A Find and install the LG Sound Bar app on Google Play or App Store from your smartphone.
B You can get more information regarding its use by selecting [Help] in [Setting].

4
Manually connecting the sound bar to the wireless subwoofer or wireless
receiver ([See “Connecting the wireless subwoofer manually”, “Manual
connection” on page 8, 10.)
If you see a red LED on the back of the wireless subwoofer or on the front of the wireless receiver, it means
that the sound bar is not connected to the speakers. If this is the case, connect them in the following order.
A Press the Power button on the sound bar to turn it off.
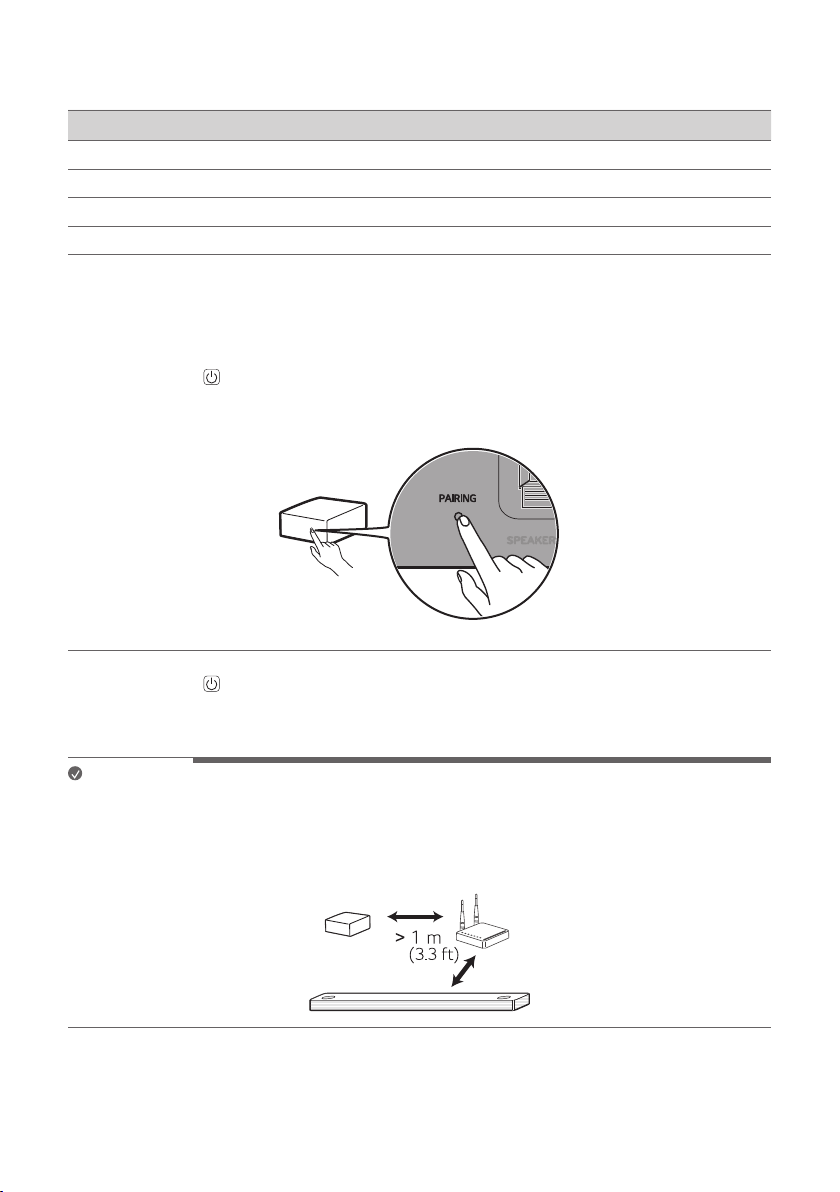
B Press the PAIRING button on the back of the disconnected wireless subwoofer or wireless receiver.
Check if each LED blinks green.
- If you still see a red LED on the back of the wireless subwoofer, press and hold the button on the
back of the subwoofer again.
C Press the Power button on the sound bar to turn it on.
D When the connection is established, you will see a green LED light on the back of the wireless
subwoofer or on the front of the wireless receiver light up in green.

5
Table of Contents
Sound Bar Quick Guide
2Installing and using the Product
Installation
6Connecting the Product
12 Enjoying enhanced sound
Exploring the Product
20 Front
22 Back
23 Exploring Remote Control
Connecting to the TV
32 Connecting with an Optical Cable
34 Connecting with LG Sound Sync (Wireless)
35 Connecting with an HDMI Cable
Connecting to an External Device
37 Connecting with an HDMI Cable
39 Connecting with an Optical Cable
Using the Product as an Audio
System
40 Connecting via Bluetooth
43 Connecting with a Smartphone via LG Sound
Bar app
45 Connecting to a USB Storage Device
Mounting the Product to a Wall
47 Checking before mounting to a wall
49 Mounting the Product to a Wall
Safety Precautions
51 Safety and Regulatory
Before Reporting Product
Malfunction
54 Troubleshooting
Appendix
57 Specifications
59 Registered Trademarks and Licenses
61 Open Source Software Notice Information
61 Handling the Product

6
Installation
Connecting the Product
You can enjoy a richer sound by connecting the sound bar to the wireless subwoofer.
Connecting the wireless subwoofer automatically
After completing installation, the wireless subwoofer will automatically be connected to the sound bar. Connect
the sound bar to the subwoofer in the following order.
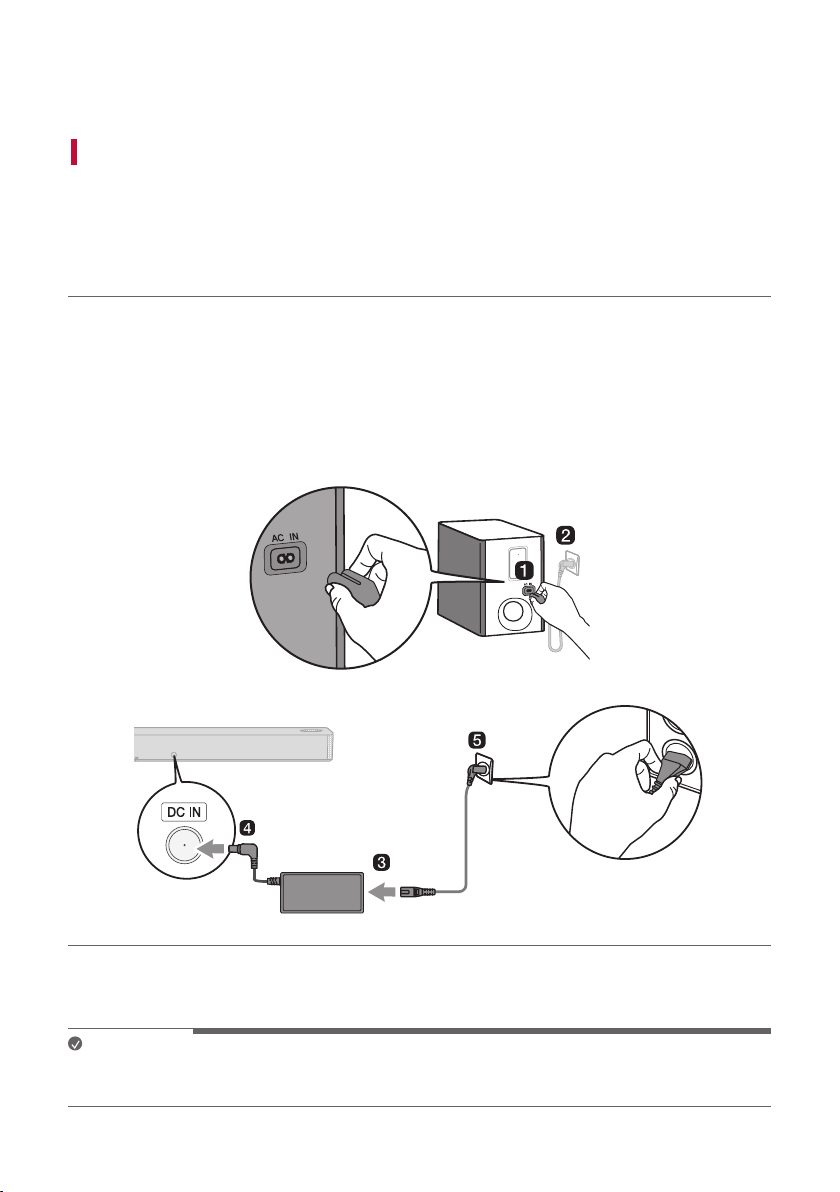
a Plug the power cable into the wireless subwoofer.
b Plug the power cable connected to the wireless subwoofer into an outlet.
c Plug the power cable into the AC adapter.
d Connect the AC adapter cable to the DC IN (AC adapter input) terminal on the back of the product.
e Plug the power cable connected to the AC adapter into an outlet.
f When the connection is automatically established, you will see the LED on the back of the wireless subwoofer
light up in green.
Note
• Make sure to use the provided AC adapter. Using other AC adapters may lead to malfunction and will forfeit the
product warranty.
Installation

7
Checking the connection with the LED on the back of the wireless
subwoofer
You can check the connection status by looking at the LED on the back of the wireless subwoofer.
LED Color Status
Blinking green Connecting in progress
Green Connected successfully
Red Bad connection, or the subwoofer is in standby
Off Power cable not connected

8
Connecting the wireless subwoofer manually
If you see a red LED on the back of the wireless subwoofer, it means that the sound bar is not connected to the
subwoofer. If this is the case, connect them in the following order.
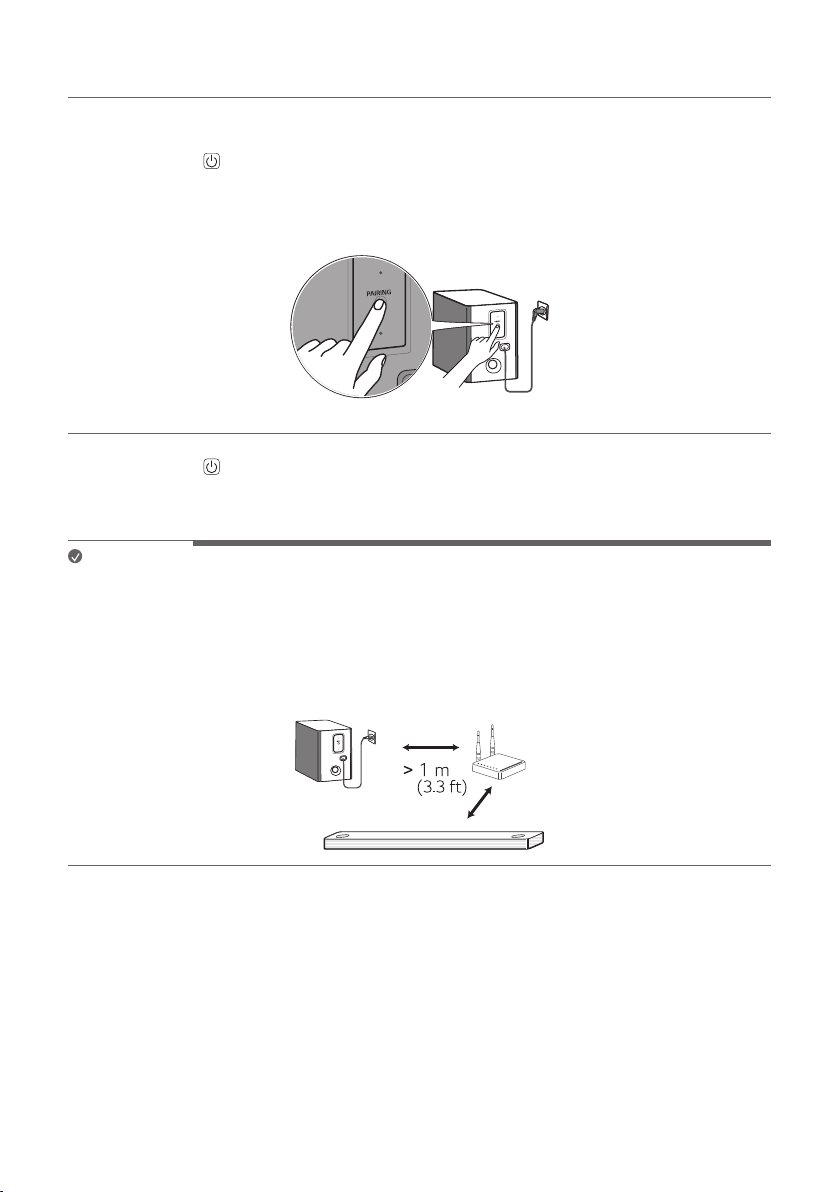
a Press the Power button on the sound bar to turn it off.
b Press the PAIRING button on the back of the wireless subwoofer. Check if the LED on the back of the
subwoofer is blinking green. If you still see a red LED on the wireless subwoofer, press and hold the button on
the back of the subwoofer again.
c Press the Power button on the sound bar to turn it on.
d When the connection is established, you will see the LED light on the back of the wireless subwoofer light up
in green.
Note
• Install the sound bar as close to the wireless subwoofer as possible. The closer the distance between the sound
bar and the wireless subwoofer, the better the sound quality.
• Please ensure there are no obstacles between the sound bar and the wireless subwoofer.
• To prevent wireless interference, maintain a distance of at least 1 m (3.3 ft) between the sound bar or the
wireless subwoofer and any peripheral devices that generate strong electromagnetic waves (ex. wireless
routers, microwave ovens, etc.).

9
Connecting the rear speakers to the wireless receiver
Automatic connection
After completing installation, the wireless receiver will automatically be connected to the sound bar. Connect the
sound bar to the wireless receiver in the following order.
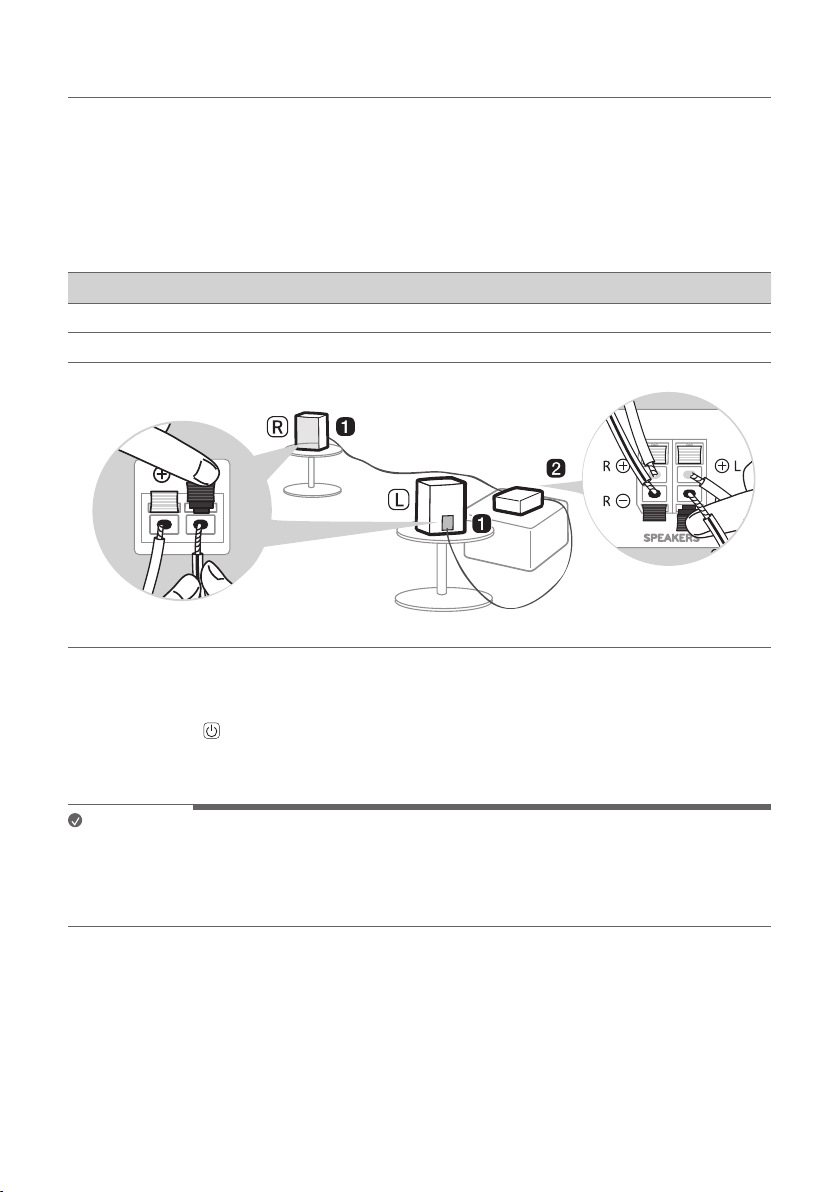
a Connect the speaker cables to the corresponding terminals on the rear speakers (left, right). Connect the
black striped cable to the negative terminal and the other cable to the positive terminal.
b Connect the speaker cables on the rear speakers (left, right) to the wireless receiver.
Receiver Terminal Color Speaker Position
Blue LLeft rear
Gray RRight rear
c Plug the power cable into the wireless receiver.
d Plug the power cable connected to the wireless receiver into an outlet.
e Press the Power button on the sound bar to turn it on.
f When the connection is automatically established, you will see the LED on the front of the wireless receiver
light up in green.
Note
• Please only use the speakers provided with the product. Using other speakers may cause malfunction.
• Connect the speaker cables to the corresponding terminals. Connect to the positive cable to the positive
terminal and the negative cable to the negative terminal. An incorrectly connected cable will distort the sound
or produce no bass.

10
Checking connection status with the LED color
You can check the connection status with the LED on the front of the wireless receiver.
LED Color Status
Blinking green Connecting In progress
Green Connected successfully
Red Bad connection, or the receiver is in standby
Off Power cable not connected
Manual connection
If you see a red LED on the front of the wireless receiver, it means that the sound bar is not connected to the
receiver. If this is the case, connect them in the following order.
a Press the Power button on the sound bar to turn it off.
b Press the PAIRING button on the back of the wireless receiver. Check if the LED on the front of the wireless
receiver is blinking green.
c Press the Power button on the sound bar to turn it on.
d When the connection is established, you will see the LED light on the front of the wireless receiver light up in
green.
Note
• Keep the rear speakers at least 30 cm (11.8 inch) away from the TV or monitor.
• To prevent wireless interference, maintain a distance of at least 1 m (3.3 ft) between the sound bar or the
wireless receiver and any peripheral devices that generate strong electromagnetic waves (ex. wireless routers,
microwave ovens, etc.).
Questo manuale è adatto per i seguenti modelli
4
Indice
Altri manuali LG Sistema di altoparlanti