
LG GCWF1069CS1 Manuale utente

WASHING MACHINE
SERVICE MANUAL
MODEL : GCWF1069CS1/GCWF1069CD1/GCWF1069QS1/
CAUTION
READ THIS MANUAL CAREFULLY TO DIAGNOSE
PROBLEMS CORRECTLY BEFORE SERVICING THE UNIT.
Any reproduction, duplication, distribution (including by way of email, facsimile or other electronic means),
publication, modification, copying or transmission of this Service Manual is STRICTLY PROHIBITED unless you
have obtained the prior written consent of the LG Electronics entity from which you received this Service
Manual. The material covered by this prohibition includes, without limitation, any text, graphics or logos in this
Service Manual.
Copyright © 2016 - 2017 LG Electronics Inc. All rights reserved. Only training and service purposes.
CONFIDENTIAL
GCWF1069QD1/GCWF1069CS3/GCWF1069CD3/
GCWF1069QS3/GCWF1069QD3

2
CONTENTS
1.IMPORTANT SAFETY INSTRUCTIONS ............................................................................. 3
2. SPECIFICATIONS ............................................................................................................... 4
3. FEATURES AND TECHNICAL EXPLANATION .............................................................. 5~6
4. PARTS IDENTIFICATION ..................................................................................................... 7
5. INSTALLATION INSTRUCTIONS .................................................................................. 8~13
6. OPERATION ................................................................................................................ 14~16
7. WIRING DIAGRAM/PROGRAM CHART/PCB LAYOUT ............................................. 17~18
8.TROUBLESHOOTING .................................................................................................. 19~22
8-1. BEFORE PERFORMING SERVICE ......................................................................... 19
8-2. QC TEST MODE . ..................................................................................................... 19
8-3. HOW TO CHECK THE WATER LEVEL FREQUENCY ............................................ 19
8-4. HOW TO CHECK THE RPM ..................................................................................... 19
8-5. ERROR DISPLAY ............................................................................................... 20~21
8-6. DISPENSER .............................................................................................................. 22
9. DIAGNOSIS AND TROUBLESHOOTING .................................................................. 23~35
10. DISASSEMBLY INSTRUCTIONS .............................................................................. 36~44
11. EXPLODED VIEW ....................................................................................................... 45~48
11-1. CABINET & CONTROL PANEL ASSEMBLY - COIN TYPE ................................... 45
11-2. DRUM & TUB ASSEMBLY ...................................................................................... 46
11-3-1. CABINET&CONTROL PANEL ASSEMBLY(FOR SINGLE MODEL) ................... 47
11-3-2. CABINET&CONTROL PANEL ASSEMBLY(FOR STACK MODEL) ..................... 48
Copyright © 2016 - 2017 LG Electronics Inc. All rights
reserved. Only training and service purposes.

3
1. IMPORTANT SAFETY INSTRUCTIONS
READ ALL INSTRUCTIONS BEFORE USE
!
WARNING
For your safety, the information in this manual must be followed to minimize the risk of fire
or explosion, electric shock, or to prevent property damage, injury to persons, or death.
IMPORTANT SAFETY INSTRUCTIONS
• Read all instructions before using the washer.
• Do not wash articles that have been previously
cleaned in, washed in, soaked in, or spotted with
gasoline, dry cleaning solvents, or other flammable
or explosive substances, as they give off vapors
that could ignite or explode.
• Do not add gasoline, dry cleaning solvents, or
other flammable or explosive substances to the
wash water. These substances give off vapors that
could ignite or explode.
• Under certain conditions, hydrogen gas may be
produced in a hot water system that has not been
used for 2 weeks or more. HYDROGEN GAS IS
EXPLOSIVE. If the hot water system has not been
used for such a period, before using the washing
machine, turn on all hot water faucets and let the
water flow from each for several minutes. This will
release any accumulated hydrogen gas. As the gas
is flammable, do not smoke or use an open flame
during this time.
• Do not allow children to play on or in the washer.
Close supervision of children is necessary when
the washer is used near children.
• Before the washer is removed from service or
discarded, remove the door to prevent children
from hiding inside.
• Do not install or store the washer where it will be
exposed to the weather.
• Do not tamper with controls.
• Do not repair or replace any part of the washer or
attempt any servicing unless specifically
recommended in the user-maintenance
instructions or published user-repair instructions
that you understand and have the skills to carry
out.
• See Installation Instructions for grounding
requirements.
• ALWAYS follow the fabric care instructions
supplied by the garment manufacturer.
• Do not place items exposed to cooking oil in your
washer. Items contaminated with cooking oils may
contribute to a chemical reaction that could cause
a load to catch fire.
• Do not use fabric softeners or products to
eliminate static unless recommended by the
manufacturer of the fabric softener or product.
WARNING : To reduce the risk of fire, electric shock, or injury to persons when using the washer, follow
basic precautions, including the following:
SAVE THESE INSTRUCTIONS
This appliance must be grounded. In the event of malfunction or breakdown, grounding will reduce the risk
of electric shock by providing a path of least resistance for electric current. This appliance is equipped with
a cord having an equipment-grounding conductor and grounding plug. The plug must be plugged into an
appropriate outlet that is properly installed and grounded in accordance with all local codes and ordinances.
• Do not use an adapter or extension cord.
• Do not remove ground prong.
• If you don’t have the proper outlet, consult an electrician.
GROUNDING INSTRUCTIONS
WARNING: Improper connection of the equipment-grounding conductor can result in risk of electric shock. Check
with a qualified electrician or serviceman if you are in doubt as to whether the appliance is properly
grounded. Do not modify the plug provided with the appliance - if it does not fit the outlet, have a proper
outlet installed by a qualified electrician.
!
!

2. SPECIFICATIONS
4
MODEL GCWF1069CS1/GCWF1069CD1/
GCWF1069QS1/GCWF1069QD1
GCWF1069CS3/GCWF1069CD3/
GCWF1069QS3/GCWF1069QD3
COLOR
BLUE WHITE STAINLESS SILVER
POWER SUPPLY
120V, 60Hz
PRODUCT WEIGHT
190 lbs. (87kg)
ELECTRIC POWER
CONSUMTION
WASHING
500W
DRAIN MOTOR
80W
CIRCULATION
MOTOR 45W
FUSE 250V, 12A (Time Delay)
REVOLUTION SPEED WASH
45 rpm
SPIN
1150 RPM (Default : 1150 RPM)
CYCLES
4
OPTIONS
ADD SUPER WASH Cycle (OPL:Custom PGM)
OPERATIONAL WATER PRESSURE
20 - 120 psi (138 ~ 827 kPa)
CONTROL TYPE
Electronic
WASH CAPACITY
3.73 cu.ft (IEC : 4.3 cu.ft)
DIMENSIONS
686 mm (W) X 767 mm (D) X 983 mm (H), 1337mm (D with door open)
DOOR SWITCH TYPE PTC + Solenoid
WATER LEVEL 10 steps (by sensor)
LAUNDRY LOAD SENSING Incorporated
ERROR DIAGNOSIS Incorporated

5
3. FEATURES & TECHNICAL EXPLANATION
3-1. FEATURES
Direct Drive System
The advanced Brushless DC motor directly drives the drum
without belt and pulley.
The Tilted Drum and Extra Large Door Opening
Tilted drum and extra large door opening make it possible
to load and unload easily.
Ultra Capacity
The larger drum enables not just higher head drop and stronger centrifugal
force, but also less tangling and wrinkling of the laundry. Heavier loads, such
as king size comforters, blankets, and curtains, can be washed.
SEE-THROUGH DOOR AND BIG DOOR
You can see the laundry throughout the cycle.
Stainless steel drum offers extreme durability.
STAINLESS STEEL DRUM
Magnetic Door Plunger
Safely and conveniently secure the door slightly ajar with the magnetic door plunger. This will
promote air circulation and allow the interior of the machine to dry. To use this feature, after the
load has been removed, do not close the door completely. When the magnetic door plunger
comes into contact with the metal washer cabinet, it will secure the door slightly open allowing the
interior of the washer to dry.
TUB CLEAN
Regular cleaning of the tub on a monthly basis using TUB CLEAN can help
keep the tub clean and fresh.

6

(-)
(+)
4. PARTS IDENTIFICATION
Drain Hose
Dispenser
(for single model)
Dispenser
(for stack model)
Door
Lower Cover Cap
Drain Plug Drain Pump Filter
Adjustable Feet
Power Plug
Control Panel
Shipping Bolts (4)
Cold Water Inlet
Hot Water Inlet
Air Vent for Safety
· If the supply cord is damaged,
it must be replaced by the
manufacturer or an authorized
service technician in order t
avoid a hazard.
Name: Front-loading Washing Machine
Power supply: 120V, 60Hz
Size: 686 mm (W) X 767 mm (D) X 983 mm (H), 1337mm (D with door open)
27"(W) X 30 3/16"(D) X 3811/16"(H), 525/8" (D with door open)
Weight: 190 lbs. (87 kg)
Wash capacity: 3.73 cu.ft (IEC:4.3 cu.ft)
Spin speed: 1150 rpm max.
Permissible water pressure: 20 - 120 psi (138 ~ 827kPa)
Back of Washer
Specifications subject to change by manufacturer.
Note
Accessories
Hot and Cold Water
Hoses
Elbow Bracket
(for securing
drain hose)
Tie Strap
(for securing drain
hose)
Hole cap (4)
(for securing auto
dosing hole)
Wrench
(for removing shipping
bolts and adjusting
leveling feet)
Caps (4)
(for covering shipping
bolt holes)
Harness
(for connecting auto
dosing)
Non-skid pads
Drum
7
Magnet Door
Plunger
(see page 5)
Auto dosing hole

8
5. INSTALLATION INSTRUCTIONS
Unscrew the 4 bolts with the wrench supplied
Take out the 4 bolts by twisting the braces slightly
※ Keep the
4 bolts and the wrench for future use
(Whenever the appliance is transported, the
shipping bolts and braces must be replaced.)
Close the holes with the caps supplied.
The appliance is fitted with shipping bolts to prevent
internal damage during transportation.
Packing and all shipping bolts must be removed
before using the washer.
☞ When unpacking the base, be sure to remove
the additional packing support in the middle of
the base packing.
Shipping bolts
• Washer is heavy. Two or more people may be needed to install and move the appliance.
Failure to do so can result in back or other injury.
• Store and install the washer where it will not be exposed to temperatures below freezing or exposed to
outdoor weather conditions. Failure to follow this warning can cause serious injury, fire, electric shock, or
death.
• This appliance must be properly grounded for personal safety. Properly ground washer to conform with
all governing codes and ordinances. Failure to follow this warning can cause serious injury, fire, electric shock,
or death.
• Do not install the washer in humid spaces to reduce the risk of electric shock. Failure to follow this
warning can cause serious injury, fire, electric shock or death.
• The base opening must not be obstructed by carpeting when the washer is installed on a carpeted floor.
• Do not remove ground prong. Do not use an adapter or extension cord. Plug into a grounded 3 prong outlet.
Failure to follow this warning can cause serious injury, fire, electric shock or death.
• Keep the area underneath and around your appliances free of combustible materials such as lint,
paper, rags, chemicals, etc. Failure to do so can result in fire.
• To reduce the risk of injury to persons, adhere to all industry recommended safety procedures including the
use of long sleeved gloves and safety glasses. Failure to follow all of the safety warnings in this manual could
result in property damage, injury to persons or death.
Removing shipping bolts
Wrench
CAP
!
WARNING

9
Installation clearances
The location must be large enough to open
the washer door completely.
Washer dimensions
The following dimensions shown are for the minimum
spacing allowed.
Additional spacing should be considered for
installation and servicing.
• Additional clearances might be required for wall,
door, and floor moldings.
•
Additional spacing of 4"(10 cm) on back,
1"(2.5 cm) on all sides of the washer is
recommended to reduce noise transfer.
Companion appliance spacing should also be
considered.
Minimum installation spacing for
recessed area installation.
Front view
Side view
52 5/8"
133.7 cm
30 3/16"
(76.7cm)
30 3/16"
76.7 cm
52 5/8"
133.7 cm
30 3/16"
(76.7cm)
30 3/16"
76.7 cm
52 5/8"
133.7 cm
30 3/16"
(76.7cm)
30 3/16"
76.7 cm
10
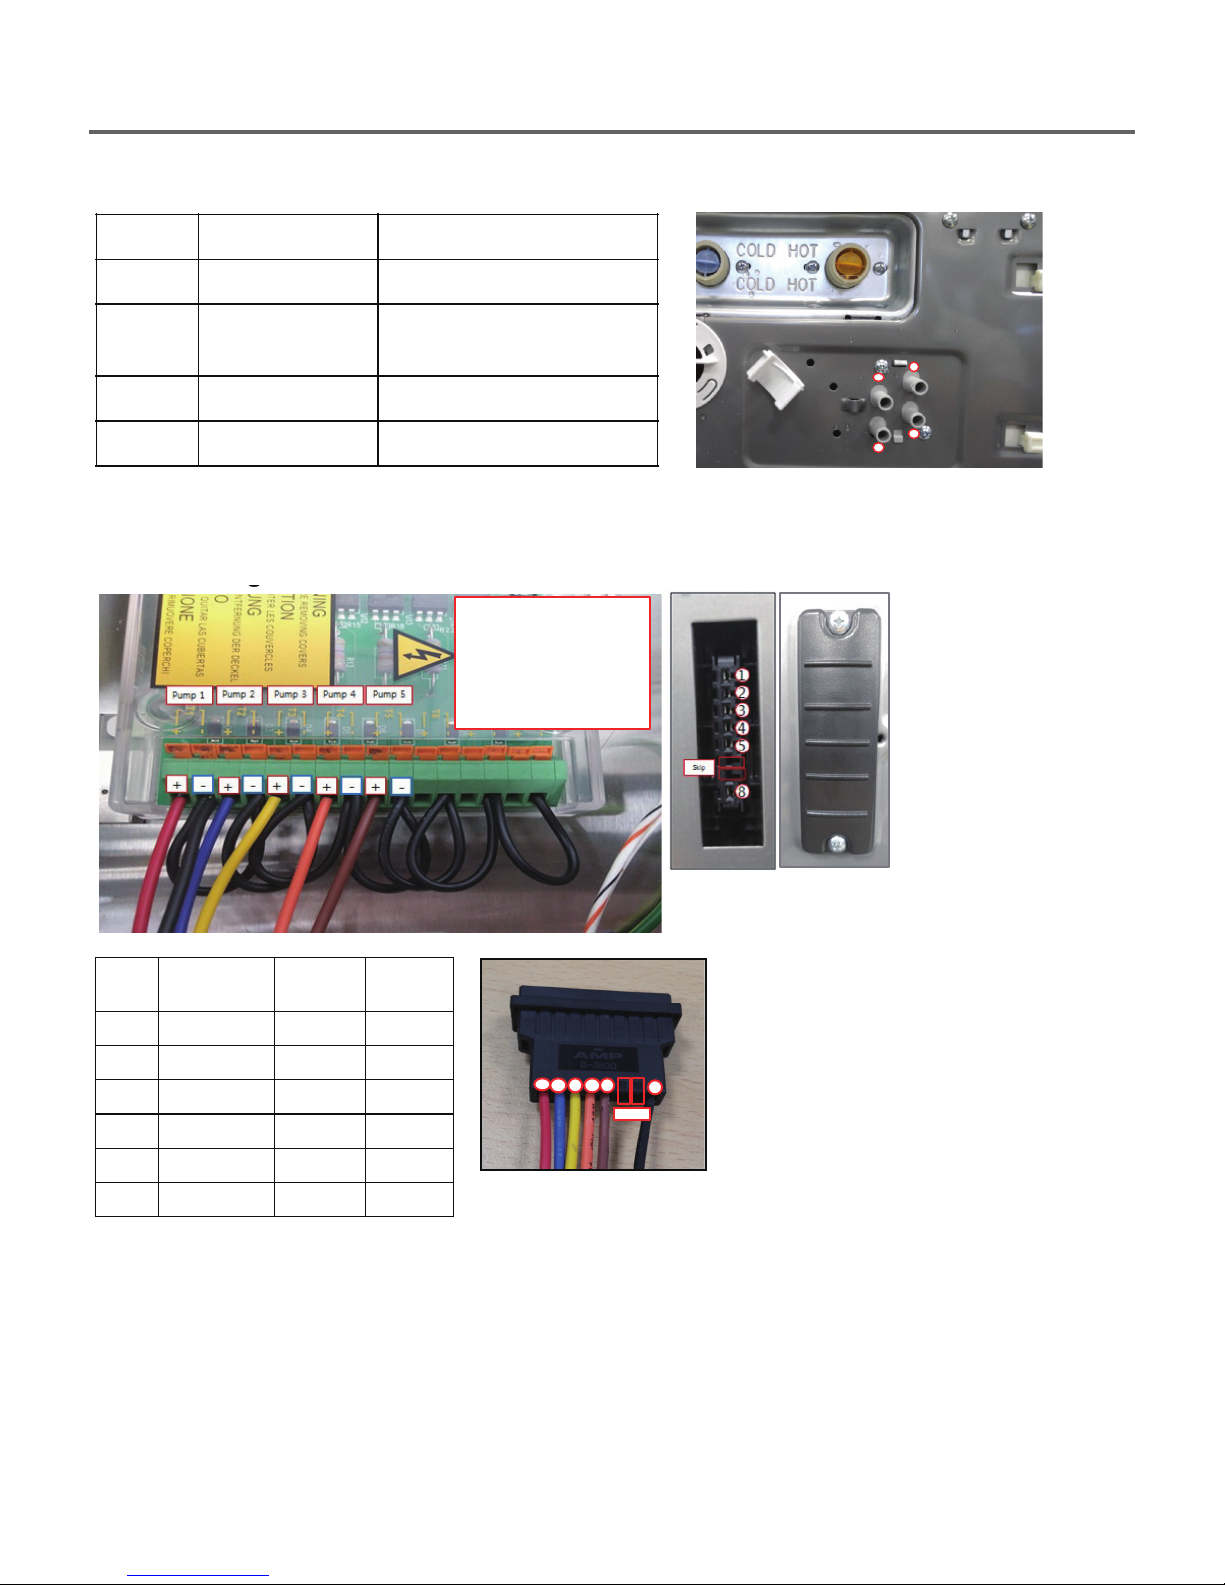
Installation of Auto dosing system
Auto dosing interface
CH DetergentInput period
£Main wash Main wash phase
¤Bleach Main wash (Remaining w
ashing me: 5 Minutes)
¥SoenerFinal rinse phase
¦Pre-wash Pre-wash phase
ʹ ΅ΪΡΖ ΈΚΣΖ
ʹΠΝΠΣ
΄ΚΘΟΒΝ
΅ΪΡΖ
ྙ;ΒΚΟΈΒΤΙΖΕ +
ྚͳΝΖΒΔΙ ͳΝΦΖ +
ྛ΄ΠΗΥΖΟ ΖΣ ΊΖΝΝΠΨ +
ྜΣΖΈΒΤΙ ΣΒΟΘΖ +
ྜྷͳΣΠΨΟ +
ྠͳΝΒΔΜ -
123 4 5 8
Skip
Auto dosing interface
Back of Washer
Wire Color
Black: Jump wire (- signal)
Red: Main Wash (+ si gnal)
Blue: Bleach (+ si gnal)
Yellow: Soener (+ signal)
Oran ge: Pre-Wash (+ signal)
Brown: Not Used (+ si gnal)
1
2
3
4
※ Dosing time should be set according to the flow rate of the pump. We recommend not exceeding 30mL
for detergent and 50mL for Bleach/Softener. Refer to detergent/chemical instructions to determine the
dosing time for optimal performance.
Questo manuale è adatto per i seguenti modelli
7
Indice
Altri manuali LG Rondella

LG
LG WM3700HWA/02 Manuale utente

LG
LG WD-12320RD Manuale utente

LG
LG WT7150C Series Manuale utente

LG
LG T8507TEDT4 Manuale utente

LG
LG WT7900HBA.ABLEUCI Manuale utente

LG
LG WT18BSB Manuale utente

LG
LG T9588NEHPA Manuale utente

LG
LG F1447TD Manuale utente

LG
LG WM-814SW Manuale utente

LG
LG F10B9QDT21 Manuale utente

LG
LG T7577TEEL Series Manuale utente

LG
LG WTS21HHBK1 Manuale utente

LG
LG T1017TEFT0 Manuale utente

LG
LG TV2517SV3B Manuale utente

LG
LG F4Y3EY Series Manuale utente

LG
LG F1243KDS Series Manuale utente

LG
LG WD-14101FD Manuale utente

LG
LG T1789EFHKD Manuale utente

LG
LG WT7000C Series Manuale utente

LG
LG WM1333HW Manuale utente


