Liliput RM-7029S Manuale utente

2
IMPORTANT SAFETY INSTRUCTIONS:
Please read User Guide before using this product.
Please keep User Guide for future reference.
FEATURES:
160°Wide viewing angles;
High resolution: 1920×1200;
High brightness: 400cd/m2;
High contrast: 2000:1;
Faster response time;
TALLY interface with indicating light;
Firm & thin design.
CAUTIONS:
1. Please do not place the display screen towards the ground.
2. Please avoid heavy impact or drop onto the ground.
3. Please do NOT use chemical solutions to clean this product. Please wipe with a clean soft
cloth to maintain the brightness of the surface.
4. Please do not block any vent hole.
5. Please follow the instructions and trouble-shootings to adjust the product. Other improper
adjustment may result in damage. Any further adjustment must be performed or conducted
by a qualified technician.
6. Please unplug the power if long-term no-use, or thunder weather.
3
Contents
1. PRODUCT DESCRIPTION ..........................................................................4
2. MENU SETTING .......................................................................................5
3. PARAMETERS...........................................................................................15
4. ACCESSORIES .........................................................................................16
5. 3D LUT Loading Demo . ......................................................................17
6. Remote Terminal Instructions ...............................................................20
7. TROUBLE SHOOTING .............................................................................22
4
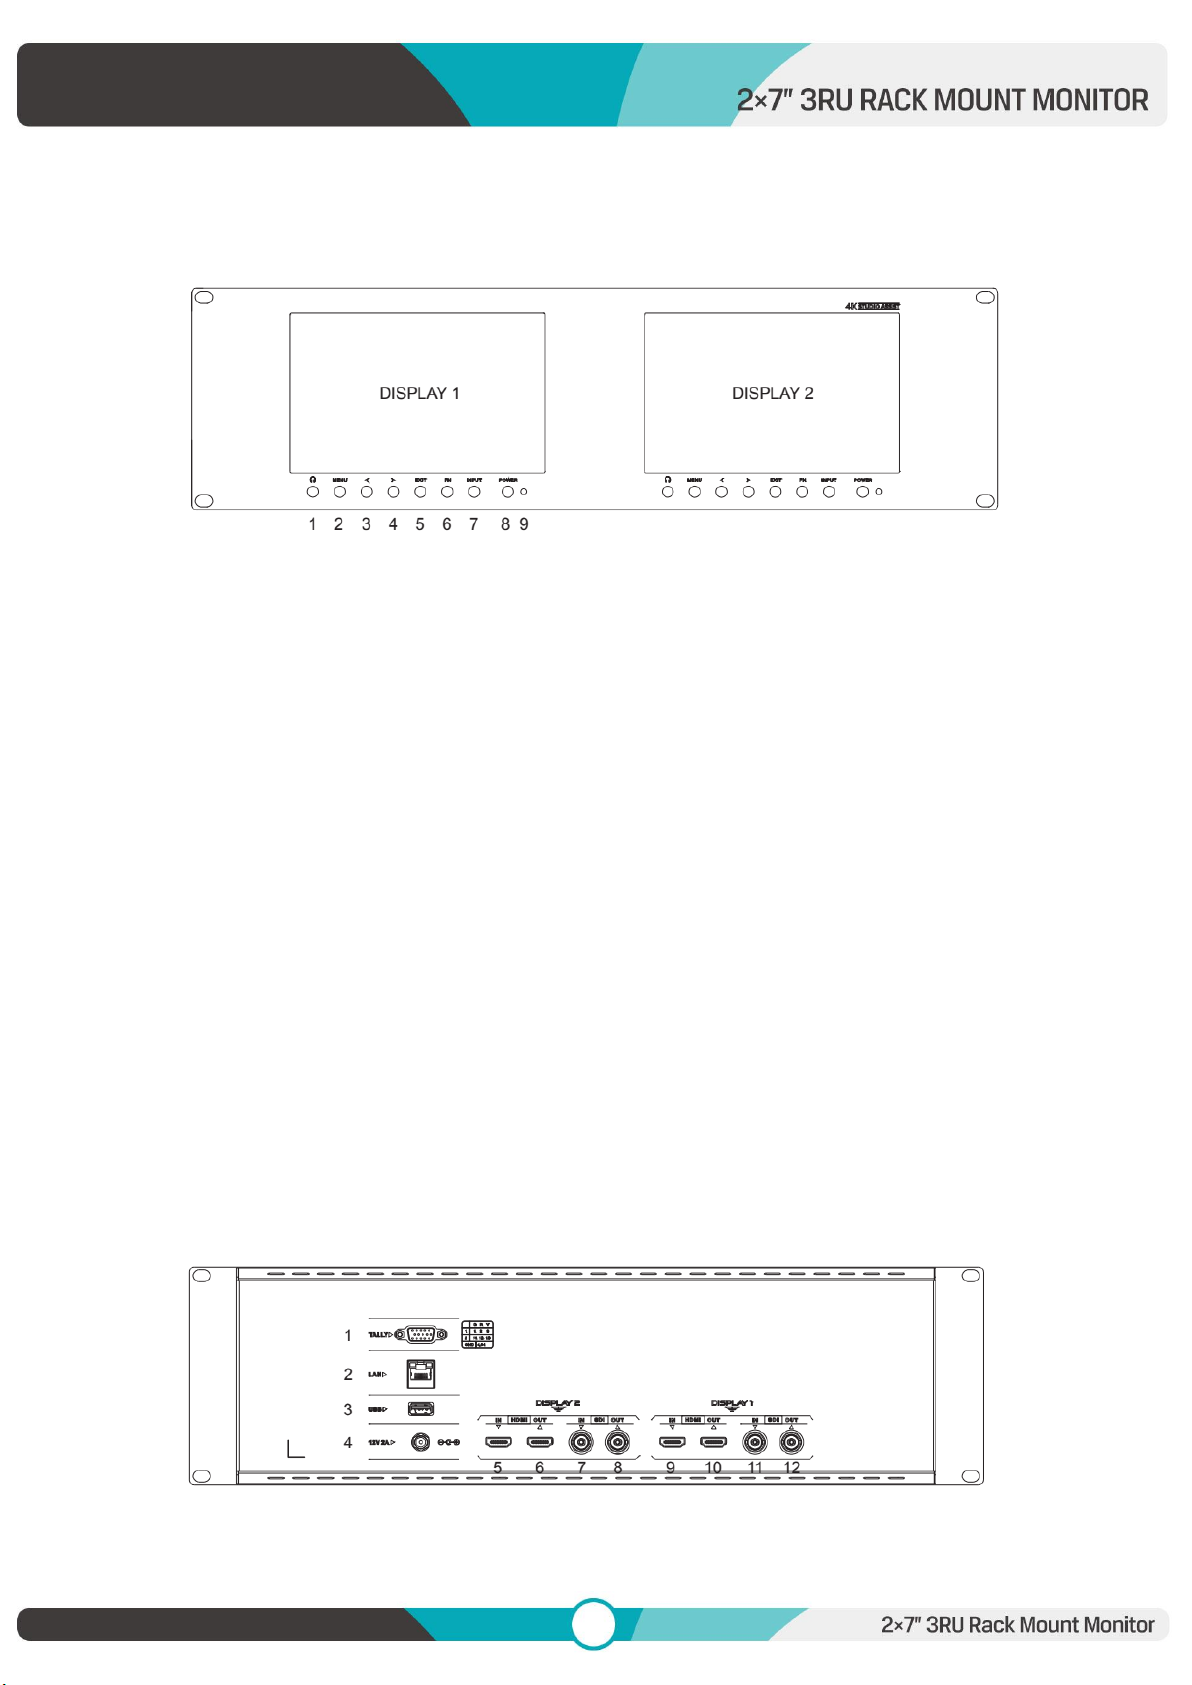
1. PRODUCT DESCRIPTION
Front Housing
1. Earphone
2. MENU: To activate OSD (on-screen display) menu. Press “◄/ ►” button to switch among the
picture, marker, function, waveform, audio, system.
3. ◄Left selection button: to select item on OSD menu and adjust its value; Press to decrease
the value of brightness, sharpness, contrast, saturation and Tint.
4. ►Right selection button: to select item on OSD menu, adjust its value and confirm it; Press to
increase the value of brightness, sharpness, contrast, saturation and Tint.
Note: When press ◄or ►” button, then press MENU button, it will activate user-definable
menu OSD(Brightness, Contrast, Saturation, Sharpness, Volume, Back light, Peaking Level). User
can select the shortcut item based on different demand. Volume is default.
5. EXIT
6. FN: Customized Function button; to launch function menu quickly. Peaking as default.
7. INPUT: circularly switch among of HDMI, SDI.
8. POWER on/off button
9. Power indicator light
Back Housing

5
Note: The interfaces within DISPLAY 1 provide signal source for left monitor. The interfaces within
DISPLAY 2 provide signal source for right monitor.
1. TALLY interface and interface definition.
2. LAN port. (Connected to PC network interface for function adjustment.)
3. USB input (Only used for program upgrades and LUT load, do NOT use if
non-professionals).
4. DC 12V power input.
5. & 9. HDMI input. 6. & 10. HDMI output.
6. & 11. SDI input 8. & 12. SDI output.
2. MENU SETTING
Before setting the functions, please make sure the device is connected
correctly.
2.1 FN user-definable function button:
Press FN button to pop up the default options, Use “◄/ ►”buttons to adjust
the value of selected item.
Long press FN button for 3-5 seconds to pop up shortcut menu directly. As
6
shown in right Figure (default menu is displayed in white font).
Use “◄/ ►”buttons to select the desired item.
Functions of FN button can be customized: Center Marker, Aspect Marker, Safety Marker,
Overscan, scan, Aspect, Camera Log, Check field, H/V delay, Freeze, Color Bar, Peaking, False
color, Exposure, Histogram, TimeCode, Mute, Level Meter.
2.2 MENU Operation
Press “MENU” button on the device after power on. The menu used for setting function will
display on the screen.
Press ◄/►buttons to select the sub-menu; then press MENU button to confirm it; after that,
press EXIT button to return to main menu.
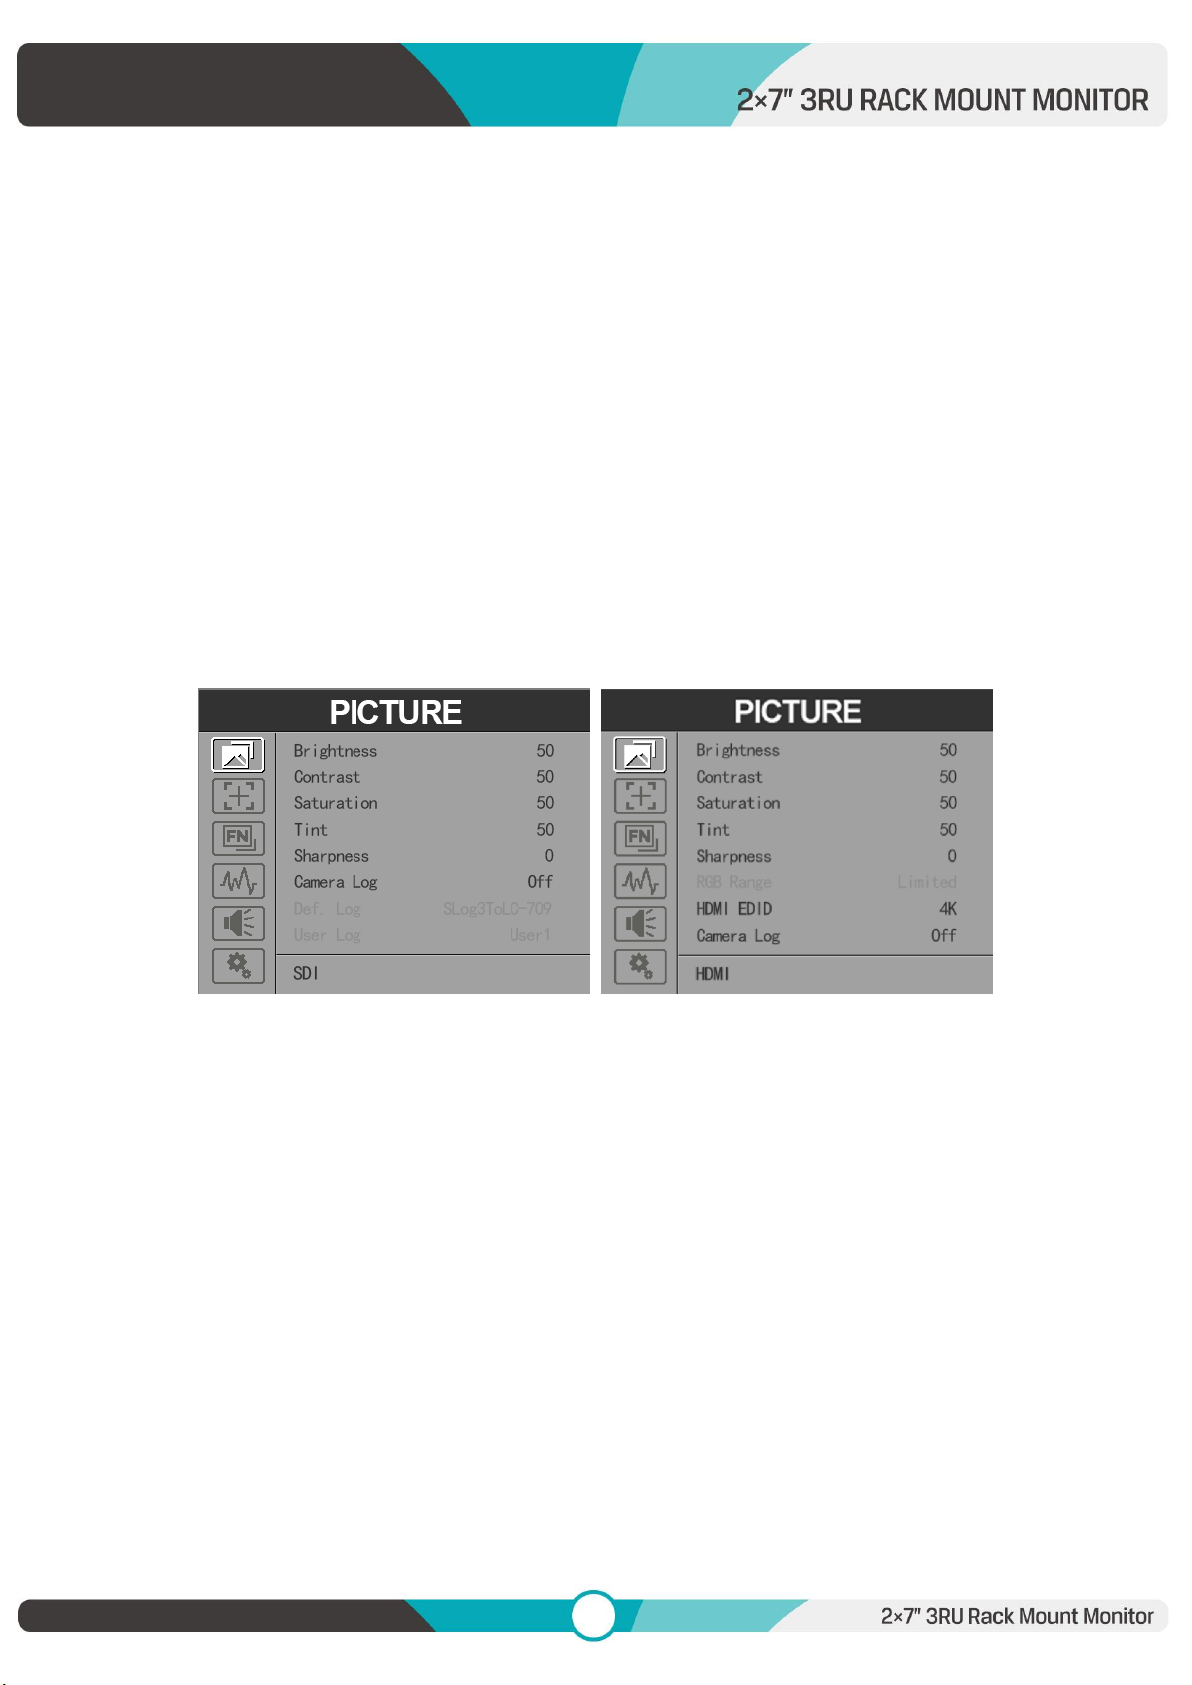
2.2.1 PICTURE
SDI Mode HDMI Mode
Brightness
Control the degree of brightness between 0-100.
Contrast
Control contrast ratio between 0-100.
Saturation
Adjust the color intensity between 0-100.
Tint
Adjust tint between 0-100.
Sharpness
Control sharpness of the image between 0-100.
RGB Range
7
Use this item to choose the RGB range of the HDMI input: [Full], [Limited].
HDMI EDID
Select the HDMI EDID from between [4K] and [2K]. This item enables PC or other devices to
recognize the property of this monitor and makes the images look excellent on the screen.
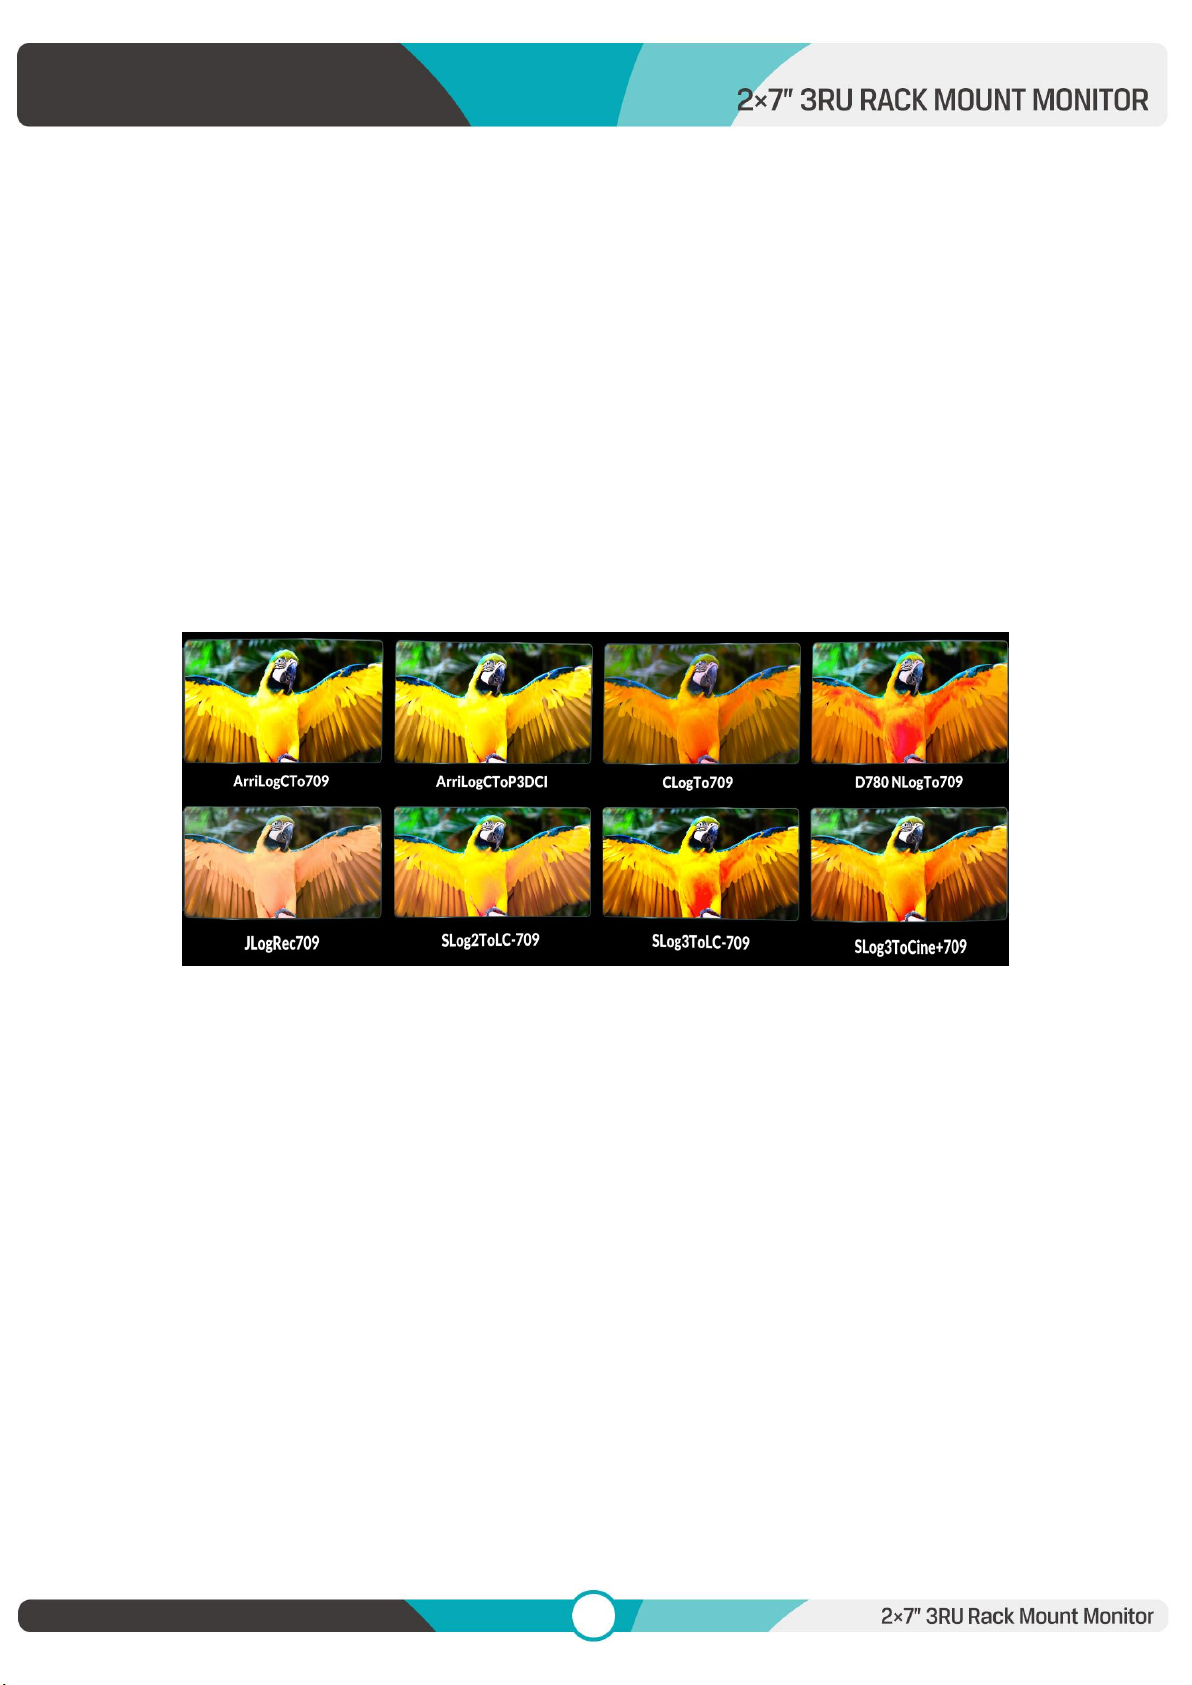
Camera Log
Use this item to choose one of the camera Log modes:
- [Off]: Turn off Camera Log.
- [Def. Log]: Use this item to choose one of the Camera Log modes as the following sequence:
[SLog2ToLC-709], [SLog2ToLC-709TA], [SLog2ToSLog2-709], [SLog2ToCine+709], [SLog3ToLC-709],
[SLog3ToLC-709TA], [SLog3ToSLog2-709], [SLog3ToCine+709],[ArriLogCTo709], [ArriLogCToP3DCI],
[CLogToV709], [VLogToV709], [JLog To709], [JLogTo709HLG], [JLogTo709PQ], [Z7 NLogTo709],
[D780 NLog To709].
- [User Log]: Use this item to choose one of the User Log modes (1-6). Please install the User Log
as following steps:
The User Log must be named with. cube in the suffix. Please note: the device only supports the
format of User Log: 17x17x17 / 33x33x33; Data order is BGR; Table order is BGR. If the format
does not meet the requirement, please use tool “Lut Tool.exe” to transform it. Naming the
User Log as User1-User6.cube, then copy the user Log into USB flash disk. Insert the USB flash
disk to the device, the User Log is saved to the device automatically at the first time.
Back Light
Adjust the level of the back light from 0 to 100.
Color Temp.
Use this item to choose one of the color temperature presets: [6500K], [7500K], [9300K], [User].
Note: Only available under [User] mode to adjust R/G/B Gain and Offset.
- R/G/B Gain
8
Adjust the R/G/B Gain of the current Color Temperature from 0 to 255. Default value: 128.
- R/G/B Offset
Adjust the R/G/B Offset of the current Color Temperature from 0 to 511. Default value: 256.
2.2.2 MARKER
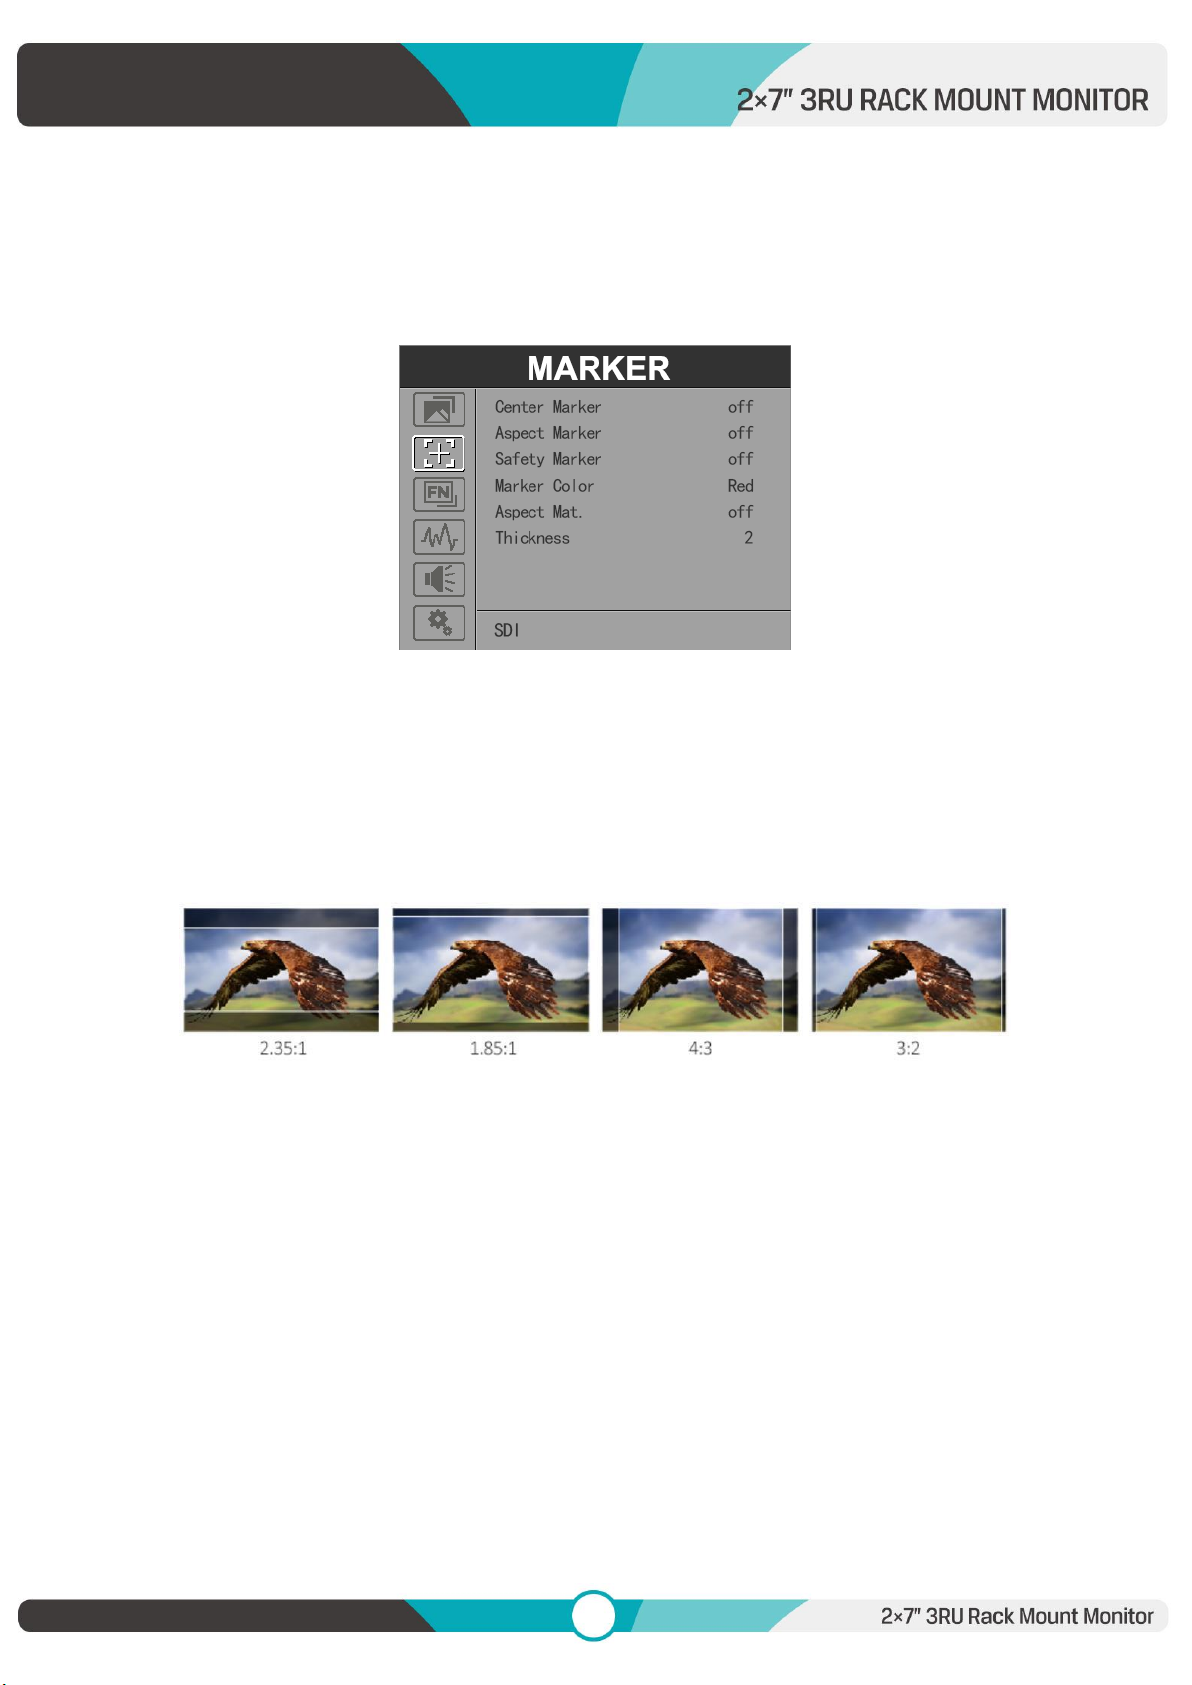
Center Marker
Select [On] to display the center marker “+” and [Off] not to display it.
Aspect Marker
Select the aspect ratio of the marker: [Off], [16:9], [1.85:1], [2.35:1], [4:3], [3:2], [1.3X], [1.5X],
[2.0X], [2.0X MAG].
Safety Marker
- Select the size of the safety markers: [95%], [93%], [90%], [88%], [85%], [80%].
Note:When this item is used with the aspect marker, it is only in aspect marker.
Marker Color
Select the color of marker displayed on the screen: [Red], [Green], [Blue], [White], [Black].
Aspect Mat.
When activated, it can be selected from 1-7 (Step value is 1).

9
Thickness
Adjust the thickness of all the marker lines from 1-7 (Step value is 1).
2.2.3 FUNCTION
Scan
Adjust the scan mode among [Aspect], [Pixel To Pixel], [Zoom].
Note: Aspect and Overscan functions only can be adjusted under [Aspect] mode. Both of them
cannot be adjusted in [Zoom] and [Pixel To Pixel] modes.
Aspect
Select the aspect of the image among [Full], [16:9], [1.85:1], [2.35:1], [4:3], [3:2], [1.3X], [1.5X],
[2.0X], [2.0X MAG].
10
Overscan
Use this item to activate or deactivate overscan.
H/V Delay
Select one of the H/V modes: [OFF], [H], [V], [H/V]. When H/V Delay on, the blanking portions of
the input signal will be displayed horizontally and vertically.
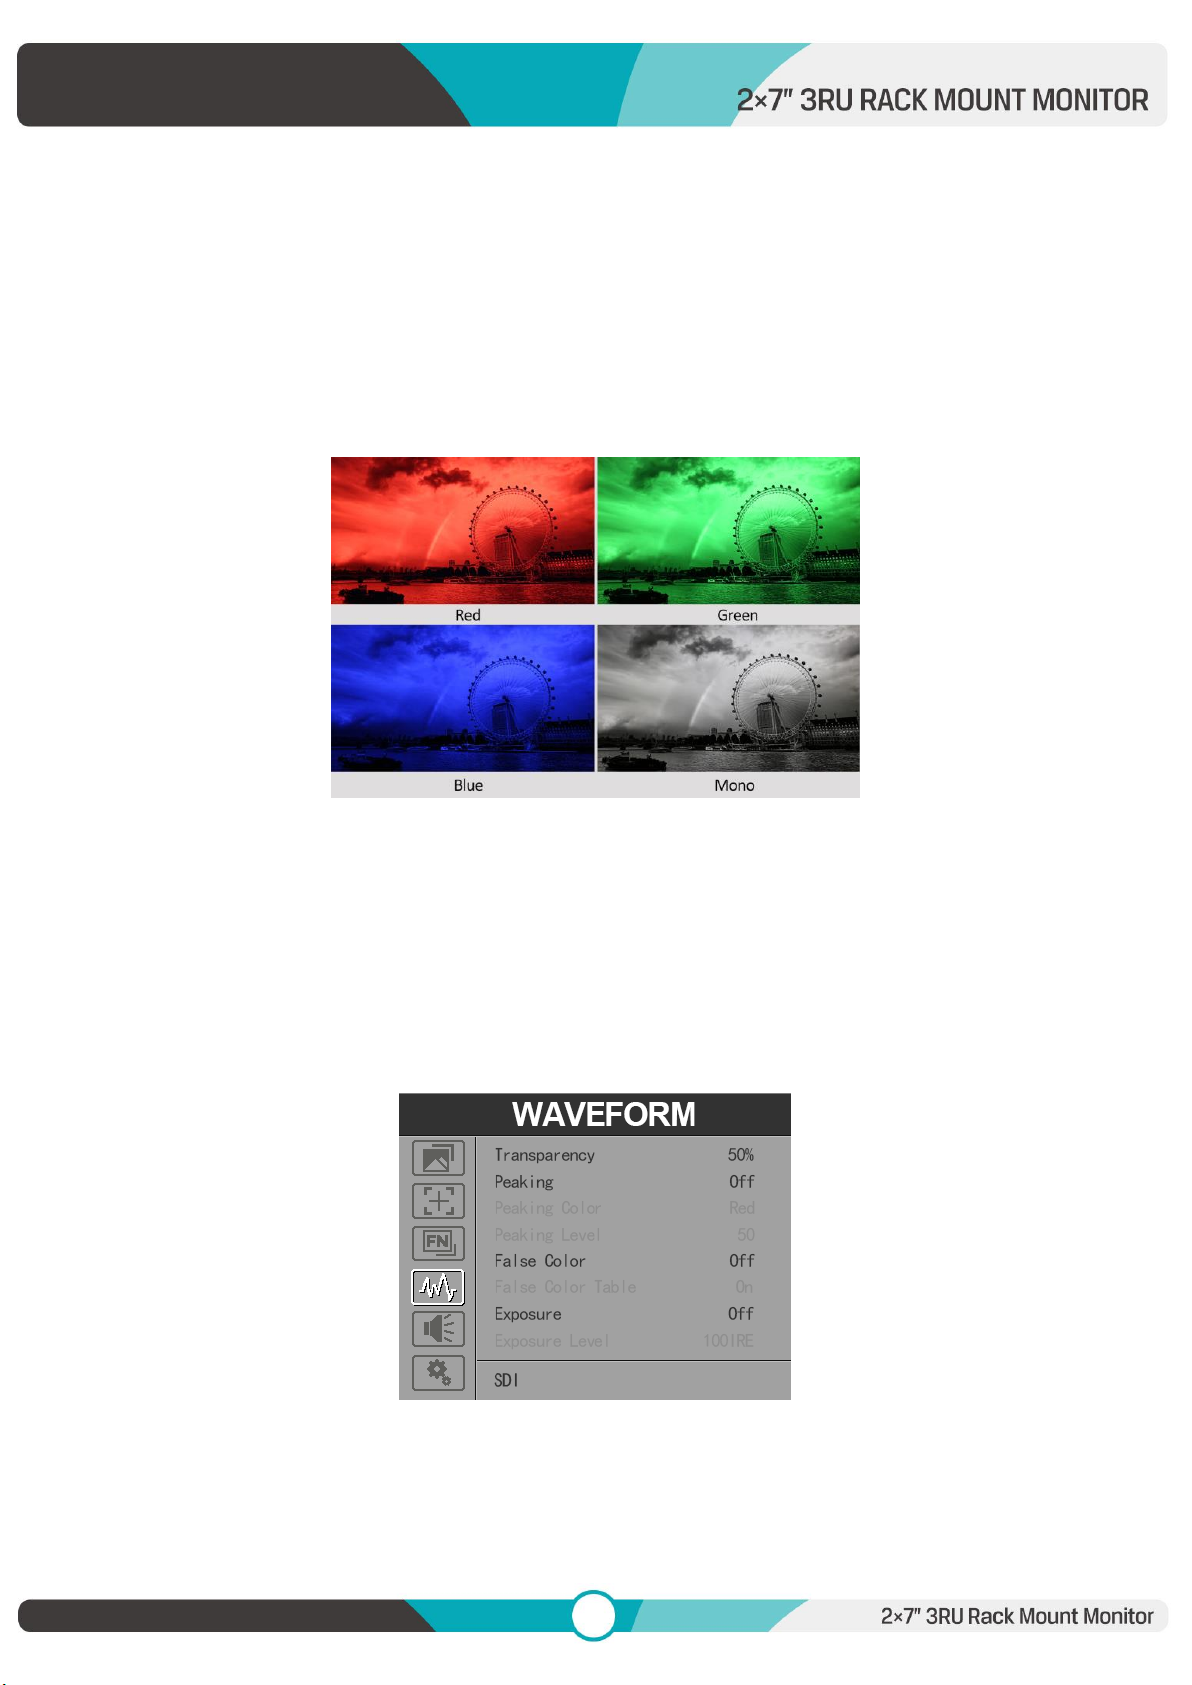
Check Field
Select one of check field modes: [Off], [Red], [Green], [Blue], [Mono].
Zoom
Select zoom scale from 10% to 90% (Step value is 10%).
Freeze
Choose [On] to capture one frame of current image on the screen, and choose [Off] to close
freeze function.
2.2.4 WAVEFORM
Transparency
Adjustment of transparency can support histogram, audio vector, level meter. Transparency can
be selected from among [Off], [25%], and [50%].
Indice
Altri manuali Liliput Monitor


