Lincoln 8005 Manuale utente

operator manual
Return Toaster
Model 8005
This document includes:
• Safety Notices
• Specifications
• Installation Instructions
• Operating Instructions
• Cleaning Instructions
• Warranty Statement
Revision: G
P/N: 20000094
Date Code: 5.1.09
For units located in United States, please contact:
Lincoln Foodservice Products, LLC
1111 North Hadley Road
Fort Wayne, Indiana 46804
United States of America
Technical Support Hotline: (800) 678-9511
Telephone: (260) 459-8200
www.lincolnfp.com
For units located in Canada, please contact:
Garland Commercial Ranges
1177 Kamato Road
Mississauga, Ontario L4W 1X4
Canada
Telephone: (905) 624-5669
Facsimile: (905) 624-0260

Model 8005 Operator Manual
2
IMPORTANT WARNING AND SAFETY INFORMATION
• Required clearances must be maintained from all walls and combustible materials.
• Keep the toaster area free and clear of combustible material.
• Do not obstruct the ventilation holes as these provide cooling air for the controls.
• The toaster is to be operated only on the type of electricity as shown on the specification plate.
• This manual should be retained for future reference.
TOASTING BREAD PRODUCTS
Toasting bread products may seem to be a simple process but the results can be easily affected by a number of
factors. The first consideration is the type of product being toasted. Varieties of bread such as whole wheat, rye,
white, english muffins, bagels and buns have different requirements to become perfectly toasted. Dryness or
moisture content of the bread (mostly described as “freshness,” with more moisture being the fresher), sugar
content and the thickness of the slice or bun all play a predominant role during toasting.
Your 8005 front return toaster is designed to accommodate these varieties of bread products by self-regulating the
conveyor speed to create lighter or darker toasting and to allow for toasting thicker products that contain more
moisture such as english muffins or fresh bagels. This is made possible by the self-regulating speed control which
senses the amount of product placed on the conveyor belt. It is normal for the toaster to operate in the lower
ranges of the speed control to perform toasting of these more difficult products.
Certain breads that contain fruit and nuts may require more attention. Loose pieces can fall on the heating
elements or into the conveyor mechanism and cause premature wear on the toaster. It is recommended that loose
pieces be removed before placing the bread on the conveyor.
Since it is nearly impossible to predetermine what conveyor speed produces perfect results, some experimentation
is necessary with all types of bread you will be toasting. Once all varieties of product have been tried and the
proper settings found, document the results and refer to them when toasting. Remember that allowances for
freshness might require additional adjustments.
DANGER!
Do not work around conveyor belt with long hair, loose clothing, or dangling jewelry.
Getting caught in the belt could result in serious injury.
!
DANGER!
For your safety, do not store or use gasoline or other flammable vapors or liquids in
the vicinity of this or any other appliance.
!
DANGER!
Do not spray aerosols in the vicinity of this appliance while it is in operation.
!
This manual contains important safety and installation-operation instructions.
Require all operators to read this manual thoroughly before installing, operating or
servicing this equipment. Improper installation, adjustment, alteration, service or
maintenance can cause property damage, injury or death.
NOTE:
!
DANGER!
If the power supply cord appears to be damaged, do not attempt to operate the unit.
Contact a service agent or qualified electrician to repair!
!
DANGER!
Do not use parchment paper when placing food product through the toaster! Use of
such materials may cause a fire and should never be placed in the toaster.
!

Model 8005 Operator Manual 3
TABLE OF CONTENTS
IMPORTANT WARNING & SAFETY INFORMATION…………………………………………………………..………. 2
TOASTING BREAD PRODUCTS………………………………………………………………………………………..… 2
UTILITY SPECIFICATION…………………………………………………………………...…………………………...…4
EXTERIOR DIMENSIONS………………………………………………………………………………………………..…4
BEFORE INSTALLATION……………………………………………………………………….……………………..……5
INSTALLATION…………………………………………………………………………………………….……………...… 5
ELECTRICAL SERVICE & GROUNDING INSTRUCTIONS……………………………..…………………………..….5
ELECTRICAL CODE REFERENCE………………………………………………………………………………………. 6
VENTILATION………………………………………………………………………………………………….………..……6
SPACING…………………………………………………………………………………………………………………..….6
CONTROL PANEL FEATURES………………………………………………………………………………………….…6
FUNCTIONS…………………………………………………………………………………………………………………..6
OPERATING INSTRUCTIONS……………………………………………………………………………….………….… 7
• Dual Menu Programs…………………………………………………………………………………………….….…. 8
• Reading Current Settings…………………………………………………………………………………..……….….9
• Changing the Settings……………………………………………………………………………………………….….10
CLEANING INSTRUCTIONS…………………………………………………………………………………..………...… 14
ERROR CODES………………………………………………………………………………………………………………15
SCHEMATIC……………………………………………………………………………………………………………..……16
WARRANTY……………………………………………………………………………………………………………..…… 17

Model 8005 Operator Manual
4
UTILITY SPECIFICATION
Model Voltage Hz Current Watts Phase Belt Width Width Depth Height
8005 208 / 240 VAC 60 Hz 23.3 Amps 4850 1Ø 10”
(254mm) 15”
(381mm) 26 ½”
(673mm) 16”
(406mm)
NOTE: Specifications subject to change without notice.
EXTERIOR DIMENSIONS
This toaster must be used with proper voltage as
specified on the unit data plate located on the
rear panel of toaster. Use of any other voltage or
altering plug will damage unit, void warranty, and
may cause injury.
!
WARNING!
!!
CE UNIT POWER CORD REQUIREMENTS
The standard requires that the supply cord must be oil-
resistant and not lighter than ordinary polychloroprene
(60245 IEC 57) (IEC/EN 60335-2-48).
Lincoln requires that the power cord must be:
3 x 4.0mm² 90°C

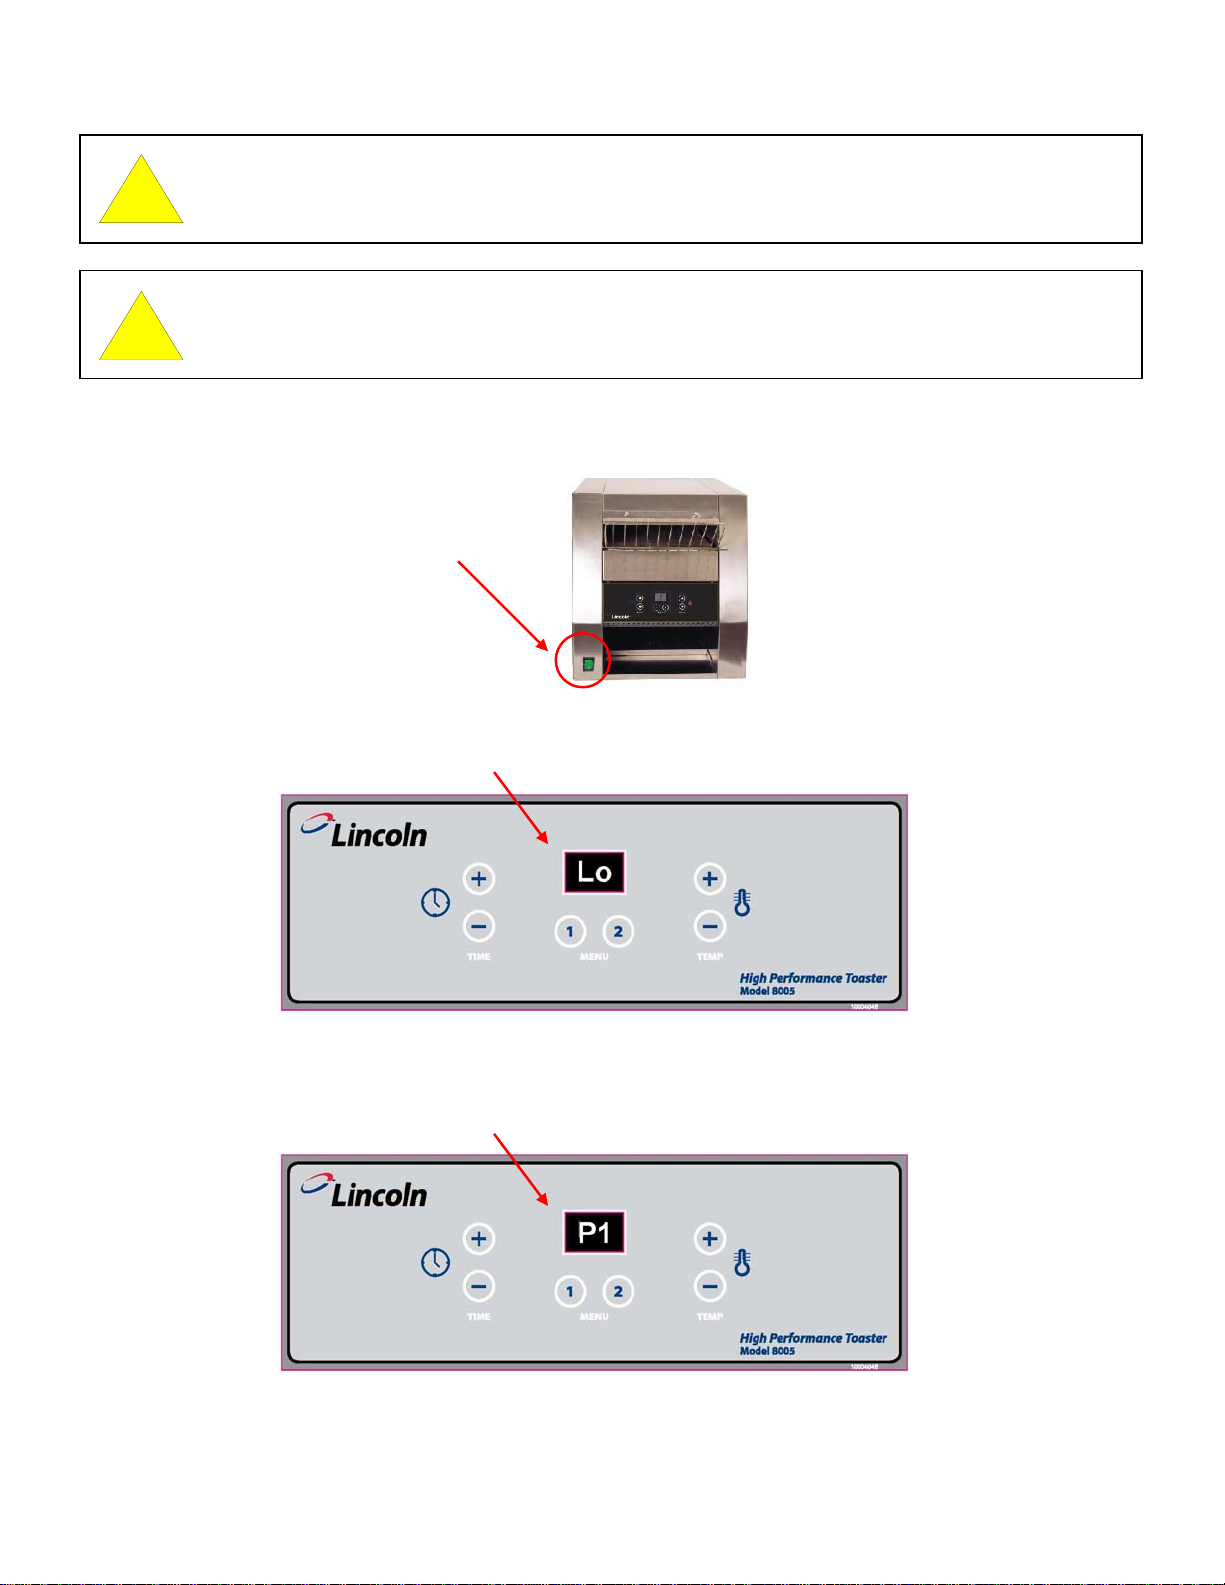
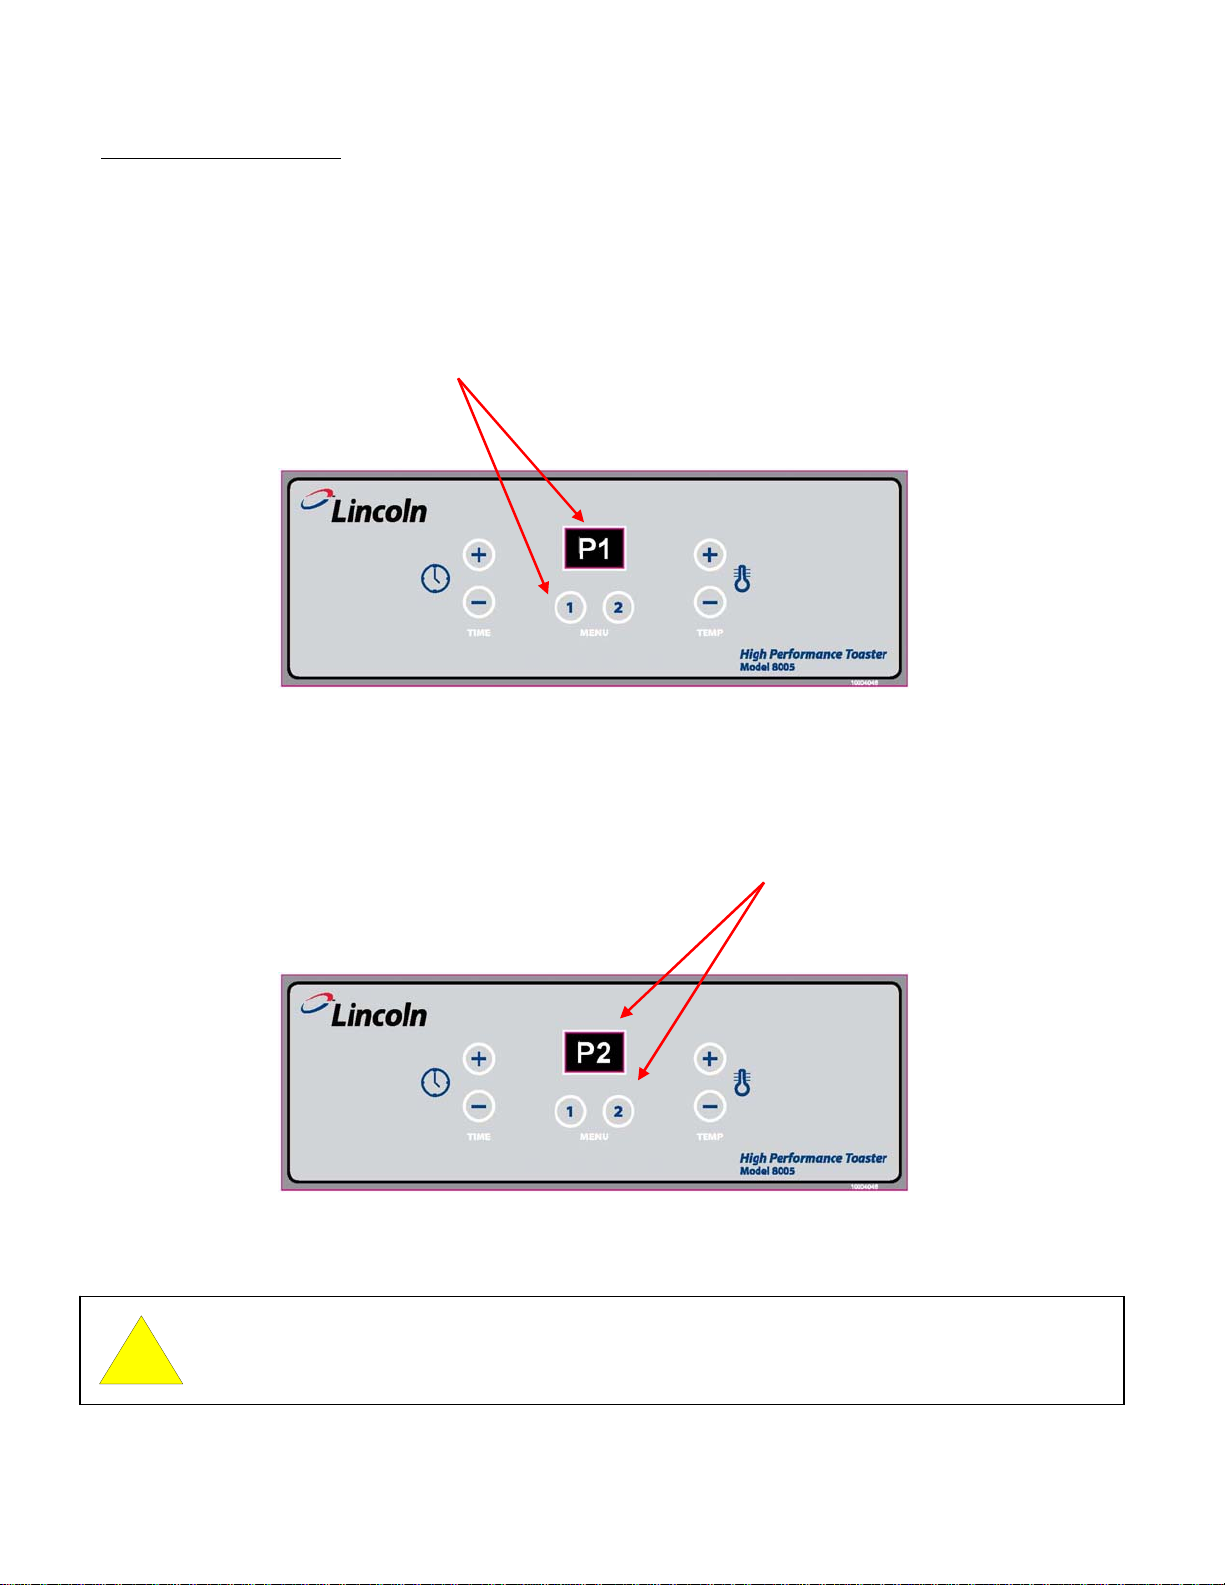
Model 8005 Operator Manual 5
WARNING
INT’L (CE):
This appliance must be properly grounded at time of installation. Failure to ensure
that this equipment is properly grounded can result in electrocution, dismemberment
or fatal injury.
BEFORE INSTALLATION
NOTE: Upon receipt of this unit, immediately unpack and inspect for possible concealed shipping damage. If unit
is found to be damaged, save all packing materials and contact your delivery carrier within 5 days. Refer to
“Shipping Damage Instructions” enclosed for detailed instructions. Failure to follow these instructions will negate
Lincoln’s or your ability to file claims and receive compensation for shipping damage.
This manual contains important safety and installation-operation instructions. Require all operators to read this
manual before using this unit. Failure to follow the instructions contained in this manual may cause injury, damage
to the unit, and will void the warranty.
INSTALLATION
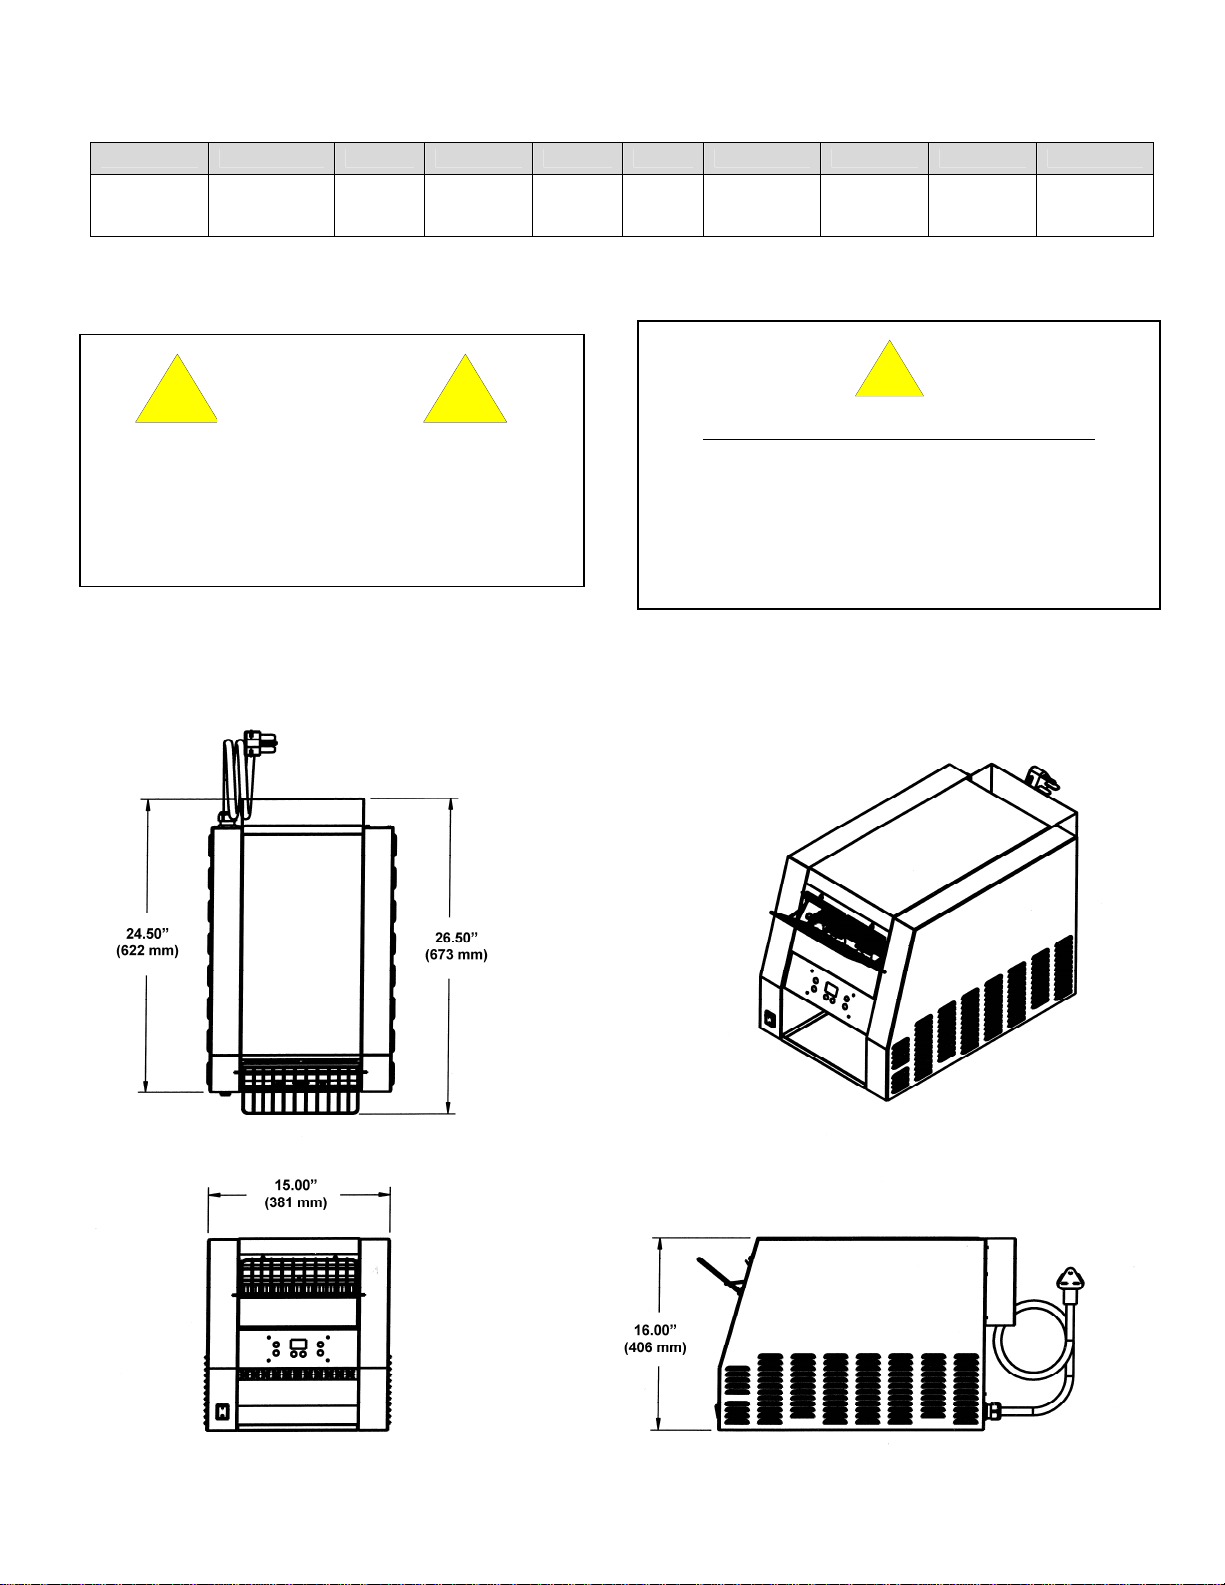
Install this unit in the most convenient location for ease of cleaning, maintenance and general operation. Avoid
installing in locations with drafts, close proximity to grease or vapor-producing appliances or other high ambient
heat equipment. If the unit is placed next to a “high-heat” appliance such as a fryer or grill, you must allow at least
2ft. (610mm) distance for proper operation. If the toaster is not located next to a high-heat appliance, it must have
6” (152mm) of clearance from all combustible surfaces. If unit is not near a combustible surface, approximately 1”
(25.4mm) of clearance is recommended for proper air circulation. Allow sufficient overhead clearance for proper
heat dissipation. This toaster must be level for proper operation.
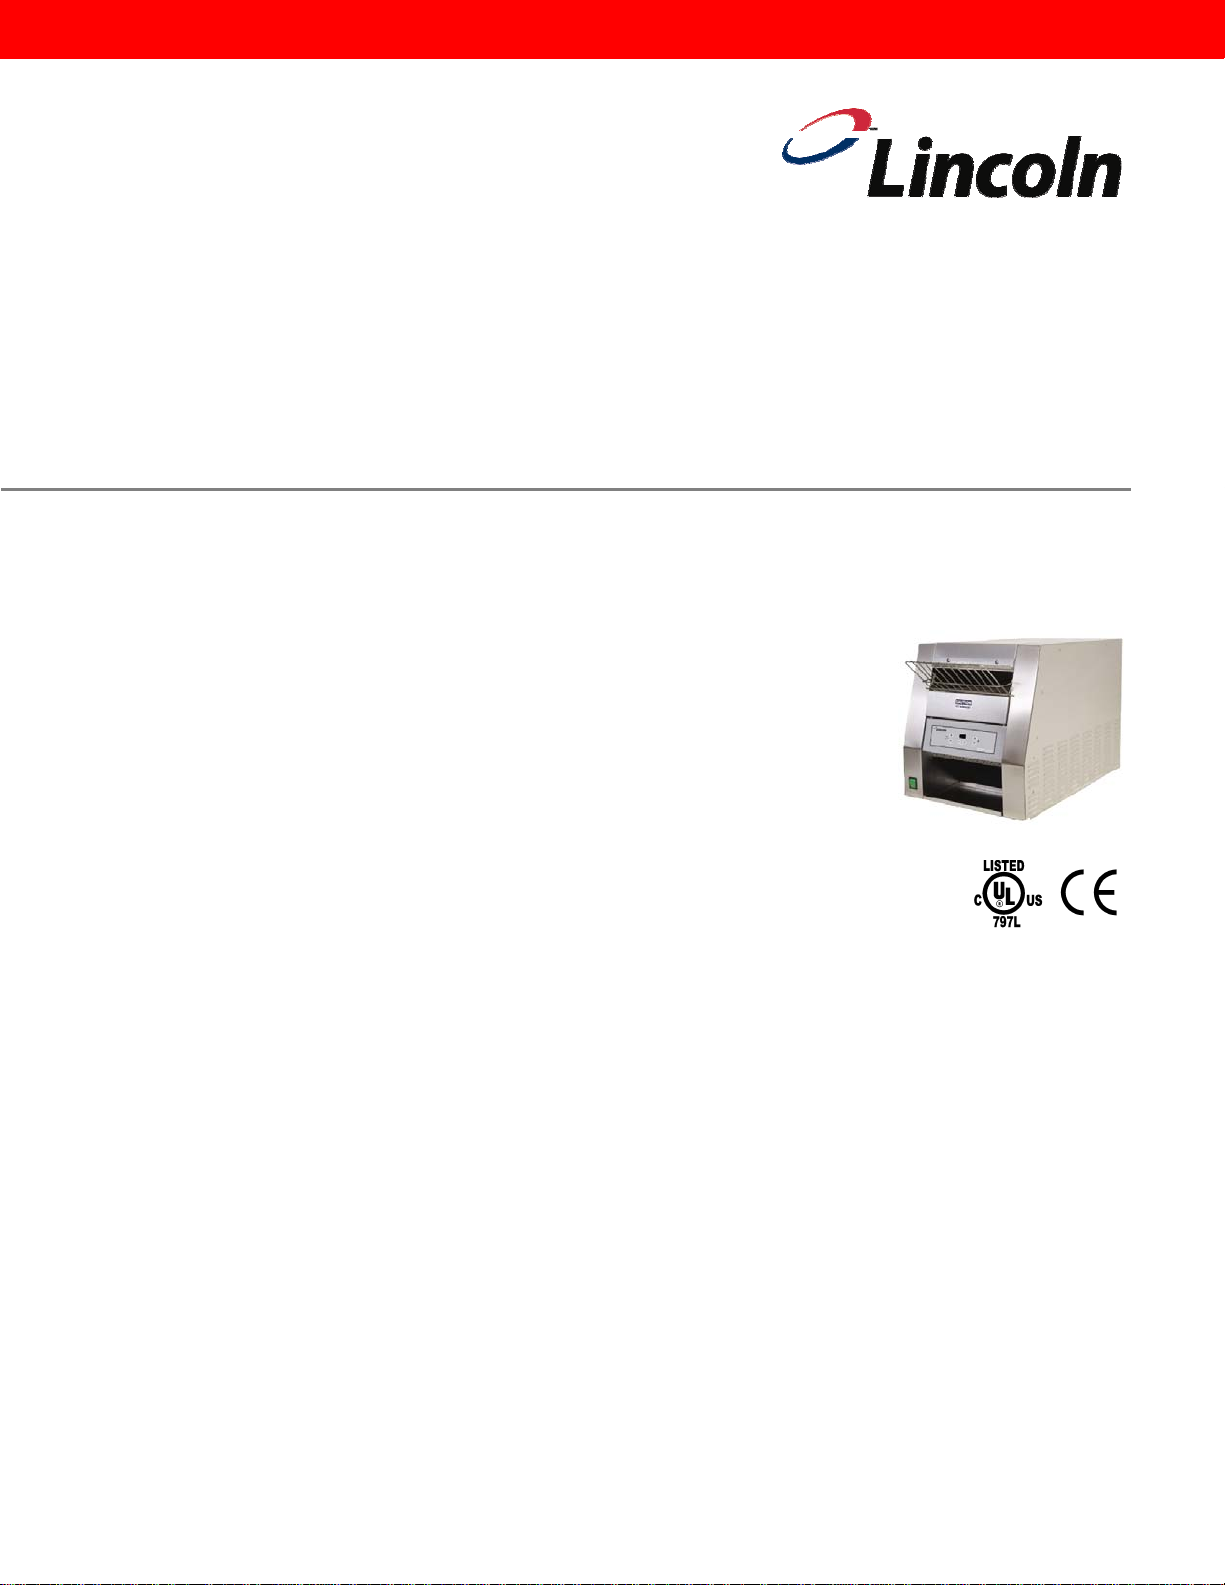
Before operating this unit, be sure the following component (Entry Tray) is properly installed.
ELECTRICAL SERVICE & GROUNDING INSTRUCTIONS
Heat is supplied by ten (10) infrared heating elements with six (6) located on top and four (4) on the bottom. Each
toaster is rated at 4850 Watts. A separate circuit breaker is required for each toaster. Domestic single phase units
require a 30 amp electrical service with receptacle type NEMA 6-30R to mate with a provided NEMA 6-30P plug.
When installed, this appliance must be electrically grounded and its installation must comply with the National
Electric Code, ANSI-NFPA 70, latest edition, the Manufacturer’s Installation Instructions, and applicable municipal
building codes. In Canada, all electrical connections are to be made in accordance with CSA C22.1 – Canadian
Electrical Code Part 1 and/or local codes.
As it pertains to domestic models, this appliance is equipped with a three-prong
(grounding) plug for your protection against shock hazard and should be plugged
directly into a properly grounded three-prong receptacle. Do not cut or remove the
grounding prong from this plug.
!
WARNING
DOMESTIC:
!
WARNING:
If the power supply cord appears to be damaged, do not attempt to operate the
unit. Contact a service agent or qualified electrician to repair!
!
!
WARNING
INT’L (CE):
This appliance is not intended for use by young children or infirm persons unless
they have been adequately supervised by a responsible person to ensure that
they can use the appliance safely. Young children should be supervised to
ensure that they do not play with the appliance.

Model 8005 Operator Manual
6
ELECTRICAL CODE REFERENCE
IN USA
When installed, this appliance must be electrically grounded and its installation must comply with the National
Electric Code, ANSI-NFPA 70, latest version, the Manufacturer’s Installation Instructions, and applicable municipal
building codes.
IN CANADA
All electrical connections are to be made in accordance with CSA C22.1 – Canadian Electrical Code Part 1 and/or
local codes.
ALL OTHER COUNTRIES
Local electrical codes will prevail.
1. Strain Relief is provided with each toaster. International Dealer/Distributors provide applicable power cord/plug
for each customer.
2. All pole disconnection switch 3mm open contact distance.
3. To prevent electrical shock, an equal potential bonding ground lug is provided in the back. This allows the
toaster to be connected to an external bonding system.
VENTILATION
Local codes prevail. These are the “authority having jurisdiction” as stated by the NATIONAL FIRE PROTECTION
ASSOCIATION, INC. in NFPA 96, latest edition.
SPACING
If the unit is placed next to a “high-heat” appliance such as a fryer or grill, you must allow at least 2 ft. (610mm)
distance for proper operation. If the toaster is not located next to a high-heat appliance, it must have 6” (152mm) of
clearance from all combustible surfaces. If unit is not near a combustible surface, approximately 1” (25.4mm) of
clearance is recommended for proper air circulation.
CONTROL PANEL FEATURES
FUNCTIONS
THERMAL CUT-OUT SWITCH
The Front Return Toaster includes a “safety thermal cut-out switch” for your protection. This safety related device
is designed to insure that the toaster doesn’t overheat and damage the unit. In the unlikely event that the toaster
would exceed the specified operating temperature range, the “safety thermal cut-out switch” will activate, thus
blocking power to the toaster and causing it to turn off.
CAUTION:
In order to avoid a hazard due to inadvertent resetting of the thermal cutout, this
appliance must not be supplied through an external switching device, such as a
timer, or be connected to a circuit that is re
g
ularl
y
switched on and off b
y
the utilit
y
.
!
Set Conveyor Speed Set Temperature
Display
Set Program Modes

Model 8005 Operator Manual 7
OPERATING INSTRUCTIONS
1. Turn the “On / Off” Switch to the “On” position. The green light will illuminate.
2. Display will read “Lo” until the toaster reaches setpoint.
3. Once the setpoint is reached the display will change to read “P1” (see “Dual Menu Programs” on next page
for more information).
4. For peak operation, allow the toaster to warm up for 30 minutes prior to use.
On / Off Switch
DANGER!
Do not work around conveyor belt with long hair, loose clothing, or dangling jewelry.
Getting caught in the belt could result in serious injury.
!
WARNING:
Do not use parchment paper when placing food product through the toaster! Use
of such materials may cause a fire and should never be placed in the toaster.
!

Model 8005 Operator Manual
8
OPERATING INSTRUCTIONS (CONT’D)
DUAL MENU PROGRAMS
The 8005 Toaster is equipped with two (2) separate menu programs to allow for dual menu settings. These menu
programs are shown on the display as “P1” and “P2.” To access each menu, simply press the “1” or “2” button to
access the respective menus. Once you have selected the desired menu, follow the step-by-step operating
instructions on the following pages to operate your toaster.
• Press and hold the “1” button to operate the toaster according to the settings of Menu 1.
• Press and hold the “2” button to operate the toaster according to the settings of Menu 2.
NOTE:
Please note that Menu 1 and Menu 2 are both preset at the factory to the same settings.
The factory default settings are as follows: Time = 30 seconds, Temp Intensity = 8.5
!

Model 8005 Operator Manual 9
OPERATING INSTRUCTIONS (CONT’D)
TO READ CURRENT SETTINGS FOR TIME AND TEMPERATURE INTENSITY
1. Select desired menu (see Dual Menu Programs section for more information). To read what the current
TIME settings are for your toaster, simply press and release the “Up” arrow once. Display will read the
current TIME setting. The allowable range for TIME settings is between 15 and 60 seconds. After a few
seconds the display will revert back to the previous view.
2. To read what the current TEMPERATURE INTENSITY settings are for your toaster, simply press and
release the “Up” arrow once. Display will read the current TEMPERATURE INTENSITY setting. The
allowable range for TEMPERATURE INTENSITY settings is between 1.0 and 9.9.
TIME “U
p
” Button Display with current TIME setting.
TEMP INTENSITY “U
p
” ButtonDisplay reading the current TEMP INTENSITY setting.

Model 8005 Operator Manual
10
OPERATING INSTRUCTIONS (CONT’D)
TO CHANGE SETTINGS FOR TIME
1. Select desired menu (see Dual Menu Programs section for more information). While toaster is on, press
and hold the TIME “Up” button until the reading on the display begins to “blink” – then release finger off the
“Up” button.
2. While the display is blinking, press either the “Up” or “Down” buttons depending on the TIME setting you
wish to reach.
3. Once you have reached the desired TIME setting, wait for display to stop blinking. The new setting will be
saved into memory once the display has stopped blinking. After the new setting has been saved the display
will revert back to “P1” or “P2” menu (depending on which menu program you originally selected).
Indice


