LIVARNO LUX 273525 Manuale utente
IAN 273525
LED SOLAR LIGHTS
LED SOLÁRNE SVETLÁ
Pokyny pre obsluhu a bezpečnostné pokyny
LED-SOLARLEUCHTEN
Bedienungs- und Sicherheitshinweise
LED-SOLARNE SVETILKE
Navodila za upravljanje in varnostna opozorila
LED SOLÁRNÍ SVÍTIDLA
Pokyny pro obsluhu a bezpečnostní pokyny
LED SOLAR LIGHTS
Operation and Safety Notes
LED NAPELEMES LÁMPÁK
Kezelési és biztonsági utalások
GB Operation and Safety Notes Page 5
HU Kezelési és biztonsági utalások Oldal 12
SI Navodila za upravljanje in
varnostna opozorila Stran 20
CZ Pokyny pro obsluhu a
bezpečnostní pokyny Strana 28
SK Pokyny pre obsluhu a
bezpečnostné pokyny Strana 35
DE/AT/CH Bedienungs- und Sicherheitshinweise Seite 43
ON OFF
A
C D
B
1
1
2
3
4
6
2
5
7
8


5GB
Proper use............................................................ Page 6
Description of parts and features..... Page 6
Scope of delivery............................................ Page 6
Technical data.................................................... Page 6
Safety instructions
Product-specific safety instructions ........................... Page 7
Safety instructions for rechargeable batteries......... Page 7
Functioning........................................................... Page 8
Preparing for use
Installing the light ...................................................... Page 8
Setting up the light .................................................... Page 9
Replacing the rechargeable battery........................ Page 9
Charging the rechargeable battery......................... Page 9
Maintenance and care............................... Page 10
Troubleshooting .............................................. Page 10
Disposal.................................................................. Page 10
Warranty............................................................... Page 11
6 GB
LED solar lights
Proper use
The solar lights are intended for outdoor use. The product is
not intended for commercial use.
Not suitable for ordinary lighting in household
room illumination.
This product is suitable for extreme temperature below
-20°C.
Description of parts and features
1Solar cell housing
2Lamp shade
3Pole
4Ground stake
5On/off switch
6Fastening screws
7Battery compartment lid
8Rechargeable battery
Scope of delivery
5 Lamp heads with solar cell, LED and rechargeable
battery
5 Lamp shades
5 Poles
5 Ground stakes
1 Assembly instruction
Technical data
Operating voltage: 1.2V
Rechargeable battery:1x Ni-MH rechargeable battery /
AAA/1.2V /150mAh
Bulb: 1x LED (not replaceable)
Rated power LED: approx. 0.06W per LED
Protection type: IP44 (splash proof)
Solar cell: approx. 30 x 30mm (L x W)
Lighting Duration
(with full charge): approx. 8 hours
7GB
Safety instructions
YOU SHOULD STORE ALL SAFETY INFORMATION AND
INSTRUCTIONS IN A SAFE PLACE IN CASE YOU NEED
TO REFER TO THEM AGAIN IN THE FUTURE!
This appliance can be used by children aged from 8 years
and above and persons with reduced physical, sensory or
mental capabilities or lack of experience and knowledge
if they have been given supervision or instruction concern-
ing use of the appliance in a safe way and understand
the hazards involved. Children shall not play with the
appliance. Cleaning and user maintenance shall not be
made by children without supervision.
Do not use the article if you detect any kind of damage.
Product-specific safety instructions
Make sure that the solar cell is free of dirt and free of
snow and ice in winter. Otherwise the performance of the
solar cell will diminish.
Cold temperatures have a negative influence on the oper-
ating life of the rechargeable battery. If the solar garden
lights are not going to be used for a long time, e.g. in win-
ter, they should be taken up, cleaned and stored in a dry,
warm room.
Safety instructions for
rechargeable batteries
DANGER TO LIFE AND
RISK OF ACCIDENTS FOR INFANTS
AND CHILDREN! Keep batteries out of the
reach of children. Do not leave the batteries lying around.
There is a risk of children or animals swallowing them.
Consult a doctor immediately if a battery is swallowed.
CAUTION! DANGER OF EXPLOSION!
Use only rechargeable batteries of the recom-
mended type. Other rechargeable or single-
use batteries could explode during charging.
FIRE HAZARD! Do not allow rechargeable
batteries to short-circuit. Otherwise the re-
chargeable batteries may overheat, become a
fire hazard or explode.
8 GB
RISK OF EXPLOSION! Never throw
rechargeable batteries into fire or water.
Chemical fluids that damage the product may leak out of
outdated or used rechargeable batteries. Remove, there-
fore, the rechargeable battery when the lamp is not re-
quired for any length of time.
WEAR PROTECTIVE GLOVES! If they come
into contact with skin, leaked or damaged re-
chargeable batteries could cause chemical
burns; you should therefore wear suitable protective
gloves at all times if such an event occurs.
Only use rechargeable batteries of the right size and of
the recommended type (see section on ”Technical data”).
Ensure correct polarity. This is indicated in the battery
compartment for the rechargeable battery.
Functioning
The solar cell installed in the article converts sunlight into elec-
trical energy and stores it in 1Ni-MH battery. Switches on the
light as it begins to get dark. The in-built light-emitting diodes
are a very long-life and energy-saving light source. The light du-
ration depends on the amount of sunlight, the angle of light on
the solar cell and the temperature (the battery capacity is tem-
perature-dependent). A vertical angle of light at temperatures
above the freezing point is ideal. The battery does not achieve
maximum capacity until after several charge and discharge
cycles.
Preparing for use
Installing the light
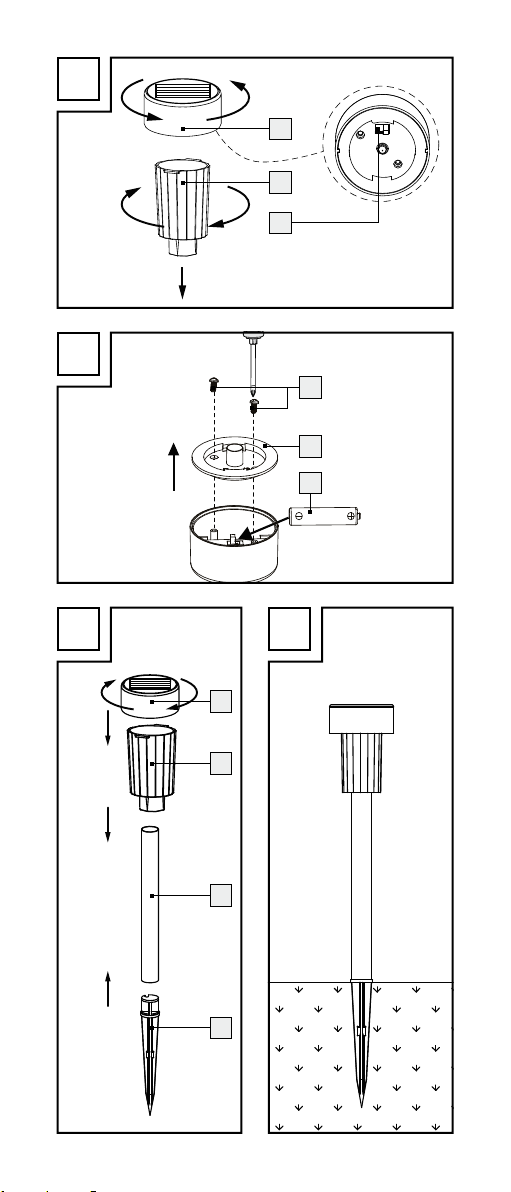
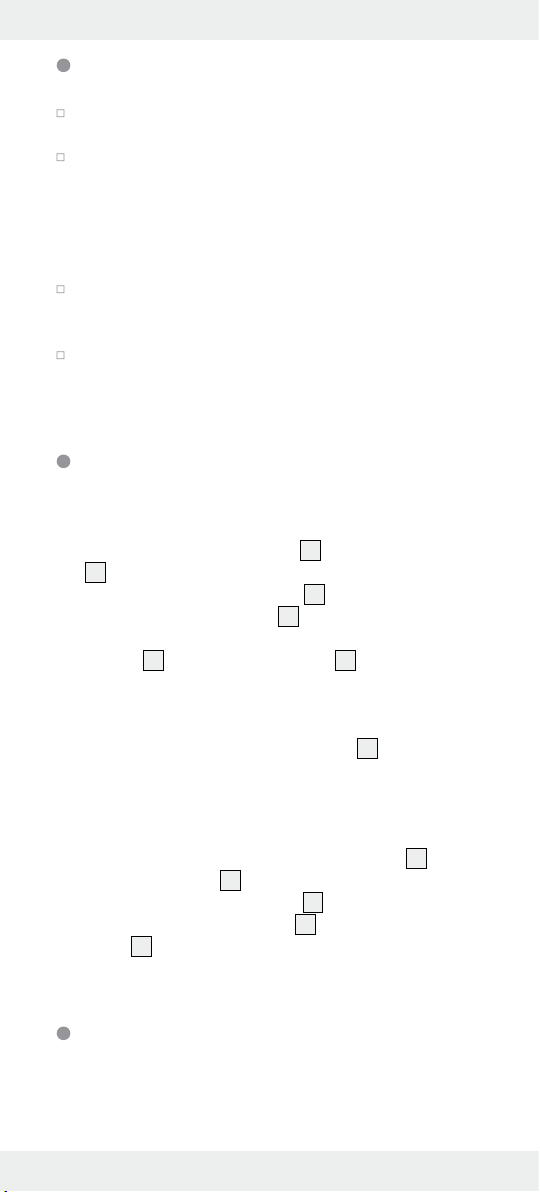
Install the light in accordance with Figures A, C, D:
1. Rotate the solar cell housing 1anticlockwise out of the
lamp shade 2(see Fig. A).
2. Move the ON/ OFF switch 5into the ON position to
switch the light on.
3. Insert the solar cell housing 1into the lamp shade 2and
tighten by turning it clockwise.
4. Place the light on to the pole 3.
5. Take out the ground stake 4from the pole 3and insert
it into the pole 3with the tip facing downwards (see
Fig. C).
6. Your solar lamp is ready for use (see Fig. D).
9GB
Setting up the light
Insert the assembled solar light far enough into the
ground (lawn, flower bed) for it to be stable.
Make sure you keep proper footing and balance at all
times. Do not use any force when assembling or setting-up
the product, e.g. hammer blows. This will damage the
product. In order to achieve the best result, set the solar
garden lamp up in a place where the solar cell will get
direct sunlight for as long as possible.
Make sure that the solar cell is not influenced by any
other source of light such as yard or street lighting as
otherwise the light will not come on in twilight.
The light automatically switches on in twilight conditions
and off again when normal outdoor lighting conditions
return.
Replacing the rechargeable battery
The battery should be replaced every 12 months to ensure
optimum performance.
1. Separate the solar cell housing 1from the lamp shade
2by moving it anti-clockwise (see Fig. A). Switch off the
lamp with the ON-/OFF-switch 5.
2. Loosen the fastening screws 6by using a small cross
head screwdriver and then lever out the battery compart-
ment lid 7of the solar cell housing 1with the help of a
slot screwdriver (see Fig. B).
3. Take care not to damage the cables and cable connec-
tions (see Fig. B).
4. Exchange the old rechargeable battery 8to a new one.
Take care to the correct polarity, when inserting the new
rechargeable battery. The polarity is indicated in the bat-
tery compartment. The new rechargeable battery has to
have the same technical data like the old one.
5. Now again fasten the battery compartment lid 7, fasten
the fastening screws 6by using a small cross head screw-
driver. Slide the On/Off switch 5to the position ON.
6. Connect the solar cell housing 1again to the lamp
shade 2and then connect every part of the solar lamp
to each other (see Fig. C).
Charging the rechargeable battery
Note that the solar garden light must be switched on when the
battery is charging.
10 GB
The charging time of the battery when the solar cell is used
depends on the intensity of the sunlight and the angle of
incidence of the light on the solar cell. Place the solar cell as
perpendicular as possible to the angle of incidence of the
light. In this way you will receive the highest light levels.
Maintenance and care
The light-emitting diodes cannot be replaced. The solar lamp is
maintenance-free, except for any necessary change of battery.
Clean the solar lamp regularly with a dry, lint-free cloth. Use
a slightly dampened cloth to remove more stubborn dirt.
Troubleshooting
Note: This appliance has delicate electronic components.
This means that if it is placed near an object that transmits
radio signals, it could cause interference. If you notice that the
device is malfunctioning, remove any sources of interference
from the area of the device.
Note: Electrostatic discharges may cause device to malfunc-
tion. In the event of such malfunctions, remove the batteries
briefly and reinsert them.
Error Cause Solution
The light will not
switch on even
though the sun
shone on the
lamp all day.
Artificial sources
of light, e.g. street
lighting, are inter-
fering with the
lamp.
Mount the lamp in a
place where it cannot
be disturbed by other
sources of light.
The light does
not come on or
comes on only
briefly.
The rechargeable
battery is broken
or there was not
enough daylight.
Replace the recharge-
able battery or mount
the lamp in a place
where it can receive
more sunlight.
Disposal
The packaging is made entirely of recyclable mate-
rials, which you may dispose of at local recycling
facilities.
Contact your local refuse disposal authority for more details
of how to dispose of your worn-out product.
Indice
Lingue:
Altri manuali LIVARNO LUX Illuminazione del paesaggio


Manuali Illuminazione del paesaggio popolari di altre marche


Cooper Lighting
Cooper Lighting MCGRAW-EDISON WBG Manuale utente

Cooper Lighting
Cooper Lighting Invue 42 - 175W Manuale utente

Saxby Lighting
Saxby Lighting Islay 68784 Manuale

LIGMAN
LIGMAN EU-10016-3 Manuale utente

Cooper Lighting
Cooper Lighting McGraw-Edison ZD Credenza Manuale utente

LIGMAN
LIGMAN KI-60475 Manuale utente


