LSG GR10 Manuale utente

Product may vary slightly from the item pictured due to model upgrades.
Read all instructions carefully before using this product.
Retain this owner’s manual for future reference.
NOTE:
This manual may be subject to updates or changes. Up to date manuals are available through our
website at www.lsgfitness.com.au
GR10 Water Resistance
Rowing Machine
USER MANUAL

2
TABLE OF
CONTENTS
I. Important Safety Instructions . . . . . . . . . . . . . . . . . . . . . . . . . . . . . . . 03
II. Care Instructions . . . . . . . . . . . . . . . . . . . . . . . . . . . . . . . . . . . . . . . . . . . . . 04
III. Exploded Diagram . . . . . . . . . . . . . . . . . . . . . . . . . . . . . . . . . . . . . . . . . . . . 05
IV. Parts List . . . . . . . . . . . . . . . . . . . . . . . . . . . . . . . . . . . . . . . . . . . . . . . . . . . . . 06
V. Assembly Instructions . . . . . . . . . . . . . . . . . . . . . . . . . . . . . . . . . . . . . . . 07
VI. Moving the Machine . . . . . . . . . . . . . . . . . . . . . . . . . . . . . . . . . . . . . . . . . 13
VII. Water Adjustment . . . . . . . . . . . . . . . . . . . . . . . . . . . . . . . . . . . . . . . . . . . 14
VIII. Stand Up Frame . . . . . . . . . . . . . . . . . . . . . . . . . . . . . . . . . . . . . . . . . . . . . . 15
IX. Display Manual . . . . . . . . . . . . . . . . . . . . . . . . . . . . . . . . . . . . . . . . . . . . . . . 16
X. Exercise Guide . . . . . . . . . . . . . . . . . . . . . . . . . . . . . . . . . . . . . . . . . . . . . . . . 18
XI. Water Care Instructions . . . . . . . . . . . . . . . . . . . . . . . . . . . . . . . . . . . . . . 20
XII. Troubleshooting . . . . . . . . . . . . . . . . . . . . . . . . . . . . . . . . . . . . . . . . . . . . . . 21
XIII. Warranty . . . . . . . . . . . . . . . . . . . . . . . . . . . . . . . . . . . . . . . . . . . . . . . . . . . . . 22
| TABLE OF CONTENTS

3
I. IMPORTANT SAFETY
INSTRUCTIONS
WARNING: Read all instructions before using this machine.
It is important your machine receives regular maintenance to prolong its useful life. Failing to
regularly maintain your machine may void your warranty.
Please keep this manual with you at all times.
•It is important to read this entire manual before assembling and using the equipment. Safe and
effective use can only be achieved if the equipment is assembled, maintained and used properly.
PLEASE NOTE: It is your responsibility to ensure that all users of the equipment are informed of all
warnings and precautions
•Before starting any exercise program you should consult your doctor to determine if you have any
medical or physical conditions that could put your health and safety at risk, or prevent you from
using the equipment properly. Your doctor’s advice is essential if you are taking medication that
affects your heart rate, blood pressure or cholesterol level.
•Be aware of your body’s signals. Incorrect or excessive exercise can damage your health. Stop
exercising if you experience any of the following symptoms: pain, tightness in your chest, irregular
heartbeat, and extreme shortness of breath, lightheadedness, dizziness or feelings of nausea. If you
do experience any of these symptoms, you should consult your doctor before continuing with your
exercise program.
•Keep children and pets away from the equipment. This equipment is designed for adult use only.
•Use the equipment on a solid, flat level surface with a protective cover for your floor or carpet.
To ensure safety, the equipment should have at least 2 meters of free space around it.
•Before using the equipment, check that the nuts and bolts are securely tightened. If you hear any
unusual noises coming from the equipment during use and assembly, stop immediately. Do not use
the equipment until the problem has been rectified.
•Wear suitable clothing while using the equipment. Avoid wearing loose clothing that may get caught
in the equipment or that may restrict or prevent movement.
•This equipment is designed for indoor and family use only.
•Care must be taken when lifting or moving the equipment so as not to injure your back.
IMPORTANT SAFETY INSTRUCTIONS |

4
•Always keep this instruction manual and assembly tools at hand for reference.
•The equipment is not suitable for therapeutic use.
II. CARE INSTRUCTIONS
•Lubricate moving joints with grease after periods of usage.
•Be careful not to damage plastic or metal parts of the machine with heavy or sharp objects.
•The machine can be kept clean by wiping it down using dry cloth.
•All nuts and bolts are to be checked and tightened on a regular basis. This includes pedals and other
moving parts. Failure to do so may cause damage to your thread and void your warranty.
| CARE INSTRUCTIONS
a. Batteries are to be installed or replaced by adult
only.
b. Do not use rechargeable batteries. Do not mix
different battery types. Do not mix old and new
batteries. Do not mix alkaline, standard (Carbon
Zinc), or rechargeable (Nickel-Cadmium) batteries.
c. Remove batteries when product is not in use.
d. Remove exhausted batteries from product and
dispose of in accordance with the manufacturer’s
recommendation.
BATTERY USAGE
+-
+-
BATTERY
e. Do not attempt to recharge non-rechargeable batteries.
f. Batteries are to be inserted with correct polarity.
g. The supply terminals are not to be short-circuited.
h. Do not dispose of batteries in fire, batteries may explode or leak.

5
III. EXPLODED DIAGRAM
EXPLODED DIAGRAM |
31
50
33
28
31 502324
50
33 50
47 8
19 37 73719
50
33
47
50
27
28
50
27
23
24
50
8
19
17
76
17
19
37
7
37
20
21
22
89
82
88
81 87
45
45 3
78 33
47
50
80
43 78
4
50
27
80
43
35
65
61
33
47
50
10 33
47
50
50
47
33
27
50
61
65
35
64
79
6
64
79
77
25
48
16
63
16
41
90 85
68
13
53 25 48
86 4832
71
2548 5
71 73
48 40
83 42
72
69
69
1
67
4648 39
39 12
39 9
39
48
11
48
39 50
33 47 48
39
48
939
48
39
48
52
48 60
26
49
66
14
74
49
30
14
49
26
15 72
72
2
74
3450
50
47
33
50
27 50
50
27
75
34
47
33
27 75
34
50
38
55
29
56
57
54
58 58
84
59
44 36
51
18
6218
70

6| PARTS LIST
IV. PARTS LIST
No. Description Qty
1Main Frame 1
2Front Foot Tube Frame 1
3Rear Foot Tube Frame 1
4Slide Tube Frame 1
5Display Frame 1
6Tension Tube 1
7Seat Cushion Limiting Plate 2
8Seat Cushion Left Mounting Plate 2
9Tank Stiffener 2
10 Slide Plate 1
11 Tank Connector 1
12 Block B 1
13 Display Mounting Plate 1
14 Retractor Casing 2
15 Fixed Pin for Wind Wheel 1
16 Deep Groove Ball Bearing606-ZZ 4
17 Deep Groove Ball Bearing608-ZZ 6
18 Deep Groove Ball Bearing6000-ZZ 2
19 Roller Sleeve 6
20 Allen Wrench 1
21 Wrench with Screwdriver S13/14/15 1
22 Open End Wrench 1
23 Pull Rod 2
24 Pull Rod Limiting Plate 2
25 Screw M6 4
26 Screw M6 2
27 Screw M8 9
28 Screw M6 2
29 Screw M3 12
30 Bolt M6*90 2
31 Bolt M8*125 3
32 Bolt M6*60 1
33 Bolt M8*20 16
34 Bolt M8*40 4
35 Bolt M8*65 2
36 Bolt M10*55 1
37 Bolt M6*8 4
38 Bolt M3*15 12
39 Bolt M6*12 22
40 Bolt M6*40 1
No. Description Qty
41 Bolt M6*55 2
42 Bolt M5*10 2
43 Bolt M6*20 4
44 Bolt ST4.2*9.5 1
45 Bolt ST4.2*19 2
46 Bolt ST4.2*13 2
47 Flat Washer 8 14
48 Flat Washer Φ6 32
49 Flat Washer Φ6 4
50 Flat Washer Φ8 30
51 Flat washer Φ10 1
52 Type C Buckle 1
53 Bolt M5*10 4
54 Water Tank Up Cover 1
55 Water Tank Bottom Cover 1
56 Water Tank 1
57 Top and Bottom Cap Seals 1
58 Sealing Ring for Axle Center 2
Hole of Upper Cover
59 Upper Cover Intake Plug 1
60 Axial Seal Ring 1
of Propeller Blade
61 Foot pedal 2
62 Ribbon Pulley 1
63 Ribbon Pulley 2
64 Foam Grip 2
65 Pedal Band 2
66 Pullback Device 1
67 Decorate Cover 1
68 Handrail Retainer 1
69 Flat Plug for Inner Tube 2
of Round Waist Tube
70 Induction Bar Clamp 1
71 Display Sleeve 4
72 Adjust Feet 3
73 Display Bracket 1
74 Handrail Plug 2
75 Transport Wheel 2
76 Cushion Roller 3
77 Base Bracket 1
78 Back Leg Cover 2

7
No. Description Qty
79 28 Pipe Plug 2
80 Cushion 2
81 Funnels 1
82 Water Pipe 1
83 Triangular Knob 2
84 Sponge Pad 1
No. Description Qty
85 Display 1
86 Bottom Wire 2
87 Bucket Water Electric Pump 1
88 Pumping Pipe 2
89 USB Charge Wire 1
90 Dry Battery 2
ASSEMBLY INSTRUCTIONS |
V. ASSEMBLY INSTRUCTIONS
1 2 3 4 5 10
22 20 21 83 50 47 89
77 81 82 34 35 27
88 6133 85 90 87

8
No. Description Specification Qty
1Main Frame 1
2Front Foot 1
Tube Frame
3Rear Foot 1
Tube Frame
4Slide Tube Frame 1
5Display Frame 1
10 Slide Plate 1
61 Feet Pedal 2
22 Open End Wrench S17-19 1
20 Allen Wrench S=5 1
47 Flat washer 8 8 11
21 Wrench with S13,14,15 1
Screwdriver S13/14/15
33 Bolt M8*20 11
PARTS LIST
| ASSEMBLY INSTRUCTIONS
No. Description Specification Qty
35 Bolt M8*65 2
90 Dry Battery 2
50 Flat washer Φ8 Φ8 15
83 Triangular Knob 2
89 USB Charge Wire 1
77 Base Bracket 1
81 Funnels 1
82 Water Pipe 1
27 Screw M8 M8 4
34 Bolt M8*40 2
87 Bucket Water 1
Electric Pump
88 Pumping Pipe 2
85 Display 1
#20 Allen Wrench S=5 1pc
#22 Open end Wrench S10 1pc
#21 Wrench with screwdriver S13, 14, 15 1pc
INSTALL TOOL:

9ASSEMBLY INSTRUCTIONS |
1. Use Allen Wrench (20), Wrench with screwdriver S13/14/15 (21), Bolt M8*40 (34), Flat washer 8 (47) and
Screw M8 (27) to secure the main frame (1) onto the front foot tube frame (2).
STEP 1
1
34
50
2
50
34
33
47
50
50
27
27
47
50
47
33
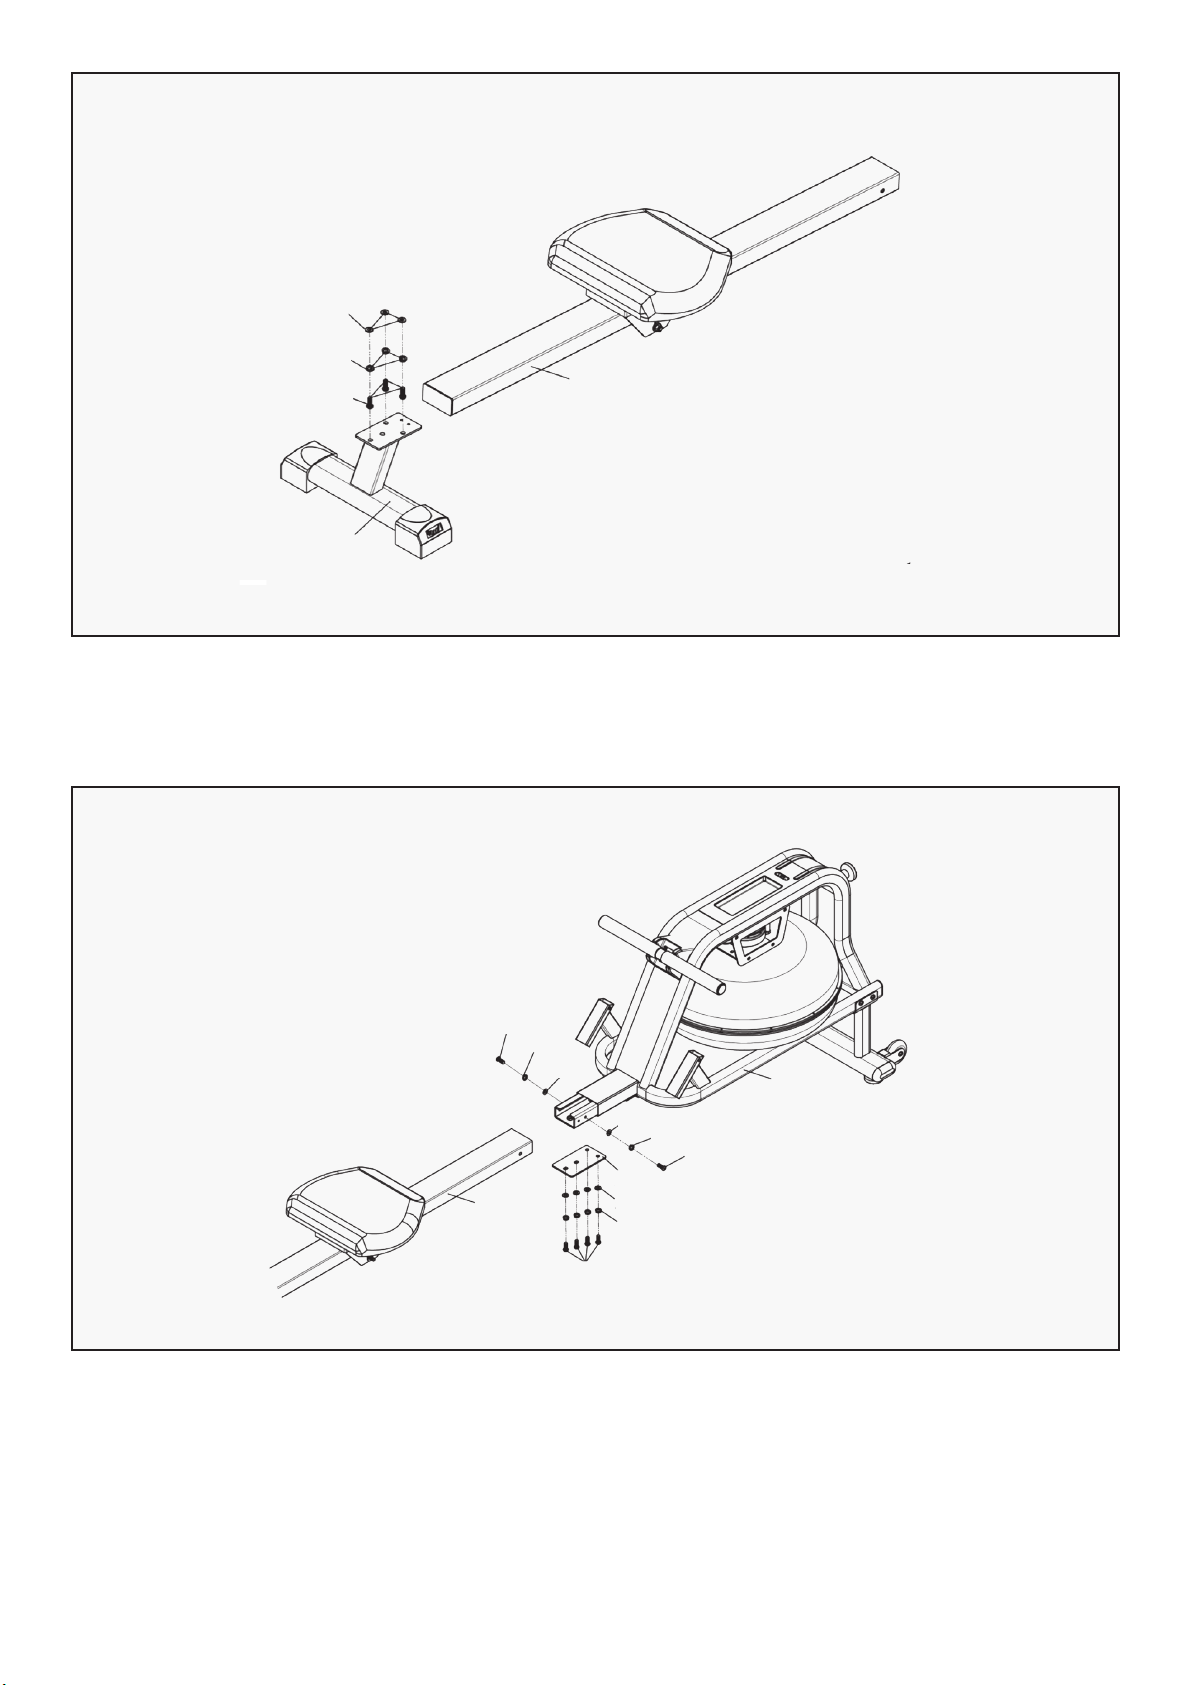
1. Lock the Base Bracket (77) to the sliding tube Frame (4).
STEP 2
77
4
10 | ASSEMBLY INSTRUCTIONS
1. Use Allen Wrench (20), Wrench with screwdriver S13/14/15 (21), Bolt M8*20 (33), Flat washer 8 (47) and
Flat washer Φ8 (50) to secure the Rear foot tube frame (3) and the Slide tube frame (4).
STEP 3
3
1. Use Allen Wrench (20) Wrench with screwdriver S13/14/15 (21), Bolt M8*20 (33), Flat washer 8 (47), Flat
washer Φ8 (50) and Slide plate (10) to secure the Slide tube frame (4) to the main frame (1).
STEP 4
33
33
47
50
4
47
50
50 47
33
1
10
50
47
33
4
Indice
Altri manuali LSG Palestra domestica


