Luraco iRobotics 6 Manuale utente


IMPORTANT SAFETY INSTRUCTIONS
When using an electrical appliance, basic precautions should always be followed, including the following:
Read all instructions before using (this appliance).
WARNING – To reduce the risk of burns, fire, electric shock, or injury to persons:
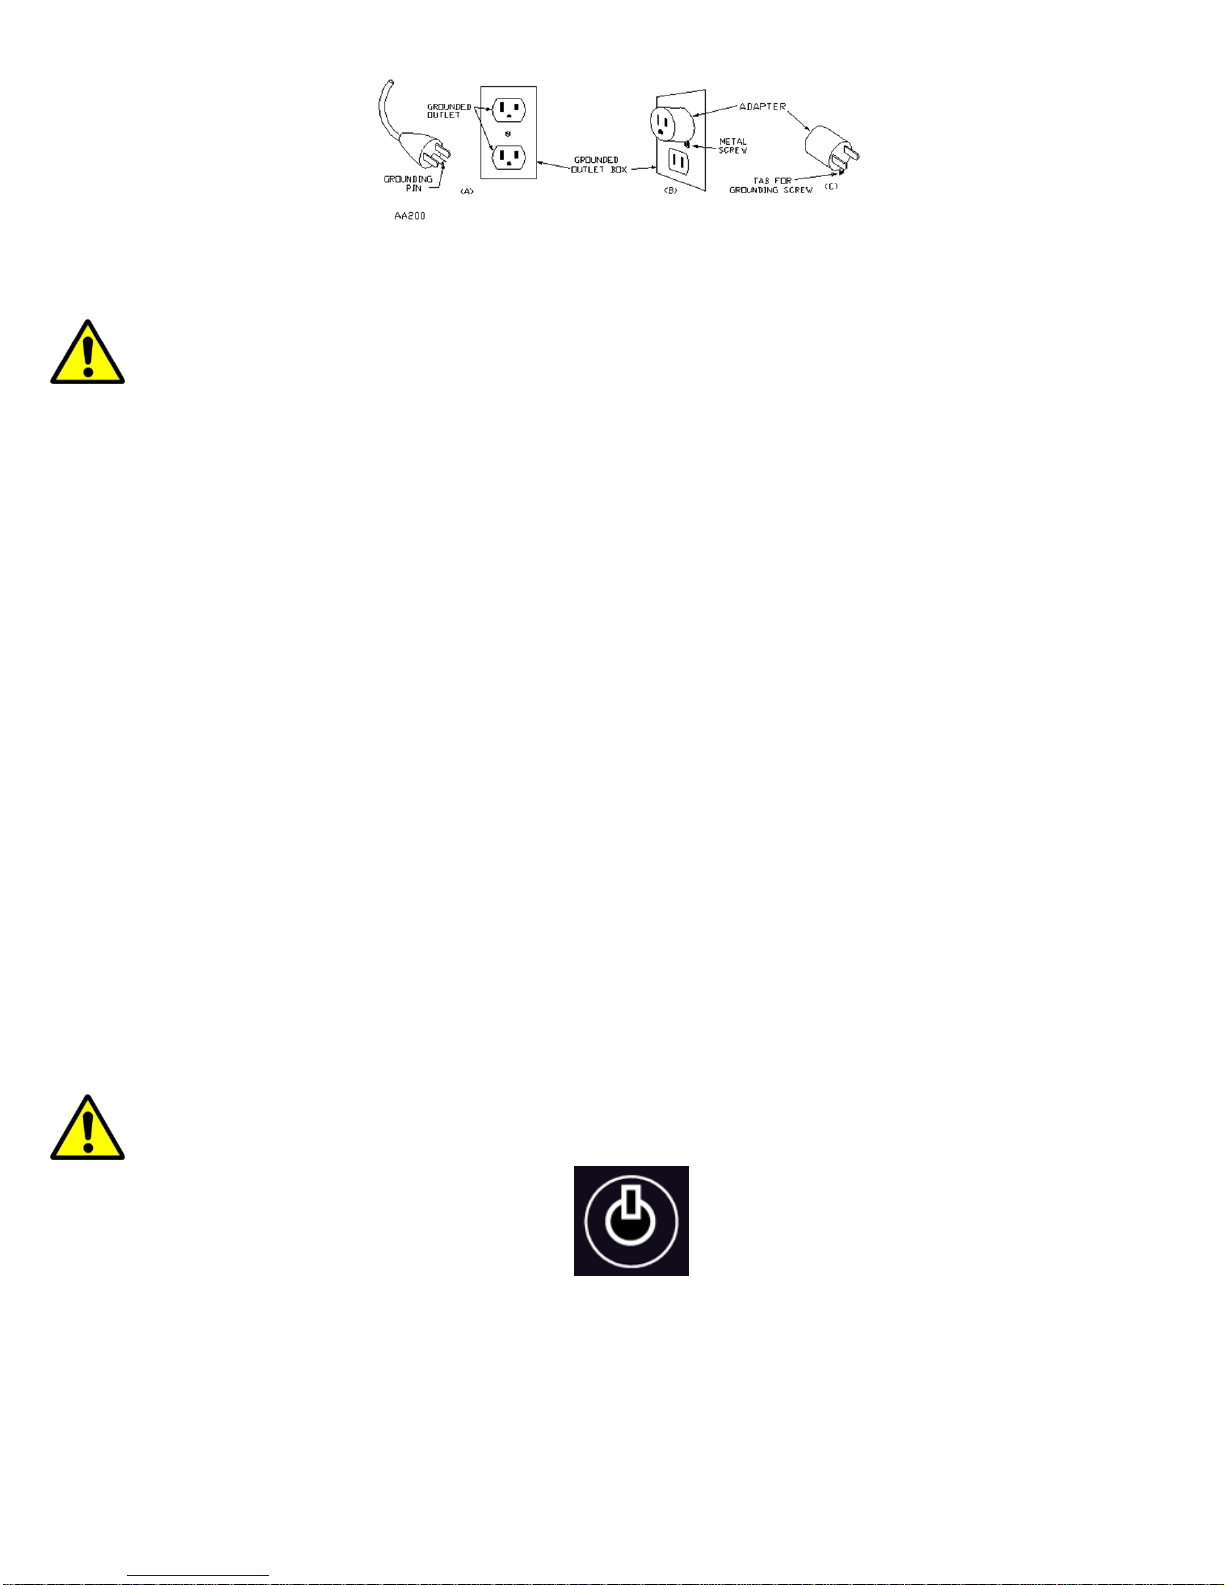
1. The main power switch is marked with international symbols “O” and “I”. The switch in position “I” means
that system is turned on, and the switch in position “O” means that system is off.
2. An appliance should never be left unattended when plugged in. Unplug from outlet when not in use and
before putting on or taking off parts.
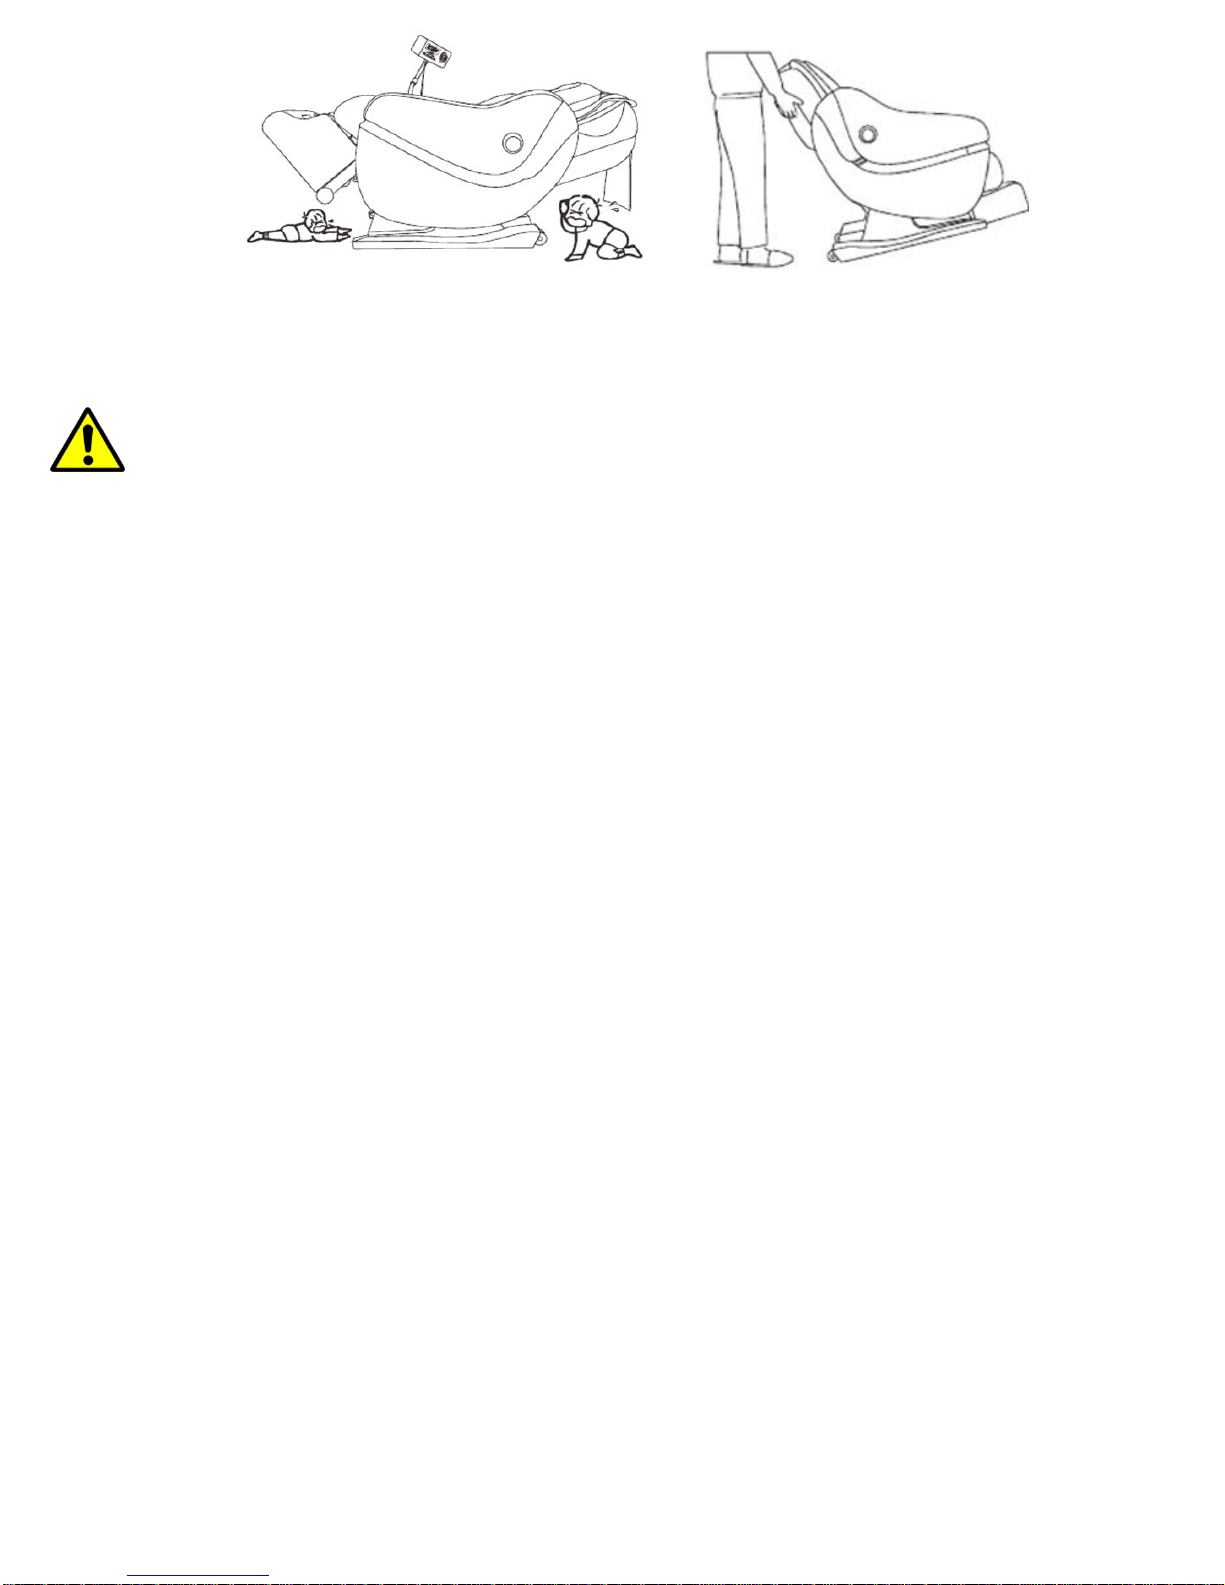
3. Close supervision is necessary when this appliance is used by, on, or near children, invalids, or disabled
persons. Keep children away from extended foot support (or other similar parts).
4. Use this appliance only for its intended use as described in this manual. Do not use attachments not
recommended by the manufacturer.
5. Never operate this appliance if it has a damaged cord or plug, if it is not working properly, if it has been
dropped or damaged, or dropped into water. Return the appliance to a service center for examination and
repair.
6. Keep the cord away from heated surfaces.
7. Do not use outdoors.
8. Do not operate where aerosol (spray) products are being used or where oxygen is being administered.
9. To disconnect, turn all controls to the off position, then remove plug from outlet.
10. Connect this appliance to a properly grounded outlet only. See grounding instructions.
11. Do not remove the back cushion and do not play with roller mechanism.
12. Do not remove the bottom seat and do not play with actuators.
13. Keep the cord out of heavy traffic area. To avoid fire hazard NEVER put the cord under rugs or near heat
generating devices.
14. Always unplug the power cord from the electrical outlet immediately after use and before cleaning.
15. Always check the volume before using the headphones.
16. Do not operate any equipment with damaged parts.
17. Any other use not recommended by the manufacturer may cause electrical shock or injury to persons.
18. Do not touch or re-wire the wires connected to the master-box.
19. Do not attempt to repair or adjust any electrical or mechanical functions on this unit. Doing so will void the
warranty.
After reading this owner’s guide, if you have any questions or comments, please call +1-817-633-1080 or
contact our technical support department at sup[email protected] or visit our website at www.luraco.com
for more information
GROUNDING INSTRUCTIONS
This product must be grounded. If it should malfunction or breakdown, grounding provides a path of least resistance
for electric current to flow, thus reducing the risk of electric shock. This product is equipped with a cord having an
equipment-grounding conductor and a grounding plug. The plug must be plugged into an appropriate outlet that is
properly grounded in accordance with all local codes and ordinances.
DANGER - Improper connection of the equipment-grounding conductor can result in a risk of electric shock. Check
with a qualified electrician or serviceman if you are in doubt as to whether the product is properly grounded. Do not
modify the plug provided with the product - if it does not fit the outlet; have a proper outlet installed by a qualified
electrician.
Followed by either instruction 1) or 2) below:
1. This product is for use on a nominal 120V circuit, and has a grounding plug that looks like the plug illustrated in
sketch A in the Figure pictured. A temporary adapter that looks like the adapter illustrated in sketches B and C
may be used to connect this plug to a 2-pole receptacle as shown in sketch B if a properly grounded outlet is not
available. The temporary adapter should be used only until a properly grounded outlet (sketch A) can be installed
by a qualified electrician. The green colored rigid ear, lug, or the like extending from the adapter must be
connected to a permanent ground such as a properly grounded outlet box cover. Whenever the adapter is used,
it must be held in place by a metal screw.
2. This product is for use on a nominal 120V circuit, and has a grounding plug that looks like the plug
illustrated in sketch A in the Figure below. Make sure that the product is connected to an outlet having the same
1

configuration as the plug. No adapter should be used with this product.
Figure Illustration: Grounding
MEDICAL WARNINGS
Not recommended for the following people
•Pregnant Women
•People with distorted joints, broken bones, skin infection or injury
•Children under 12
If you have a medical issue or concern, please consult your doctor before using the massage chair
Do Not
•Do not allow children to play near the chair especially during operation
•Do not leave mobility impaired or speech impaired people alone in chair
Additional Safety Precautions
•Do not use more than 20 minutes per session
•Do not place or stock this machine near damp places such as swimming pools or bathrooms
•Do not press by force on the massage rollers
•Do not stand on the chair or store heavy items on the chair
•Do not use in the environment which is dusty, greasy or lacking oxygen
•Do not place near steam oven, open fire, or heat
•Wear suitable clothing, do not massage with bare skin
•Do not place directly in the sun
•Do not use electric blanket while using the massage chair
•Do not use outdoors
•Do not use while smoking
•Place this machine horizontally with space over 80cm, enough for full recline mode. Place on level floor.
EMERGENCY STOP
In case of emergency, press the power button to stop the system.
2

Do not operate near young children Do not move the machine during operation
NOTE: Do not use this apparatus as a bed or fall asleep in the course of massage. Do not use more than 20 minutes, the
recommended time of use is 20 minutes. Prolonged massaging may cause aches, muscle or nerve issues. (The preferred total
duration of massaging within the day should be 30 minutes total or less).
Caution for User
•This device should not be used until grounded
•For a softer massage, a dry towel can be placed on the chair (never use an electric blanket)
(note that a gentle massage pad is included)
•In the course of normal use, lift the back cushion regularly to check if there is any damage or crack in the
fabric of cushion part. Please stop using immediately even if there is minor damage, turn off the power cable.
Send the cushion in for repair to avoid possible electric shock.
•Do not move the chair while in use
•Do not place heavy objects on the armrest, foot cushion or back of the chair to avoid turning over the chair
or damage to the chair
•Do not pull the fabric forcefully or stab it with sharp objects which can result in injury or damage to the chair
•Do not move the chair on wooden floor, carpet or other easily damaged flooring
•Children and pets should not be allowed to play around chair
•Please be sure that no people, pets, or other objects are behind the chair or under the legs before reclining or
lowering the leg massager
•Do not put your hands or head under the chair
•When using the massage chair, ascertain that the footrest is in the lowest position
•Do not use immediately after meals
•Do not sit on the back cushions, armrest, or legs
•Don’t use the massage chair when your body is wet or moist as it can result in electrical shock
•Do not operate with more than one person
•Don’t use when using head ornamentation as it can result in injury
•Do not stumble over electrical wires or connections
Do Not Use the Chair under the Following Conditions
•When the apparatus has been rinsed with water or fails to operate
•Power cable is damaged
•If you feel abnormal or extremely achy during the course of the massage, please stop using the massage chair
immediately and consult a doctor
•Power failure occurs
•When the massage chair malfunctions during the course of operation
•Do not touch the inner parts of the chair as this can cause damage and electrical shock
•Do not dismantle and remove inner parts, or repair the massage chair
•Do not operate during a thunderstorm
Methods of Storage
•Do not dismount the back of the chair
•Keep the massage chair free of dust
•Cover the chair with dust-free cloth to prevent dust from collecting
•Do not store in a hot, humid, damp place or in direct sunlight or heat
•Do not store in an overly cold place 3

Cleaning Methods
•Before cleaning unplug from electrical source to avoid shock
•Clean the cloth surface with neutral detergent or special mild detergent for cloth
•Dust can be cleaned off with a damp cloth of mild detergent and air dry
•Do not spray pesticide on device
•Specified cleaner can be used on the leather, plastic, and dried with a cloth
•DO NOT use a damp cloth on the electronic components which can cause shock and damage
•The leather covers (headrest, seat cushion, foot cushion) can be removed for cleaning
iRobotics 6 Installation Parts
4
Controller Pillow
Foot Massager
Back Cushion
Decorative Part
A
rmrest
Casing of Seat Frame
Seat Cushion
Controller Holder
Back Rest Cover
Decorative Parts
Movable Pulley

Massage Chair Dimensions
Space Requirement
5

INSTALLATION INSTRUCTION
Step 1: Unpack the two large packages
Take out the main body, seat frame casing, back cushion, seat cushion, pillow, controller supporter, leg massager,
controller and wireless controller of massage chair from the box carefully. In order to avoid damaging the system
we suggest at least two people to assist with assembly.
ATTENTION
6
Package 1: Main body, seat frame casing,
back cushion, pillow, controller, supporter,
foot massager.
Package 2: Left and right armrest, and left
and right seat casing.
Tool Box: This box is inside package 1. Box
with tools, user manual, power cords,
washers, and assembly handles/screws
and nuts.
Be sure no children, pet, or substance is
around chair for enough space for
installation

Step 2: Assemble the moving wheels
Step 3: Assemble the casing of seat frame
Incline the chair main body forward to one side about 20 degrees (Fig. 3). Loosen the two screws of rubber pad at
bottom of the seat frame (Fig. 2). Remove completely screw at center. Finally align the bottom of seat frame casing
with the rubber pad and fasten the casing to the frame (Fig. 3).
Step 4: Assemble the backrest
1/ Fix the back to the locked upright position raise seat back until you hear a click.
2/ Connect two wires from Mother board to the Backrest.
7
Fig. 2: Use Screw driver to loosen and tighten
screws as shown.
Fig. 1: Three screws are on sections as indicated
with red circle above.
Fig. 3: Once loosened, add casing and then
tighten screws to casing and frame.
Center
screw
Insert lock
Insert wheel
Mother
board
cover

Step 5: Assemble the Armrests
1. Using tools provided, remove nut indicated in red circle (Fig. 4 and Fig. 5)
Fig. 4 Fig. 5
2. Align armrest to the perfect position with chair frame, and then match the couple axle between armrest
and backrest. Finally, once aligned tighten with provided tool as shown in (Fig. 6 and Fig. 7).
8
Locked
Tighten by hand the
knob screw handle as
shown in next photo.
Tighten with tool
provided as shown
in photo
2 connectors

Fig. 6
Fig. 7
3. Connect the air pipes with green clamps (Fig. 8) and power wire (Fig. 9) to chair body carefully and completely.
Fig. 8 Fig. 9
4. Repeat procedures 1. 2. and 3. for the armrest assembly on other side. Note total number of air pipes
(2-right arm, 2-left arm, 3 seat, and 2 head). Note total number of connections (1 right arm, 1 left arm,
2 back of chair).
9
Armrest axis
Install axis in the chute, use
the screw and tighten with
hand held screw driver
Altri manuali per iRobotics 6
1
Indice
Altri manuali Luraco Massaggiatore

Luraco
Luraco iRobotics 7 series Manuale utente

Luraco
Luraco iROBOTICS 9 Series Manuale utente

Luraco
Luraco iROBOTICS 9 MAX Series Manuale utente

Luraco
Luraco iRobotics 7 series Manuale utente

Luraco
Luraco LEGEND Series Manuale utente

Luraco
Luraco iRobotics 6 Manuale utente

Luraco
Luraco iRobotics Manuale utente

Luraco
Luraco SOFY series Manuale utente

Luraco
Luraco iROBOTICS 7 PLUS Manuale utente

Luraco
Luraco iROBOTICS 5 Manuale utente


