Masterlock BH150CE Manuale utente

R
IMPORTANT
Read and understand this manual before assembling, starting or servicing
heater. Improper use of heater can cause serious injury. Keep this manual
for future reference.
PORTABLE
FORCED
AIR HEATER
OWNER’S MANUAL
Model BH150CE
Heater Size: 44 kW (150,000 BTU/Hr)

2
101487
Safety Information.........................................................................3
Product Identification .................................................................... 4
Unpacking......................................................................................4
Assembly .......................................................................................5
Theory of Operation ......................................................................6
Fuels ..............................................................................................6
Ventilation .....................................................................................7
Operation .......................................................................................7
Storage ........................................................................................... 8
Preventative Maintenance Schedule..............................................8
Troubleshooting.............................................................................9
Service Procedures ........................................................................10
Upper Shell Removal ..............................................................10
Fuel Filter ................................................................................ 10
Spark Plug ............................................................................... 11
Air Output, Air Intake, and Lint Filters .................................. 11
Pump Pressure Adjustment .....................................................12
Nozzle .....................................................................................12
Pump Rotor ............................................................................. 13
Fan........................................................................................... 14
Specifications................................................................................. 15
Wiring Diagram.............................................................................15
Illustrated Parts Breakdown and Parts List....................................16, 17
Wheels and Handles................................................................ 18
Accessories ....................................................................................18
Warranty and Repair Service......................................................... Back Cover
CONTENTS SECTION PAGE

3
101487
SAFETY
INFORMATION WARNINGS
IMPORTANT: Read this owner’s manual carefully and completely
before trying to assemble, operate, or service this heater. Improper
use of this heater can cause serious injury or death from burns, fire,
explosion, electrical shock, and carbon monoxide poisoning.
Carbon Monoxide Poisoning: Early signs of carbon monoxide poisoning
resembletheflu,with headaches, dizziness, or nausea. If youhavethesesigns,the
heater may not be working properly. Getfresh air atonce!Have heater serviced.
Some people are more affected by carbon monoxide than others. These include
pregnant women, persons with heart or lung disease or anemia, those under the
influence of alcohol, and those at high altitudes.
Make certain you read and understand all warnings. Keep this manual for
reference. It is your guide to safe and proper operation of this heater.
• Use only kerosene or No. 1 fuel oil to avoid risk of fire or explosion. Never
use gasoline, naphtha, paint thinners, alcohol, or other highly flammable
fuels.
• Never use heater where gasoline, paint thinner, or other highly flammable
vapors are present.
• Follow all local ordinances and codes when using heater.
• Use only in well-vented areas. Provide at least a 2800 square cm (3-square-
foot) opening of fresh, outside air for each 29.3 kW (100,000 BTU/Hr) of
rating.
• Use only in places free of flammable vapors or high dust content.
• Use only with the electrical voltage and frequency specified on model plate.
• Use only a three-prong, grounded (earthed) extension cord.
• Minimum heater clearances from combustibles:
Outlet: 250 cm (8 Ft.) Sides, Top, and Rear: 125 cm (4 Ft.)
• Locate heater on a stable and level surface while hot or running or a fire may
occur.
• When moving or storing heater, keep heater in a level position or fuel
spillage may occur.
• Keep children and animals away from heater.
• Unplug heater when not in use.
• When used with thermostat, heater may start anytime.
• Never use heater in living or sleeping areas.
• Never block air inlet (rear) or air outlet (front) of heater.
• Never move, handle, refuel, or service a hot, operating, or plugged-in heater.
• Never attach duct work to front or rear of heater. Using duct work could
reduce the necessary air flow of heater. Heater would produce excessive
carbon monoxide.
DANGER
Carbon monoxide poisoning may lead to death!

4
101487
PRODUCT
IDENTIFICATION
Fuel Cap
Lower
Shell
Power Cord
Figure 1 - 44 kW (150,000 BTU/Hr) Model
Hot Air
Outlet
Fuel
Tank
Fan Guard
Air Filter
End Cover
Flame-Out Control
Reset Button
Upper Shell
UNPACKING 1. Remove all packing items applied to heater for shipment.
2. Remove all items from carton.
3. Check items for any shipping damage. If heater is damaged, promptly inform
dealer where you bought heater.

5
101487
ASSEMBLY These models are furnished with wheels and handles. Wheels, handles, and the
mounting hardware are found in the shipping carton.
Tools Needed
• Medium Phillips Screwdriver
• 3/8" Open or Adjustable Wrench
• Hammer
1. Slide axle through wheel support frame. Install wheels on axle.
IMPORTANT:
When installing wheels, point extended hub of wheels toward
wheel support frame (see Figure 2).
2. Place cap nuts on axle ends. Gently tap with hammer to secure.
3. Placeheateronwheelsupportframe.Makesureairinletend(rear)ofheaterisover
wheels. Line up holes on fuel tank flange with holes on wheel support frame.
4. Place front handle and rear handle on top of fuel tank flange. Insert screws
through handles, fuel tank flange, and wheel support frame. Attach nut finger
tight after each screw is inserted.
5. After all screws are inserted, tighten nuts firmly.
Screw
Fuel
Tank
Flange
Wheel
Support
Frame
Wheel
Cap Nut
Nut
Extended
Hub
Air
Inlet
Rear
Handle
Hot Air
Outlet
Axle
Front Handle
Figure 2 - Wheel and Handle Assembly

6
101487
THEORY OF
OPERATION The Fuel System: The air pump forces air through the air line. The air is then
pushed through the burner head nozzle. This air causes fuel to lift from the tank. A
fine mist of fuel is sprayed into the combustion chamber.
The Air System: The motor turns the fan. The fan pushes air into and around
the combustion chamber. This air is heated and provides a stream of clean, hot air.
The Ignition System: The electronic ignitor sends voltage to the spark plug.
The spark plug ignites the fuel and air mixture.
The Flame-Out Control System: This system causes the heater to shut down
if the flame goes out.
Fan
Fuel
Filter
Air For Fuel
System Air For Combustion
And Heating Fuel
Spark
Plug
Combustion
Chamber Intake
Air
Filter
Motor Air Pump
Air line
To Burner Electronic
Ignitor
Burner
Head
Clean
Heated
Air Out
Cool
Air
In
Output
Air
Filter
Nozzle
Fuel
Tank
Figure 3 - Cross Section Operational View
FUELS
Do not use heavy fuels such as No. 2 fuel oil or No. 2 Diesel. Using heavy fuels
will result in:
• clogged fuel filter and nozzle
• carbon build up on spark plug
• use of non-toxic anti-icer in fuel during very cold weather
IMPORTANT:
Use a KEROSENE ONLY container. Be sure storage container is
clean. Foreign matter such as rust, dirt, or water will cause the flame-out control to
shut down heater. Foreign matter may also require you to clean fuel system often.
WARNING
Use only kerosene or No. 1 fuel oil to avoid risk of fire or
explosion. Never use gasoline, naphtha, paint thinners,
alcohol or other highly flammable fuels.

7
101487
VENTILATION
Continued
Provide a fresh air opening of at least 2800 square cm (3 square feet) for each 29.3
kW (100,000 BTU/Hr) rating. Provide extra fresh air if more heaters are being
used.
Example:
A 44 kW (150,000 BTU/Hr) heater requires one of the following:
• a 4.88 m (16 foot) wide two-car garage door raised 8.59 cm (3.38 inches)
• a 2.75 m (9 foot) wide single-car garage door raised 15.24 cm (6 inches)
• two, 76.20 cm (30 inch) wide windows raised 28 cm (11 inches)
WARNING
Follow the minimum fresh, outside air ventilation
requirements. If proper fresh, outside air ventilation is not
provided, carbon monoxide poisoning can occur. Provide
proper fresh, outside air ventilation before running heater.
OPERATION WARNING
Review and understand the warnings in the
Safety
Information Section.
They are needed to safely operate this
heater. Follow all local codes when using this heater.
To Start Heater
1. Follow all ventilation and safety information.
2. Fill fuel tank with kerosene or No. 1 fuel oil.
3. Attach fuel cap.
4. Plug power cord of heater into standard 230 volt/50 hertz, grounded (earthed)
outlet. Use an extension cord if needed. Use only a three-prong, grounded
(earthed) extension cord.
Extension Cord Wire Size Requirements
Up to 30.5 meters (100 feet) long, use 1.0 mm2(16 AWG) conductor
30.6 to 61 meters (101 to 200 feet) long, use 1.5 mm2(14 AWG) conductor
Heater will start when power cord is plugged into outlet. If not, push in flame-
out control reset button (see Figure 4).
Figure 4 - Flame-Out Control Reset Button
Flame-Out
Control
Reset Button
(Fan Guard
Removed)

8
101487
OPERATION
Continued
To Stop Heater
1. Unplug power cord from outlet.
To Restart Heater
1. Wait 2 minutes after stopping heater.
2. Repeat steps under To Start Heater, page 7.
PREVENTATIVE
MAINTENANCE
SCHEDULE
Item How Often How To
Fuel tank Flush every 150-200 hours See Storage above.
of operation or as needed.
Air output and Replace every 500 hours of See Air Output, Air Intake,
lint filters operation or once a year. and Lint Filters, page 11.
Air intake Wash and dry with soap and See Air Output, Air Intake,
filter water every 500 hours of and Lint Filters, page 11.
operation or as needed.
Fuel filter Clean twice a heating season See Fuel Filter, page 10.
or as needed.
Spark plug Clean and regap every 600 See Spark Plug, page 11.
hours operation or replace
as needed.
Fan blades Clean every season or as needed. See Fan, page 14.
Motor Not required/permanently lubricated
WARNING
Never service heater while it is plugged in, operating, or
hot. Severe burns and electrical shock can occur.
STORAGE 1. Drain fuel tank.
Note:
Some models have drain plug on underside of fuel tank. If so, remove
drain plug to drain all fuel. If heater does not have drain plug, drain fuel
through fuel cap opening. Be sure all fuel is removed.
2. Replace drain plug if used.
3. Add 4 liters (one gallon) of clean kerosene to fuel tank.
4. Attach fuel cap.
5. Move heater forwards and backwards to stir fuel.
6. Remove fuel cap or drain plug and drain fuel tank. Be sure all fuel is removed.
7. Replace fuel cap or drain plug. Properly dispose of old and dirty fuel.
8. Store heater in dry place. Make sure storage place is free of dust and corrosive
fumes.
IMPORTANT:
Do not store kerosene over summer months for use during next
heating season. Using old fuel could damage heater.

9
101487
TROUBLE-
SHOOTING WARNING
Never service heater while it is plugged in, operating, or hot.
Severe burns and electrical shock can occur.
OBSERVED FAULT POSSIBLE CAUSE REMEDY
Wrong pump pressure
Dirty air output, air intake,
and lint filters
Dirty fuel filter
Dirt in nozzle
Dirty photocell lens
Bad flame-out control
Heater ignites, but
flame-out control
shuts off heater after
a short period of
time.
See Pump Pressure
Adjustment, page 12.
See Air Output, Air Intake
and Lint Filters, page 11.
See Fuel Filter, page 10.
See Nozzle, page 12.
Clean photocell lens.
Replace flame-out control.
Heater will not
ignite, but motor runs
for a short period of
time.
Wrong pump pressure
Carbon deposits on spark
plug and/or improper gap
Dirty fuel filter
Dirt in nozzle
Water in fuel tank
Electronic ignitor not
grounded (earthed)
Bad electronic ignitor
See Pump Pressure
Adjustment, page 12.
See Spark Plug, page 11.
See Fuel Filter, page 10.
See Nozzle, page 12.
Drain and flush fuel tank
with clean kerosene. See
Storage, page 8.
Make sure electronic
ignitor mounting is tight.
Replace electronic
ignitor.
Reset flame-out control
button, see Figure 4,
page 7.
If fan is hard to turn, see
Pump Rotor, page 13.
WARNING: High voltage!
Flame-out control not reset
Binding pump rotor
Motor does not start
when heater is
plugged in, fan
rotates slowly or
does not turn.

10
101487
SERVICE
PROCEDURES
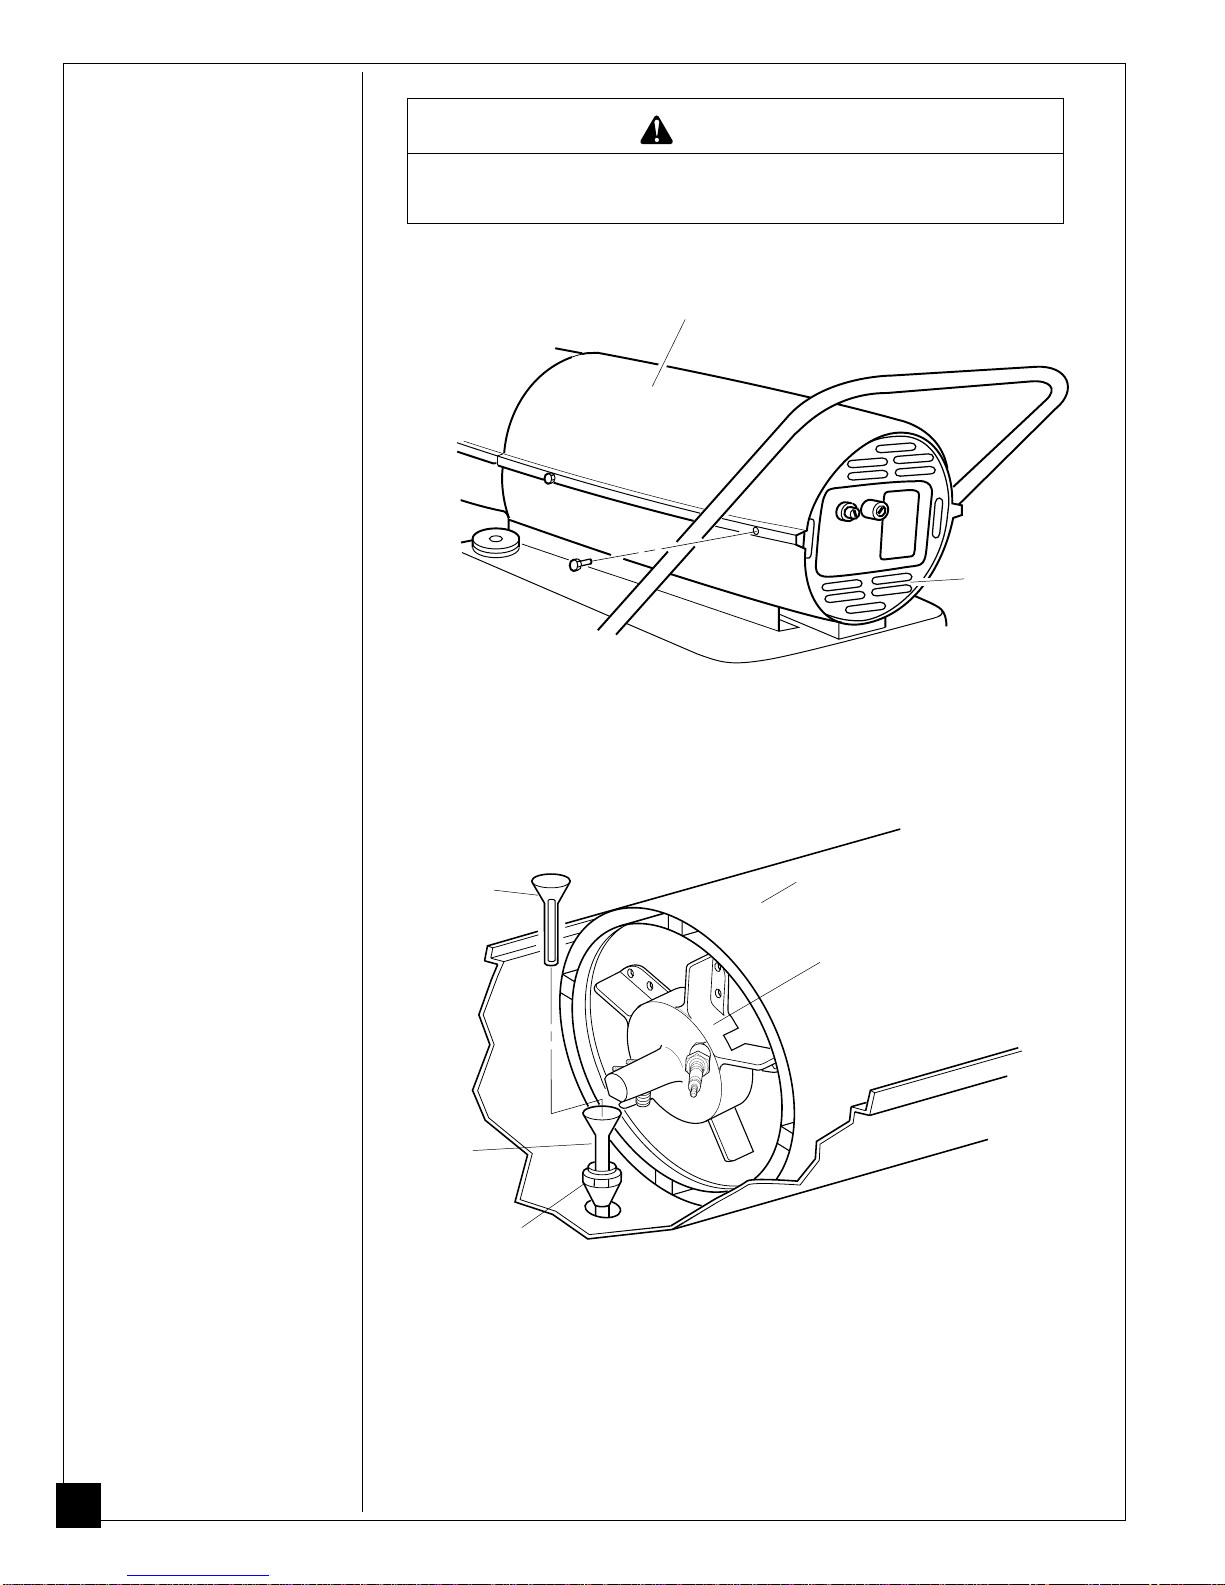
Upper Shell Removal
1. Remove screws along each
side of heater using 5/16"
nut-driver. These screws
attach upper and lower
shells together.
2. Lift upper shell off.
3. Remove fan guard.
WARNING
Never service heater while it is plugged in, operating, or
hot. Severe burns and electrical shock can occur.
Fuel Filter
1. Remove upper shell (see
page 10).
2. Remove fan (see page 14).
3. Loosen flare nut using 3/4"
open-end wrench. Push fuel
tube down, away from
burner head. Fuel filter is
located inside of fuel tube.
4. Lift out fuel filter.
5. Wash fuel filter with clean
fuel and replace in fuel
tube.
6. Connect fuel tube to burner
head. Attach flare nut until
nut seats against fuel tube
and fitting. Tighten 1/4 turn
more using 3/4" open-end
wrench (11.3-14.7 n-m/
100-130 inch-pounds).
7. Replace fan (see page 14).
8. Replace fan guard and
upper shell.
Upper
Shell
Fan Guard
Figure 5 - Upper Shell Removal
Burner
Head
Combustion
Chamber
Fuel Filter
Fuel Tube
Flare Nut
Figure 6 - Fuel Filter Removal
Indice
Lingue:
Altri manuali Masterlock Stufa
Manuali Stufa popolari di altre marche

Empire Heating Systems
Empire Heating Systems WCC65 Manuale utente

Wetekom
Wetekom 92 86 43 Manuale utente

Desa
Desa SPC170-F Manuale utente

Watlow
Watlow Watrod Electric Tubular Heaters Manuale utente

Haverland
Haverland ECO-DRY GPS Series Manuale elenco delle parti

Stelpro
Stelpro ASILVC2060 Series Manuale utente