Meade LPI Guida rapida

Meade®LPI Camera Program
The Basics

When first opening the packing box, note carefully the following parts:
•LPI camera
•Parfocal ring
•USB cable
•DB-9 to RJ-11 adapter
•LX200 serial cable
•Autostar #497 serial cable
•CD ROM, including the Operating Instruction in .pdf format
Recommended Minimum System:
PC running Windows 98SE with 64 MB and 100 MB free disk space.
To get the best view and resolution for the images in this manual, zoom in to 200% using the viewing controls
in the Acrobat Reader control bar.
Parts Listing
2

The following procedure is also found on the printed Quick Start Guide supplied with this product.
Before you can operate the LPI camera, you must install the Autostar Suite software.
1. Do not plug the USB cable into your PC at this time. You will be asked to do so later in this installation.
2. Turn on your PC. Allow Windows to load.
3. Place the CD ROM into your PC's CD drive.
4. The Main Menu screen displays. Click "Install Autostar Suite."
5. You are prompted to choose a directory in which to install the driver. You may accept the default directory or
create your own directory path. Click “Next” when done.
6. The “Select Components” window displays. This window allows you to choose whether or not to install the
Guide Star Catalog.
Note: This is an optional catalog that may be used by the Planetarium program and contains all of the
locations of the Hubble Space Telescope (HST) Guide stars. This file is very large and takes up a large
amount of memory. Only download if you have enough memory or wish to use this amount of memory of
your hard drive. Memory totals for the file and your hard drive are displayed in this window.
If you wish to install the catalog, check the GSC check box.
If you do not wish to install the catalog, uncheck the GSC check box.
Then click “Next.”
7. The “Start Installation” window displays. The program is now ready to install the Autostar Suite. Click "Next”
to begin installation.
8. The “Microsoft Text to Speech Engine” window displays. Click "Yes” to agree to the terms and to continue
with the installation.
9. The “Microsoft .Net Framework installation” window displays. You must click “Yes” for the LPI to operate.
10. Once .Net Framework installs, the .Net Framework agreement displays. Click “OK” to continue.
11. A window displays that allows you to install Adobe Acrobat Reader if you do not already have it installed on
your PC. Click “Yes” or “No.”
12. The “InstallShield Wizard for the Meade LPI” displays. Click "Next.”
13. A window displays prompting you to do a complete or custom install of InstallShield Wizard. Click on the
“Complete”
button and then click “Install” to begin installation.
14. (XP versions only) “Windows Logo Test” window displays. Clicking “Continue Anyway” will install a driver
that should operate with most PC configurations.
15. InstallShield Wizard completes installation. Click “Finish.”
16. A window displays that tells you that Autostar Suite has been installed. Click “Finish.”
Install the Autostar Suite Software
3

To connect the LPI Camera to your PC, you need to install the LPI device driver and connect the USB cable:
1. Connect one end of the USB Cable to the LPI camera.
2. Connect the other end of the USB Cable to your PC or to a USB hub.
3. “Found camera” displays at the bottom right of your PC screen.
4. The “Hardware Wizard” window displays. The “Install Software” selection is checked as the default choice.
Click “Next.” The Wizard searches for the driver.
5. (XP versions only) “Windows Logo Test” window displays. Clicking “Continue Anyway” will install a driver
that should operate with most PC configurations.
6. The driver is installed. Click “Finish.”
The camera driver is now installed and your PC will now be able to recognize the LPI whenever you connect it
to the PC.
Connect The LPI Camera to Your PC
4

If the Autostar Suite icon doesn’t appear on your desktop, you can start the Autostar Suite program by going to
Start/Program/Meade/Autostar Suite. The Planetarium program will display.
You can open other programs of the Suite by going to the Image menu and selecting the desired program.
You can open the Operating Instruction manuals or the Meade General Catalog by selecting them from the Main
Menu screen of the CD ROM.
Click the word “Meade” in the Main Menu or in the General catalog to go www.meade.com.
Start the Suite Software
5

6
To connect the LPI camera to an ETX Telescope:
• Orient the LPI camera into the eyepiece holder so that the USB
cable points at the front end of the telescope’s optical tube (see
photo at right).
• If you are using the ETX in a “straight-through” configuration, orient
the LPI camera in the holder so that the USB cable points
downward.
To connect the LPI camera to an LX-200 or LX-90 Telescope:
• Orient the LPI camera into the eyepiece holder so that the USB
cable points downward.
To connect the LPI camera to other telescopes:
• Move the LPI camera around in the eyepiece holder until the image on the LPI display screen (17) is
upright.
To connect the LPI camera when using an autoguider:
• Go to the Object box and choose “Autoguide” from the list ( see pages 25 and 26 for more information).
Enter comm port number and other information.
• Attach the correct serial cable from the telescope’s control panel RS-232 port to the comm port of your PC
(see the Autoguider instruction sheet for more information). Also see “Autoguider,” page 25, for more
information.
Connect the LPI Camera to Your Telescope
Cable points at front of tube

To open the LPI Imaging program, go to the Image menu of the Planetarium program and select LPI Imaging.
The LPI program will display.
Open the LPI Program
7

8
LPI Controls
b
cd
e
f
gh
i
j
1)
1!
1@
1#
1$
1%
1^ 1&
1*
1(
2) 2!
2@
2#
2$
2%
2^
2&
2*
3)
3!
2(

1. Gain and Offset sliders
2. Expose control
3. Auto Adj (Auto Adjust) button
4. Mono (Black and white) check box
5. Live Image check box
6. Dark Sub check box
7. Status box
8. Take Pictures, Settings tabs
9. Align & Combine, Filter controls
10. Object Type combo box
11. Object Name box
12. File Type combo box
13. Save Every Image check box
14. Start/Stop button
15. Image Acquire status bars
16. Stats, Files tabs
Key to LPI Controls
9
17. Help, Live, File Names tabs
18. Histogram display
19. Histogram sliders and controls
20. Log check box
21. ROI check box
22. Magic Eye Focus display
23. Avg (Average), Reset check boxes
24. Status display
25. Image display
26. Image directory field & Browse button
27. Dark Frames directory field & Browse
button
28. Open button
29. Close button
30. Tracking box
31. Centroid
Throughout this manual, any number that is displayed in parentheses, refers to key above.
For example, “(3)” refers to the Auto Adjust button and “(14)” refers to the Start/Stop button.
Once you have connected your camera to the computer and opened the LPI program, you’ll want to start taking
pictures. Follow the steps below to start taking simple pictures with your LPI camera. We recommend that the
first time you take pictures, you do so during daylight hours. Point your telescope at a stationary landmark, such
as a building, telephone pole or so forth—trees and other objects that move slightly are not the best objects to
use during your first image tests.
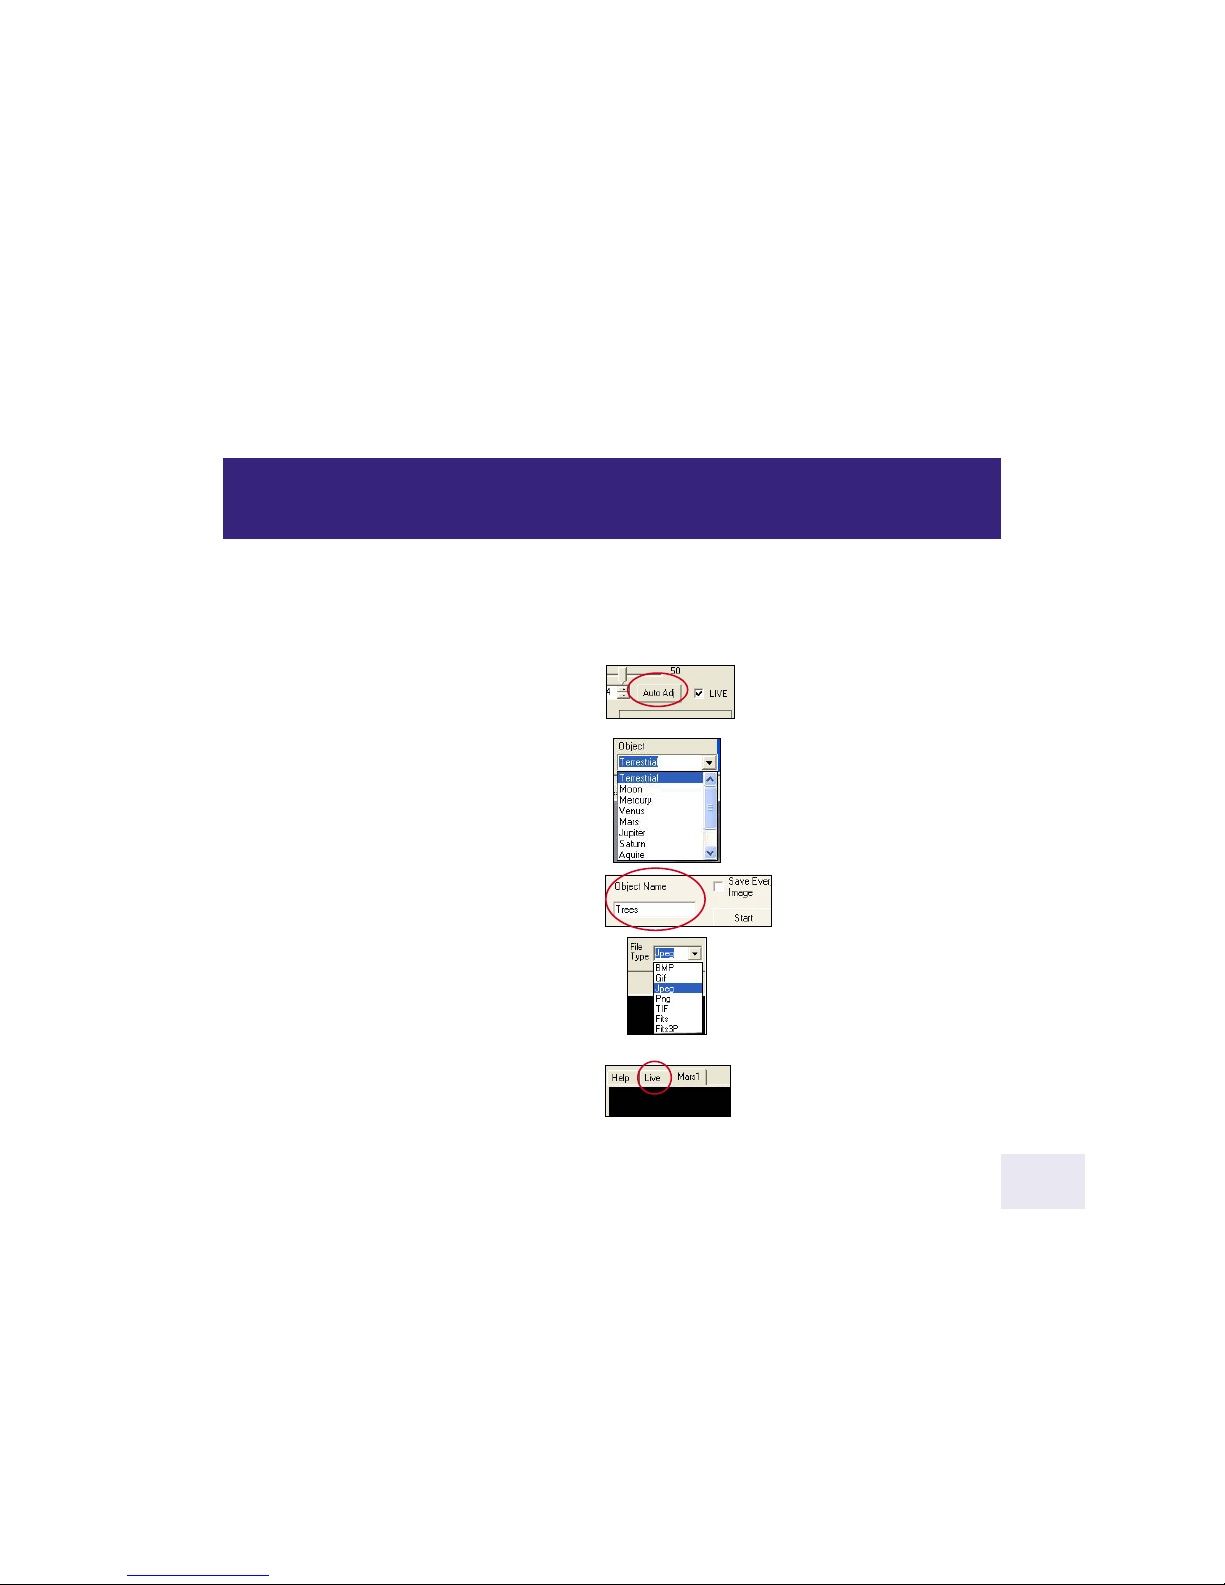
1. Click on the “Auto Adj” button (3).
See “Auto Adjust Button,” page 16, for more infor-
mation.
2. Click on the combo box controls in the “Object”
field (10) to display a list of object types. Scroll
down the list and select “Terrestrial.” See “Object,”
page 17, for more information.
3. Type a name for the object in the “Object
Name” box (11). This will be used as the image
file name. See “Object Name,” page 18, for more
information.
4. Click on the combo box controls in the File
Type field (12) and select “JPEG.” See “File Type,”
page 18, for more information.
5. Click on the “Live” tab (17). See “Live Image
Check Box,” page 16, for more information.
more...
Start Taking Pictures1
10
Indice
Altri manuali Meade Macchina fotografica digitale


