Medeli M10 Manuale utente


2
Music Stand
Instruction Manual
12V Adaptor
Congratulations
Congratulations on your purchase of this electronic keyboard!
This keyboard is easy-to-use, with advanced functions especially suitable for self-learning beginners.
No matter you are adult or children, you will enjoy playing the keyboard as it provides amazing styles
for accompaniment, expressive tones, and real time record. Other features such as numbered musical
notation display chord dictionary, variety of songs will help you better master the playing skill.
You are recommended to study this manual carefully before using the unit.
Please make sure the package completely contains the following:
Inside This Package
The Instrument

3
Important Notes
Your keyboard will give you years of playing
pleasure if you follow the simple rules given
below:
Location
Do not expose the unit to the following
conditions to avoid deformation,
discoloration, or more serious damage.
Direct sunlight.
High temperature (near a heat source, or
inside a car under long exposure of
Sunlight.
Excessive humidity
Excessive dust
Strong vibration
Power Supply
Make sure the suitable AC adaptor is
used, and the AC outlet voltage at your
country matches the input voltage
specified on the AC adaptor s label.
Turn the power switch OFF when the
instrument is not in use.
An AC adaptor should be unplugged from
the AC outlet if the instrument is not
going to be used for an extended period of
time.
Unplug the AC adaptor during electric
storms.
Avoid plugging the AC adaptor into the
same AC outlets as appliances with high
power consumption, such as electric
heaters or ovens. Also avoid using multi-
plug adaptors since this could reduce
sound quality, causes operation errors
and damages.
'
's
Turn Power OFF When Making
Connections
To avoid damaging the instrument and
other devices to which it is connected,
turn the power switches of all related
devices OFF prior to connecting or
disconnecting cables.
Handling and Transporting
Never apply excessive force to the
controls, connectors or other parts of the
instrument.
Always unplug cables by gripping the plug
firmly, but not pulling the cables.
Disconnect all cables before moving the
instrument.
Physical shocks caused by dropping,
bumping, or placing heavy objects on the
instrument could result in scratches or
even severe damages.
Cleaning
Clean the unit with a soft dry cloth.
A slightly dampened cloth may remove
stubborn grime and dirt.
Never use cleaners such as alcohol or
thinner.
Avoid placing vinyl object on top of the
unit (vinyl might discolor and stick to the
surface).
Electrical Interference
This instrument contains digital circuitry
and may cause interference if it is placed
too close to radio or television receivers.
If this occurs, move the instrument
further away from the receivers.
The normal function of the product may be disturbed by Strong Electro Magnetic If so,
simply reset the product to resume normal operation by following the instruction manual. In case the function
could not resume, please use the product in other location.
Interference.
Caution!

Main Features
4
KEYBOARD
61-key touch keyboard
OPERATION
Use numeric keypad and [+/YES] [-/NO] to select voice, style and song,Function including Transpose,
Octave, Beat, Split point, MIDI,Accomp volume, Bank select。
VOICE
157 voices in total, including 128 GM Voices, 6 Percussion Voices, and Synth Voices.
STYLE
100 styles in total, including 10 PIANO styles.
SONG
100 songs in total. Each song has its learning mode.
SONG LESSON
There are 3 different ways to practise the songs. Lesson1、Lesson2、Lesson3. This keyboard
also offers the GRADE function in all 3 learning modes to help you know well about your progress.
CHORD MODE
Both Single finger chords and Fingers chords.
CHORD DICTIONARY
Provide chord information for users.
RECORD FEATURE
One recorded song as the 101st song in the song list.
STYLE CONTROL
Sync,Start/Stop,Main/Fill,Intro/Ending
OTHER FEATURES
Piano, Dual, Sustain, O.T.S., Record, Demo,Touch, Metromonme, USB and etc.

Basic Operation.................................
Voices and Effects............................
Style Control.......................................
Connections.......................................
Trouble Shooting....................................
Specifications..........................................
5
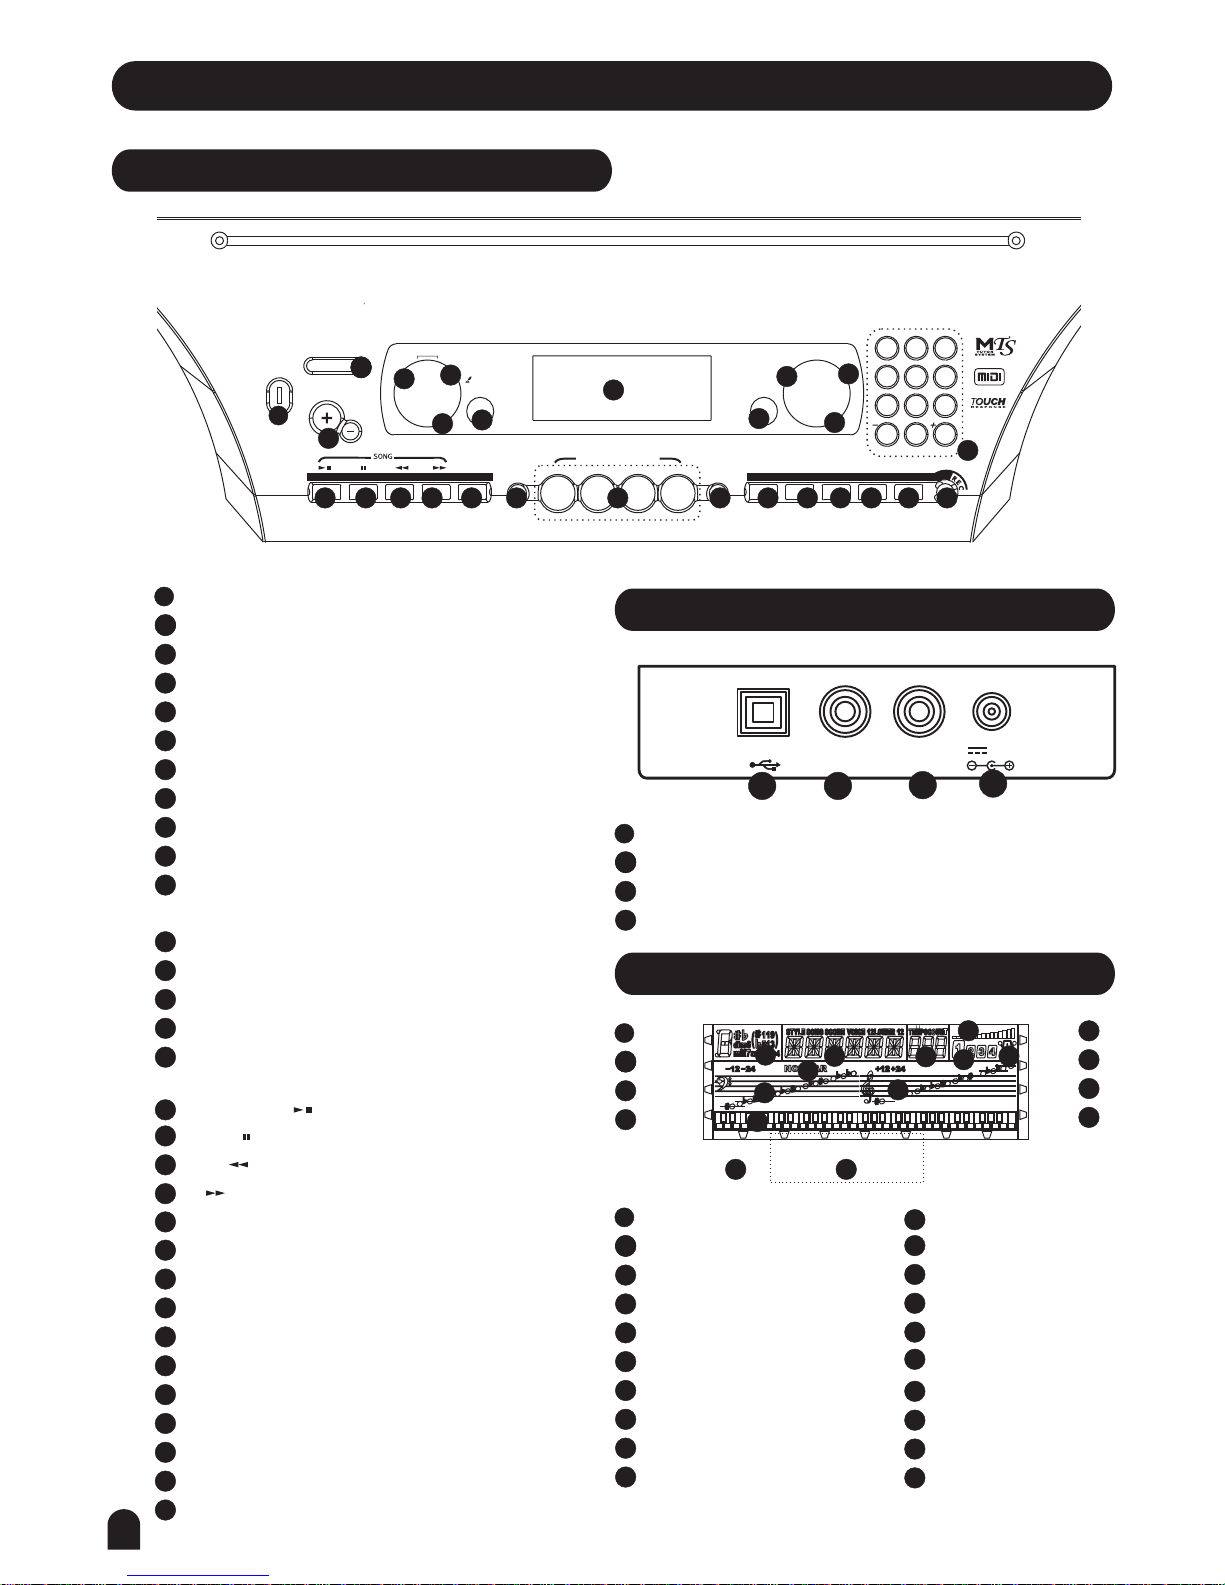
General Guide..............................
*Front Panel.................................................
*Rear Panel...................................................
*LCD Display...................................................
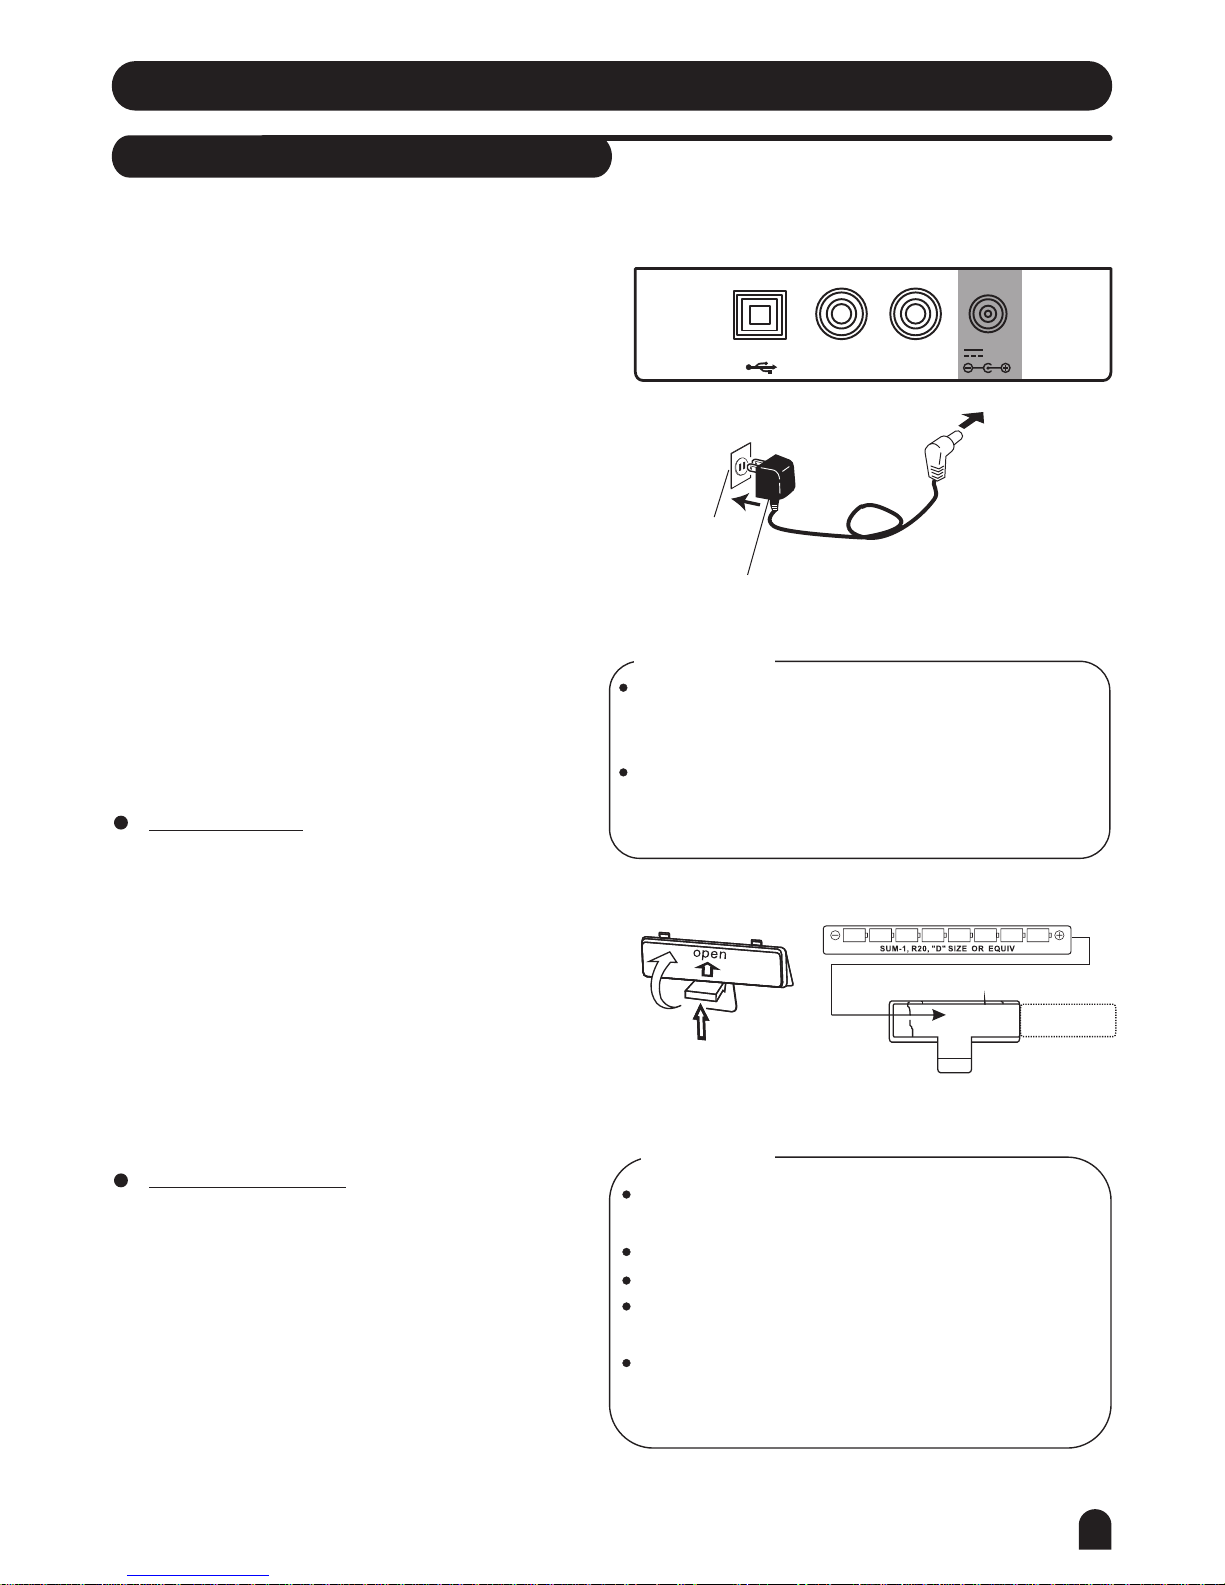
Preparation...................................
*Power Supply...................................................
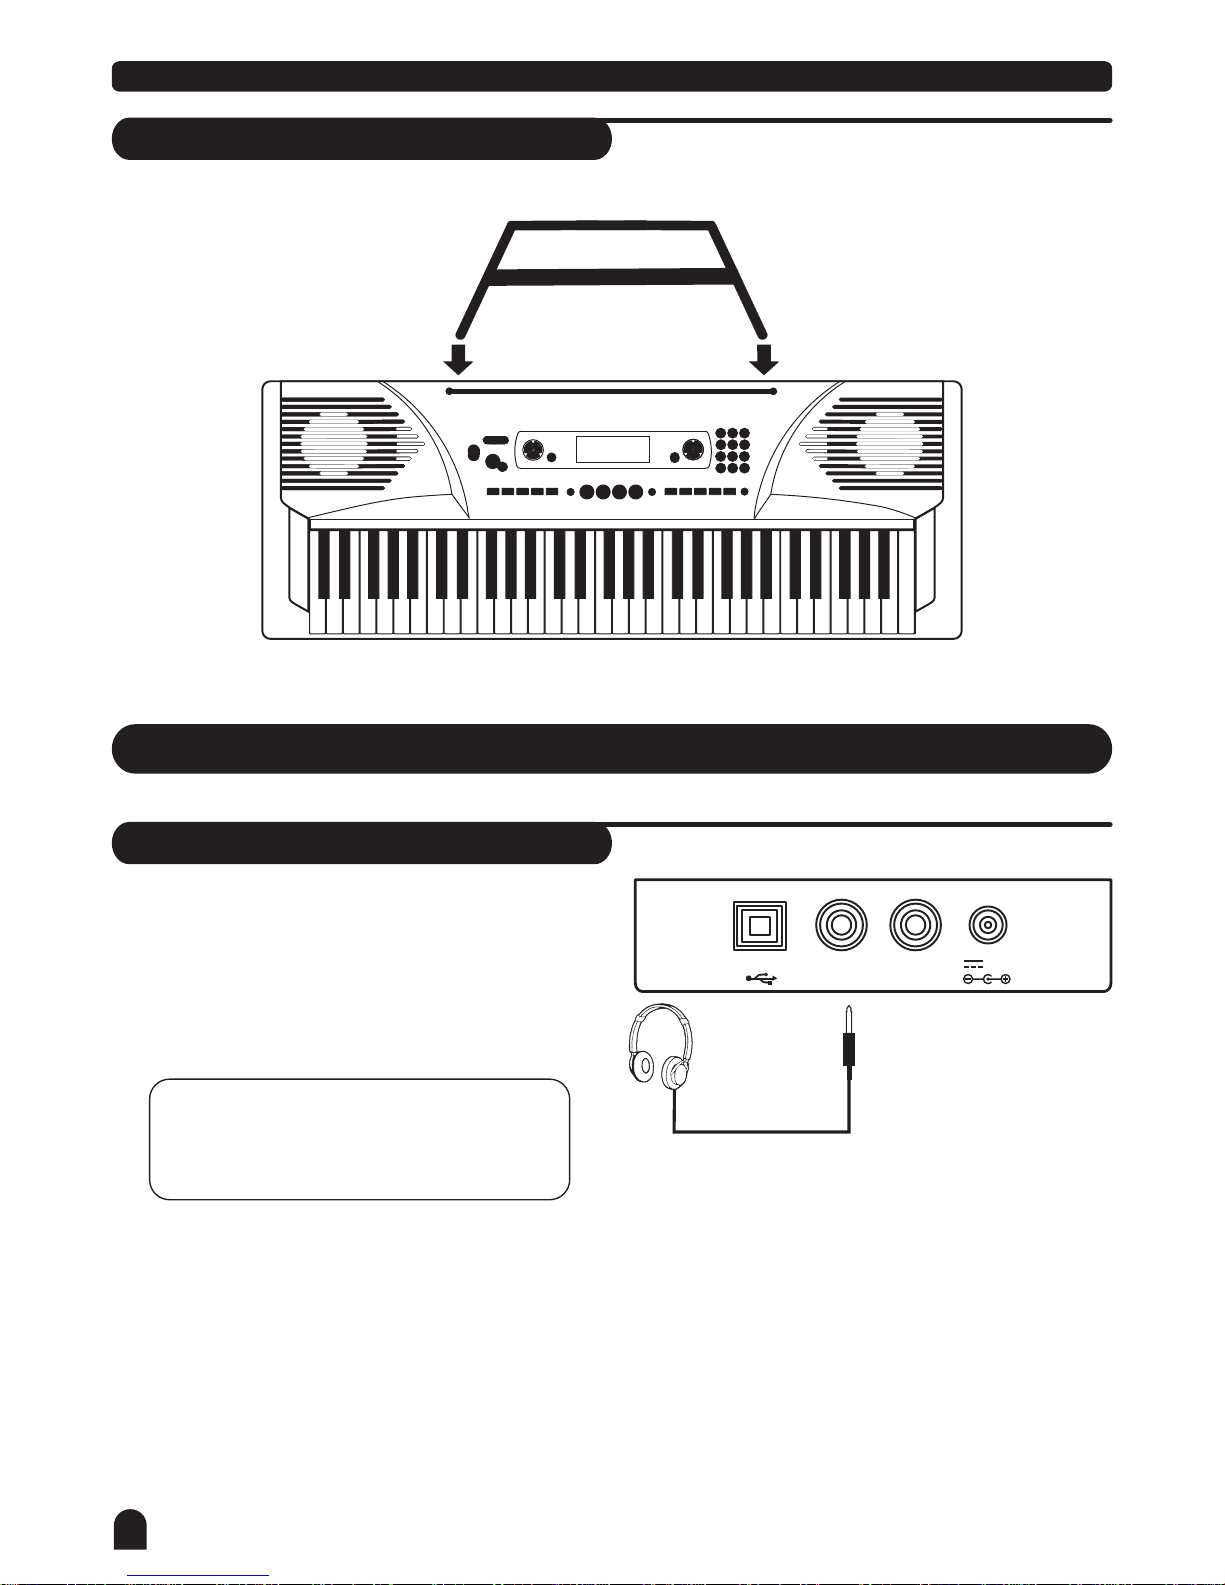
*Setting the Music Stand.................................
*Headphones Jack........................................
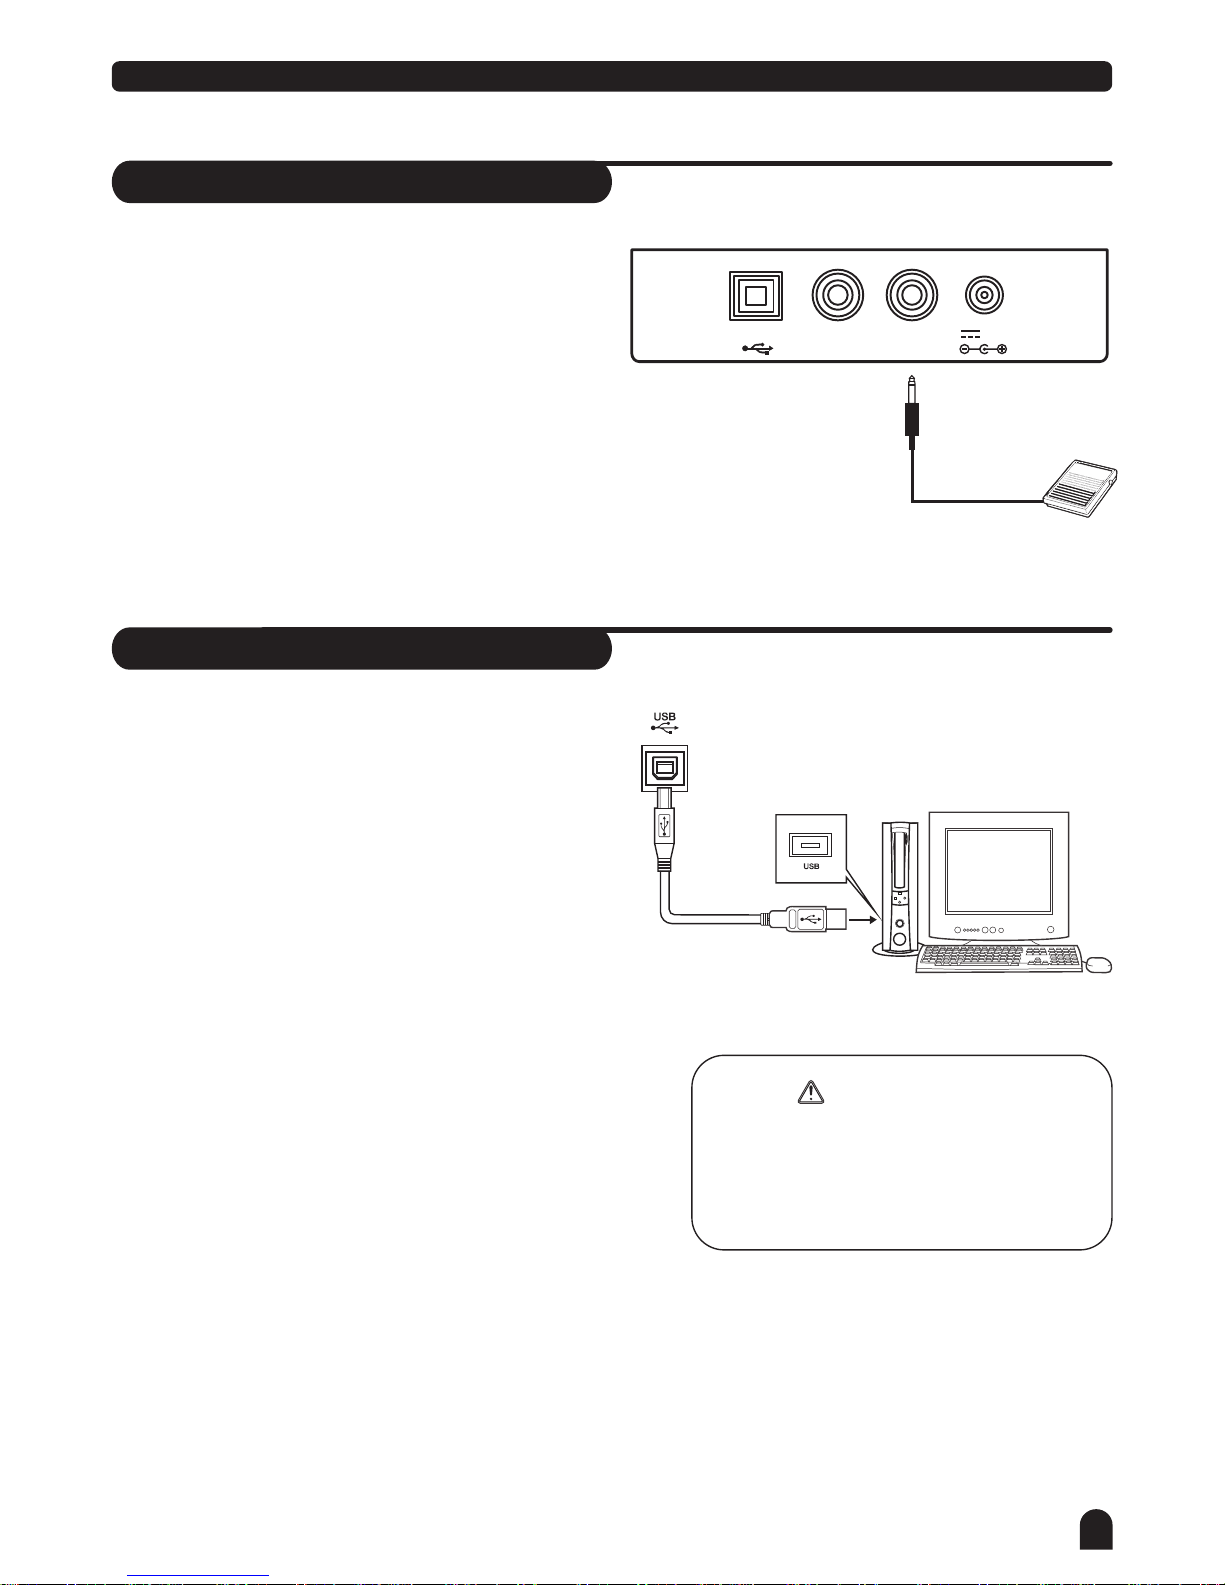
*Sustain Jack.........................................
*USB Jack.................................................
*Master Volume............................................
*Demo......................................................
*Power Switch....................................
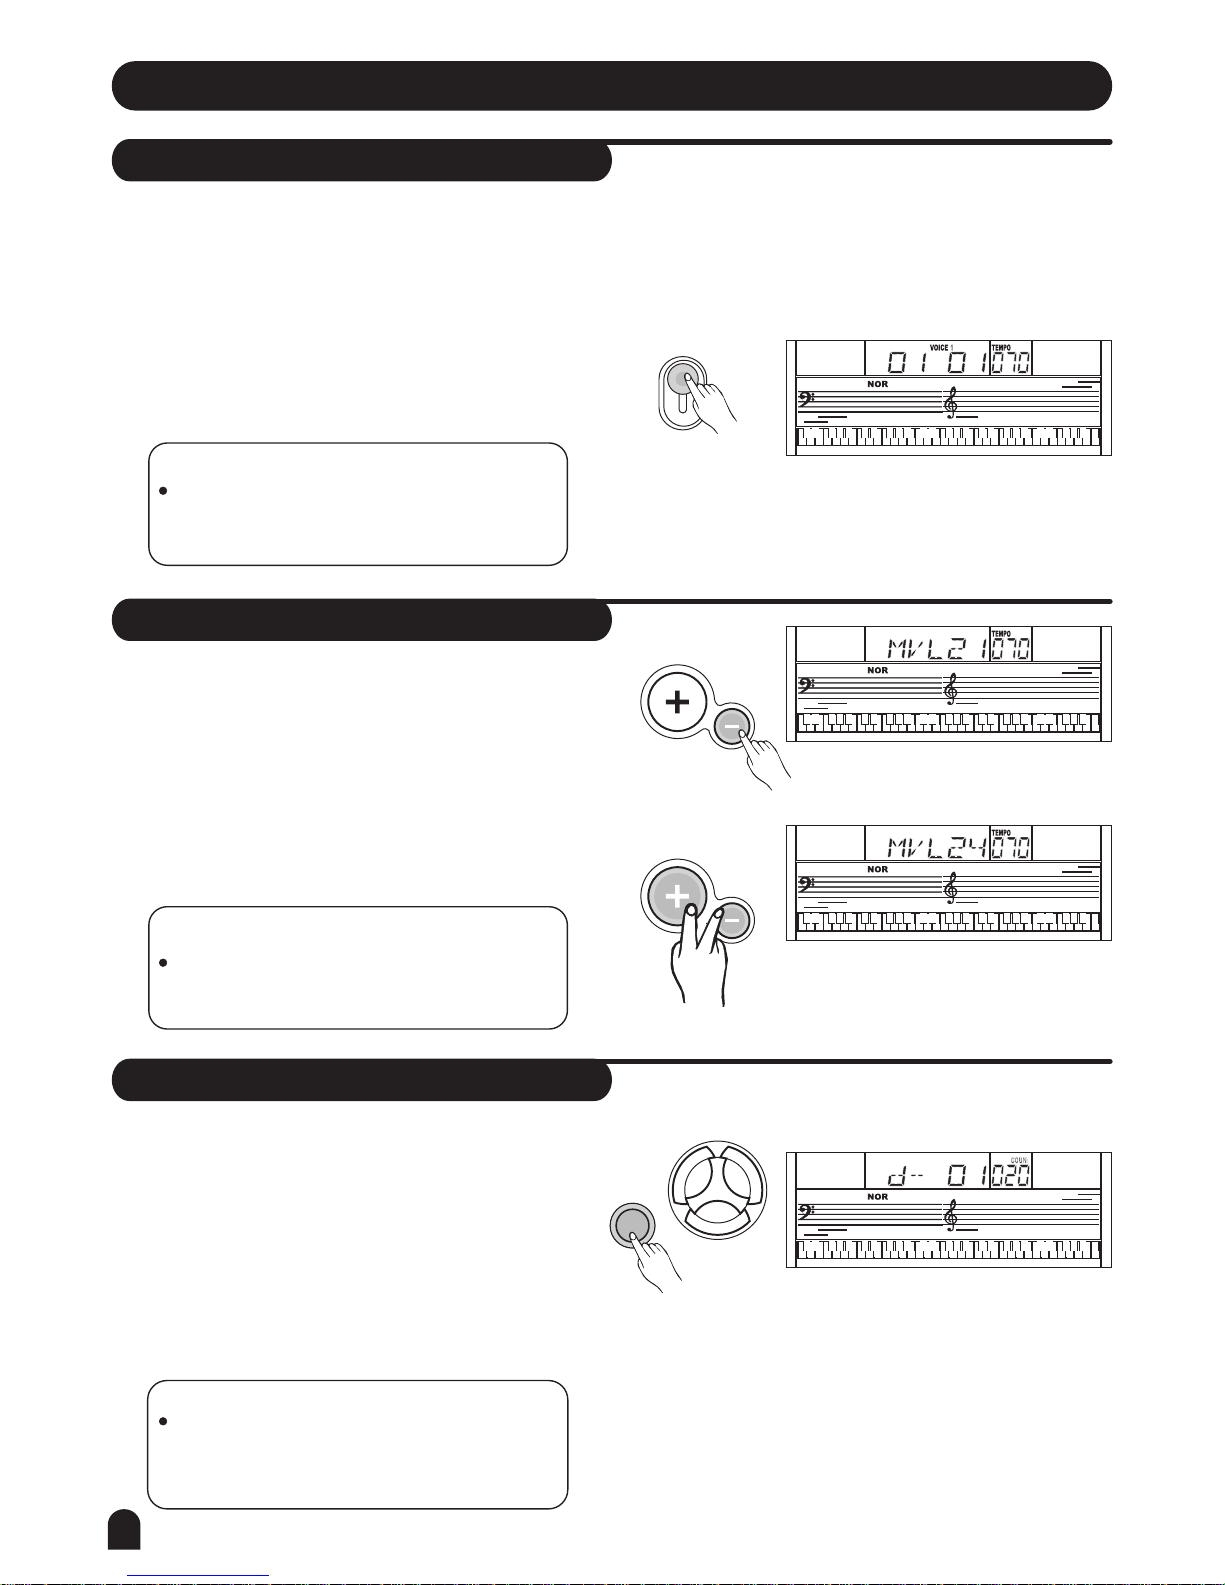
*Select a Voice............................................
*Dual Voice.....................................................
*Sustain...................................................
*Metronome...................................................
*Touch............................................................
*Piano............................................................
*Stop a Style..........................................
*Chord Recognize....................................
*Select a Style..............................................
*The Accompaniment Section....................
*Start a Style.............................................
*Main/Fill............................................
*Tempo.......................................................
One Touch Setting..........................
Chord Dictionary..................................
*LESSON Mode.............................................
Song.....................................................
*USB Connection......................................................
*What is MIDI.......................................................28
*MIDI Application.............................................
MIDI Function.................................
*Appendix 5 - Chord List...........................................
*Appendix 6 - MIDI List..............................................
*Appendix 2 - Style List................................................
*Appendix 1 - Voice List............................................
*Appendix 3 - Song List..........................................
*Appendix 4 - Demo List..........................................
Appendix..........................................
Memory...........................................
*Stop Record.........................................................
*Octave.........................................................
*MIDI IN........................................................
*Accomp Volume................................................
*Lesson 2................................................
*Start Record.............................................................
*Transpose.............................................................
*Split Point.............................................................
*Playback Record................................................
*Beat................................................
*MIDI OUT................................................
*Lesson 1................................................
*Bank Select.............................................
*Lesson 3.............................................
*Grade Function.............................................
Record....................................................
Function Menu................................
Contents
9
9
10
10
10
10
11-13
11
11-12
12
12
13
13
14-19
14
14
15-16
16
17
17
18-19
6
6
6
6
7-8
7
8
8-9
8
20
20
21
22-23
24-26
24
27
38
28
21
22
23
28
21
22
23
23
25
21
22
23
25
23
26
26
28
29
29
30-34
30
31
32
33
33
34

6
General Guide
Front Panel
METRO PIANO DUAL TOUCH SUSTAIN
4
7
2
5
8
0
3
6
9
1
M2 M3
M1 M4
- TEMPO +
POWER
ON
OFF
MASTER VOLUME
NO YES
PAUSE
STORE O.T.S.
157 VOICES
001-008 PIANO
009-016 MALLET
017-024 ORGAN
025-032 GUITAR
033-040 BASS
041-048 STRINGS
049-056 STRING ENSEMBLE
057-064 BRASS
065-072 REED
073-080 PIPE
081-088 LEAD
089-096 PAD
097-104 EFFECTS
105-112 ETHNIC
113-120 PERCUSSIVE
121-128 SOUND EFFECTS
129-151 SYNTH EFFECTS
152-157 DRUM SET
100 STYLES
001-015 BEAT POP
016-028 ROCK
029-038 DANCE
039-048 SOUL FUNK
049-058 JAZZ
059-070 COUNTRY
071-080 LATIN
081-090 TRADITIONAL
091-100 PIANO
100 SONGS
001-014 CLASSIC
015-040 FAVORITE
041-066 FOLK
067-080 KID S SONG
081-085 BALLROOM
086-100 PIANO & KEYBOARD
2 DEMOS
001 POP
002 CHA CHA
ONE TOUCH SETTING
STYLE START/STOP SYNC INTRO/END MAIN/FILL A.B.C.
CHORD
DICT.
L & R
VOICESTYLE
SONGLESSON
LESSON 1
LESSON 2
LESSON 3
A.B.C.
RIGHT
LEFT
DUAL
TOUCH
DEMOFUNCTION
O.T.S.
M1 M3
M2 M4
3
45
678
910
11
12 13 14 15 16
2
1
2
1
17 2119 23 25
27
2220 2418
26
POWER ON/OFF
TEMPO +/-
MASTER VOLUME
LEFT HAND LESSON MODE
RIGHT HAND LESSON MODE / CHORD DICTIONARY
LESSON
FUNCTION
DEMO
STYLE
VOICE
SONG
In the Style mode
In the Song mode
3
3
4
4
5
5
6
6
7
7
8
8
9
10
11
TEMPO/COUNT
11
START/STOP
SYNC
INTRO / ENDING
MAIN / FILL
AUTO BASS CHORD
12
12
13
14
15
BEAT
METRO
VOLUME
TREBLE CLEF
BASS CLEF
12
13
14
15
16
16
START/STOP
PAUSE
REW
FF
13
14
15
2
1
2
2
1
2
1
LESSON 1
LESSON 2
LESSON 3
A.B.C.
RIGHT
LEFT
DUAL
TOUCH
CHORD
VOICE/STYLE/DEMO/SONG
3
4
5
6
7
8
9
10
2
1
2
1
1
USB JACK
PHONES JACK
SUSTAIN JACK
POWER JACK
3
4
2
1
2
1
STORE
17
PANEL MEMORY M1-M4
ONE TOUCH SETTING
METRO
PIANO
DUAL
TOUCH
SUSTAIN
RECORD
NUMERIC KEYPAD
LCD DISPLAY
21
19
23
25
27
26
22
20
24
18
61 KEY KEYBAORD
NOR / VAR
ONE TOUCH SETTING
M1-M4
17
19
20
18
Rear Panel
PHONES SUSTAINUSB 12V
1 2 34
LCD Display
LESSON 1
LESSON 2
LESSON 3
A.B.C.
O.T.S.
M1 M3
M2 M4
RIGHT
LEFT
DUAL
TOUCH
910 11 12 13
14
15 16
17
19 20
18

PHONES SUSTAINUSB 12V
7
Preparation
Power Supply
This electronic keyboard can be powered by the current
of a standard household wall outlet (using the specified
AC adaptor) or by batteries.
Using the AC Adaptor
Make sure that only the AC adaptor specified for this
electronic keyboard is used. The adaptor shall be 12V
DC output, center positive type. Be sure to turn off the
electronic keyboard before you connect the adaptor into
the AC wall outlet and the cord into the unit.
1.
Using Batteries
Always make sure to turn the keyboard off before
inserting new batteries or replacing old ones.
2.
Use only the specified AC adaptor. Using other types
of adaptor creates the risk of fire and electrical shock.
For safety sake, be sure to unplug the AC adaptor
from the wall outlet whenever leaving the electronic
keyboard unattended for a long time.
CAUTIONS!
When inserting batteries, make sure to follow the
polarity marking.
Never use batteries of different types.
Never mix old batteries with new ones.
Replace the batteries as soon as possible after any
sign of discharge.
Always remove the batteries from the battery
compartment when the keyboard is not expected to
be used for a long period of time.
CAUTIONS!
Insert 8 D-size (SUM-1, R-20) batteries into the battery
compartment and follow the correct polarity.
Replace the compartment cover and make sure that it
locks firmly in place.
To insert batteries
Open the battery compartment on the bottom of the
keyboard.
A dim and difficult-to-read LCD display.
Abnormally low speaker/headphone volume.
Distortion of the sound output.
Sudden power failure when playing at high volume.
Abnormal rhythms or demo songs are played.
Dimming of the display when playing at high volume.
Low battery indications
Any of the following symptoms indicate low battery
power. Replace the batteries as soon as possible if
any of the following occurs.
AC Adaptor
AC Outlet

8
Preparation
Setting Music Stand
Please set up the music stand as the instruction below:
Connections
Headphones Jack
If you prefer to play with headphones for high quality
personal monitoring, plug a set of stereo headphones
into the rear panel PHONES jack.
Plug a set of headphones into the PHONES jack and
the speakers will be disabled automatically.
1.
2.
NOTE:
Never use headphones in high volume,
as it may hurt your ears.
PHONES SUSTAINUSB 12V

9
Connections
Sustain Jack
USB Jack
An optional footswitch can be plugged into the
SUSTAIN jack for sustain control.
The footswitch functions like the damper pedal of a
piano. Press for sustain, release for normal sound.
Connect PC or other USB host devices that support
USB Audio.
For devices with USB cable, after the driver is installed
and initialization is finished, you can choose USB Audio
Device in the device menu of the software to transfer
midi data.
1.
1.
2.
2.
To avoid damages, turn the power switches of
this keyboard and all related devices OFF if you
want to plug in or unplug between this instru-
ment with all related devices.
WARNING
PHONES SUSTAINUSB 12V

10
Basic Operation
Power Switch
Master Volume
Demo
1.
1.
1.
2.
2.
2.
3.
NOTE:
If the keyboard is silent, that means the
volume has adjusted to its minimum level.
NOTE:
In the demo mode, all function keys except
DEMO, START/STOP, TEMPO, +/YES, -/NO,
NUMBER 1, NUMBER 2, MASTER VOLUME
will be disabled.
First, please ensure the correct connection has been
made based on the previous instruction.
Turn the [POWER] switch on. The LCD display lights
up.
The keyboard volume could be adjusted from 0 to 31
by pressing [MASTER VOLUME + /-] button,LCD will
display MVL XX.
Press [MASTER VOLUME +] and [MASTER VOLUME -]
buttons simultaneously to set to the default value MVL
24.
POWER
ON
OFF
MASTER VOLUME
MASTER VOLUME
Press [DEMO] key to enter the DEMO mode.
Select a demo song with [+/YES], [-/NO] or number
buttons [1] [2] .
Press [START/STOP] or [DEMO] key again to exit
the demo mode.
This keyboard includes 2 classic demo songs.
NOTE:
If the LCD display does not light up after you
turned on the keyboard, please check the
power supply.
VOICE
STYLE
SONG
DEMO
Altri manuali per M10
1
Indice
Altri manuali Medeli Tastiera elettronica

Medeli
Medeli mc 620 Manuale utente

Medeli
Medeli MC560 Manuale utente

Medeli
Medeli A1000 Manuale utente

Medeli
Medeli MC780 Manuale utente

Medeli
Medeli MD700 Manuale utente

Medeli
Medeli A100 Manuale utente

Medeli
Medeli MC-110 Manuale utente

Medeli
Medeli MK200 Manuale utente

Medeli
Medeli mc37 Manuale utente

Medeli
Medeli M221L Manuale utente

Medeli
Medeli MK401 Manuale utente

Medeli
Medeli mc710 Manuale utente

Medeli
Medeli MD700 Manuale utente

Medeli
Medeli M-30 Manuale utente

Medeli
Medeli MC37A Manuale utente

Medeli
Medeli MC49A Manuale utente

Medeli
Medeli M20 Manuale utente

Medeli
Medeli A1000 Manuale utente

Medeli
Medeli Millenium Series Guida all'installazione

Medeli
Medeli A100S Manuale utente


