Memco 452 003 Manuale utente

Universal 3G GSM Gateway
Installation Guide
Product Part No. 452 003
LED
The Universal 3G GSM gateway has 2 LEDs that indicate the device status
3G GSM Gateway
GSM
Status
LED STATUS DESCRIPTION
Status
OFF
ON
Slow Blinking
Fast Blinking
Device turned OFF
Device ON and Backup Battery Charging
Device powered by Battery Backup
Backup Battery NOT present (or not connected)
GSM
OFF
Slow Blinking
ON
Fast Blinking
GSM Network Searching, Low GSM Signal Level, SIM card not present, PIN not inserted
Good GSM Signal Level
Very Good GSM Signal Level
Roaming Services
Ref no. 452 863 (ML) Version 2

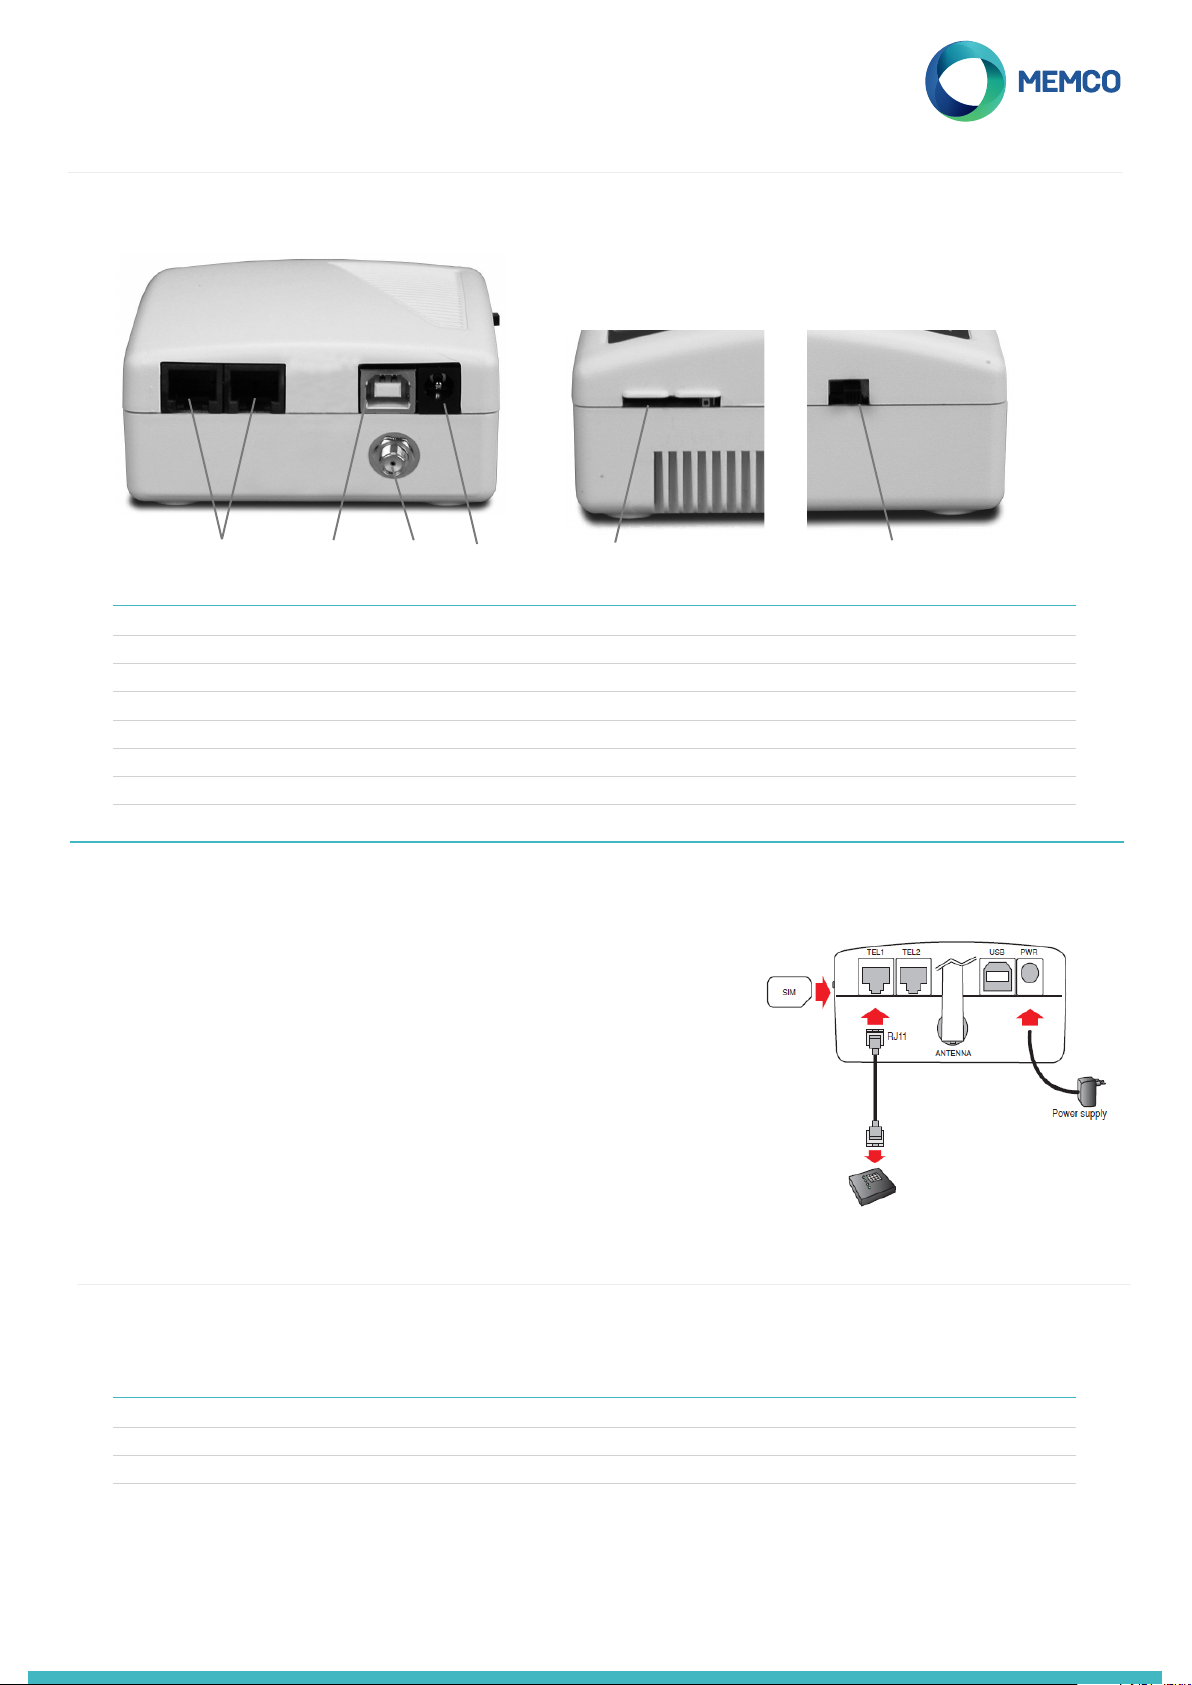
CONNECTIONS
CONNECTOR DESCRIPTION
APWR Power supply connector
BUSB USB connector for upgrades
CTEL1/TEL2 RJ11 FXS connectors
DAntenna SMA/f connector for external GSM antenna
ESIM SIM connector
FSwitch Switch for the device power o-on
C B D A E F
INSTALLATION
1. Location: It is recommended that the device be installed at the highest point
(e.g. motor room or top of shaft)
2. Connect the GSM antenna to the SMA connector being careful not to over-
tighten. The antenna should be placed a minimum of 3 metres from the
GSM unit
3. Insert the SIM Card into the SIM holder. Be sure the SIM is inserted in the
correct orientation with the gold contacts facing downwards.
4. Connect the Emergency Telephone to the TEL1 connector. If connecting
more than one emergency telephone either daisy chain the connection
between the telephones or use a junction block to split the connection from
the device.
5. Connect the power supply and turn the GSM Gateway on using the switch.
It is possible to connect up to eight Memcom+or C100 emergency telephones
to the GSM.
Emergency Telephone
INITIAL SETUP
A few seconds after power on, at the end of the self test, you will see one of the following situations.
LED Regular situation PIN required Roaming/Virtual Operator
GSM Blinking / ON OFF Flashing
Status ON ON ON

Regular situation: Check there is a good GSM signal level, in order to call and receive the voice call (GSM LED ON or
Blinking).
PIN required: enter the PIN code,
Roaming Services
Roaming allows multi-network access, which could improve signal stability in some cases. Note that enabling roaming
near national borders could result in roaming charges from foreign networks.
To disable roaming:
Disconnect the emergency telephone and connect a standard DTMF telephone handset to terminal TEL2. Lift the
handset, wait for the dial tone and dial the following code:
# # 1 1 1 1 # 1 # 2 # operator code #
2 3 4 0 2 for O2; 2 3 4 1 5 for Vodafone; 2 3 4 2 0 for 3; 2 3 4 3 0 for T-Mobile; 2 3 4 3 3 for Orange.
To enable roaming:
Disconnect the emergency telephone and connect a standard DTMF telephone handset to terminal TEL2. Lift the
handset, wait for the dial tone and dial the following code:
# # 1 1 1 1 # 1 # 1 #
The Memco Memcom or C100 emergency telephones can monitor the GSM signal strength, SIM status, battery status,
and mains power supply of the Universal 3G GSM. Select ‘GSM Status’ under ‘HW Monitoring’ on the Memcom or C100
to activate this feature.
Memcom programming menu: C100 Programming menu:
When ‘GSM Status’ is active, the Memcom or C100 will perform the following actions:
If the GSM signal strength is below the minimum required to place a call or a SIM fault is detected (e.g. the SIM card has
been removed), the Memcom or C100 will treat this as a phone line failure.
In the event that the Memcom or C100 detects a GSM battery failure or a mains power failure to the GSM, the Memcom
or C100 will place a technical call (provided ‘Technical Calls’ have been activated on the unit).
The Memcom or C100 detects faults by communicating with the GSM over the ‘local loop’ (the immediate connection
between the emergency telephone and GSM).
Monitoring the Universal 3G GSM Gateway using the Memco Memcom or C100
HW Monitoring >
Power Supply
Battery
Phone Line
Spkr/mic.
AS
GSM Status
HW Monitoring >
Power Supply
Battery
Phone Line
GSM low sig.
GSM no sig.
Spkr/mic.
GSM Status

If using the Universal 3G GSM with an emergency telephone other than the Memcom or C100, the GSM can be
congured remotely and send status information via SMS to a list of authorised users.
Two types of authorised user prole can be congured:
• Up to 4 users who have permission to congure and request information messages from the Universal GSM
• Up to 4 users who can receive SMS information messages from the Universal GSM.
NOTE: If no numbers are set to congure then any user can remotely manage the GSM
The authorised user list can be setup by sending the following SMS to the Universal GSM unit:
*1 # ID # conf1 , conf2 , conf3 , conf4 # dest1 , dest2 , dest3 , dest4
Conguration of the Authorised User List
Command Description
*1 Conguration message start
# Separator
ID GSM ID - maximum 8 alphanumeric characters - Default: 3GLIFT
# Separator
conf1 Number enabled to congure GSM
, Separator
conf2 Number enabled to congure GSM
, Separator
conf3 Number enabled to congure GSM
, Separator
conf4 Number enabled to congure GSM
# Separator
dest1 Number enabled to receive messages from GSM
, Separator
dest2 Number enabled to receive messages from GSM
, Separator
dest3 Number enabled to receive messages from GSM
, Separator
dest4 Number enabled to receive messages from GSM
Notes: All telephone numbers must have the international prex e.g. +44 for UK
Example conguration message (two users):
*1#3GLIFT#+447987654321,+447123456789#+447987654321,+447123456789
SMS Remote Conguration and Management of the Universal 3G GSM
When the GSM has received a message it will check if the message is from the list of authorised numbers.
• If the message is from an unauthorised number then it will be ignored
• If the message is from an authorised number, and is correctly formatted, then a message reading ‘ACK’ will be
received
• If the message is from an authorised number, and is incorrectly formatted, then a message ‘NACK’ will be received
All the messages from the GSM start with an index number followed by a #. This index number starts at 0 and will
increase to 255 before resetting to 0. This will reset if the GSM is powered down.
Example of successful conguration message:
2 # *1 3GLIFT # ACK
Conguration acknowledgement messages

To check conguration, send the following message to the Universal GSM:
*1?
Provided the sender is an authorised number, then the following example will be received:
3#*1#3GLIFT#+447987654321,+447123456789#+447987654321,+447123456789
Conguration check
The Universal GSM can be congured to send warning messages if the backup battery is running low.
There are two battery warning messages:
1. A low battery message is sent when the battery has >= 60 minutes capacity.
2. A shutdown warning message is sent when there is between 5 and 30 minutes of battery life left.
The ‘Battery Low’ and ‘Shutdown in Progress’ messages are setup as default but can be changed using the following
message:
*2 # First msg text , 60 # Second msg text , 5 # N retry , Time retry
Command Description
*2Conguration message start
# Separator
First msg text Battery Low message text sent when the battery has >= 60 minutes capacity - max 30 characters -
Default = Battery Low
, Separator
60 Fixed value
# Separator
Second msg text Shutdown in Progress message sent when there is between 5 and 30 minutes of battery life left -
max 30 characters - Default = Shutdown in progress
, Separator
5 Fixed value
# Separator
N retry Number of attempts to send SMS - can be set between 0 and 9 - Default = 2
, Separator
Time retry Waiting time before a repeat sending of the SMS - can be set between 0 and 9 Default = 1
Example:
*2#Battery Low,60#Shutdown in progress,5#2,1
As in the conguration message ‘ACK’ and ‘NACK’ messages will be received.
4#*2#3GLIFT#ACK
5#*2#3GLIFT#NACK
The low battery setup can then be checked by sending the following message:
*2?
Then this SMS will be received:
6*2#Battery Low,60#Shutdown in progress,5#2,1
Low battery warning setup

Low battery warning messages
When the GSM battery has >= 60 minutes capacity or between 5 and 30 minutes of battery life left, the following SMS
will be sent:
7#*B#3GLIFT#Battery Low
8#*B#3GLIFT#Shutdown in progress
GSM status request message
Authorised numbers can request information about the GSM including signal level, battery & power status, rmware etc,
by sending the following message:
INFO
An SMS detailing the following information will be sent by the device:
• Device ID
• GSM Operator
• GSM Signal
• GSM Network info
• Battery Status
• PCB Firmware
• GSM Firmware
• IMEI number
• Date and time
• Autotest SMS frequency and time
• List of Autotest SMS recipients
A full breakdown of the message is shown on the following page.
DEVICE REBOOT
Users can remotely reboot the device with the following message:
RESET
After the reception of the message, the device answers with an ACK message then will re-boot.

3G GSM IG V02 (ML) PA 20.07.2017
Command Description
Message index SMS index - 0 to 255
# Separator
INFO
# Separator
ID Device ID - default = 3GLIFT
, Separator
GSM operator GSM operator name
, Separator
GSM signal GSM signal level indicated by a letter (H= high, M =
medium, L= low) and a value from 1 to 31. Example H27 =
very good signal.
, Separator
GSM network info Can be either Home, Roaming or Forbidden
# Separator
Battery status Absent = no battery tted or faulty battery
Charge = battery charging
In use = no mains power but battery present
Low = no mains power and battery life < 60 minutes
# Separator
PCB rmware Firmware of main PCB
# Separator
GSM rmware Firmware of the GSM module
, Separator
IMEI GSM Module IMEI
# Separator
YYMMDD Current date of the system
, Separator
hhmm Current time of the system
# Separator
Autotest SMS frequency Autotest period:
0 = disabled
1 = every day
2 = every 2 days etc
, Separator
Autotest SMS: hour Hour of sending autotest SMS
, Separator
Autotest SMS: Receiver 1 Recipient 1 of autotest SMS
, Separator
Autotest SMS: Receiver 2 Recipient 2 of autotest SMS
,Separator
Autotest SMS: Receiver 3 Recipient 3 of autotest SMS
,Separator
Autotest SMS: Receiver 4 Recipient 4 of autotest SMS
GSM status request message breakdown
Avire Ltd
Unit 1 The Switchback
Gardner Road
Maidenhead
Berkshire SL6 7RJ, UK
T: 01628 540 100
F: 01628 621 947
E: sales.uk@avire-global.com
W: www.avire-global.com

Univerzální brána 3G GSM
Montážní návod
Art. č. 452 003
LED
Univerzální 3G GSM brána má 2 LED oznamující stav zařízení
3G GSM Gateway
GSM
Status
LED Stav Popis
Status
VYPNUTO
ZAPNUTO
Pomalé blikání
Rychlé blikání
Zařízení je VYPNUTO.
Zařízení je ZAPNUTO a záložní baterie je nabíjena.
Zařízení je napájeno ze záložní baterie.
Záložní baterie NENÍ přítomna (nebo není připojena).
GSM
VYPNUTO
Pomalé blikání
ZAPNUTO
Rychlé blikání
Vyhledávání sítě GSM, nízká hladina signálu GSM, není přítomna karta SIM, nebyl vložen PIN.
Dobrá hladina signálu GSM.
Velmi dobrá hladina signálu GSM.
Roamingové služby.
Ref. č. 452 863 (ML) Verze 2

PŘIPOJENÍ
KONEKTOR POPIS
ANAPÁJENÍ Konejktor napájení
BUSB Konektor rozhraní USB pro aktualizace software
CTEL1/TEL2 Konektory rozhraní RJ11 FXS
DAnténa Konektor rozhraní SMA/f pro externí anténu GSM
ESIM Konektor karty SIM
FSpínač Spínač na vypínání a zapínání zařízení
C B D A E F
INSTALACE
1. Umístění: Doporučujeme nainstalovat zařízení do co nejvyššího místa
(například do strojovny nebo na vrchol šachty).
2. Připojte anténu GSM ke konektoru SMA, přičemž dbejte, abyste ji nedotáhli
nadměrně. Anténa by měla být umístěna alespoň 3 metry od jednotky GSM.
3. Vložte kartu SIM do držáku karet SIM. Zajistěte, aby karta SIM byla vložena
se správnou orientací, a sice tak, aby zlacené kontakty směřovaly dolů.
4. Připojte havarijní telefon ke konektoru TEL1. Při připojování více havarijních
telefonů než jednoho buďto zapojte telefony sériově nebo pomocí
svorkovnice rozdělte výstup ze zařízení.
5. Připojte zdroj proudu a pomocí spínače zapněte bránu GSM.
Připojte zdroj proudu a pomocí spínače zapněte bránu GSM. Emergency Telephone
PRVOTNÍ NASTAVENÍ
Několik sekund po zapnutí, po skončení autotestu, uvidíte jednu z následujících situací.
LED Běžná situace Je třeba zadat PIN Roaming/virtuální operátor
GSM Blikání/ZAPNUTO VYPNUTO Blikání
Stav ZAPNUTO ZAPNUTO ZAPNUTO

Běžná situace: Zkontrolujte, zda je dobrá síla signálu GSM, abyste mohli volat a přijímat hlasová volání (GSM LED
ZAPNUTA nebo blikání).
Je třeba zadat PIN: zadejte kód PIN,
Roamingové služby
Roaming umožňuje použít telefon s více sítěmi a připojení standardního telefonního sluchátka DTMF ke koncovce TEL2.
Zdvihněte sluchátko, počkejte na vyzváněcí tón, a vytočte následující kód:
Chcete-li roaming zakázat:
Odpojte havarijní telefon a připojte standardní telefonní sluchátko DTMF ke koncovce TEL2. Zdvihněte sluchátko,
počkejte na vyzváněcí tón a vytočte následující kód:
# # 1 1 1 1 # 1 # 2 # operator code #
2 3 4 0 2 pro O2; 2 3 4 1 5 pro Vodafone; 2 3 4 2 0 pro 3; 2 3 4 3 0 pro T-Mobile.
Chcete-li povolit roaming:
Odpojte havarijní telefon a připojte standardní telefonní sluchátko DTMF ke koncovce TEL2. Zdvihněte sluchátko,
počkejte na vyzváněcí tón a vytočte následující kód:
# # 1 1 1 1 # 1 # 1 #
Havarijní telefony Memco Memcom nebo C100 mohou monitorovat sílu signálu GSM, stav karty SIM, stav baterie a
stav zdroje proudu na Universal 3G GSM. Tuto funkci můžete aktivovat volbou ‘Stav GSM’ pod ‘Monitorování HW’ na
Memcom nebo na C100.
Programové menu Memcom: C100 Programming menu:
Monitorování Univerzální brány 3G GSM pomocí Memco Memcom nebo C100
Monitorování hardware >
Zdroj napájení
Baterie
Telefonní linka
Reproduktory/mikrofon
AS
Stav GSM
Monitorování hardware >
Zdroj napájení
Baterie
Telefonní linka
Nízký signál GSM
Chybí signál GSM
Reproduktory/mikrofon
Stav GSM
Když je ‘Stav GSM’ aktivní, Memcom nebo C100 provede následující činnosti:
Je-li síla signálu GSM nižší než minimální požadovaná k realizaci hovoru nebo je-li detekována závada karty SIM (např.
byla-li karta SIM odstraněna), bude to Memcom nebo C100 interpretovat jako závadu telefonní linky.
V případě, že Memcom nebo C100 detekuje závadu baterie GSM nebo výpadek napájení GSM, realizuje Memcom nebo
C100 technický hovor (za předpokladu, že byly ‘Technické hovory’ na jednotce aktivovány).
Memcom nebo C100 detekuje závady komunikací s GSM přes ‘místní smyčku’ (bezprostřední spojení mezi havarijním
telefonem a GSM).
Indice
Lingue:
Altri manuali Memco Portale
Manuali Portale popolari di altre marche

LST
LST M500RFE-AS Manuale utente

Kinnex
Kinnex Media Gateway Manuale utente

2N Telekomunikace
2N Telekomunikace 2N StarGate Manuale utente

Mitsubishi Heavy Industries
Mitsubishi Heavy Industries Superlink SC-WBGW256 Manuale utente

ZyXEL Communications
ZyXEL Communications ZYWALL2 ET 2WE Manuale utente

Telsey
Telsey CPVA 500 - SIP Manuale utente