Mercury CyperPix S930X Manuale utente

1

2
Table of Contents
Welcome.........................................................................................................................……..3
Getting Started………………………………………………………………………………………..4
-Contents of Package................................................……….............…….............. 4
-System Requirements................................................……….............……......….. 5
-Feature...................................................................…............................…......….. 6
-LCD Display Icons...................................................................….......................... 6
-Shooting Mode...................................................................…..............…………… 7
-Camera Setting Icons...........…............................................................................. 8~12
Power Up……………………………………………………………………………………………. 13
-Battery Installation..................................................................…......................... 13
-Turning the Power ON/OFF.......…...................................................................… 13
-Sleep Mode..................................................................…............................…….13
Set Up Mode………………………………………………………………………………………….14
-Startup Screen…………………………………………………………………………14
-Video Format..................................................................…............................….. 14
-Sharpness...................................................................…..................................... 14
-Specifying Image Size and Quality.............................…..................................... 14~15
-Selecting the Focus Mode............................................…................................... 15
-Using Different Metering Options...................................….................................. 15
-Using the Flash...................................…............................................................. 16
-Exposure Compensation (EV Shift) ...…............................................................. 17
-Adjusting White Balance..................…................................................................ 17
-Using the Self-Timer.................…........................................................................17
-Quick View................…....................................................................................... 17
-Deleting Pictures, Video and Audio..................................................................... 18
Taking Pictures.................................................................................................….......…….. 19
Taking Video or Audio..................................................................................….......….……. 20
Playing Back Pictures, Video and Audio.......................................................….......…….. 21
DPOF Print.....................................................….......….….................................................... 21
Install Camera Drivers and ArcSoft Programs……………………………………………….. 22
-Install Camera Driver.......................................................................................... 22
-ArcSoft PhotoImpression 4.0.......................................……………………….….. 23
-ArcSoft PhotoBase 3.0..........................................………………………............. 24
-ArcSoft VideoImpression 1.6...........................……………………….....……....... 25
-QuickTime Player 6.....……………………….....……...............…………………… 26
Uninstall Application Programs……………………………………………………………….... 27
Download Photos…………………………………………………………………………………..28
-Using a Memory Card to Transfer Images to a Computer..................………….. 28
-Transferring Record Photos/ Video to Your Computer………………………….. 29
-Downloading Photos Using PhotoImpression4.0……..…………………………... 30
-Photo and Sharing Management Using PhotoBase 3.0………………….....….... 31
Video Playback…………………………………………………………………………………….. 32
-Video Playback Using VideoImpression 1.6……………………………………..... 32
-Playing Movie Clips Using QuickTime Player 6…………………………………… 33
Appendix……………………………………………………………………………………………. 34
-Troubleshooting………………………………………………………………………. 34
-Specifications………………………………...…………………………………….…. 35

3
Welcome
¾Thank you for choosing the Camera to pursue your digital adventures. Whether you are
creating memories of your friends and family or exploring the great outdoors to get the
utmost satisfaction from your digital camera, please take a moment to read through this
manual. Its contents will send you on an educational journey into your camera's multiple
capabilities.
Safety Information
Before using the camera, please ensure that you read and understand the safety precautions
described below. Always ensure that the camera is operated correctly.
•Never operate the camera inside of an aircraft or anywhere else where operation of
such devices is restricted. Improper use creates the risk of serious accident.
•Do not aim the camera directly into the sun or other intense light sources which could
damage your eyesight.
•Do not try to open the case of the camera or attempt to modify this camera in any way.
High-voltage internal components create the risk of electric shock when exposed.
Maintenance and repairs should be carried out only by authorized service providers.
•Do not fire the flash too close to the eyes of animals or people, especially for young
children. Eye damage may result. In particular, remain at least one meter away from
infants when using flash.
•Keep the camera away from water and other liquids. Do not use the camera with wet
hands. Never use the camera in the rain or snow. Moisture creates the danger of fire
and electric shock.
•Keep the camera and its accessories out of the reach of children and animals to
prevent accidents or damage to the camera.
•If you notice smoke or a strange odor coming from the camera, turn the power off
immediately. Take the camera to the nearest authorized service center for repair.
Never attempt to repair the camera on your own.
•Use only the recommended power accessories. Use of power sources not expressly
recommended for this equipment may lead to overheating, distortion of the equipment,
fire, electrical shock or other hazards.
•Never apply too much force when cleaning the surface of the lens. Doing so can
scratch the lens surface and cause malfunction.
•The camera may become slightly warm during use. This does not indicate
malfunction.
•If the exterior of the camera needs cleaning, wipe it with a soft, dry cloth.
4
Getting Started
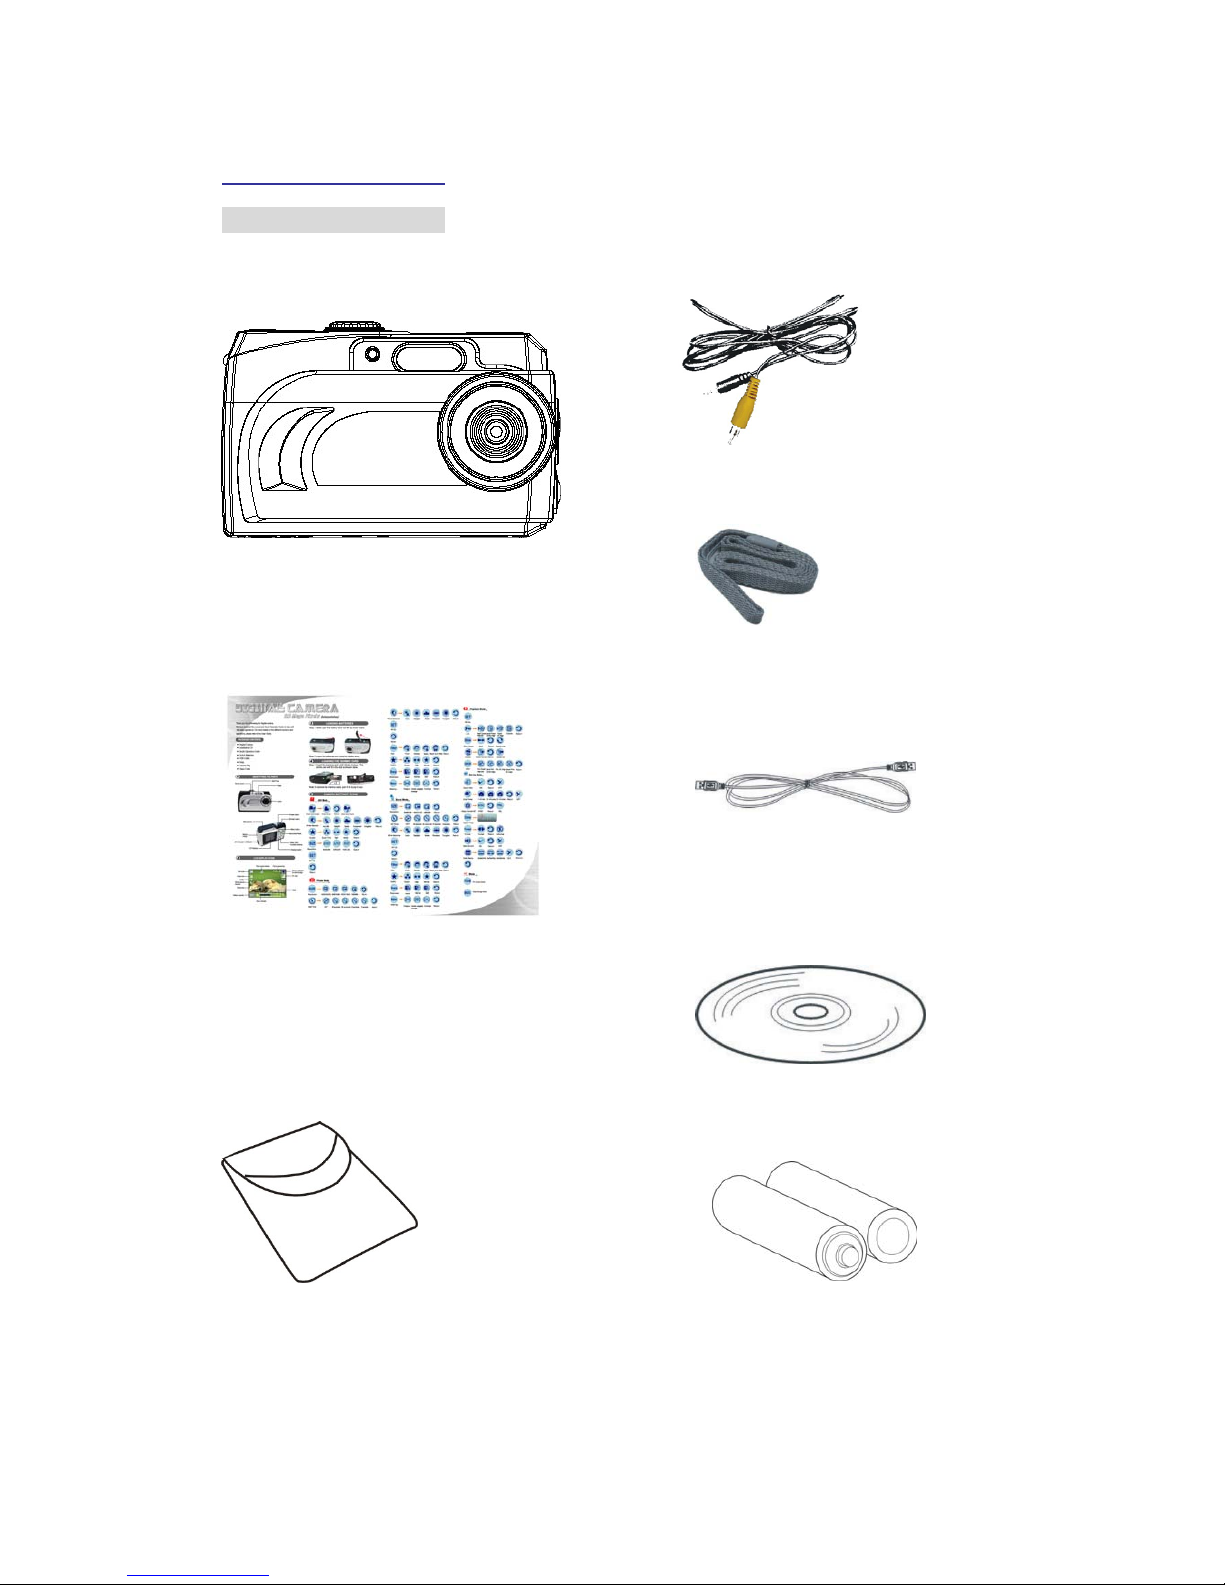
Contents of Package
1. DigitalCamera 4. VideoCable
5. Strap
2. QOG
6. USB Cable
7. Installation CD
3. Carry Bag
8. 2AAABatteries

5
Getting Started
System Requirements
¾Personal computer, laptop, desktop, or IBM compatible with Pentium 166 MHz minimum,
and with an active USB (universal serial bus) port.
¾Windows 98SE/ ME/ 2000/ XP, CD ROM drive, color monitor, mouse and keyboard.
NOTE
For transferring still images or for video conferencing, your computer, must have modem and
communication software for internet connection.

6
Power button
Flash
Lens
Self-Timer indicator
Mode switch
Microphone Menu button
4way, Multi-
Function buttons
Set button/
Flash button
Display button
LCD display
M
acro mo
d
e
A/V Out port / USB
M
emory se
l
ecte
d
for date storage
EV value
Photo mode
Image size
Quality
White balance
indicator
Sharpness
Battery capacity
Zoom indicator
Flash mode indicator
Timer
Picture remaining
Getting Started
Feature
LCD Display Icons

7
Getting Started
Shooting Mode
AVI Use this mode to record video clips at a resolution of 320x240, 160x120 or
640x480 pixels.
PHOTOGRAPHY Use this mode to take a single image each time the [Shutter]
button is pressed.
BURST Use this mode to take up to five images when the [Shutter] button is
pressed.
PLAYBACK Use this mode to view the images/ video clips. Thumbnail display,
delete or set DPOF recorded images is available.
PC CAMERA Use this mode to open the Webcam mode.

8
Getting Started
Camera Setting Icons
AVI Mode
Video and Audio Video Only Return Video and Audio
White Balance
Auto WB
Daylight Shade Fluorescent Tungsten
Return
Quality Super Fine
High Normal
Return
Resolution 640X480 320X240 160X12
0
Return
Return
Set Up

9
Getting Started
Camera Setting Icons
Photo Mode
Resolution 3500X2625 2048X1536 1600X1200 1280X960 Return
Return
Self Timer OFF 50 seconds 30 seconds 10 seconds 2 seconds
Return
White Balance Auto Daylight
Shade Select Fluoresce Tungsten
Return
Set Up
Return
Filter Vivid Normal Sepia Black and White
Return
Quality Super Fine High Normal
Return
Sharpness Hard Normal Soft
Return
Metering Pattern Center-weighted
average Average

10
Getting Started
Camera Setting Icons
Burst Mode
Resolution
Return
Self Timer OFF 50 seconds 30 seconds 10 seconds 2 seconds
Return
White Balance Auto Daylight Shade Select Fluoresce Tungsten
Return
Set Up
Return
Filter Vivid Normal Sepia Black and White
Return
Quality Super Fine
High
Normal
Return
Sharpness Hard Normal Soft
Return
Metering Pattern Center-weighted
average Average
Indice
Altri manuali Mercury Macchina fotografica digitale

Mercury
Mercury EX-V7SR Manuale utente

Mercury
Mercury CyperPix S330 Manuale utente

Mercury
Mercury CyperPix S590Y Manuale utente

Mercury
Mercury MER-030-120UC Manuale utente

Mercury
Mercury VQ3240 Manuale utente

Mercury
Mercury CyperPix S830D Manuale utente

Mercury
Mercury CyberPix S-330 Manuale utente

Mercury
Mercury CyperPix E580V Manuale utente

Mercury
Mercury 350K Manuale utente


