Microchip Technology PD-9501-GCO/AC Series Guida alla risoluzione dei problemi

PD-9501-xxGCO/AC
PoE Midspan User Installation Guide
Introduction
Microchip’s family of Power over Ethernet (PoE) Midspans PD-9501-xxGCO/AC is a single-port high-power PoE
outdoor solution that offers a cost-effective IEEE® 802.3bt compliant solution and pre-BT support for IEEE®
802.3af/at standard guaranteeing 60W of power and ensures safe and reliable operation in outdoor environments
for standard PoE data terminal. The PD-9501-xxGCO/AC supports emerging wireless 10 Gbps devices, such as
wireless IEEE® 802.11ac access points.
PoE midspan powers devices that are PoE enabled or equipped to receive PoE. These devices are called powered
devices (PDs).
Features
PoE Midspans offer the following key features:
• Outdoor Rated: IP66 and IP67
• Extended Temperature Range: –40 °C to 65 °C
• Supports 10/100/1000 Mbps and 2.5/5/10 Gbps Data Rates
• Standards Compliant: IEEE 802.3bt and IEEE 802.3af/at
• Plug and Play Installation
• Includes Integrated Surge Protection
© 2022 Microchip Technology Inc.
and its subsidiaries
User Guide DS50003340A-page 1

Table of Contents
Introduction.....................................................................................................................................................1
Features.................................................................................................................................................. 1
1. Standards and Safety Guidelines............................................................................................................3
1.1. Part Number Definition.................................................................................................................3
1.2. Electrical Compatibility Approvals................................................................................................ 3
1.3. Safety Standard Approvals...........................................................................................................3
1.4. CE Marking...................................................................................................................................3
1.5. GS Compliance............................................................................................................................ 3
1.6. Surge/Lightening Protection.........................................................................................................3
1.7. Safety Information........................................................................................................................ 4
2. Information en Matière de Sécurité......................................................................................................... 5
2.1. Directives Générales....................................................................................................................5
2.2. Mises en Garde............................................................................................................................5
3. PoE Midspan Unit Installation (Outdoor Unit)......................................................................................... 6
3.1. Parts List...................................................................................................................................... 6
3.2. Additional Tools............................................................................................................................ 6
3.3. Midspan Unit Installation.............................................................................................................. 7
4. Installation of Cables.............................................................................................................................10
4.1. AC Power Cable Installation.......................................................................................................10
4.2. RJ45 Cable Installation.............................................................................................................11
4.3. Data and Power Connection...................................................................................................... 12
5. Troubleshooting.....................................................................................................................................13
5.1. Preliminary Steps....................................................................................................................... 13
5.2. Troubleshooting Steps................................................................................................................13
6. Specifications........................................................................................................................................ 14
6.1. Environmental Specifications..................................................................................................... 14
6.2. Electrical Specifications..............................................................................................................14
6.3. Interface..................................................................................................................................... 14
7. Technical Support..................................................................................................................................15
8. Revision History.................................................................................................................................... 16
Microchip Information...................................................................................................................................17
The Microchip Website..........................................................................................................................17
Product Change Notification Service.................................................................................................... 17
Customer Support................................................................................................................................. 17
Microchip Devices Code Protection Feature.........................................................................................17
Legal Notice.......................................................................................................................................... 17
Trademarks........................................................................................................................................... 18
Quality Management System................................................................................................................ 19
Worldwide Sales and Service................................................................................................................20
PD-9501-xxGCO/AC
© 2022 Microchip Technology Inc.
and its subsidiaries
User Guide DS50003340A-page 2

1. Standards and Safety Guidelines
This chapter describes the standards and safety guidelines for the product.
1.1 Part Number Definition
PD-9501-xxGCO/AC: 4–pairs AC input family.
Table 1-1. Part Number Definition
Symbol Description
xxGCO Represents the bandwidth:
• xx = 25—up to 2.5 Gbps Data Rate
• xx = 10—up to 10 Gbps Data Rate
AC Midspan has an AC input.
1.2 Electrical Compatibility Approvals
Microchip’s PD-9501-xxGCO/AC series complies with the following standards:
• EN55035
• EN55032: Class B
• FCC Part 15: Class B
• VCCI
1.3 Safety Standard Approvals
Microchip meets the following safety standards. Consult Microchip for a complete list of safety certifications.
• UL/IEC/EN62368-1
• UL/IEC/EN60950-22
• GS Compliance
1.4 CE Marking
CE marking on this product indicates that this product complies with the Electromagnetic Compatibility (EMC)
Directive.
1.5 GS Compliance
GS marking on this product indicates that the product complies with the German Product Safety Act.
1.6 Surge/Lightening Protection
Microchip’s PD-9501-xxGCO/AC is designed according to the following requirements.
• ITU-T K.21 (6 kV enhanced surge)—Port and AC Main
• EN61000-4-5 (6 kV)—Port and AC Main
• GR-1089-CORE Issue 6—Port Only
PD-9501-xxGCO/AC
Standards and Safety Guidelines
© 2022 Microchip Technology Inc.
and its subsidiaries
User Guide DS50003340A-page 3

1.7 Safety Information
Read the safety information before using the PoE midspan unit.
1.7.1 General Guidelines
Read the following safety information before carrying out any installation, removal, or maintenance procedure on the
PoE midspan. Warnings contain directions to be followed for the safety of personal and product.
1.7.2 Warnings
• Read installation instructions in 3. PoE Midspan Unit Installation (Outdoor Unit) before connecting midspan unit
to its power source.
• Follow basic electricity safety measures when connecting the PoE midspan unit to its power source.
• Only trained and qualified personnel must be allowed to install, replace, and service this equipment.
• A voltage mismatch can damage the equipment and can pose a fire hazard. If voltage indicated on the label is
different from the power outlet voltage, do not connect midspan unit to this outlet.
• All wiring and connections must conform to NFPA 70 (NEC).
• Power supply cord must not be attached to the building surface or run through walls, ceilings, floors, and similar
openings in the building structure.
• Measures must be taken to prevent physical damage to the power supply cord, including proper routing.
• Data and Data and Power ports of the midspan unit are shielded RJ45 data sockets. They cannot be used as
Plain Old Telephone Service (POTS) sockets. Only connect RJ45 data connectors to these sockets.
• When disposing this product, follow all local laws and regulations.
PD-9501-xxGCO/AC
Standards and Safety Guidelines
© 2022 Microchip Technology Inc.
and its subsidiaries
User Guide DS50003340A-page 4

2. Information en Matière de Sécurité
Lire les informations suivantes en matière de sécurité avant d'utiliser d'activer l'alimentation sur votre appareil
Ethernet unité midspan.
2.1 Directives Générales
Lire les informations suivantes en matière de sécurité avant d'installer ou enlever quoi que ce soit, ou procéder à
l'entretien de l'alimentation de votre appareil Ethernet midspan. Les mises en garde contiennent des instructions qui
doivent être suivies pour la sécurité des personnes et du produit. Suivre les instructions soigneusement.
2.2 Mises en Garde
• Lire les instructions d'installation dans 3. PoE Midspan Unit Installation (Outdoor Unit) avant de connecter le
midspan à une source d'alimentation.
• Suivre les mesures de sécurité électrique de base lors de la connexion de l'injecteur PoE à sa source
d'alimentation.
• Seul du personnel formé et qualifié doit être autorisé à installer, remplacer et entretenir cet équipement.
• Une disparité de voltage peut endommager l'équipement et constituer un risque d'incendie. Si le voltage indiqué
sur l'étiquette est différent du voltage de la source d'alimentation, ne pas connecter le midspan à cette prise.
• Tout le câblage et les connexions doivent être conformes à la norme NFPA 70 (NEC).
• Le cordon d'alimentation ne doit pas être fixé à la surface du bâtiment ni passer à travers les murs, les plafonds,
les planchers et les ouvertures similaires de la structure du bâtiment.
• Des mesures doivent être prises pour éviter tout dommage physique au cordon d'alimentation, y compris son
acheminement correct.
• Les ports Data et Data et Power du PoE midspan sont des prises de données blindées RJ45. Elles ne peuvent
pas être utilisées comme prises de service téléphonique traditionnel. Connecter seulement des connecteurs de
données RJ45 à ces prises. Le câblage Ethernet connexe doit être limité à l'intérieur de l'immeuble.
• Pour disposer/jeter ce produit, suivre les lois et règlements locaux.
PD-9501-xxGCO/AC
Information en Matière de Sécurité
© 2022 Microchip Technology Inc.
and its subsidiaries
User Guide DS50003340A-page 5

3. PoE Midspan Unit Installation (Outdoor Unit)
This chapter describes the procedure to install the midspan unit.
Note: Do not use a cross-over cable between the PoE midspan output port and the load device.
Warnings:
1. Take extra care when connecting the AC power inlet terminals, so that N, L, and Ground are connected to the
proper polarity.
2. Ensure that the AC power is within the allowed range.
3. Earth ground screw must be connected to earth ground in all types of installations.
3.1 Parts List
The following table lists the parts included in the kit.
Quantity Component
1 60W midspan unit, outdoor model
1 AC female connector
1 Quick Installation Guide
3.2 Additional Tools
The following table lists the additional tools required to install the midspan unit.
Quantity Part
1 Screwdriver
1 Wire stripper
1 Solid Wrench No. 27 or Adjustable Wrench
PD-9501-xxGCO/AC
PoE Midspan Unit Installation (Outdoor Unit)
© 2022 Microchip Technology Inc.
and its subsidiaries
User Guide DS50003340A-page 6

3.3 Midspan Unit Installation
This section describes the prerequisites and available installation options for the midspan unit.
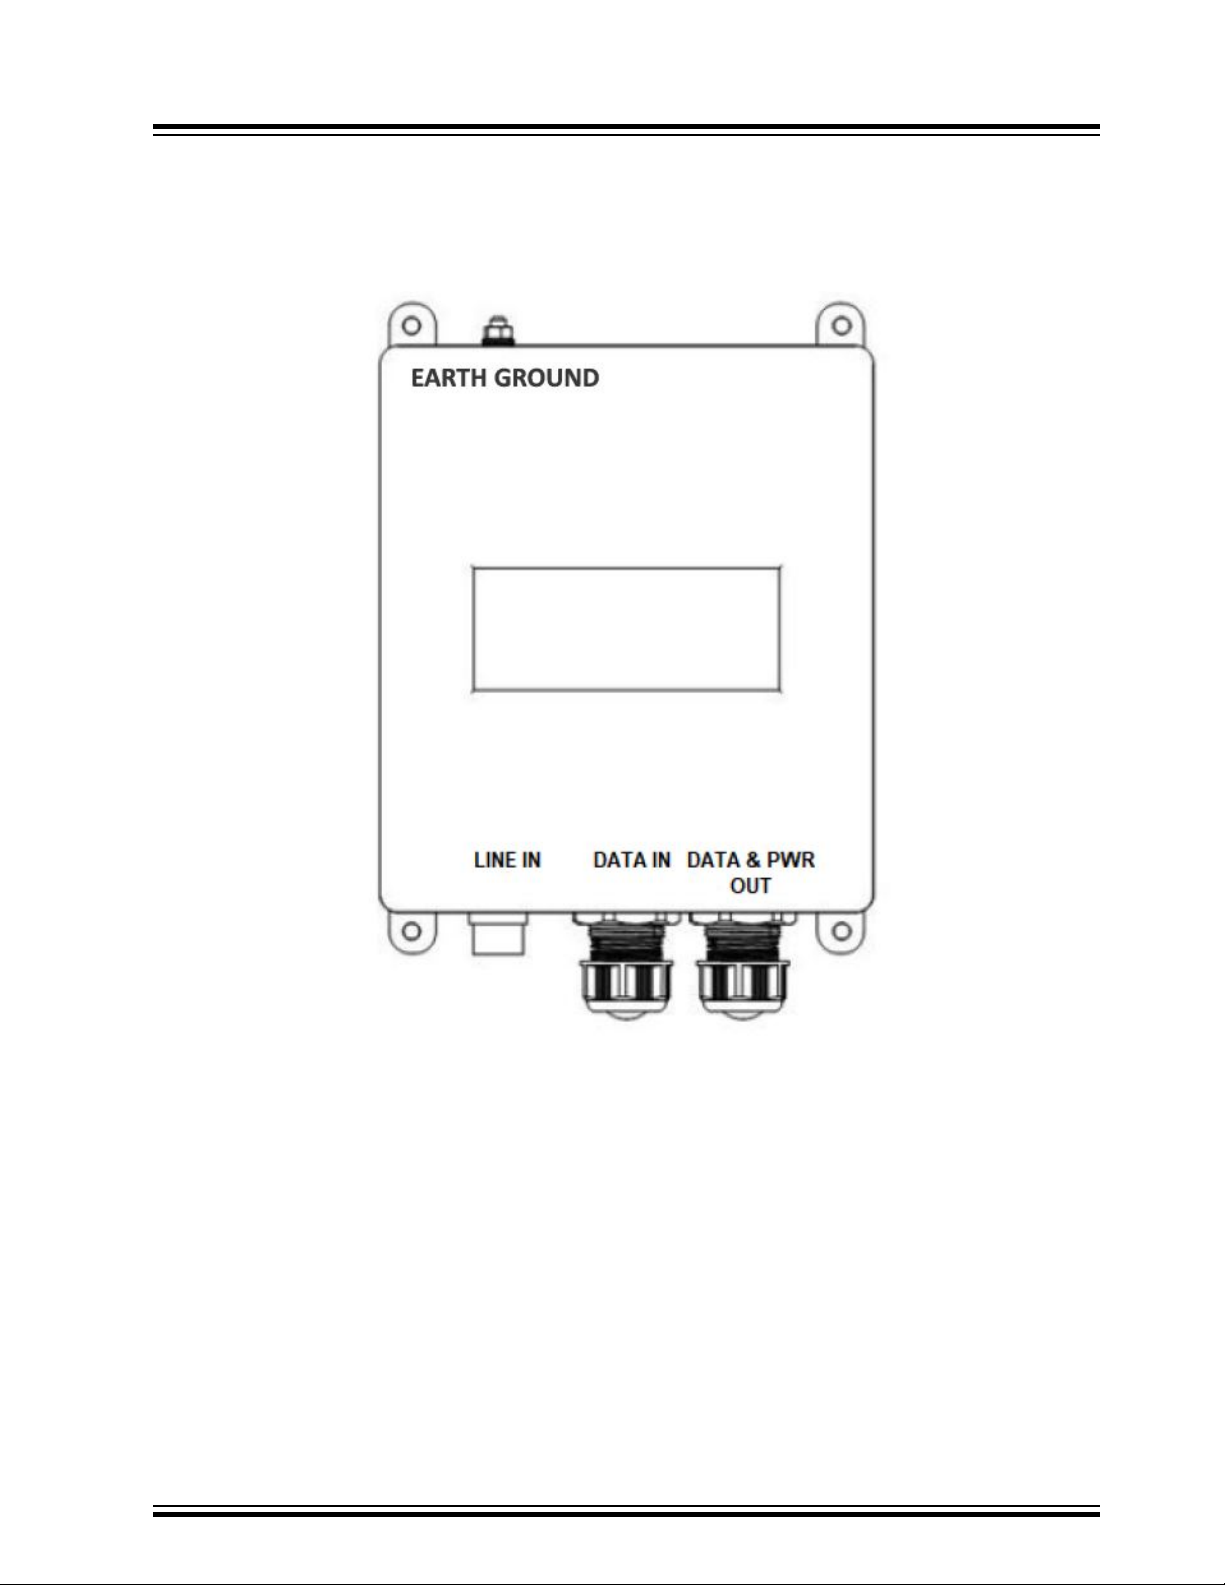
The following figure shows the overview of the midspan unit.
Figure 3-1. Product Overview
3.3.1 Prerequisites
Note the following before mounting the PoE midspan unit to a fixed location:
• To ensure weather-proof connection in order to meet IEC60529 level IP67. PoE midspan AC power plug needs
to be connected to a weather-proof AC power source box.
• Do not cover the midspan or block the airflow to the PoE with any foreign objects.
• Keep the midspan away from excessive heat and free from vibration.
• Ensure that the cable length from the Ethernet network source to the terminal does not exceed 100 meters (333
feet). The midspan is not a repeater and does not amplify the Ethernet data signal.
• The midspan has no ON-OFF switch, simply plug the midspan to an AC power source.
• PoE midspan AC power lines must be connected to the socket-outlet that shall be installed near the equipment
and be easily accessible.
PD-9501-xxGCO/AC
PoE Midspan Unit Installation (Outdoor Unit)
© 2022 Microchip Technology Inc.
and its subsidiaries
User Guide DS50003340A-page 7

3.3.2 Installation Options
Following are the two options available for the installation of this midspan unit:
1. Wall Mounting—PoE midspan unit can be mounted on a wall/bench (all kind of flat surfaces such as wood,
brick, concrete and other) using the mounting holes.
CAUTION
Use only a solid mounting surface to install the midspan unit, do not install on drywall or
plasterboard walls.
2. Pole Mounting—Using the optional mount kit.
Note: The mounting kit is not provided with the midspan unit. Contact 7. Technical Support for more
information on ordering the mounting kit (Part Number: PD-OUT/MBK/GCO).
3.3.2.1 Wall Mounting
Follow the procedure to mount the unit directly to a wall.
1. Using the screw holes of the midspan as a template, put marks on the mounting surface (a wall of wood, brick
or concrete) to mark drill points and drill four holes.
2. With the unit attached to the mounting surface, insert four mounting screws through the screw holes on the
unit and into the mounting surface. For bricks or concrete wall, use anchor screws (5 mm x 40 mm). For
wooden wall, use wood screws (5 mm x 40 mm).
Notes:
• For bricks or concrete wall, use anchor screws (5 mm x 40 mm), and for wooden wall, use wood screws
(5 mm x 40 mm).
• The screws are not provided with the kit.
3. Tighten each screw until the midspan unit is securely attached to the mounting surface.
Note: The dimensions in the above figure are in millimeters.
PD-9501-xxGCO/AC
PoE Midspan Unit Installation (Outdoor Unit)
© 2022 Microchip Technology Inc.
and its subsidiaries
User Guide DS50003340A-page 8

3.3.2.2 Pole Mounting
Before installing the midspan, ensure that all the items listed in the 3.1. Parts List are available in the kit. If any item
is missing, notify your Sales or Customer Service Representative from Microchip.
Follow the procedure to mount the unit on a pole using a mounting bracket.
1. Attach the pole bracket to the midspan using four pan head screws and tighten the pan head screws to 1.1
Nm.
2. Place the midspan/pole bracket assembly onto the pole. Tighten the midspan/pole bracket assembly to the
pole using worm clams, as shown in the following figures.
Notes:
• Pole bracket supports poles with diameters ranging from 60 mm to 200 mm (2.5 inches to 8 inches).
• The unit must be installed with DATA IN, and DATA & PWR OUT ports facing down, as shown in the
following figures.
PD-9501-xxGCO/AC
PoE Midspan Unit Installation (Outdoor Unit)
© 2022 Microchip Technology Inc.
and its subsidiaries
User Guide DS50003340A-page 9

4. Installation of Cables
This chapter describes the procedure to install the cables to the midspan unit.
4.1 AC Power Cable Installation
The following table lists the AC power cable specifications.
Table 4-1. AC Cable Specifications
Parameter Value
Recommended cable type North America—SJOW or SOOW
Worldwide—H05RN-F or H07RN-F
Voltage rating 300V (or better recommended)
Temperature range –40 ℃ to 65 ℃ (or better recommended)
Cable size 16 AWG–18 AWG 3C
1.0 mm2 – 1.5 mm2 3C
Cable outer dimension Dia. 3/16 in.–3/8 in.
Dia. 5.0 mm–9.5 mm
Approved for indoor and outdoor applications.
The following figure shows how to connect the AC power cable to the midspan unit:
Figure 4-1. Connecting the AC Power Cable to the Unit
PD-9501-xxGCO/AC
Installation of Cables
© 2022 Microchip Technology Inc.
and its subsidiaries
User Guide DS50003340A-page 10
Questo manuale è adatto per i seguenti modelli
2
Indice
Lingue:
Altri manuali Microchip Technology Hardware di rete
Manuali Hardware di rete popolari di altre marche

Matrix Switch Corporation
Matrix Switch Corporation MSC-HD161DEL Manuale utente

B&B Electronics
B&B Electronics ZXT9-IO-222R2 Manuale utente

Yudor
Yudor YDS-16 Manuale utente

D-Link
D-Link ShareCenter DNS-320L Manuale utente

Samsung
Samsung ES1642dc Istruzioni per l’uso

Honeywell Home
Honeywell Home LTEM-PV Istruzioni per il montaggio