Montego MAMA Manuale utente

User’s Guide
MAMA ₪KIDS
₪TOUR
₪
CITY
₪URBAN
₪BMX
2
© GuideXpert, Dalibor Sevcik, www.guideXpert.net. All rights reserved.
manual
MIMI, RAINBOW, ...
Congratulation on the purchase of your
new quality bicycle. We have done our
best to ensure that you will always reach
your destination safely, comfortably and
reliably.
Your Montego team wish you enjoyable
cycling.
Contents:
At a glance
Description of parts ... 3
Good habits
Check before every ride ... 5
The essentials
Brakes, gears, light ... 6
Make yourself comfortable
Adjusting the bike ...10
Special situations
Care, luggage, kids, transport ...17
Troubleshooting / break-down help
Tyres, brakes, gears, bell ...21
Maintenance ...29
Index ...30
Handover receipt ...31
Bike licence ...32
Terms of warranty ...33
Keep this manual for
future reference.
MAMA
Liberty 3
Liberty 7
KIDS
Mimi
Rainbow
Rocket
Free Spirit
Scout
Wild Rose
Lizard
TOUR
Villager 7
Villager 21
Traveller
Voyager
CITY
Avantgard+
Heritage 7
Society
Distinction
Status
Elite
URBAN
Barrow
Legend
Divine
Daily Urban
Daily Classic
BMX
Turbo
Downtown
Graffiti
Voodoo
You and your children are
much safer when wearing
a helmet.
Key to symbols
Models MONTEGO
Technical note
Warning
Info
The following part is
valid for models listed
Hint
Edition 02/2010
3
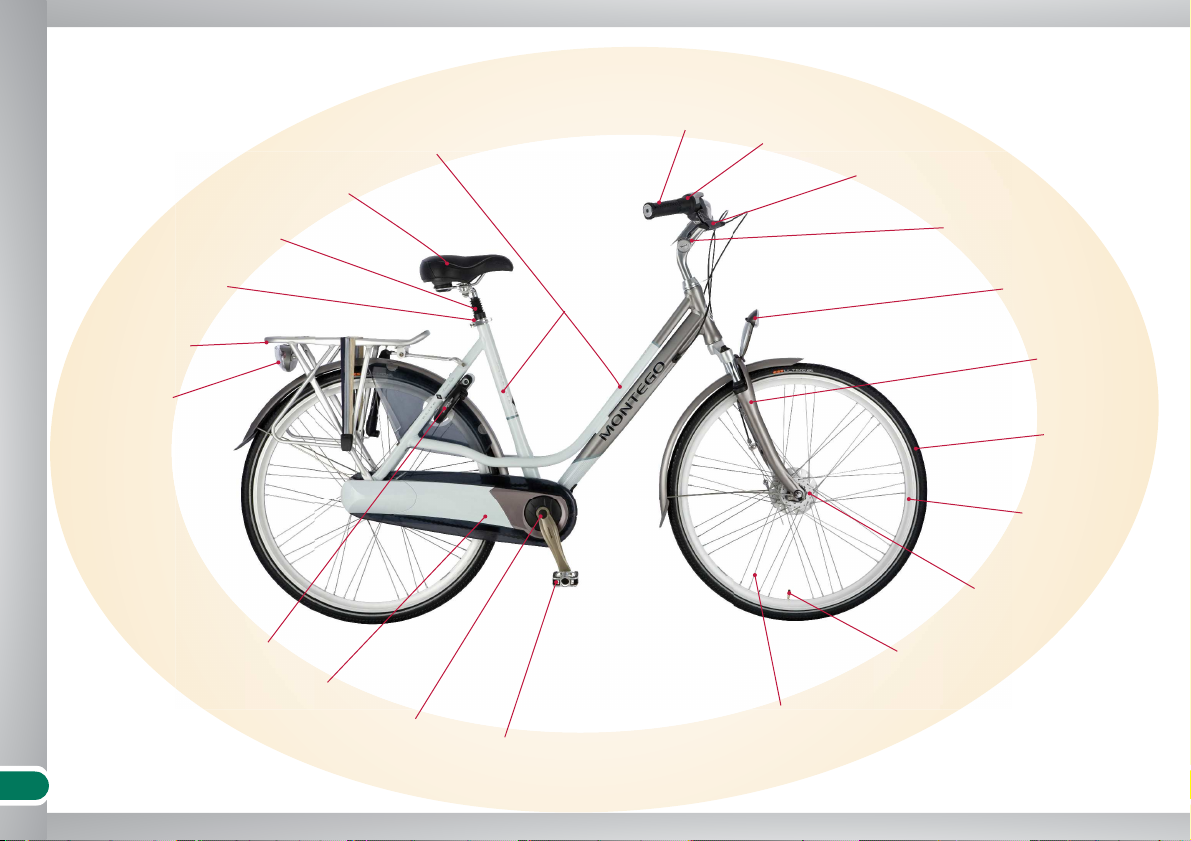
At a glance
At a glance
Seat
Frame
HandlebarShift lever
Brake lever
Front light
Tyre
Rim
Hub
Valve
Spoke
Crankset
Chainguard
Rear light
Rack
Quick-release/
seat post clamp
Seat post
Pedal
Stem
Fork
Bikes with a hub gear system
Lock
4
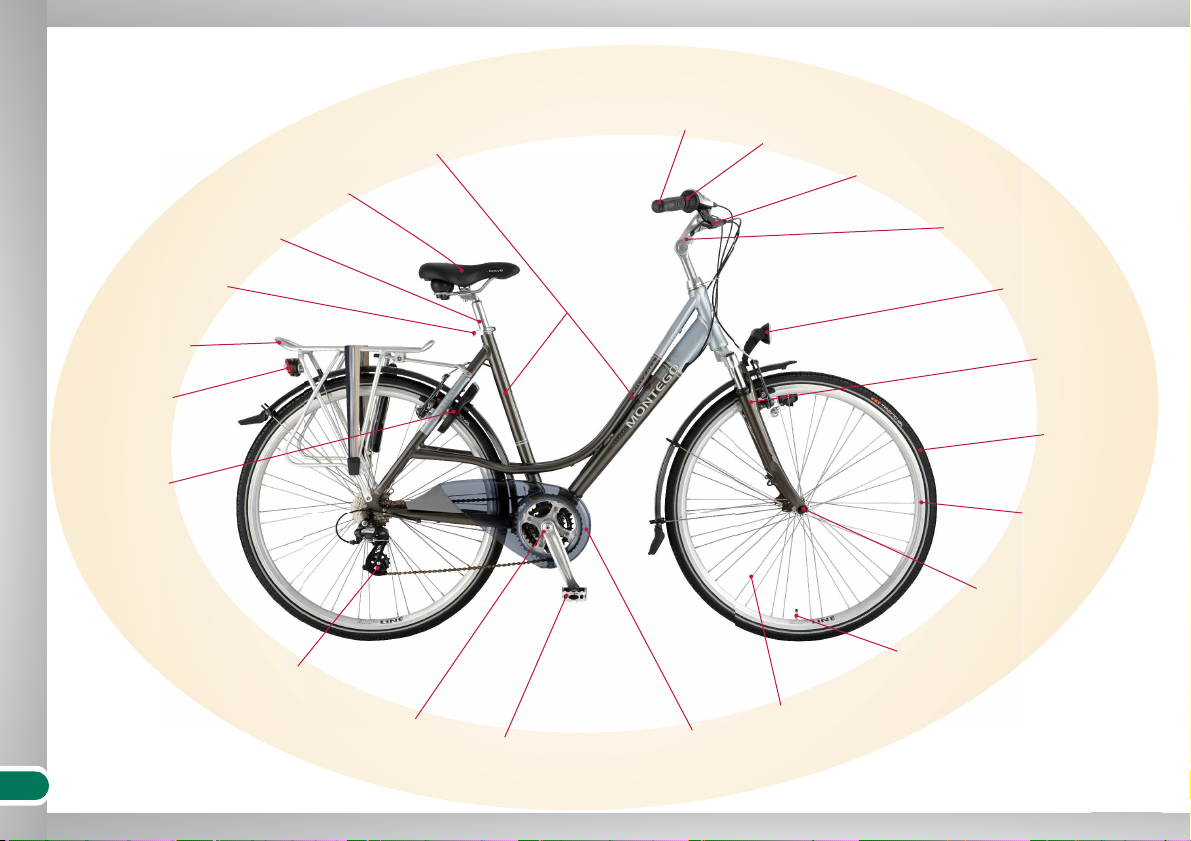
At a glance
Seat
Frame
HandlebarShift lever
Brake lever
Front light
Tyre
Rim
Wheel nut
Valve
Spoke
Crankset Chainguard
Rear light
Rack
Quick-release/
seat post clamp
Seat post
Pedal
Stem
Fork
Bikes with derailleur gears
Lock
Rear derailleur
5
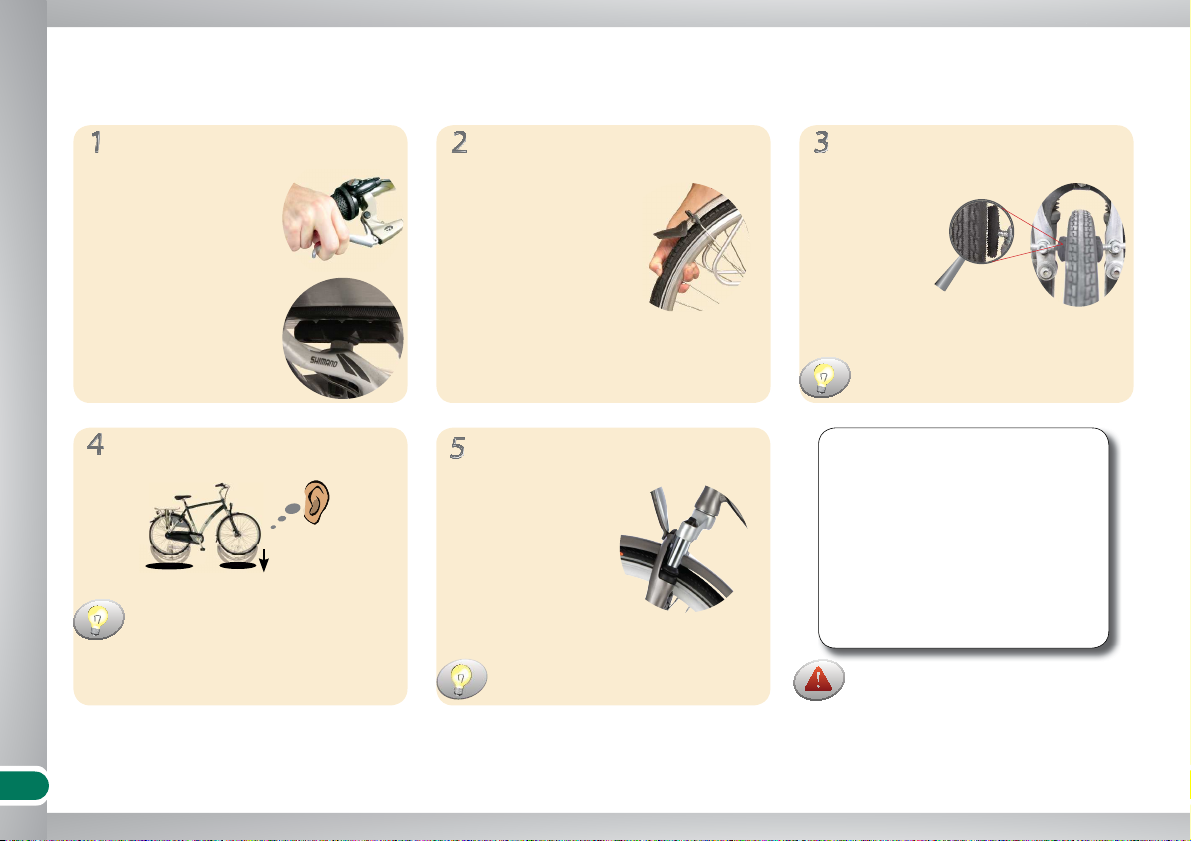
Good habits
Test the brakes
Good habits
... a short start-up check for more safety and comfort
Check the tyres
Check for rattling
Check the wheels’ rotation
Test the suspension fork
Feels normal?
Right pressure? Smooth and regular?
At maximum pull the
lever doesn‘t touch
the handlebar
All blocks touch
along the whole
length
Checklist
1) Brakes OK ü
2) Tyres OK ü
3) Wheel rotation OK ü
4) No unusual noises ü
5) Suspension visibly OK ü
Don’t use your bike if any of these
points are in doubt — consult an
expert. Using a bicycle that is not in
good working order may result in
serious injuries.
Sit on the bike to test this.
Observe the distance between the
rotating wheel and the brake pads.
Drop your bike from a few inches‘
height onto the floor and listen for
any clatter.
If there is any, tighten all bolts and
nuts.
6
The essentials
Avantgard+, Distinction, Divine, Downtown, Elite, Free Spirit, Graffiti, Heritage 7, Legend, Liberty 3, Liberty 7, Lizard, Mini, Scount, Society, Status, Traveller, Turbo,
Villager 21, Villager 7, Voodoo, Voyager:
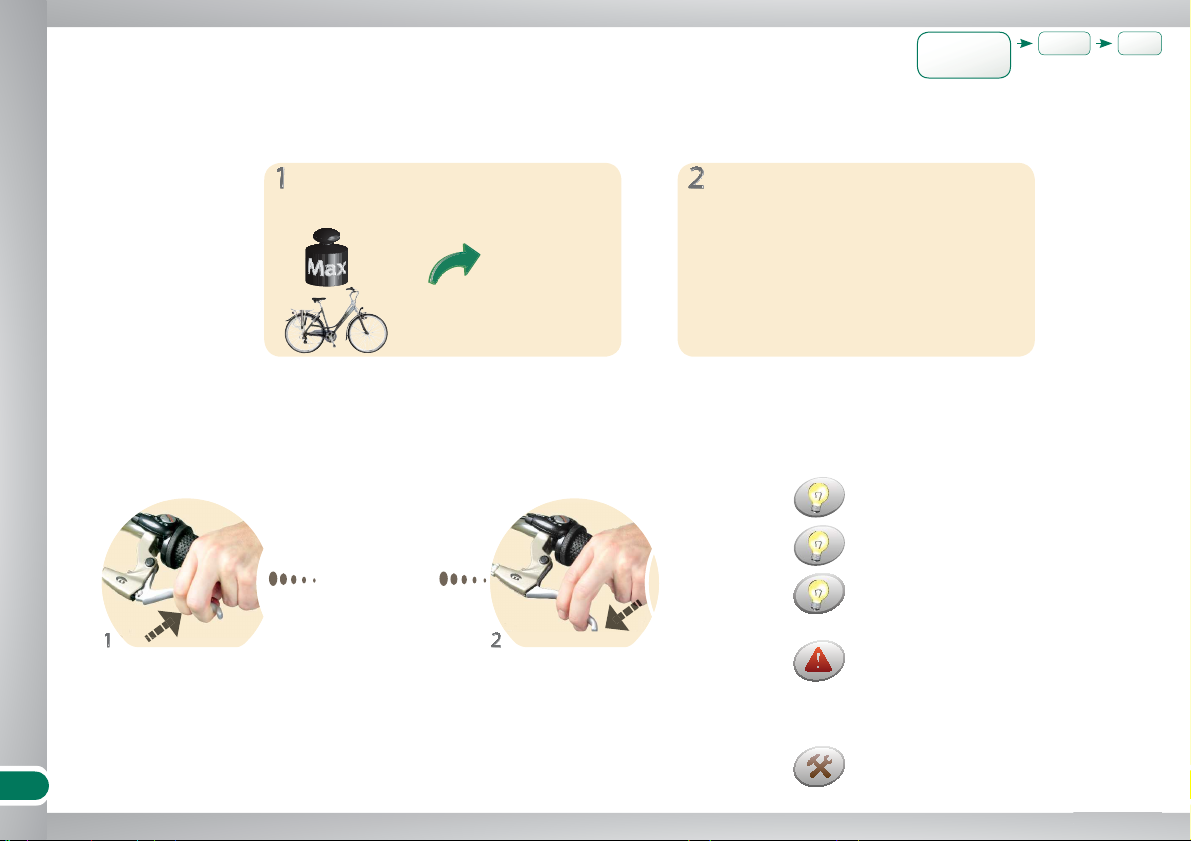
Max ...... Kg
The essentials
Braking
Basic knowledge
... to pedal and stop correctly.
Front + rear
pull the lever release the lever
Remember which lever operates the
front brake and which the rear brake.
Ideally use both front and rear brakes
simultaneously.
No grease, oil or wax on the brake
pads or rims.
Preferably brake short and hard
instead of long to prevent overheating
of the components.
Longer braking could cause the hub
brakes to overheat and subsequently
fail. As soon as you note the braking
force is getting weak, stop and let the
brakes cool down.
Braking Gear
shifting
Lights
on / off
slow down or
stop
Bike licence
(Page 32)
Respect maximum overall
weight
Use the bike for designed pur-
pose only
Only on streets, public roads and
tarred bicycle paths; not under
extreme conditions; no sport riding
or competitions.
7
The essentials
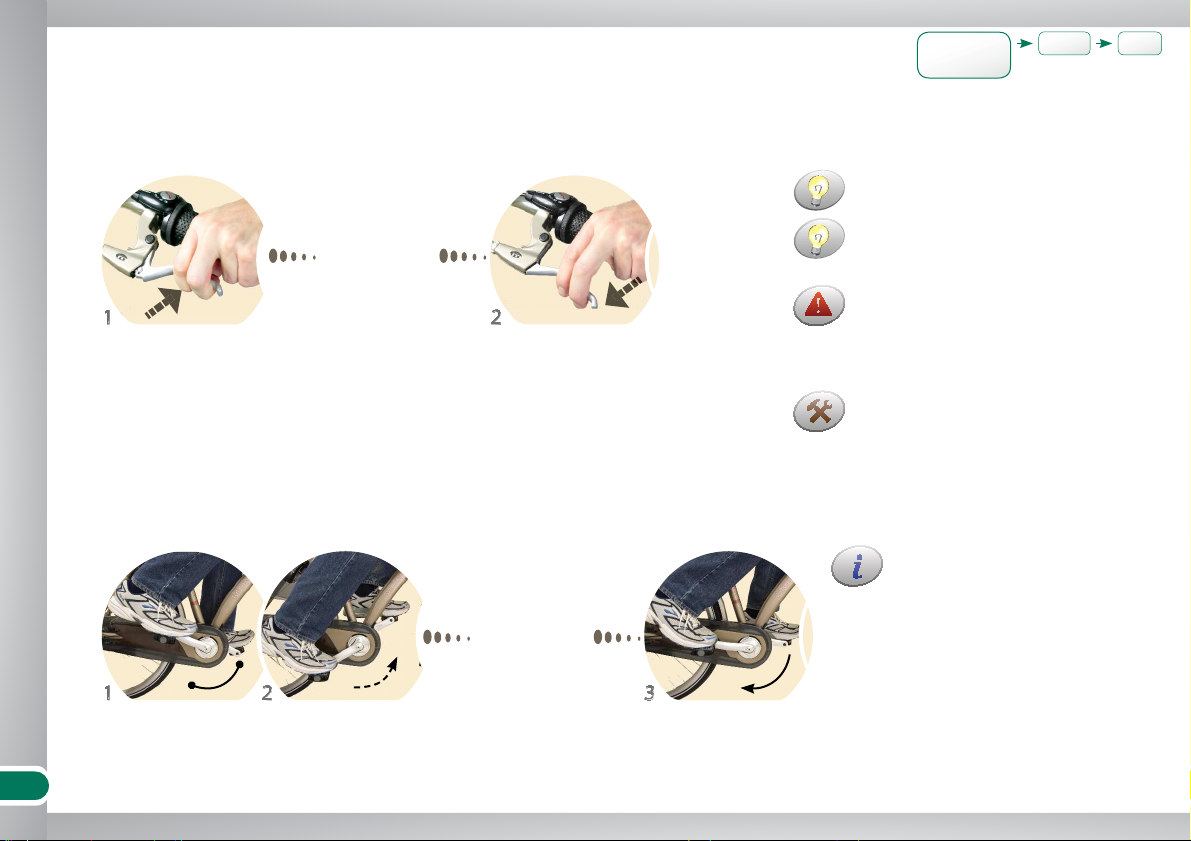
Free Spirit, Lizard, Mimi, Rainbow, Rocket, Scout, Turbo, Wild Rose:
Barrow, Daily Classic, Daily Urban, Free Spirit, Lizard, Mimi, Rainbow, Rocket, Scout, Turbo, Wild Rose:
Front
Rear (coaster brake)
The strongest braking is achieved
in the horizontal pedal position.
Interrupt pedalling Pedal carefully back-
wards
Pedal forwards a little
(freewheel) or restart
pedalling
slow down or
stop
Braking Gear
shifting
Lights
on / off
Ideally use both front and rear brakes
simultaneously.
No grease, oil or wax on the brake
pads or rims.
Preferably brake short and strong
instead of long to prevent overheating
of the components.
Longer braking could cause the hub
brakes to overheat and subsequently
fail. As soon as you note the braking
force is getting weak, stop and let the
brakes cool down.
pull the lever release the lever
slow down or
stop
8
The essentials
Avantgard+, Barrow, Distinction, Divine, Elite, Heritage 7, Legend, Liberty 3, Liberty 7, Lizard, Society, Status, Villager 21, Villager 7, Wild Rose:
Traveller, Voyager:
Daily Classic, Daily Urban, Downtown, Free Spirit, Graffiti, Mimi, Rainbow, Rocket, Scout, Turbo, Voodoo:
û
û
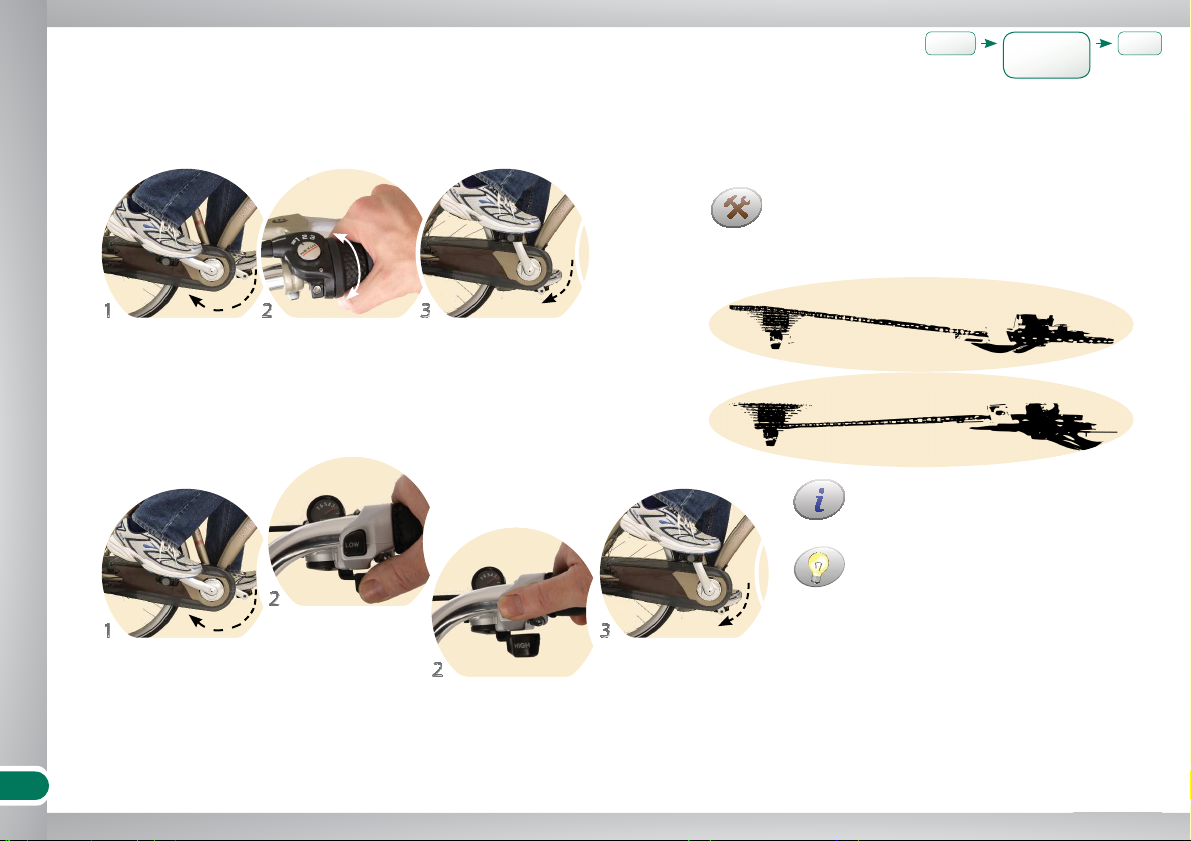
Gear shifting
Single speed
The most effective pedalling frequen-
cy is about 60 - 70 revolutions per
minute; much less downhill.
Avoid using extreme gear ratios with the
derailleur gears (big in front — big in rear; small
in front — small in rear). These hugely increase
the wear on the chain.
The lightest pedalling (e.g. uphill) is
with the smallest chainring in front
and the largest chainring at the rear.
Braking Gear
shifting
Lights
on / off
Slow pedalling down
Slow pedalling down
Twist the grip up to
a click
Press the LOW button
Push the HIGH lever
Pedal lightly until the
gear shifts
Pedal lightly until the
gear shifts
9
The essentials
2x
Avantgard+, Barrow, Daily Classic, Daily Urban, Distinction, Divine, Elite, Heritage 7, Legend, Liberty 3, Liberty 7, Lizard, Mimi 20", Society, Status, Wild Rose:
Free Spirit 20", Scout 20", Traveller, Villager 21, Villager 7, Voyager:
Downtown, Free Spirit 16", Graffiti, Mimi 16", Rainbow, Rocket, Scount 16", Turbo, Voodoo:
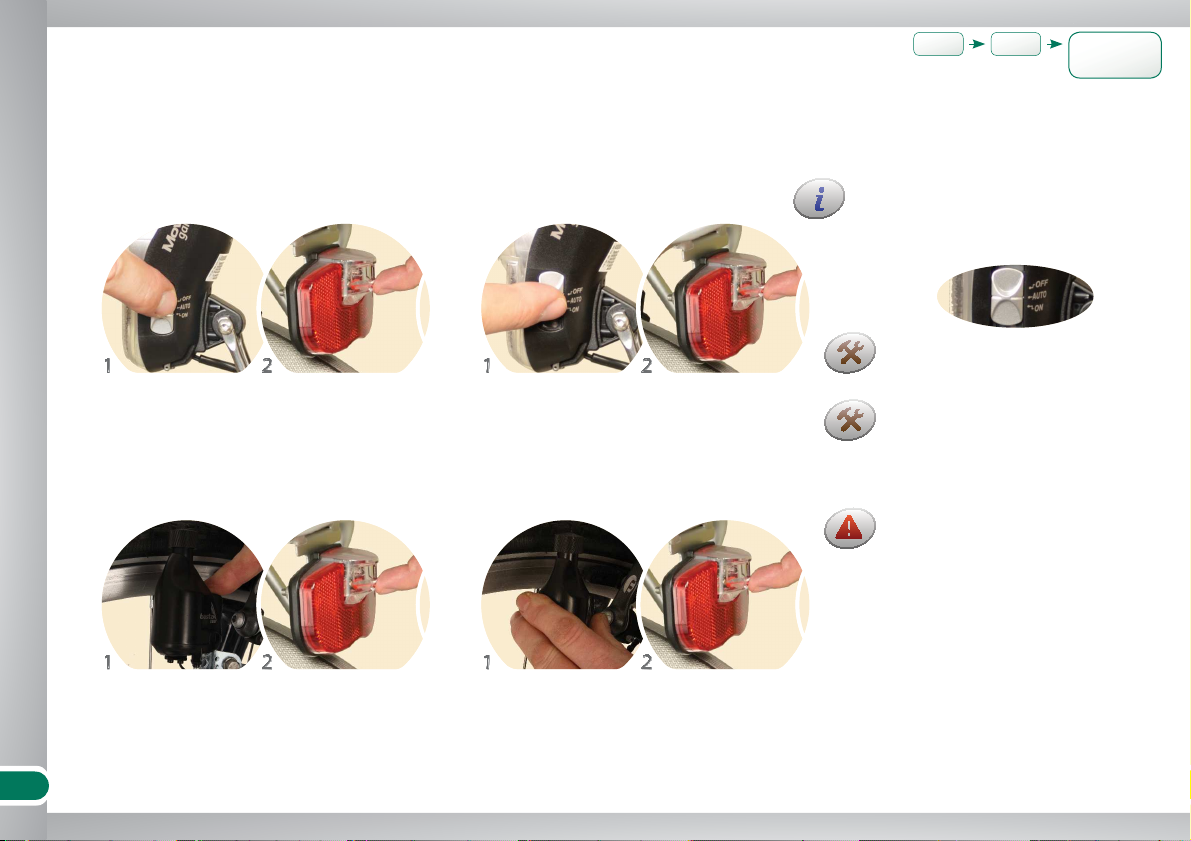
Lights on / off
On
front
front
front
front
rear
rear
rear
rear
On
Off
Off
Front light illuminates only while
riding (hub dynamo), rear light
also when standing (battery).
“Smart” rear light has three
states: on (1x press), auto (2x
press) and off (3x). In AUTO the
light turns on automatically when
it is dark (at night or in tunnels).
Position AUTO: The front light turns
on automatically when it is dark (at
night or in tunnels).
No lights
Braking Gear
shifting Lights
on / off
Shift the switch to ON
Press the button —
dynamo touches the
wheel
Press the button
Press the button
Shift the switch to OFF
Pull the dynamo from
the wheel
Press the button twice
Press the button
Don't turn the dynamo on or off
while riding — risk of accident.
10
Make yourself comfortable
Make yourself comfortable
... adjustments for comfort, efficiency and safety.
Saddle height
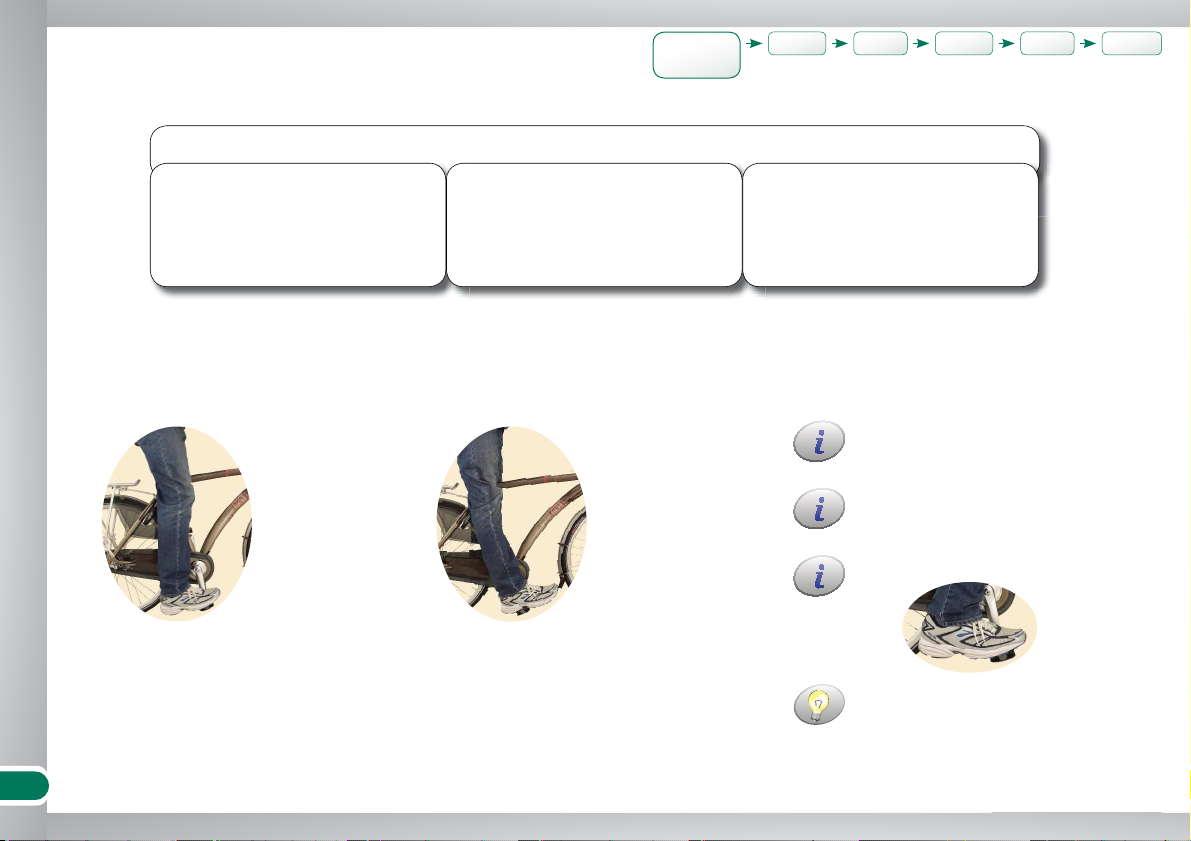
For correct adjustment, how it feels is
more important than general rules.
Ideal height Height test
- Pedal in the lowest position
- Heel on the pedal
- Leg completely straight
(Knee slightly bent)
In special conditions, such as slippery
roads, it is sensible to lower the
saddle height for increased safety.
Optimum foot position on the pedal:
It is important that children can easily
reach the floor with both feet to avoid
falling.
Saddle
height
Handlebar
height
Saddle
position
Handlebar
tilt
Brake
levers
Suspension
fork
Checklist: Adjustments
1) SADDLE
Height• ü
Tilt• ü
Horizontal position• ü
2) HANDLEBAR
Height• ü
Tilt• ü
3) BRAKE LEVERS
Tilt and position• ü
4) SUSPENSION FORK
Rigidity• ü
Questo manuale è adatto per i seguenti modelli
5
Indice


