
MRC MR Series Manuale utente

WWW.MRCAMERICA.COM
MR Series Protein Skimmer
Congratulations on your purchase of a +Series MRC Protein Skimmer the finest filtration in the world.
Please read the instructions in its entirety before starting to assemble your skimmer in order to assure proper
assembly and operation.
The skimmer comes disassembled for shipping. Refer to these instructions and assembly diagram for set up.
Failure to follow the assembly instructions could cause skimmer to malfunction
Section A: Assembly
Install the provided O-ring seal in the groove on the top flange of the skimmer body.
Partially screw the nylon thumbscrews in place (approx ¼ inches).
Place the upper riser/collection cup on the lower body and turn to lock the upper riser to the body using
the nylon screws.
Hand-tighten the nylon screws. Do not over tighten. The upper tube should now be secured to the lower
body.
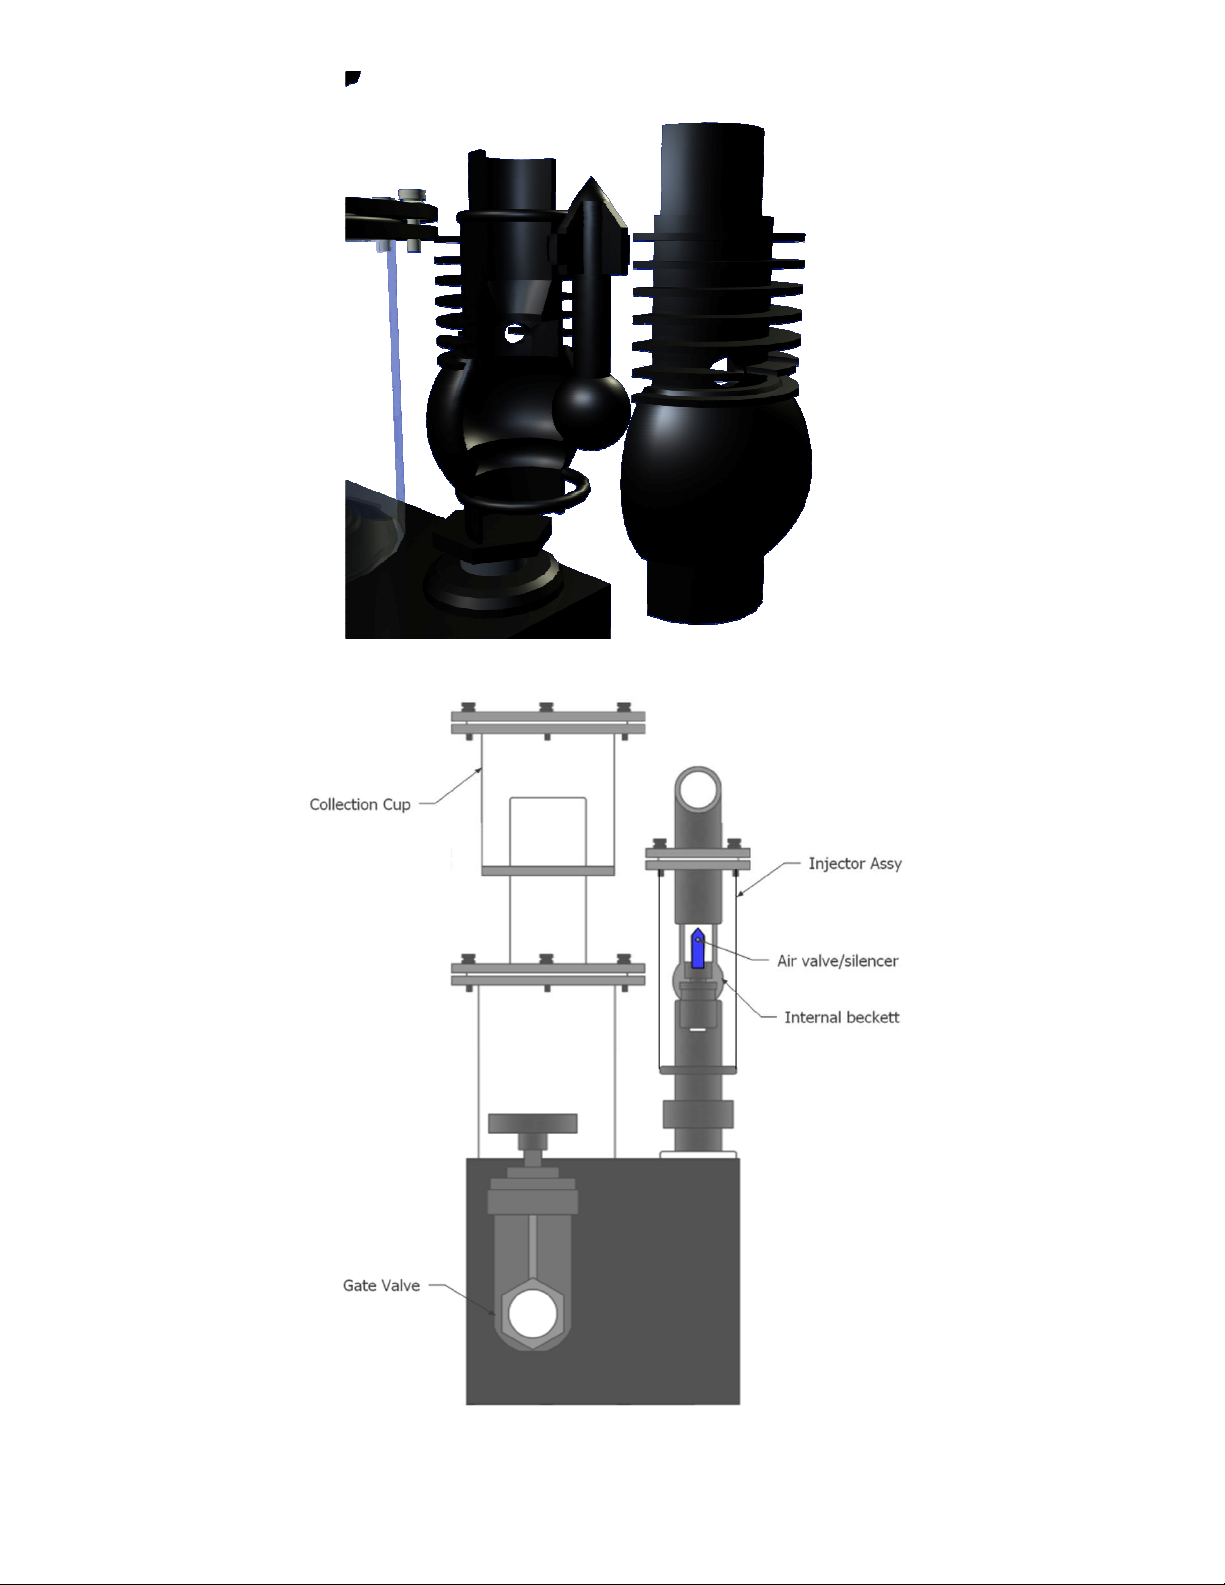
Screw the injector assembly into the 1 inch bulkheads located next to the riser body on the top of the box.
Teflon tape is needed for all threaded fittings.
Screw the air valves into the injector assembly. Teflon tape is not needed for the air valves.
Insert the threaded nipple into the gate valve. Install the gate valve & nipple onto the skimmer box & hand
tighten. Do not over tighten. Open gate valve fully.
Connect the skimmer pump to the top of the injector assembly.
Section B: Skimmer Installation and Operation
The protein skimmer can be used either inside or outside of a sump. Due to the large footprint of the MR series
skimmers we recommend out of sump installation. Do not raise the water level of the skimmer above the height
of the air valves. This will cause water to exit via the air valve. Note: if the recommended pump is an EXTERNAL
pump, DO NOT use this pump inside the sump.
In-Sump Installation
Use only submersible pumps for in-sump applications. Match the pressure curves of the recommended pump.
Connect the gate valve to the skimmer. The gate valve is shipped in the closed position. Open gate valve.
Place the skimmer inside the sump.
Connect the skimmer pump to the top of the injector assembly.
Make sure all flange screws are tight and that the gate valve and collection cup drain are completely
open. We recommend using an MRC waste collector. Do not cap off or block the cup drain. Close
the air valves.
Turn on the pump and adjust the water level of the skimmer to 2 inches above the skimmer box by
slowly closing the gate valve. Slowly being to open each air valve until you get a good bubble density
and size (1/4 – 1/3 open in most cases).
Allow a 24 hour break-in period at this level before adjusting the air valves. After this period the air
valves may be adjusted down to decrease bubble size.

WWW.MRCAMERICA.COM
Out Of Sump Installation
Refer to the website for recommended pumps for out of sump applications.
Connect a drain line from the skimmer to the sump. The gate valve may be connected along any
part of the drain line. PVC Cement should be used to connect the parts of the drain line and
allowed at least two hours to cure before use. For best results, install the return water line from the
skimmer above the water level of the sump. This will eliminate back pressure and make adjusting
the skimmer much easier. The skimmer can only drain level or downwards.
Connect the skimmer pump to the top of the injector assembly.
Make sure all flange screws are tight and that the gate valve and collection cup drain are completely
open. We recommend using an MRC waste collector. Do not cap off or block the cup drain. Close
the air valves.
Turn on the pump and adjust the water level of the skimmer to 2 inches above the skimmer box by
slowly closing the gate valve. Slowly being to open each air valve until you get a good bubble
density and size (1/4 – 1/3 open in most cases).
Allow a 24 hour break-in period at this level before adjusting the air valve. After this period the air
valve may be adjusted down to decrease bubble size.
Adjusting the Skimming Rate
Raising the water level of the skimmer or increasing the air flow will cause the skimmer to skim
wetter.
Lowering the water level or air flow will cause the skimmer to skim drier. A combination of the two
will allow for the desired skim rate.
Section C: Cleaning the Skimmer
If the reaction chambers have collected a dark film or sludge, it is time to clean the skimmer. The
skimmer will still function while it is dirty, though less efficiently.
Cleaning the Skimmer Body
Turn off the skimmer pump.
Loosen the nylon screws that connect the reaction chambers and remove the riser. It is not
necessary to remove the screws.
Loosen the nylon screw and remove the lid for the collection cup.
Using an acrylic safe pad wipe down the reaction chambers and collection cup and rinse with
clean water, removing all waste from the cylinders and cup.
Reassemble in the reverse order making sure the O-Rings are seated properly.
Cleaning the Injector and Beckett
The injector assembly can easily be disassembled for cleaning and maintenance. This should be done
at least once every 2 months or if there is a noticeable decline in bubble output.
Turn off and disconnect the skimmer pump from the top of the injector assembly.
Loosen the nylon thumb screws.
Turn the top of the injector to unlock the Beckett and lift to remove the injector top and Beckett.
Remove the two O-Rings found on the Beckett (these only serve to hold the Beckett together.
Open the Beckett housing and clean to remove any buildup.
Reassemble in the reverse order (see diagram below).
WWW.MRCAMERICA.COM
Indice
Manuali Filtro per piscina popolari di altre marche


Davey
Davey EcoPure DEP2140 Manuale utente

JUWEL Aquarium
JUWEL Aquarium EccoSkim Manuale utente

POLYGROUP LIMITED
POLYGROUP LIMITED SFS600 Filter System with F600C Pump Manuale utente

Pentair Pool Products
Pentair Pool Products Filter CFW Series Manuale utente

Oase
Oase Skimmer 250 Manuale utente

Oase
Oase CrystalSkim 350 Manuale utente