multicomp pro MP740055 Manuale utente

80W Soldering Iron Models: MP740055 and MP740061
150W Soldering Iron Models: MP740057 and MP740063
IMPORTANT SAFETY INFORMATION
Please read these instructions carefully before use and retain for future reference
• When using electrical appliances basic safety precautions should always be
followed.
• Check that the voltage indicated on the rating plate corresponds with that of the
local network before connecting the appliance to the mains power supply.
• This appliance is not intended for use by persons (including children) with reduced
physical, sensory or mental capabilities, or lack of experience and knowledge,
unless they have been given supervision or instruction concerning use of the
appliance by a person responsible for their safety.
• Children shall not play with the appliance. Cleaning and user maintenance shall
not be made by children unless they are older than 8 and supervised.
• Do not operate the appliance with a damaged plug or cord, after a malfunction or
after being dropped or damaged in any way.
• If the supply cord is damaged, it must be replaced by a qualied engineer in order
to avoid injury or a hazard.
• Ensure there is sufcient space and ventilation around the appliance to allow the
escape of heat and/or fumes.
• Do not expose to rain or moisture.
• Never place the product or part of it in water, or operate if your hands are wet.
• Soldering work must be conducted on a stable, non-combustible surface.
• Do not touch any metallic parts near the soldering tip.
• The iron must not be left unattended while it is connected to the supply mains.
• The soldering iron must be placed in it’s holder when not in use.
• Turn the soldering iron off and unplug it when it is not in use.
• This device must be earthed through the mains lead and plug.
1

PRODUCT OVERVIEW
WHAT’S INCLUDED
• Fast heating and precise temperature control.
• Ergonomic handle mounted two button temperature adjustment.
• Visual display for temperature setting.
• LED indicator for heating indication.
• Auto standby function MP740061 and MP740063 models only with digital readout.
• Connect to the mains supply and turn on the soldering iron by pressing the mode
button.
• Default temperature is set to 325oC and is shown on the display when initially
powered on but thereafter the last set temperature is stored and restored after
being powered off.
• The mode button LED ashes brightly when the heating element is on and ashes
less bright when the set temperature is reached.
• If switching to a lower setting the mode button LED goes off until the temperature
has dropped to the new setting.
Pre-set Temperature Adjustment
• Pressing + or - will increase or decrease the temperature in 9 initial pre-set steps:-
250oC/482oF; 300oC/ 572oF; 325oC/617oF; 350oC/662oF; 375oC/707oF; 400oC/752oF
425oF/ 797oF; 450oC/842oF; 480oC/896oF.
• The display shows the temperature set.
Quick Setting Mode
• Long press the mode button once in the normal working state to enter the quick
temperature setting mode.
• Press + or - buttons to increase or decrease the temperature in the range 250oC to
480oC.
• The display shows the temperature set.
Pre-set Temperature Setting
• In the quick temperature setting state, press the mode button to enter the pre-set
temperature setting. This allows custom pre-sets to be stored and used.
• Press + or - to adjust in 1 degree increments shown on the display.
• The adjustment range: ± 50oC / ± 90oF applicable to the last pre-set used.
• Soldering Iron and holder
• User manual
OPERATION MP740061 and MP740063 MODELS ONLY
Tip Nut
Barrel
Plus
Button
LCD
Display
Minus
Button
3 Core
Mains Lead
Mode
Button
Tip Handle
2

OPERATION MP740055 and MP740057 MODELS ONLY
TROUBLESHOOTING
• Connect to the mains supply and turn on the soldering iron by pressing the mode
button.
• Default temperature is 390oC as indicated by the LED when initially powered on but
thereafter the last set temperature is stored and restored after being powered off.
• The mode button LED ashes brightly when the heating element is on and ashes
less bright when the set temperature is reached.
• If switching to a lower setting the mode button LED goes off until the temperature
has dropped to the new setting.
Temperature Adjustment
• Pressing + or - in the normal state will increase or decrease the temperature.
• 350oC/662oF; 370oC/698oF; 390oC/734oF; 450oC/842oF; 480oC/896oF.
• The indicator LED lights for the setting chosen.
Shutdown
• Press the mode button in normal state to turn the iron off. Any LED indicating a set
temperature goes off.
Temperature Unit Switching
• In the temperature compensation state, press the mode button to enter Centigrade
or Fahrenheit setting mode.
• Pressing + or - switches between units displayed.
Sleep and Power Off Setting
• In the temperature unit switching state, press the mode button to enter sleep setting
mode.
• Pressing + or - switches sleep mode on or off. 1 indicates mode is on, 0 is off.
• After 10 mins inactivity the display shows SLP and the tip maintains 250oC then
after a further 20 mins the iron powers off.
Shutdown
• Press the mode button in normal state to turn the iron off. OFF is displayed.
• If all 5 temperature indicating LEDs are ashing or if H-E is displayed on the
screen and there is no heating, the heating element may have failed.
• If all 5 temperature indicating LEDs are lit solidly or when S-E is displayed on the
screen, there is a fault in the temperature sensor.
3 Core
Mains Lead
Temperature
Setting LED
Tip Nut
Barrel
Minus
Button
Plus
Button
Mode
Button
Tip Handle
3
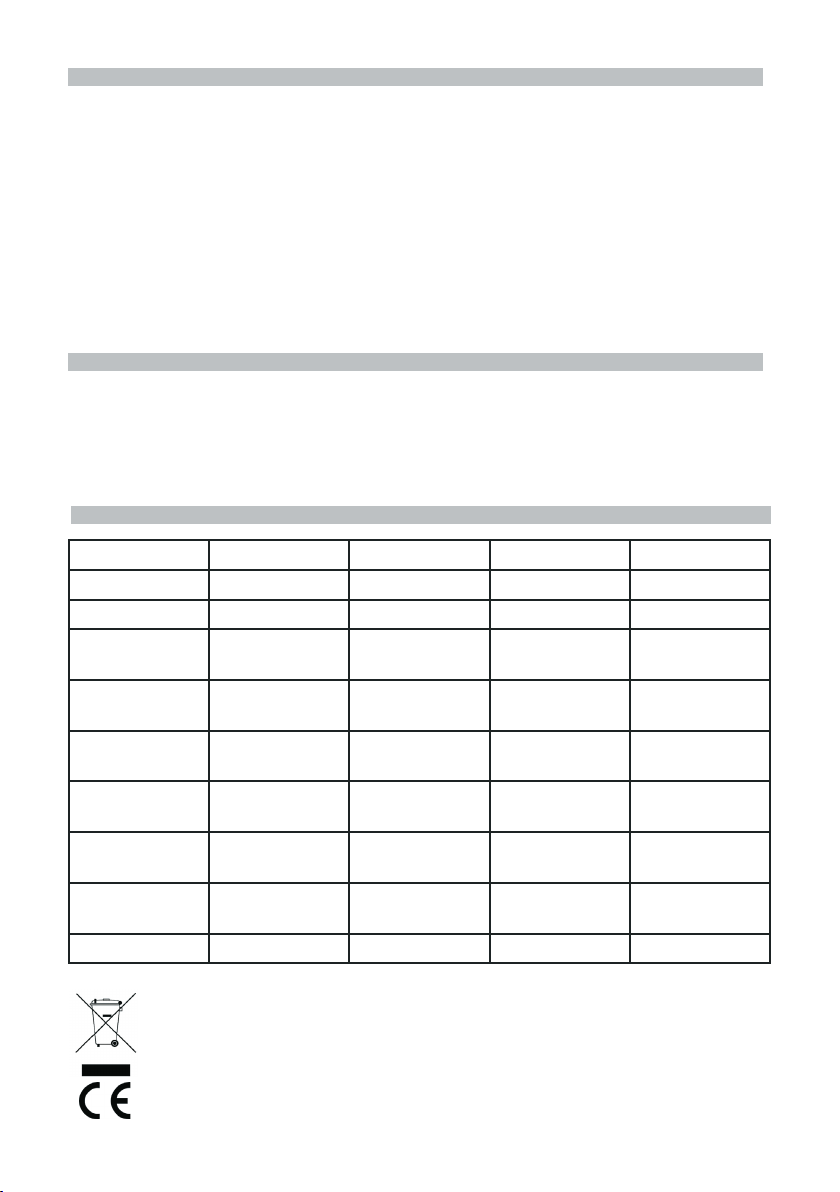
SPECIFICATION
INFORMATION ON WASTE DISPOSAL FOR CONSUMERS OF
ELECTRICAL & ELECTRONIC EQUIPMENT.
When this product has reached the end of its life it must be treated as Waste Electrical & Electronic
Equipment (WEEE). Any WEEE marked products must not be mixed with general household waste,
but kept separate for the treatment, recovery and recycling of the materials used. Contact your local
authority for details of recycling schemes in your area. Made in China. LS12 2QQ
Man Rev 1.0
SOLDERING IRON TIP REPLACEMENT
• Replacing the soldering iron tip should only be done when the iron is switched off
and at room temperature.
• The tip can be changed or replaced by unscrewing the knurled nut barrel.
Caution: Damage could occur if the iron is left on without the tip inserted.
• After removing the tip, blow out any remaining oxide dust that may have formed in
the tip retaining area of the barrel.
Warning: Care should be taken to avoid getting dust in your eyes.
• Replace the tip and tighten the knurled nut barrel assembly with your ngers.
• Pliers should only be used to tighten the nut if loosening occurs when the iron is
hot.
• Do not over tighten the nut as the element could be damaged.
CLEANING
• Cleaning should only be done when the power is switched off and the iron is at
room temperature.
• Use a damp cloth and a small amount of liquid detergent if necessary.
• Do not use any chemicals, abrasives or solvents that could damage the soldering
iron.
Part Number MP740055 MP740057 MP740061 MP740063
Voltage 110/24 0VAC 110/240VAC 110/24 0VAC 110/240VAC
Power 80W 150W 80W 150W
Temperature
Range
5 Preset
Adjustments
5 Preset
Adjustments 250oC~480oC250oC~480oC
Temperature
Accuracy ±10oC±10oC±10oC±10oC
Temperature
Stability ±2oC±2oC±2oC±2oC
Heating
Element
4 core
PTC heater
4 core
PTC heater
4 core
PTC heater
4 core
PTC heater
Heat
Indication Blue LED Blue LED Blue LED Blue LED
Temperature
Units
oCoCoC/oFoC/oF
Indication LED LED LCD LCD
4
Questo manuale è adatto per i seguenti modelli
3
Indice
Altri manuali multicomp pro Utensili elettrici

multicomp pro
multicomp pro MP740971 Manuale utente

multicomp pro
multicomp pro MP740074 Manuale utente

multicomp pro
multicomp pro MP740070 Manuale utente

multicomp pro
multicomp pro MP740408 Manuale utente

multicomp pro
multicomp pro MP740414 Manuale utente

multicomp pro
multicomp pro MP740054 Manuale utente

multicomp pro
multicomp pro MP740867 UK Manuale utente


