Nasaco Hasselblad 500 EL/M Manuale utente


This Astronaut’s Photography Manual has been
prepared by Hasselblad in close cooperation with
the Training and Man-Machine Divisions at the
Johnson Space Center of the National Aeronau-
tics and Space Administration. As a guidebook
for the NASA Photography Training Program, it
not only describes the operation of the Hassel-
blad 500 EL/M cameras used on the U. S. Space
Shuttle but is also a concise manual on photog-
raphy to assist astronauts in creating the best
possible space photographs.
Hasselblad cameras have performed with preci-
sion on every manned space ight since 1962
and undoubtedly future missions will continue to
yield those awe-inspiring and beautiful images
from space - a priceless pictorial legacy for future
generations.
A Hasselblad lunar data surface camera was mounted into the Shuttle
Pallet Satellite and operated remotely by the astronauts by means of a
radio signal to record images of the Challenger in ight.
Foreword

1
Sunlight coming through the windows can make beautiful "available
light" shots. The slide is perfectly exposed for the most important part of
the scene - the astronauts facial esh tones.
Camera Controls ............................................................................................. 2
Film Magazine Controls................................................................................... 2
Viewnder Controls ......................................................................................... 3
The EL/M Power Supply.................................................................................. 4
Releasing the Camera..................................................................................... 4
Remote Operation ........................................................................................... 5
Camera Steadiness......................................................................................... 5
Operating Modes............................................................................................. 6
Film Magazines ........................................................................................... 6, 7
Film Magazine with Databack.......................................................................... 8
Permanently Attached Databack ..................................................................... 8
Databack with Removable Module.................................................................. 8
Changing Lenses............................................................................................. 9
Lenses........................................................................................................... 10
Lens Controls ...........................................................................................10, 11
Viewing .......................................................................................................... 12
Diopter Adjustment ........................................................................................ 12
Focusing........................................................................................................ 13
Focusing Suggestions ................................................................................... 14
Depth of Field .................................................................................... 14, 15, 16
Depth of Field at Different Apertures ............................................................. 15
Depth of Field with Different Lenses.............................................................. 16
Focusing for Depth of Field ..................................................................... 17, 18
Use of Lenses.................................................................................... 19, 20, 21
Lens Aperture ................................................................................................ 22
Shutter Speed................................................................................................ 23
Setting Aperture & Shutter Speed ................................................................. 23
Changing Aperture & Shutter Speed ............................................................. 24
Exposure ....................................................................................................... 24
Exposure from Charts.................................................................................... 24
The Exposure Meter...................................................................................... 25
ASA/ Shutter Speed Setting .......................................................................... 26
Viewnder on Meter....................................................................................... 26
Operating Meter....................................................................................... 26, 27
Determining Lens Settings with Exposure Meter...................................... 27,28
Exposing for Sun or Shade............................................................................ 29
Exposing for Slides........................................................................................ 29
Exposing for Negative Film............................................................................ 29
High Contrast Scenes.................................................................................... 29
Bracketing Exposure ..................................................................................... 29
Exposure Techniques .................................................................................... 30
Composition....................................................................................... 31, 32, 33
Obtaining the Most Effective Images................................................. 34, 35, 36
Table of Contents

2
Camera Controls:
1) Operate Push button
2) Mode Selector (taped)
3) Lens Cocking Tool (Under tape)
4) Remote Connector
5) Battery Compartment
6) Battery Compartment Lock
7) Lens Release Button
Film Magazine
Controls:
8) Magazine Release Button
9) Magazine Insert Lock (Taped)
10) Darkslide
11) Frame Counter
12a) End of Film Indicator
12b) Film Advance Indicator
Hasselblad 500 EL/M Camera
14 11 12a 312b 2 1 134

3
Viewnder Controls:
13) Prism Viewnder
14) Diopter Correction Eyepiece
15) Lock for Correction Eyepiece
16) Rubber Eyecup
75 8 10 6 9 15 16

4
The electric lm advance is powered by
two 6V rechargeable nickel cadmium
batteries located in the battery compart-
ment. Two fully charged batteries provide
power for approximately 2000 exposures
and changing the batteries should not be
necessary. A slowing down of the wind-
ing cycle, however, indicates low battery
voltage and that both batteries need to be
changed.
The battery compartment is opened by
turning the slotted compartment lock (6)
counter clockwise to the vertical position
using the lens cocking tool (3). Remove
the compartment cover (Fig. 1). Always
remove both batteries and insert one
spare battery in either compartment. Bat-
teries (A) are inserted with the (+) end rst
(Fig. 2). Properly inserted, the batteries
rest on a spring and can be pushed up
&down. When inserted the wrong way, the
cover cannot be closed easily and may
be permanently bent. Do not force. Check
position of batteries. Cover is re-attached
by placing the hooks at the front of the
cover into the openings (D) in the camera
then pressing the rear rmly towards the
compartment while turning the slotted lock
(6) clockwise to the horizontal (locked)
position.
NOTE: Camera operates only if a fuse in good
condition is in the fuse receptacle. The fuse (C)
can be replaced and inserted in (B) either way.
The image is recorded on the lm by
pressing the operate push button. The
shutter is re-cocked, and the lm ad-
vanced to the next frame, when removing
the nger from the button. A second expo-
sure can be made as soon as the winding
cycle is completed. If the camera does not
operate when the release is depressed:
1. Darkslide may be inserted in lm
magazine. Remove it.
2. There may be no lm left in magazine.
Check lm load signal (12a) if red,
change magazine.
3. The fuse is dead. Replace.
4. The batteries may have no charge left.
Replace.
The EL/M
Power Supply
Releasing the Camera
FIGURE 1 FIGURE 2 FIGURE 3

5
Camera can also be released with remote
cable, Remove socket cover (Fig. 3) by
turning it counter clockwise and attach
remote release cable to remote connector
4. The camera operation is determined by
the position of the mode selector (page 6)
one picture in position 0 - or sequences in
position A.
The camera must be perfectly steady
when the exposure is made. Camera mo-
tion while the lm is being exposed can
result in unsharp pictures. Reduce the
danger of camera movement by:
1. Holding camera rmly with both hands,
one hand on the bottom, the other on
top (Fig. 4&5). 2. Pressing both elbows
into your body for additional support.
3. Pressing rubber eyepiece of the view-
nder against your viewing eye to form
a rm contact between the forehead
and nder (Fig. 6).
4. Holding Breath.
5. Pressing the operate push button
slowly and gently so you are hardly
aware when the exposure is made
and keeping it depressed until the
exposure is completed. Don't jerk the
release or depress it rapidly.
NOTE: Perfect camera steadiness is important
with aIl lenses - but more so with the 250mm
Sonnar. The long focal length magnies camera
shake.
Remote Operation Camera Steadiness
FIGURE 4 FIGURE 5 FIGURE 6

6
1) The mode selector is set at 0 at launch
and taped over (Fig. 7). Do not remove
the tape and change the setting except
for automatic sequence operation.
2) For automatic sequence operation
(1 picture per second) remove tape,
change selector to A (Fig.8). When
the release is depressed, the camera
takes pictures at regular intervals of
1frame/second as long as the release
is kept depressed - and as long as
there is lm in the camera. When se-
quence is completed, change dial back
to 0 and re-tape.
To attach a lm magazine to the cam-
era body, hook the magazine onto the
two lower support catches (E) (Fig. 9),
swing the top of the magazine rmly and
completely against the upper catches (F)
and camera body while at the same time
sliding the magazine release button (8) to
the right (Fig. 10). After the magazine is
attached remove darkslide (Fig. 9a).
To remove a magazine, insert darkslide
(10) slide magazine release button (8) to
the right (Fig.11), lift off magazine (Fig.
12).
NOTES: a) Magazines cannot be attached or
removed unless darkslide is inserted. b) Never
remove the darkslide from a magazine that is
not attached to the camera. It would expose
some of the lm in the magazine.
OPERATlNG SIGNALS: (Fig. 13)
The lm magazine includes a frame coun-
ter (11) which counts up and indicates
number of frames exposed. Check once
in a while so you do not run out of lm in
the middle of an important picture taking
sequence. There are about 120 frames
on a roll of lm. There is also an end of
lm indicator (12a). It turns from white to
red when the roll of lm is nished and at
that moment the camera will stop operat-
ing. Film advance indicator (12b) goes
from white to red to white to show lm is
advancing properly.
Operating Modes Film Magazines
FIGURE 7
FIGURE 8

7
FIGURE 9
FIGURE 9a
FIGURE 10
FIGURE 12
FIGURE 11
FIGURE 13
8
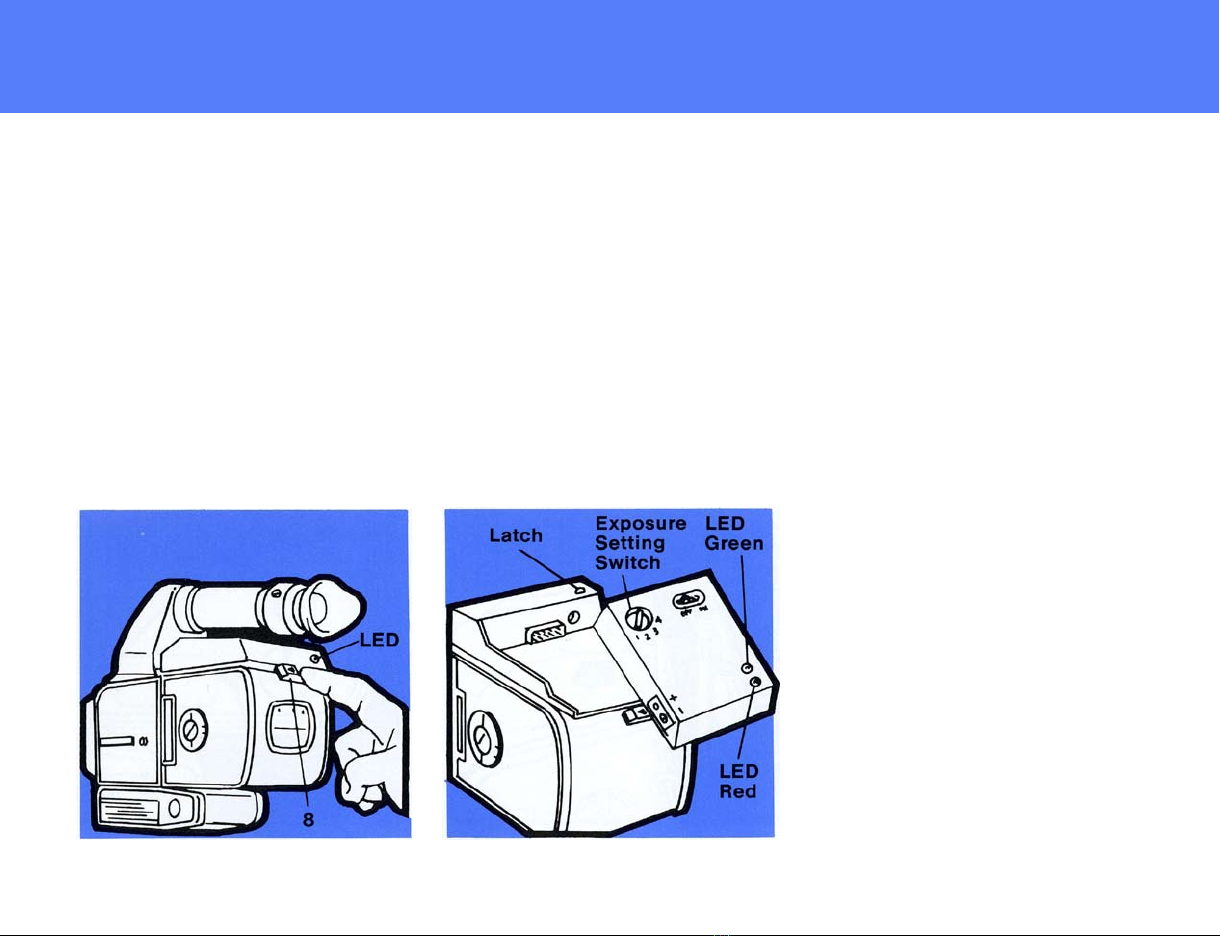
Some or all lm magazines used on your
mission may be equipped with a databack.
It may be permanently attached to the
magazine (Fig. 14) or have a removable
electronics module which can be switched
from one magazine to another (Fig. 15).
The lm magazine of either version is at-
tached to the camera body, as is the regu-
lar magazine 100/200 but the magazine
release button (8) is pushed towards the
left (not right). To remove a lm magazine,
push the magazine release button again
towards the left (Fig. 14).
Proper operation is indicated by a green
LED at rear. Check whether it goes on and
off after the exposure. This indicates that
the data recording has been successful.
The electronics module is removed by de-
pressing the latch and sliding the module
towards the rear. It can now be attached
to another magazine in the same fashion
by depressing the latch again (Fig. 15). It
is made operative with the On/Off Switch.
Make certain that the exposure setting
switch is set for the ASA rating of the lm
in that particular magazine.
Position 1 for ASA 25 - 100
Position 2 for ASA 100 - 400
Position 3 for ASA 400 - 1600
Position 4 for ASA 1600 - 6400
Instructions for the correct setting will be
supplied.
A green LED lights up momentarily at the
end of each shot to indicate a successful
data recording.
Malfunctioning or low battery power is
indicated by a red LED. The batteries,
however, have sufcient power for an
entire ight.
FIGURE 14 FIGURE 15
Film Magazines with
Databacks
Permanently Attached
Databack
Databack with
Removable Module
Indice


