
nedis SCBI9000BK Manuale utente

ned.is/scbi9000bk
Night Vision Monocular
5 × 32 mm
SCBI9000BK

aQuick start guide 4
cKurzanleitung 8
bGuide de démarrage rapide 14
dSnelstartgids 19
jGuida rapida all’avvio 24
hGuía de inicio rápido 29
iGuia de iniciação rápida 34
eSnabbstartsguide 39
gPika-aloitusopas 43
fHurtigguide 48
2Vejledning til hurtig start 53
kGyors beüzemelési útmutató 58
nPrzewodnik Szybki start 63
xΟδηγός γρήγορης εκκίνησης 68
1Rýchly návod 73
lRychlý návod 78
yGhid rapid de inițiere 83
1 2 3 54 6 7
wer t y u i
98 q
A
03727 SD
1 2
3 4
B
4
aQuick start guide
Night Vision Monocular SCBI9000BK
For more information see the extended manual online: ned.is/
scbi9000bk
Intended use
This product is a monocular intended for observing up to 150 meters in
completely dark conditions.
This product can also be used as a video recording device.
Any modication of the product may have consequences for safety, warranty
and proper functioning.
Specications
Product Night Vision Monocular
Article number SCBI9000BK
Dimensions (l x w x h) 190 x 83 x 56 mm
Weight 345 g
Input power 4.2 VDC
Batteries 3x 1.5 V AA (not included)
Optical zoom 5x
Digital zoom 3x
Operating time 6 hours
Objective lens diameter 32 mm
Eye relief 20 mm
Field of view 87/1000 mm
Spectrum range 450 – 1100 nm
Viewing distance in dim light 2.0 m
Viewing distance in total darkness 100 - 150 m
Minimum working illumination 0.001 Lux
IR illumination adjustment 9 levels

5
Focal length 57 mm
Video resolution 640 x 480 pixels
Photo resolution 0.3 MP
MicroSD card 4 - 32 GB (Class 10) (not included)
Connections Mini USB, 3.5 mm AV output
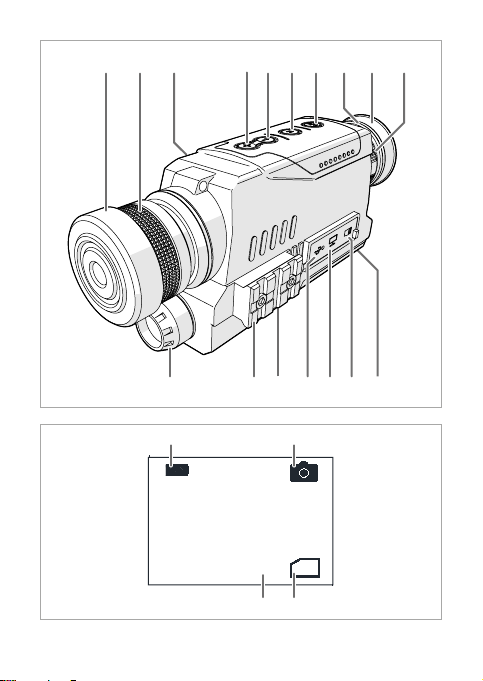
Main parts (image A)
1Objective lens cover
2Focus ring
3Hand strap
4Down button
5Up button
6Mode button
7Power button
8Diopter mark
9Ocular lens
qDiopter ring
wAuxiliary illuminator
ePicatinny rail
rTripod mount
tMini USB port
yVideo transmit port
uMicroSD card slot
iBattery cover
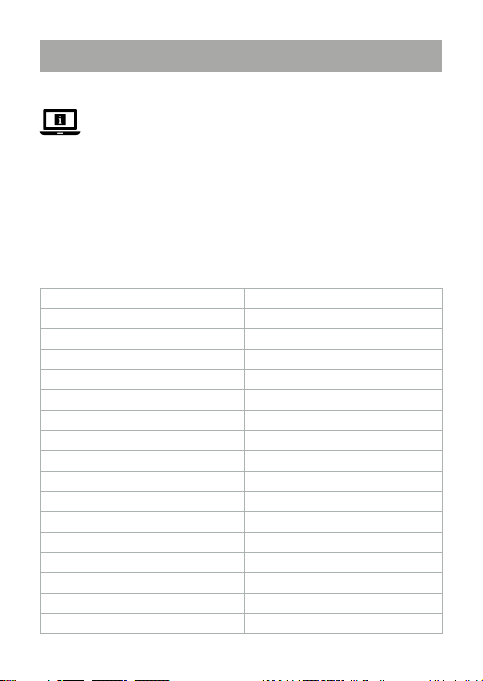
Symbols (image B)
1Battery level indicator
2Camera mode indicator
3Available storage for photos or
video
4MicroSD card indicator
Safety instructions
-
WARNING
• Ensure you have fully read and understood the instructions in this document
before you install or use the product. Keep the packaging and this document
for future reference.
• Only use the product as described in this document.
• Do not use the product if a part is damaged or defective. Replace a damaged
or defective product immediately.
• Do not drop the product and avoid bumping.
• Do not expose the product to water or moisture.
• This product may only be serviced by a qualied technician for maintenance
to reduce the risk of electric shock.
• Protect the product from excessive lighting. Do not use the product in
daylight. Do not point the product at a bright light source. This can cause
damage of your product.

6
• Only power the product with the voltage corresponding to the markings on
the product.
• Wipe the battery terminals with a clean dry cloth if they are dirty.
• Non-rechargeable batteries are not to be recharged.
• Do not short-circuit a battery.
• Children of less than 8 years should be kept away.
• Cleaning and user maintenance shall not be done by children without
supervision.
• Make sure to match the (+) and (-) polarity markings.
• Do not clean the inside of the product.
• For more detailed information about disposal of your old battery, check the
local rules and regulations for the correct disposal instructions.
Setting up the product
1. Remove the battery cover Ai.
2. Insert 3 type AA batteries (not included) into the battery compartment. Make
sure that the battery polarity (+/-) matches the polarity markings inside the
battery compartment.
3. If you want to save photos or videos, insert a 4-32 GB Class 10 microSD card
into the microSD card slot Au.
4. Place back Ai.
5. Press the power button A7.
Look through the ocular lens A9. The screen lights up.
4If the screen does not light up, check if the batteries are charged and have
been installed correctly.
Using the product
4Rain, fog, snow or smoke can negatively inuence the viewing distance and
image quality.
1. Remove the objective lens cover A1.
4Leave the lens cover A1on during daylight.
2. Press A7to switch on the product.
4The product starts up in observation mode.
3. Look through the ocular lens A9.
4. Rotate the diopter ring Aqto adjust the light sensitivity.
5. Rotate the focus ring A2to adjust the focus distance.
6. Press the up and down buttons A45 to adjust the digital zoom.
4In dark environments, the infrared lamp switches on automatically.

7
4The objective lens is equipped with an optic lter. Remove the optic lter in
low light conditions.
Making photos
4The product has no internal storage. Photos can only be saved on a microSD
card (not included).
1. Press A7when the product is in observation mode to take a photo.
Making videos
4The product has no internal storage. Videos can only be saved on a microSD
card (not included).
1. Press A6to enter video mode.
2. Press A7to start recording.
3. Press A7to stop and save the recording.
Viewing photos and videos
1. Double press A6to enter playback mode.
2. Press A4or A5to browse the stored les.
3. During video playback, press A7to start and pause playback.
Deleting photos and videos
1. Double press A6to enter playback mode.
2. Press and hold A6on the le you wish to delete.
3. Press A4or A5to select Yes .
4. Press A7to conrm.
Adjusting screen brightness
1. Press and hold A6to enter the settings.
2. Press A6to select the screen brightness setting.
3. Press A4or A5to adjust the screen brightness. Select level 1-9.
4. Press A6to conrm.
4The product returns to observation mode after 5 seconds of inactivity.
Infrared light settings
The product is equipped with an infrared lamp Awfor increased visibility
in dark environments. By default, Awautomatically switches on in dark
environments.You can also set Awto manual mode to manually switch it on
and o.

8
4If the infrared lamp is switched on, the brightness level is indicated on the
screen.
Using Awin manual mode:
1. Press and hold A6to enter the settings.
2. Press A6to select the infrared lamp brightness setting.
3. Press A4or A5to adjust the infrared lamp brightness.
4. Press A6to conrm.
4The product returns to observation mode after 5 seconds of inactivity.
Setting the time and date
1. Press and hold A6to enter the settings.
2. Press A6to select the time setting.
3. Press A4or A5to change the value between the arrows.
4. Press A7to select the next value.
5. After setting all numbers, press A7to conrm.
Connecting the product to an external monitor
1. Plug a cable into the video transmit port Ay.
2. Plug the other end of the cable into an external monitor.
Switching o the product
Press and hold A7for 3 seconds to switch o the product.
4When the product is not in video recording or playback mode, the product
switches o automatically after 3 minutes of inactivity.
cKurzanleitung
Nachtsicht-Monokular SCBI9000BK
Weitere Informationen nden Sie in der erweiterten Anleitung online:
ned.is/scbi9000bk
Bestimmungsgemäße Verwendung
Dieses Produkt ist ein Monokular, das für die Beobachtung von bis zu 150 Metern
bei völliger Dunkelheit bestimmt ist.
Dieses Produkt kann auch als Videoaufnahmegerät verwendet werden.

9
Jegliche Modikation des Produkts kann Folgen für die Sicherheit, Garantie und
ordnungsgemäße Funktionalität haben.
Spezikationen
Produkt Nachtsicht-Monokular
Artikelnummer SCBI9000BK
Größe (L x B x H) 190 x 83 x 56 mm
Gewicht 345 g
Eingangsleistung 4,2 VDC
Batterien 3x 1,5 V AA (nicht im Lieferumfang
enthalten)
Optischer Zoom 5x
Digitaler Zoom 3x
Betriebszeit 6 Stunden
Objektivlinsendurchmesser 32 mm
Augenabstand 20 mm
Sichtfeld 87/1000 mm
Spektralbereich 450 – 1100 nm
Betrachtungsabstand bei
schwachem Licht
2,0 m
Betrachtungsabstand bei völliger
Dunkelheit
100 - 150 m
Minimale Arbeitsbeleuchtung 0,001 Lux
IR-Beleuchtungseinstellung 9 Stufen
Brennweite 57 mm
Videoauösung 640 x 480 Pixel
Fotoauösung 0.3 MP
microSD-Karte 4 32 GB (Klasse 10) (nicht im
Lieferumfang enthalten)
Anschlüsse Mini-USB, 3,5 mm AV-Ausgang

10
Hauptbestandteile (Abbildung A)
1Objektivdeckel
2Fokusring
3Handschlaufe
4Runter-Taste
5Hoch-Taste
6Modus-Taste
7Ein/Aus-Taste
8Dioptrienmarkierung
9Okular
qDioptrienring
wZusatzbeleuchtung
ePicatinny-Schiene
rStativanschluss
tMini-USB-Anschluss
yVideoübertragungsanschluss
uEinschub für Micro-SD-Karte
iBatterieabdeckung
Symbole (Abbildung B)
1Batteriestandsanzeige
2Kameramodus-Anzeige
3Speicherplatz für Fotos oder
Videos verfügbar
4MicroSD-Kartenanzeige
Sicherheitshinweise
-
WARNUNG
• Vergewissern Sie sich, dass Sie die Anweisungen in diesem Dokument
vollständig gelesen und verstanden haben, bevor Sie das Produkt installieren
oder verwenden. Heben Sie die Verpackung und dieses Dokument zum
späteren Nachschlagen auf.
• Verwenden Sie das Produkt nur wie in diesem Dokument beschrieben.
• Verwenden Sie das Produkt nicht, wenn ein Teil beschädigt ist oder es einen
Mangel aufweist. Ersetzen Sie ein beschädigtes oder defektes Produkt
unverzüglich.
• Lassen Sie das Produkt nicht herunterfallen und vermeiden Sie Kollisionen.
• Setzen Sie das Produkt keinem Wasser oder Feuchtigkeit aus.
• Dieses Produkt darf nur von einem ausgebildeten Techniker gewartet
werden, um die Gefahr eines Stromschlags zu reduzieren.
• Schützen Sie das Produkt vor übermäßiger Lichteinstrahlung. Verwenden Sie
das Produkt nicht bei Tageslicht. Richten Sie das Produkt nicht auf eine helle
Lichtquelle. Dies kann zu Schäden am Produkt führen.
• Betreiben Sie das Produkt nur mit der auf der Kennzeichnung auf dem
Produkt angegebenen Spannung.
• Wischen Sie die Batterieanschlüsse mit einem sauberen, trockenen Tuch ab,
wenn sie verschmutzt sind.
Indice


