Norcent DC-420 Manuale utente

Digital Camera >>
30-E
Recording Voice Memos
A voice memo can be recorded once for 30 seconds at still image mode
immediately following a still image captured or at playback mode while viewing
the picture.
1. Slide the mode switch to [ ] .
2. Press the MENU button, and select the
[Function] menu with the button.
[Function] of the still image menu is
displayed.
3. Select [VOICE MEMO] with the /
buttons, and press the SET button.
4. Select [ON] with the / buttons, and
press the SET button.
5. Press the MENU button to exit from the still image menu.
[ ] icon is displayed on the screen.
6. Compose the picture, press the shutter button down halfway, then press it
down fully.
[VOICE RECORDING] is displayed on the screen immediately, and the
voice memo recording starts.
7. Press the shutter button one more time during recording, or wait for 30
seconds
[VOICE RECORD END] will be displayed and the recording will end.
A [ ] icon is displayed with images that have been recorded with a
voice memo.
Adjust

User’s Manual >>
E-31
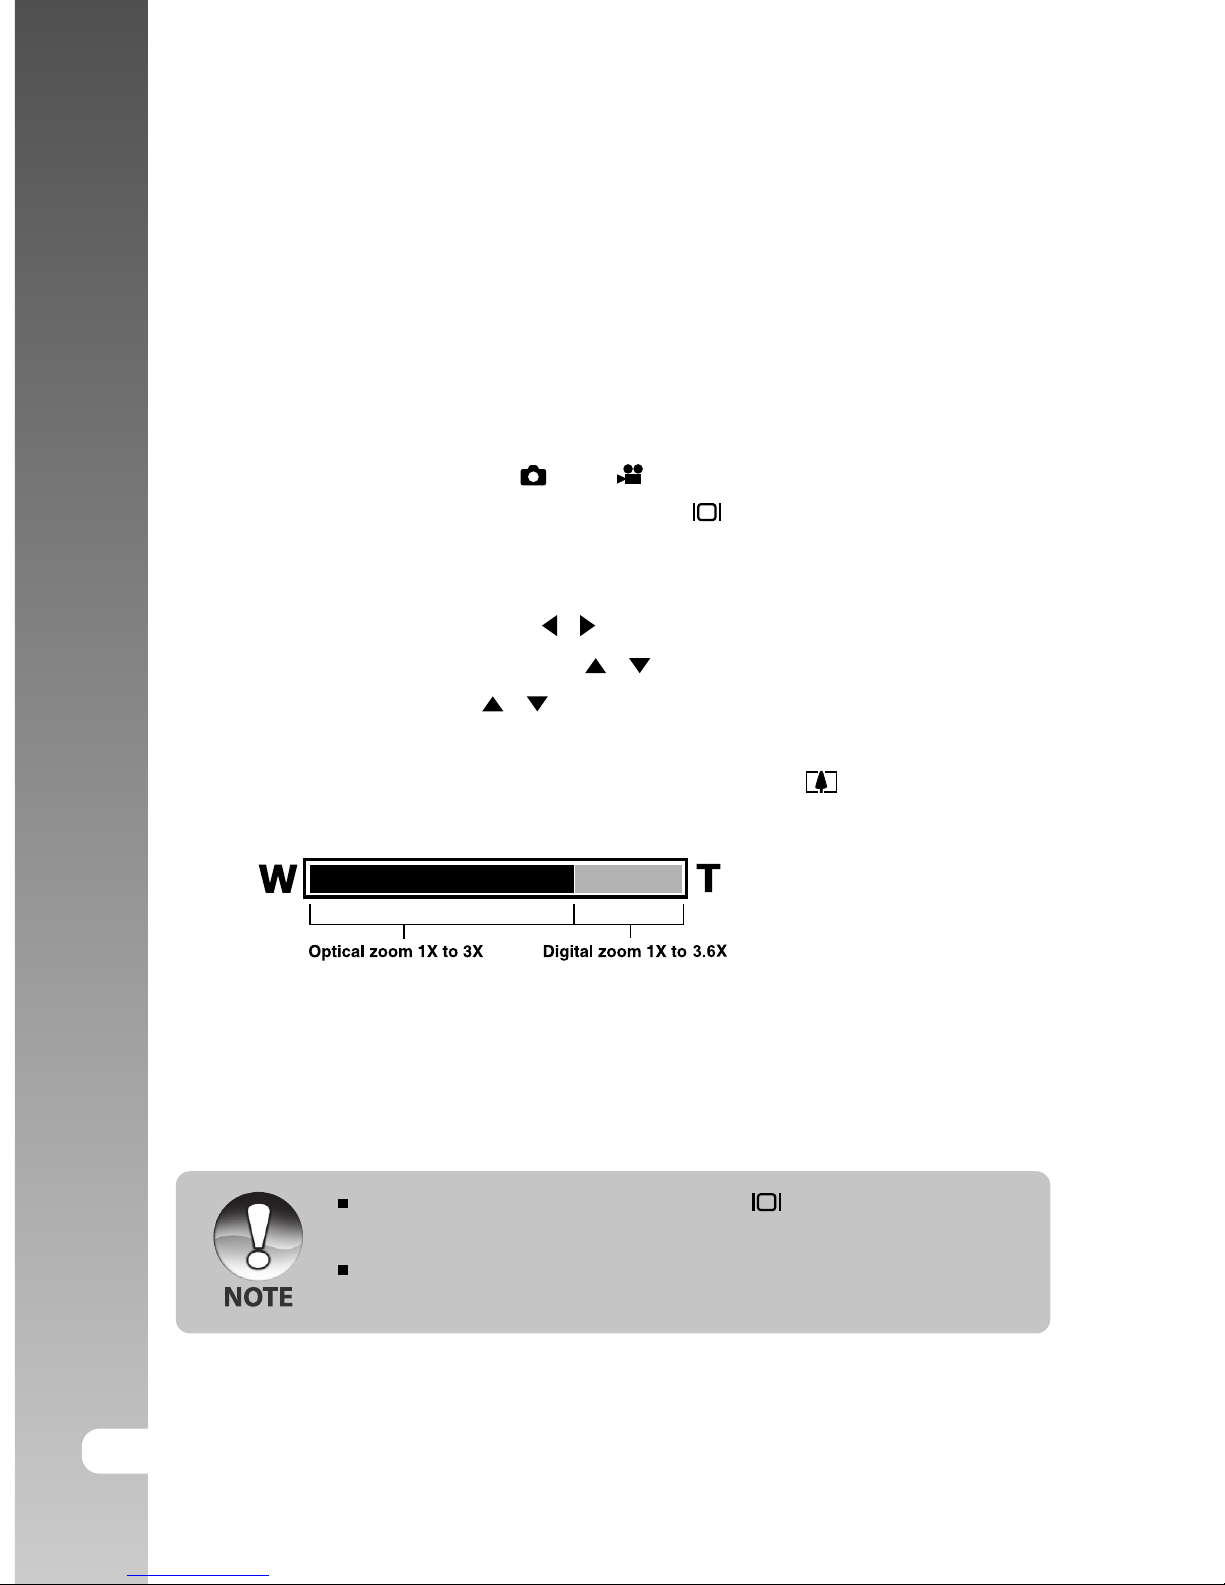
Using the Optical Zoom
Zoom photography allows you to take zoom photographs up to 3 times the size
or wide-angle photography depending on the distance up to the subject. You
can also enlarge the center of the screen and take photographs in the digital
zoom mode.
1. Slide the mode switch to [ ] or [ ] .
2. If required, turn on the LCD monitor by
pressing the button.
3. Compose the picture with the zoom button.
Pressing the button zooms in on the
subject, and enlarges the subject on the
LCD monitor.
Pressing the button provides a wider
angle picture.
The lens position moves according to the
zoom button setting.
4. Press the shutter button down halfway,
then press it down fully.
Digital Camera >>
32-E
Using the Digital Zoom
Using a combination of 3 times optical zoom and 3.6 times digital zoom permits
zoom photography of up to 10.8 times to suit the subject and the distance. The
digital zoom is a compelling feature, the more an image is enlarged (zoomed),
the more pixilated (grainer) the image will appear.
1. Slide the mode switch to [ ] or [ ].
2. Turn on the LCD monitor by pressing the button.
3. To enable the digital zoom:
a. Press the MENU button.
b. Select [Function] with the / buttons.
c. Select [Digital Zoom] with the / buttons, and press the SET button.
d. Select [ON] with the / buttons again, and press the SET button.
e. Press the MENU button to exit from the menu screen
f. To activate the digital zoom, press and hold the button completely
until the image on the LCD monitor expands.
4. Press the shutter button to capture a “zoomed” image.
The digital zoom is cancelled when the button is pressed and the
LCD monitor is turned off.
The zoom setting is automatically cancelled by either turning the camera
off or the activation of the Auto OFF function.

User’s Manual >>
E-33
Setting the Flash
Set the flash for taking photographs. The flash firing mode can be set to suit for
the photographic conditions.
1. Slide the mode switch to [ ].
2. Toggle the button to select the
desired flash mode.
Each press of the button moves
the icon one step through the sequence
and displays it on the screen.
[ Blank ] Auto [ ] Red-eye Reduction [ ] Forced Flash
[ ] Night Scene [ ] Suppressed Flash

Digital Camera >>
34-E
The table below will help you choose the appropriate flash mode:
Flash mode Description
[ Blank] Auto The flash fires automatically to suit the
photographic conditions.
[ ] Red-eye Reduction Use this mode to reduce the red-eye
phenomenon when you want to take natural-
looking photographs of people and animals in
low-light conditions.
When taking photographs, the red-eye
phenomenon can be reduced by asking the
subject (person) to look at the camera or get
as close to the camera as possible.
The flash always fires twice, and the
photograph is taken at the second firing.
[ ] Forced Flash In this mode, the flash always fires. Use this
mode for photographing under artificial light
such as backlighting, fluorescent lighting, etc.
[ ] Suppressed Flash Use this mode when taking pictures using
indoor lighting, for stages and indoor
competitions, and when the subject is too far
away for the flash to be effective.
[ ] Night Scene Use this mode when taking pictures of people
at dark or night-time background.
When the Night Scene is selected, the flash
mode is fixed to Slow Synchronization. (the
flash is fired at a slower shutter speed.)
In the [ ] focus mode and capture mode [Continuous] and [Auto
Exp.], the flash mode is fixed to [ ] Suppressed Flash.
The flash cannot be set in the [ ] mode.

User’s Manual >>
E-35
Setting the Focus
Photographs can be taken with the distance to the subject set by auto focus,
[ ] macro or [ ] infinity.
The settings will be maintained even when the power is turned off or when Auto
OFF is activated.
1. Slide the mode switch to [ ] or [ ].
2. Toggle the button to select the
desired focus mode.
Each press of the button moves
the icon one step through the sequence
and displays it on the screen.
The table below will help you choose the appropriate focus mode:
Focus mode Description
[ Blank]Auto Focus Selects this when you want to leave the settings up to
the camera so that you can take photographs without
paying attention to settings.
Approximately 50 cm to infinity (both Wide and Tele)
[ ] Macro Selects this when you want to takes a close up photography.
Wide (zoom off) : Approximately 6 cm to infinity
Tele (at optical zoom 3x) : Approximately 35 cm to infinity
[ ] Infinity Selects this when you want to take photographs of
subjects at a distance of infinity.
[Blank] Auto focus [ ] Macro [ ] Infinity

Digital Camera >>
36-E
Setting the Self-timer
This setting allows photographs to be taken with the self-timer.
1. Slide the mode switch to [ ] or [ ].
2. Toggle the button to select the setting.
Each press of the button moves the
icon one step through the sequence and
displays it on the screen.
OFF [ 10s] 10 sec. [ 2s ] 2 sec.
[ 10+2s ] 10+2 sec.
For the [ ] mode and capture mode
([Continuous] and [Auto Exp.])
OFF [ 10s ] 10 sec. [ 2s ] 2 sec.
3. Compose the picture, press the shutter button down halfway, then press it
down fully.
The self-timer LED flashes and the photograph is taken after the preset
time has elapsed.
The countdown is displayed on the LCD monitor.
To cancel the self-timer during operation, press the SET button.
The table below will help you choose the appropriate self-timer mode:
Self-timer mode Description
[ 10s] 10 sec. The picture is taken about 10 seconds after the shutter
button is pressed.
[ 2s] 2 sec. The picture is taken about 2 seconds after the shutter
button is pressed.
[ 10+2s]10+2 sec. One picture is taken about 10 seconds after the shutter
button is pressed, and the other photograph is taken
again after 2 seconds. This is convenient when taking
group photographs in succession.
The self-timer setting is automatically cancelled after a photograph is
taken.

User’s Manual >>
E-37
Exposure Compensation/Backlight Correction
Photographs can be taken with the overall screen intentionally made brighter
or darker. These settings are used when a suitable brightness (exposure) cannot
otherwise be obtained in circumstance where the difference in brightness
between the subject and the background (the contrast) is large, or when the
subject that you want to photograph is very small within the screen. Exposure
can be set in 0.3 EV units.
1. Slide the mode switch to [ ] and press
the button.
Each press of the button displays
the setting in the order of [Blank], [ ]
Backlight Correction, and [ ] Exposure
Compensation.
2. Set the exposure value with the /
buttons.
Press the button to increase the value.
Press the button to decrease the value.
The setting range of the exposure
compensation is as follows.
-2.0, -1.7, -1.3, -1.0, -0.7, -0.3, 0, +0.3,
+0.7, +1.0, +1.3, +1.7, +2.0
The larger the value, the brighter the
image. The smaller the value, the darker
the image. The set value is displayed
on the screen.

Digital Camera >>
38-E
Effective Subjects and Set Values
+ (positive) compensation
* Printed matter comprising black text on whitish paper
* Backlighting
* Bright scenes or strong reflected light such as ski slopes
* When the sky accounts for a large area on the screen
- (negative) compensation
* People illuminated by a spotlight, in particular, against dark background
* Printed matter comprising white text on blackish paper
* Weak reflecting bodies such as evergreen trees or darkish leaves
Backlight correction (+1.3, fixed)
* When the background is bright and the subject is dark.
* When subjects (people) have a light source such as the sun to their backs.

User’s Manual >>
E-39
[ ] Movie Mode
This mode allows you to record video clips at a resolution of 320 x 240 pixels.
Voice can also be recorded.
1. Slide the mode switch to [ ].
2. Compose the picture with the zoom button.
Optical zoom and digital zoom can be set while composing.
3. Fully pressed the shutter button.
The recording of the video clip will start.
Pressing the shutter button one more time will end the recording of the
video clip, and record the image into the SD card.
The recording time depends on the storage size and the subject of the
image to be recorded.
In the [ ] mode, the LCD monitor cannot be turned off.
When recording a video clip, flash photography is not possible.
While the image is being recorded into the SD card, do not open the
battery/SD card cover, nor remove the battery or SD card. Doing so
might damage the SD card or destroy the data of the SD card.
Altri manuali per DC-420
2
Indice
Altri manuali Norcent Macchina fotografica digitale


