Numatic TTB 1840G Manuale utente
Warning! Read instructions before using the machine
Owner Instructions
TTB 1840G
SCRUBBER DRYER
www.numatic.co.uk
Machine Overview ................................ Pages 2
Control Panel Overview ................................ Page 3
Quick Set up Guide ................................ Page 4
Machine Set up Guide ................................ Page 5
Fitting the Brush / Pad ................................ Page 5
Fitting the Floor Tool ................................ Page 5
Filling the Clean Water Tank .......................... Page 6
Fill Level Indicator .............................. Page 6
Water Flow Adjustment ................................ Page 6
Setting the Cleaning Controls .................... Page 7
Raising/Lowering Floor Tool ............................ Page 8
Emptying Top/Bottom Tanks ........................... Page 8
Machine in Use ................................ Page 8
Regular Maintenance ................................ Page 9
Changing Floor tool Blades............................. Page 10
Removing Battery ................................ Page 11
Removing Battery Fuse ................................ Page 11
Battery Charging ................................ Page 11
Specications ................................ Page 12
Trouble Shooting ................................ Page 12
Rating Label / Personal Protective Equipment /
Recycling ................................ Page 13
Safety Precautions ................................ Page 14-15
Recommended Spare Parts .......................... Page 16
Schematic Diagram ................................ Page 16
EU Declaration Document ............................. Page 17
Warranty ................................ Page 18
Company Address ................................ Page 19
SCRUBBER DRYER
Index
After the removal of all the packaging,
carefully open and check the contents
● Owner Manual
● Battery Charger & Lead
● Battery Pack ● Scrub Brush
● Squeegee Assembly
PLEASE READ
BEFORE COMMENCING
OPERATION
1Operator control panel ( see page 3 )
2Triggers
3Waste-water tank
4Clean-water tank
5Brush deck
6Squeegee blades
7Floor-tool retaining knobs
8Clean-water On / Off tap
9Clean-water emptying cap
10 Floor-tool vacuum hose
11 Vacuum hose
12 Separator
13 Clean-water ller cap
14 Clean-water level indicator
15 Clean-water tank ll point
16 On / Off switch
17 Battery connector
18 Top tank (waste water) drainage hose
19 Battery
TTB 1840G
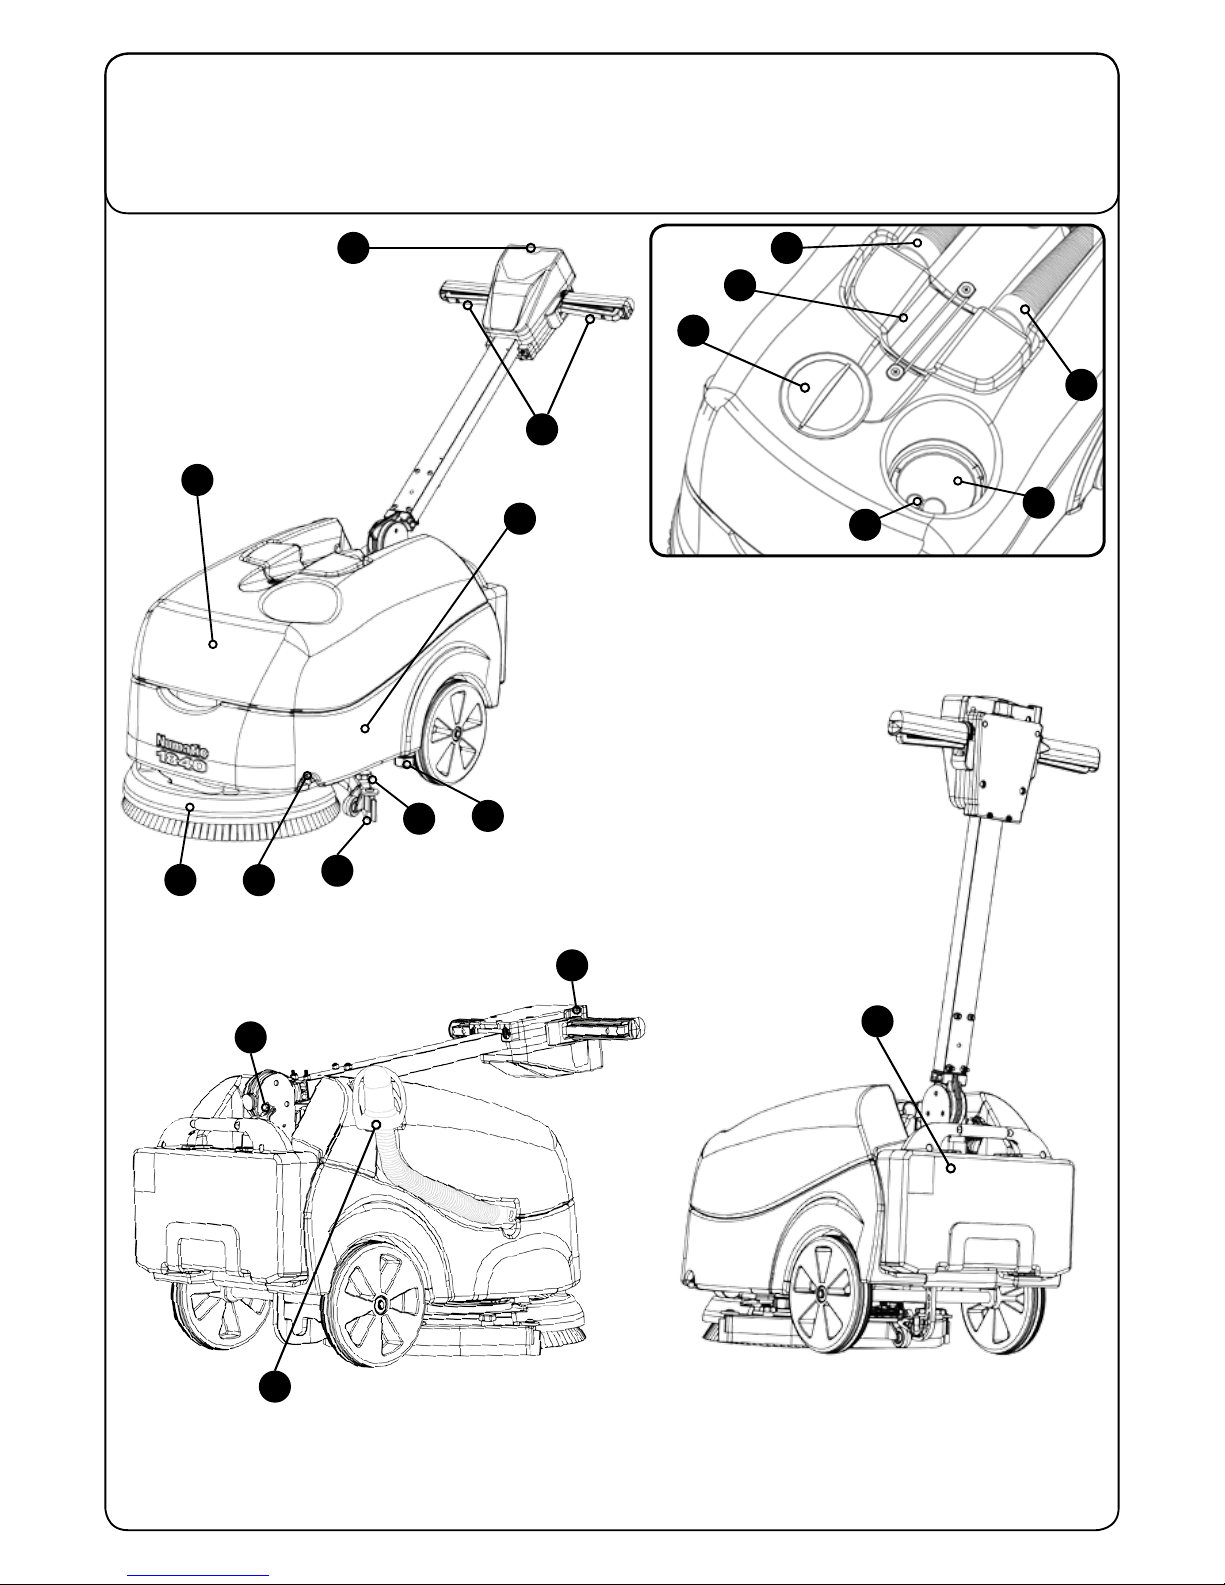
Machine Overview
1
6
4
2
3
9
8
7
5
13
14
15
16
12
17
19
18
11
10
SCRUBBER DRYER
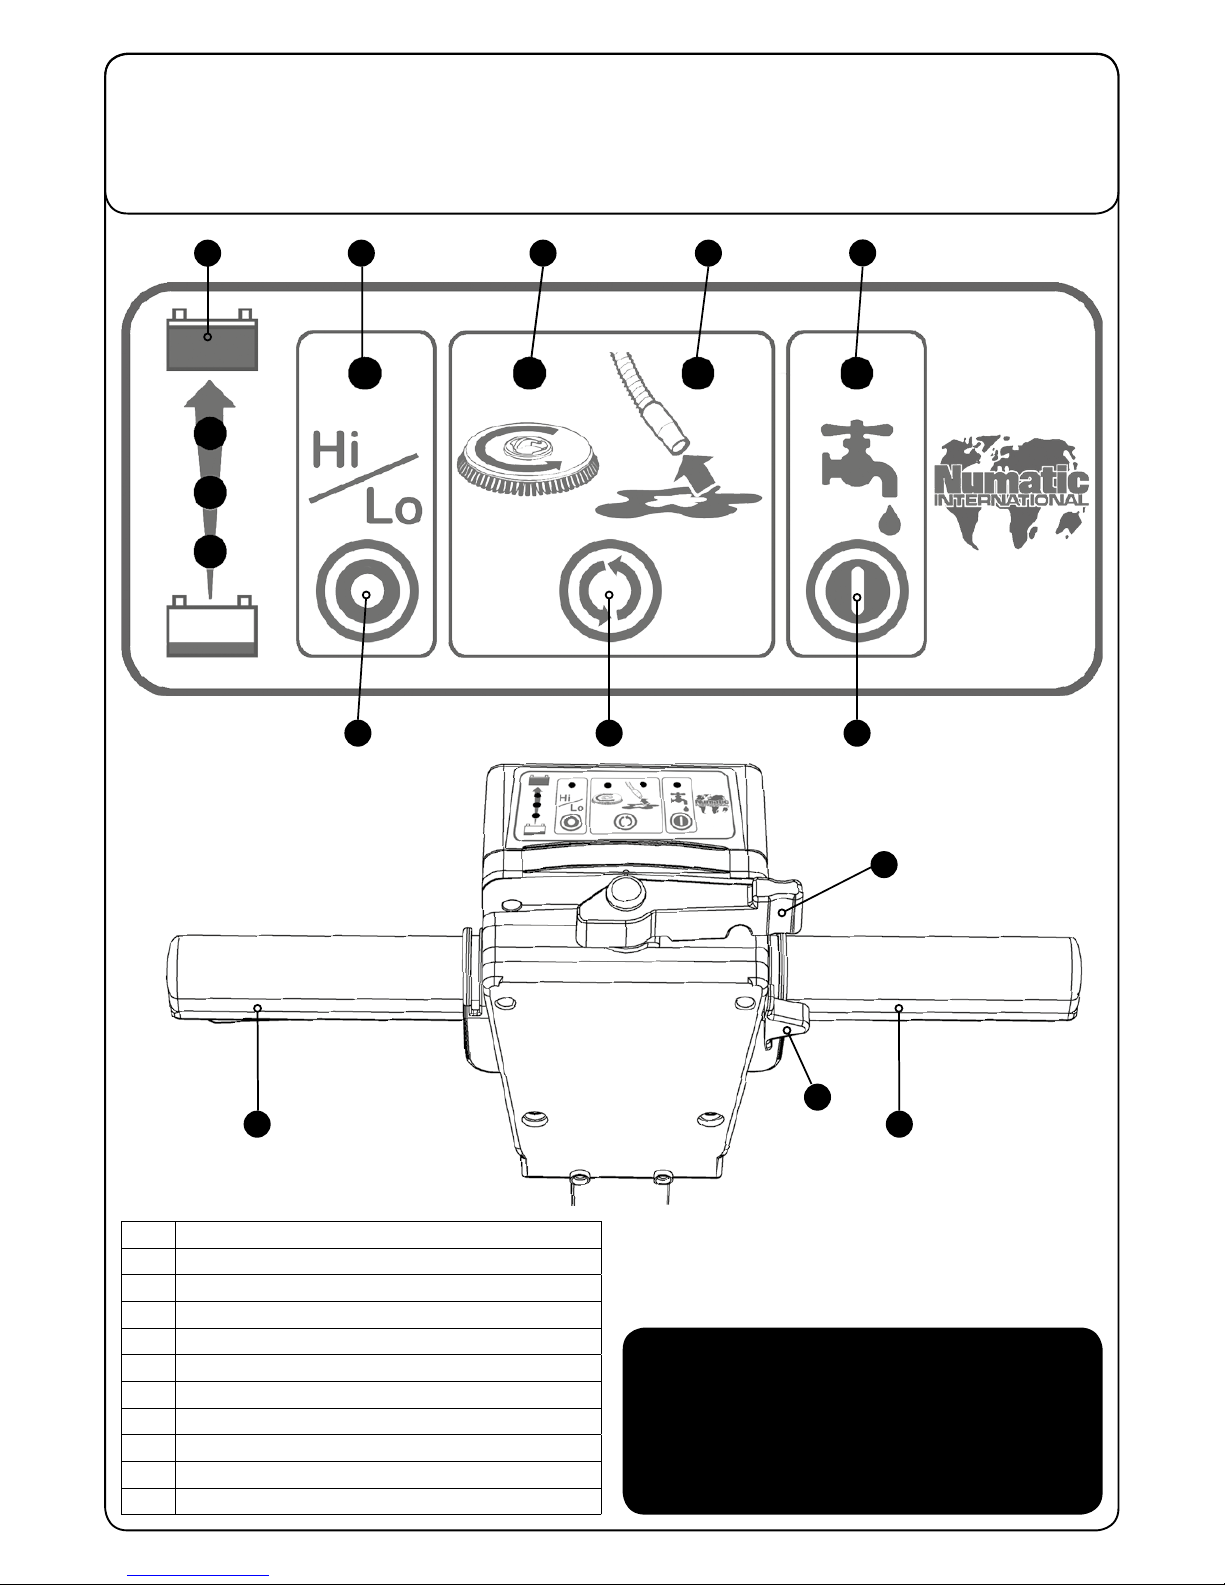
1Battery Charge Level Meter
2Hi / Lo Indicator
3Brush Operation / Load Indicator
4Vacuum Indicator
5Water Flow Indicator
6Hi / Lo Button
7Mode Select Button
8Water Flow On / Off Button
9Handle Position Lever
10 Start Switch
11 Triggers
Control Panel Overview
In the event of a breakdown contact
your Numatic dealer or the
Numatic Technical
help line +44 (0)1460 269268
1
5
2
3
6
11
11
9
10
8
7
4
TTB 1840G
4
T 01460 68600
Quick Set-up Guide
TTB1840G CONTENTS
● Owner Manual
● Battery Charger & Lead
● Battery Pack ● Scrub Brush
● Squeegee Assembly
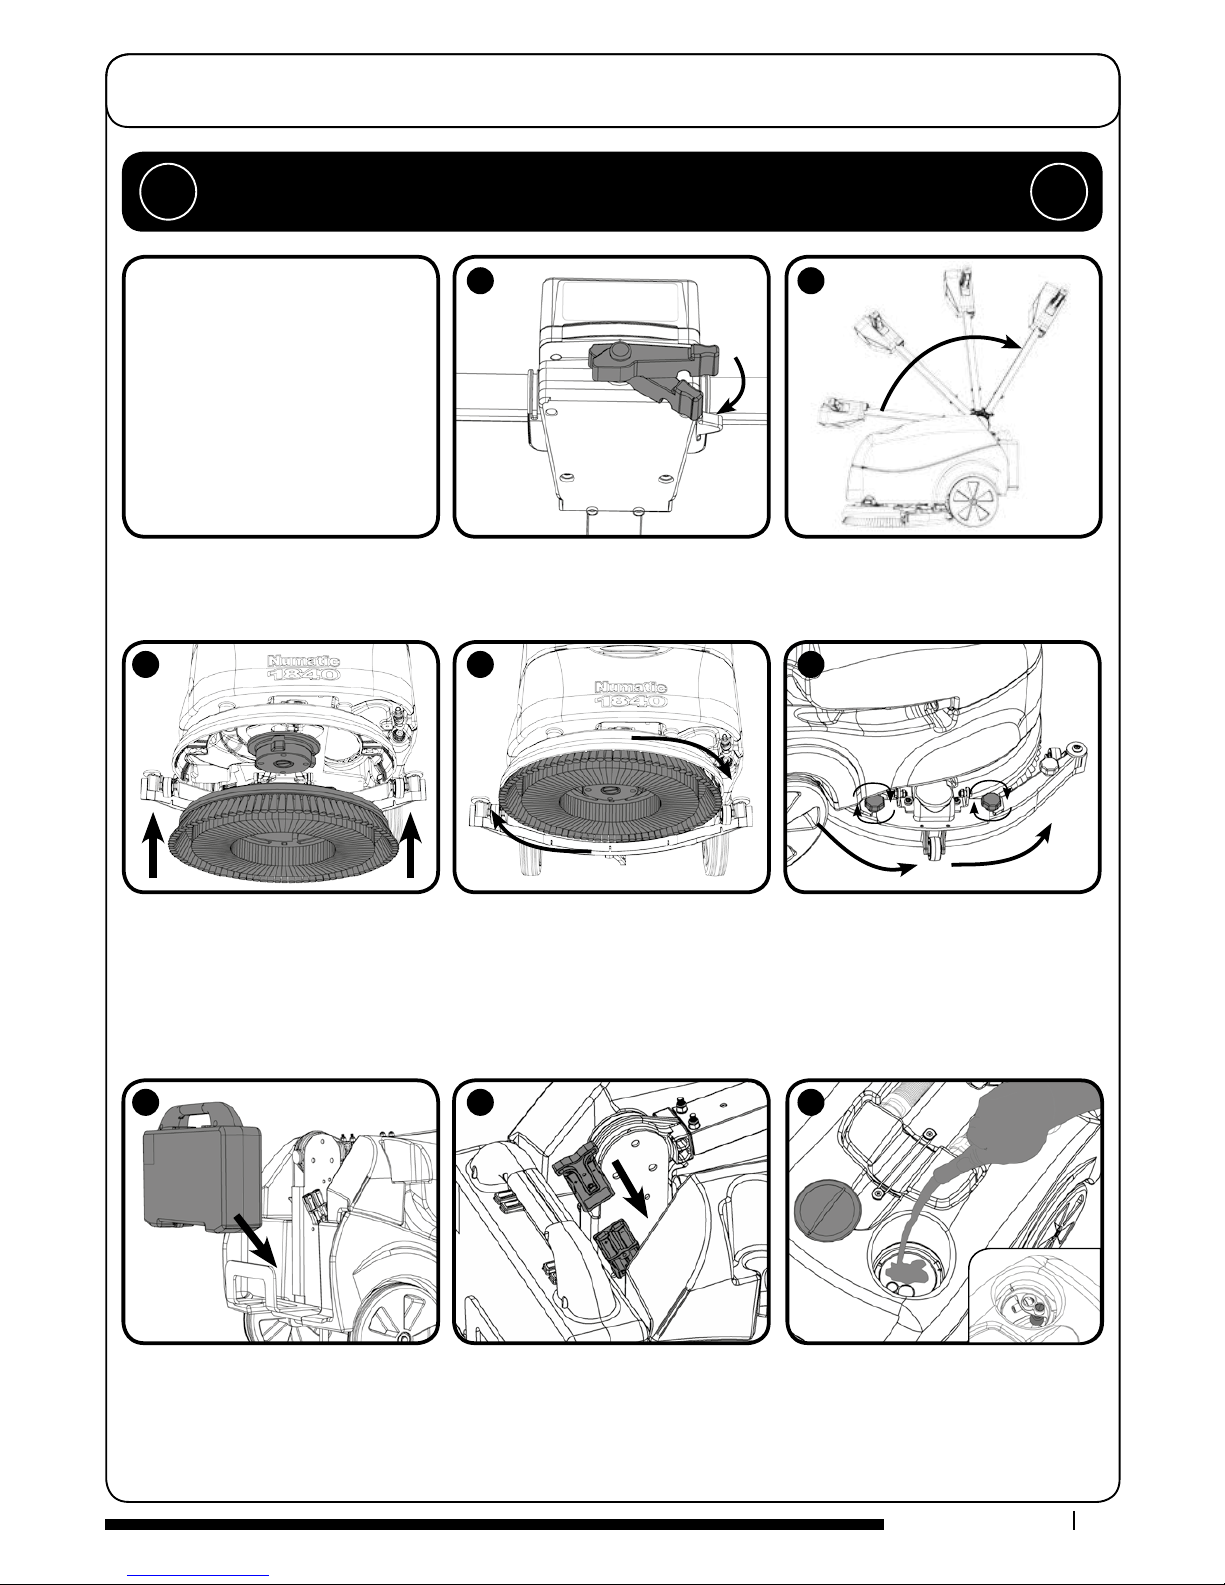
Using the handle position lever, (Fig.1) move the handle into the upright position, (Fig.2)
Slide the brush / pad under the brush deck
(Fig.3).
Fit the brush / pad onto the Nulock drive
chuck, twist to lock the brush / pad in
place (Fig.4).
Swing the oor-tool carrier from behind the
brush. Using the two locking knobs tted to
the oor-tool, secure to the oor-tool to the
oor-tool carrier (Fig.5).
Fill the clean-water to a Max of 18 litres
Fit the battery to the machine (Fig.6) and plug in the power supply (Fig.7). Ensure the
battery has been charged before use.
PLEASE READ BEFORE COMMENCING ANY OPERATION AFTER THE REMOVAL OF ALL
THE PACKAGING, CAREFULLY OPEN AND CHECK THE CONTENTS. !!
3
6
8
7
1
4
2
5
5
www.numatic.co.uk
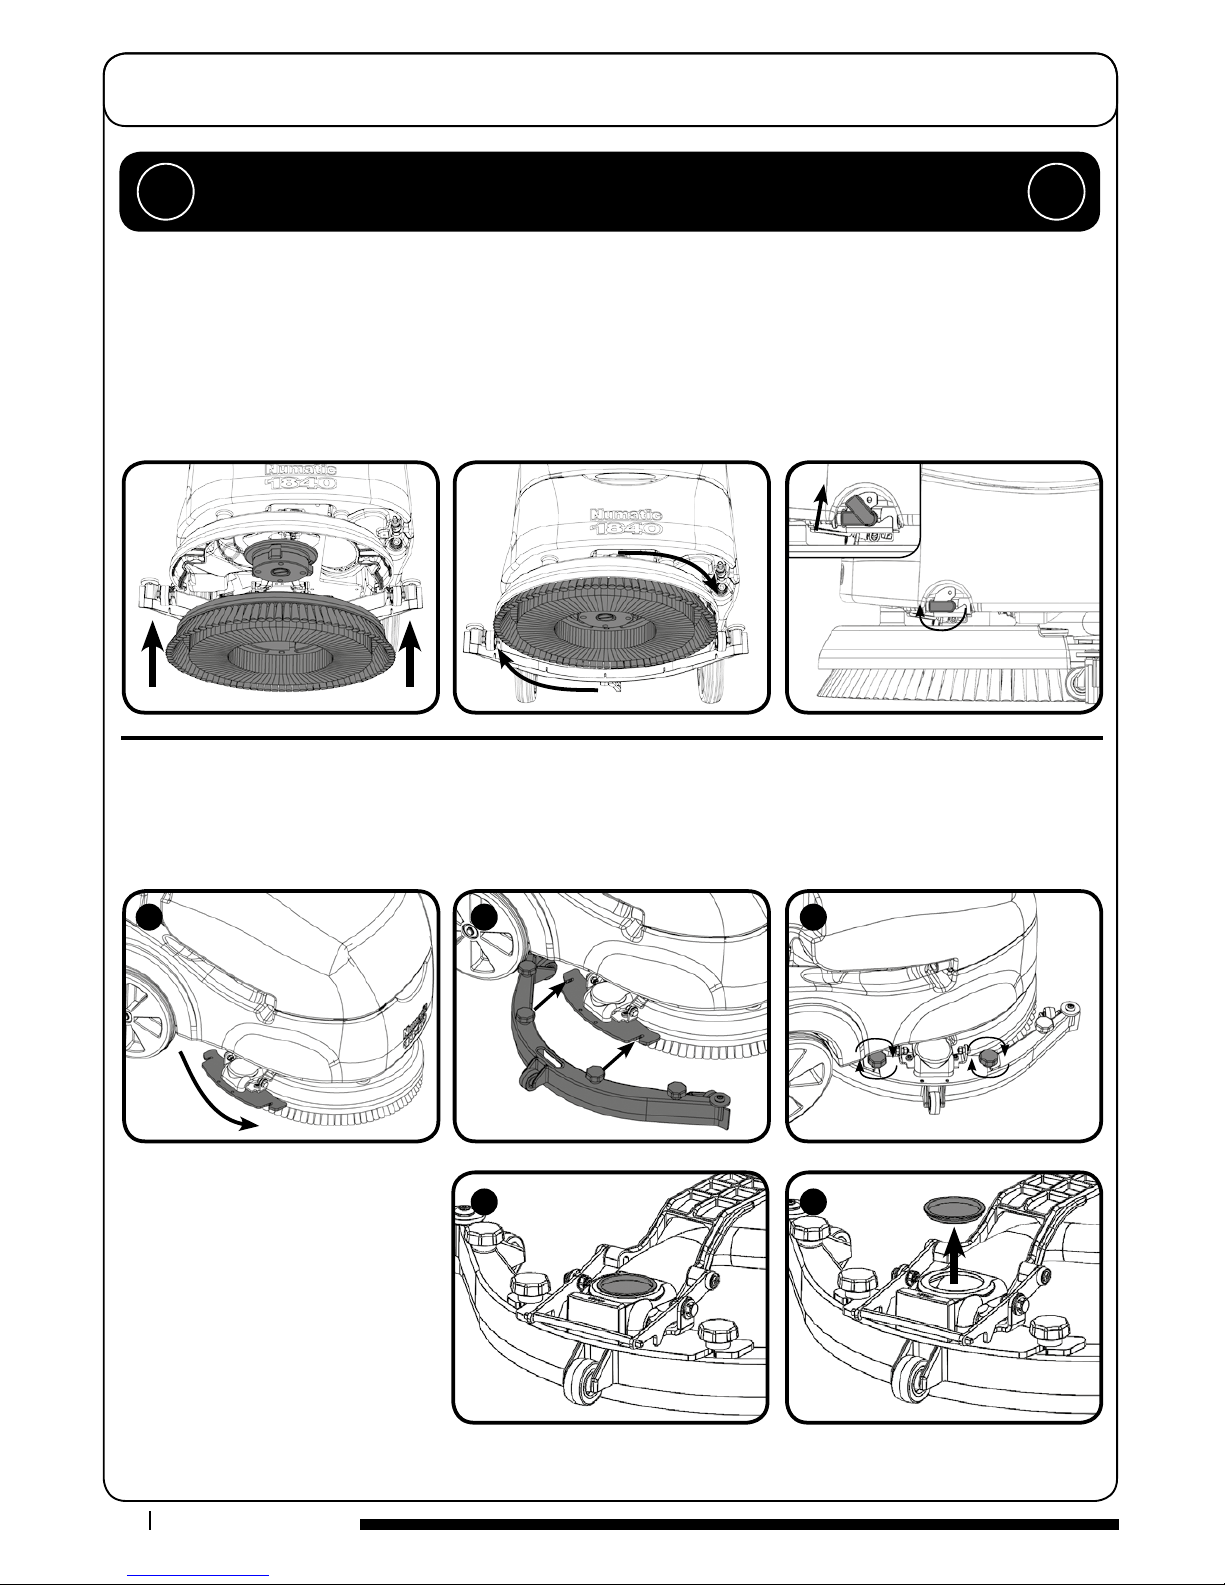
Swing the oor-tool carrier to the side
of the machine. (Fig.1).
Secure to the carrier using the two
knobs tted to the oor-tool carrier
(Fig.2) - (Fig.3).
Do not over tighten the retaining
knobs.
Ensure inspection cap is in place on
the uid pipe. (Fig.4) - (Fig.5)
For tting the oor tool blades
(See Page 10).
Machine Set-up Guide
ALWAYS ENSURE THAT THE MACHINE IS SWITCHED OFF
BEFORE MAKING ANY ADJUSTMENTS !!
400mm Brush / 360mm Pad.
Featuring the Nulock brush system.
The brush is simply pushed and twisted to lock, making tting and removal a simple process.
Slide the brush / pad under the brush deck.
Fit the brush / pad onto the Nulock drive chuck, twist to lock the brush / pad in place.
Safety gloves are recommended for the changing of used brushes.
Turn on the clean water tap.
Fitting the Brush / Pad / Turn on water
Fitting the Floor Tool
The oor tool has been designed for quick tting, allowing easy squeegee blade replacement and a safety knock-o feature if the
oor tool gets snagged, whilst in transit.
NOTE: It is easier to t the oor tool if the weight of the machine is resting on the brush. Ensure the brush is tted rst.
1
2
3
4
5
6
T 01460 68600
Machine Set-up Guide
NOTE: Great care must be taken to ensure that contaminants (leaves, hair, dirt, etc.) are not allowed to enter the clean water
tank during the lling process. If using a bucket or similar, ensure it is always clean and free from debris.
The TTB 1840 is equipped with a large 18 litre clean-water tank allowing large areas to be cleaned in a single ll.
The TTB 1840 is equipped with a large 18 litre clean-water tank allowing large areas to be cleaned in a single ll.
Filling the Clean Water Tank
Fill Level Indicator
Water Flow Adjustment
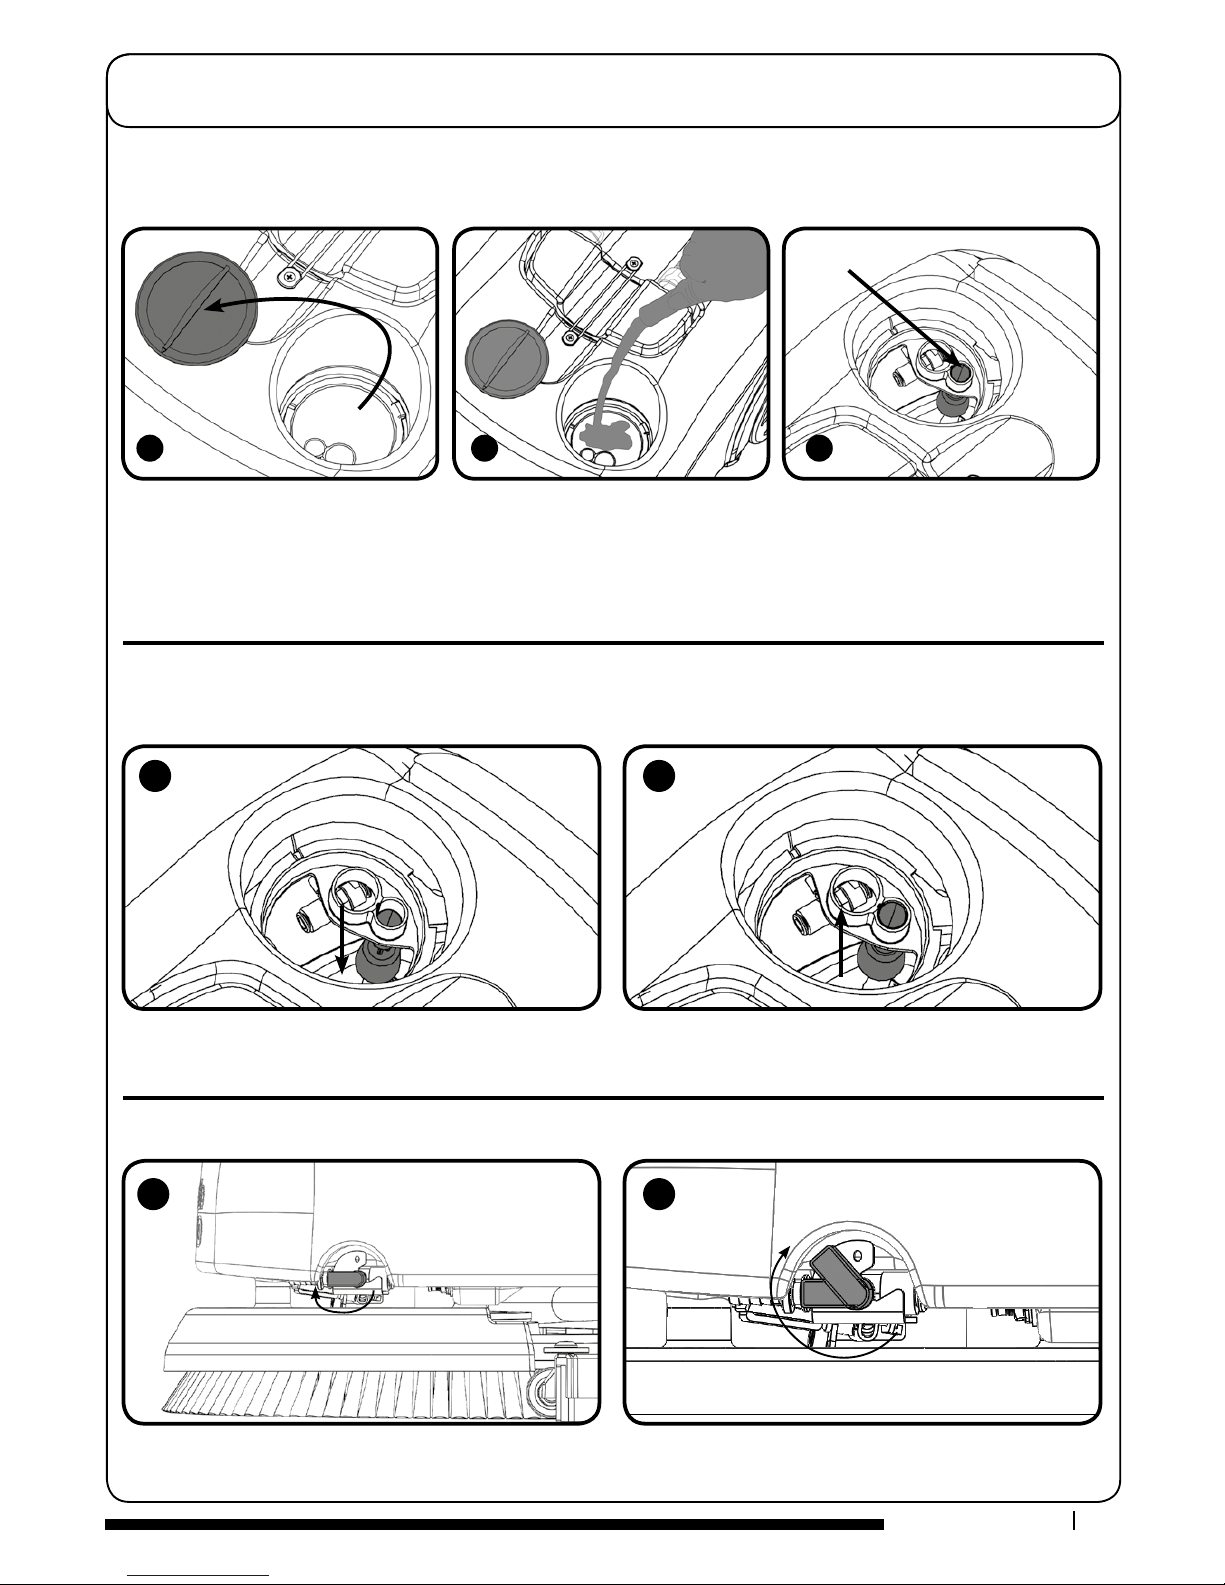
To ll the clean-water tank, remove the ller cap (Fig.1). Fill using a hose, bucket or a suitable container (Fig.2). Use
the ll indicator (Fig.3).
1
2
3
Fill Indicator
A
1
2
B
Showing the clean-water tank full
(Fig.B)
Showing the clean-water tank empty
(Fig.A)
Located on the left of the machine is the On / Off water tap (Fig.1).
Ideally set the tap to 450 this enables the cleaning solution to last the same time as a fully-charged battery (Fig.2).
7
www.numatic.co.uk
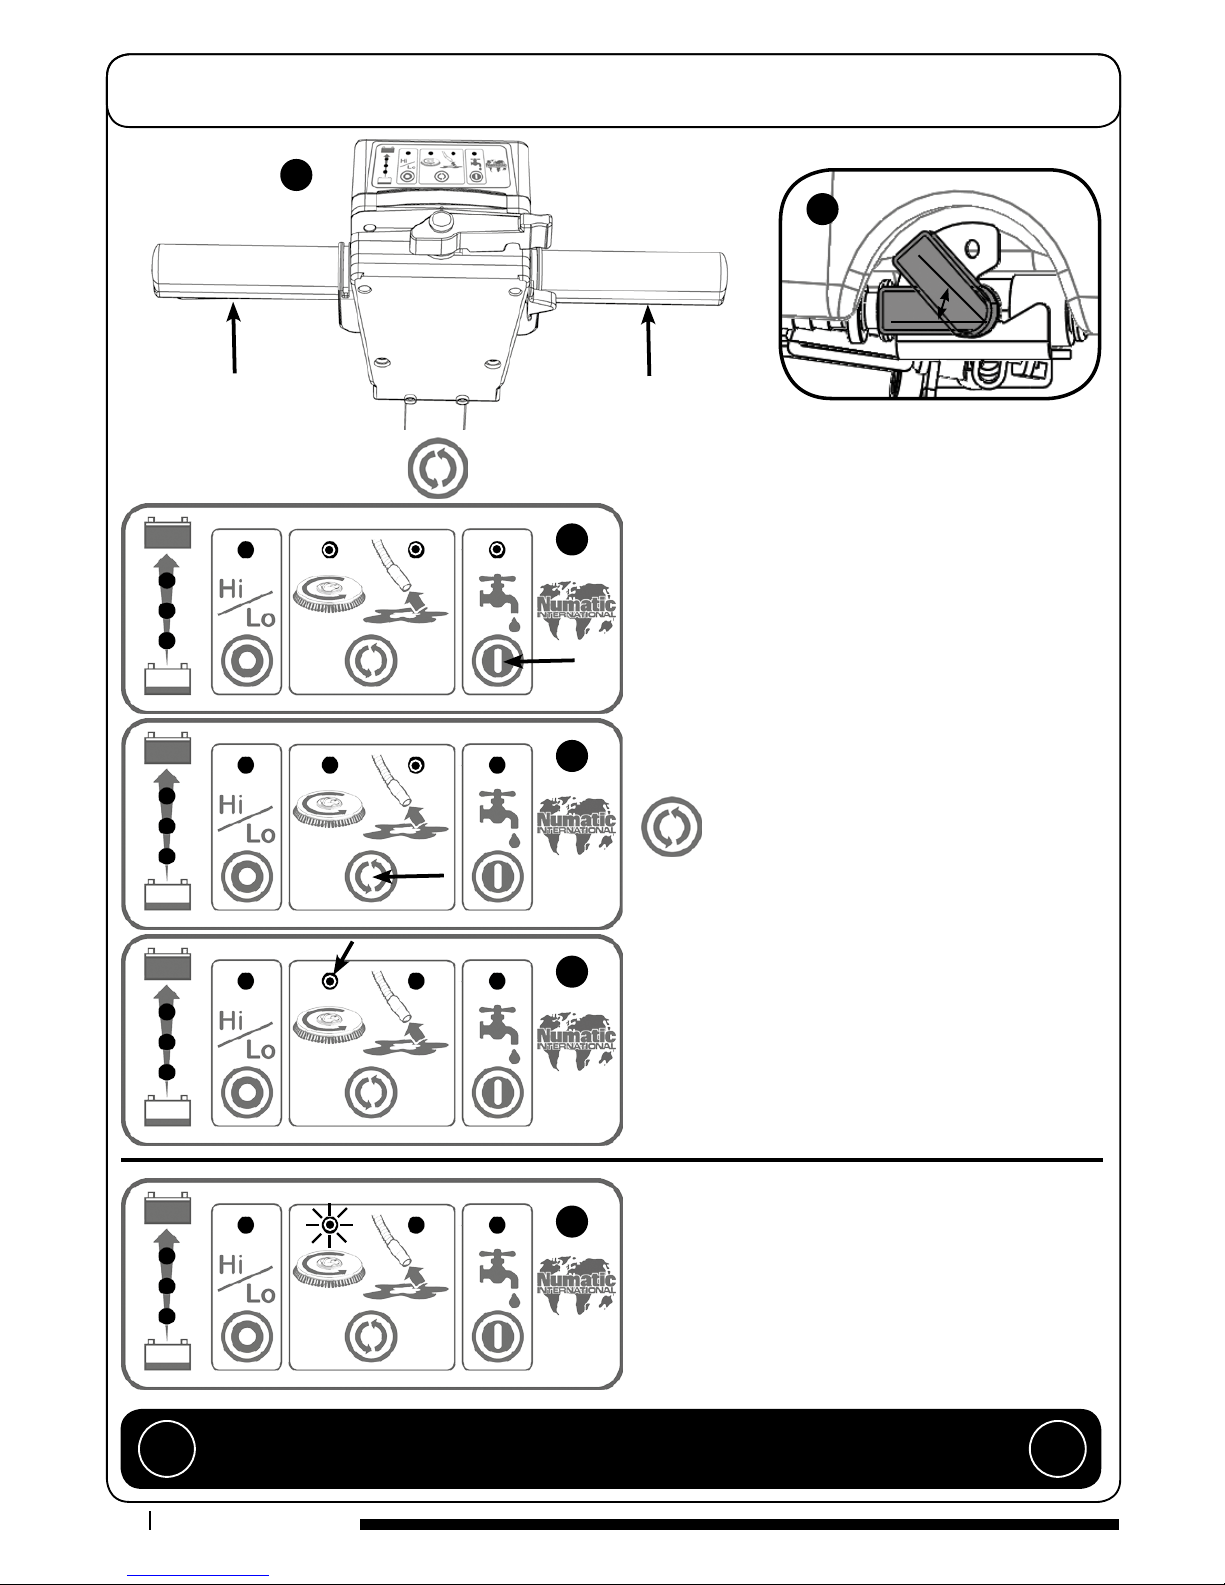
The brush motor will cut out and the brush load light will ash if
the brush motor has been overloaded (Fig.F).
Releasing the handle triggers will allow the machine to reset.
Setting the cleaning controls
Brush Overload
To start: hold down either Trigger and press the On / O
Switch once (Fig.A).
Whilst the brush motor is running press the water ow On / O
Button for uid control (Fig.C), the clean water On / O tap
must be open.
Ideally set the tap to 450 (Fig.B) this enables the cleaning solu-
tion to last the same time as a fully-charged battery.
When the Triggers are released the brush motor and the
cleaning solution pump will switch o, the vacuum motor will
continue for 10 seconds.
Press the mode select button to operate the brush
only (Fig.D).
The start sequence is required in this mode.
The water ow On / O button will operate in this mode.
Press the mode select button again to get vacuum only.
The On / O Switch and triggers are not required in this mode.
(Fig.E)
Press the mode select button to switch this mode o and
return to default mode.
The panel if unused will automatically turn o after 60
seconds.
IMPORTANT
If the brush motor keeps overloading consider using a dierent type of brush.
Heavy brush load decreases the available battery run time. !!
To activate the control panel: press the Mode select button or press a trigger (Fig.A).
450
A
C
D
E
F
B
8
T 01460 68600
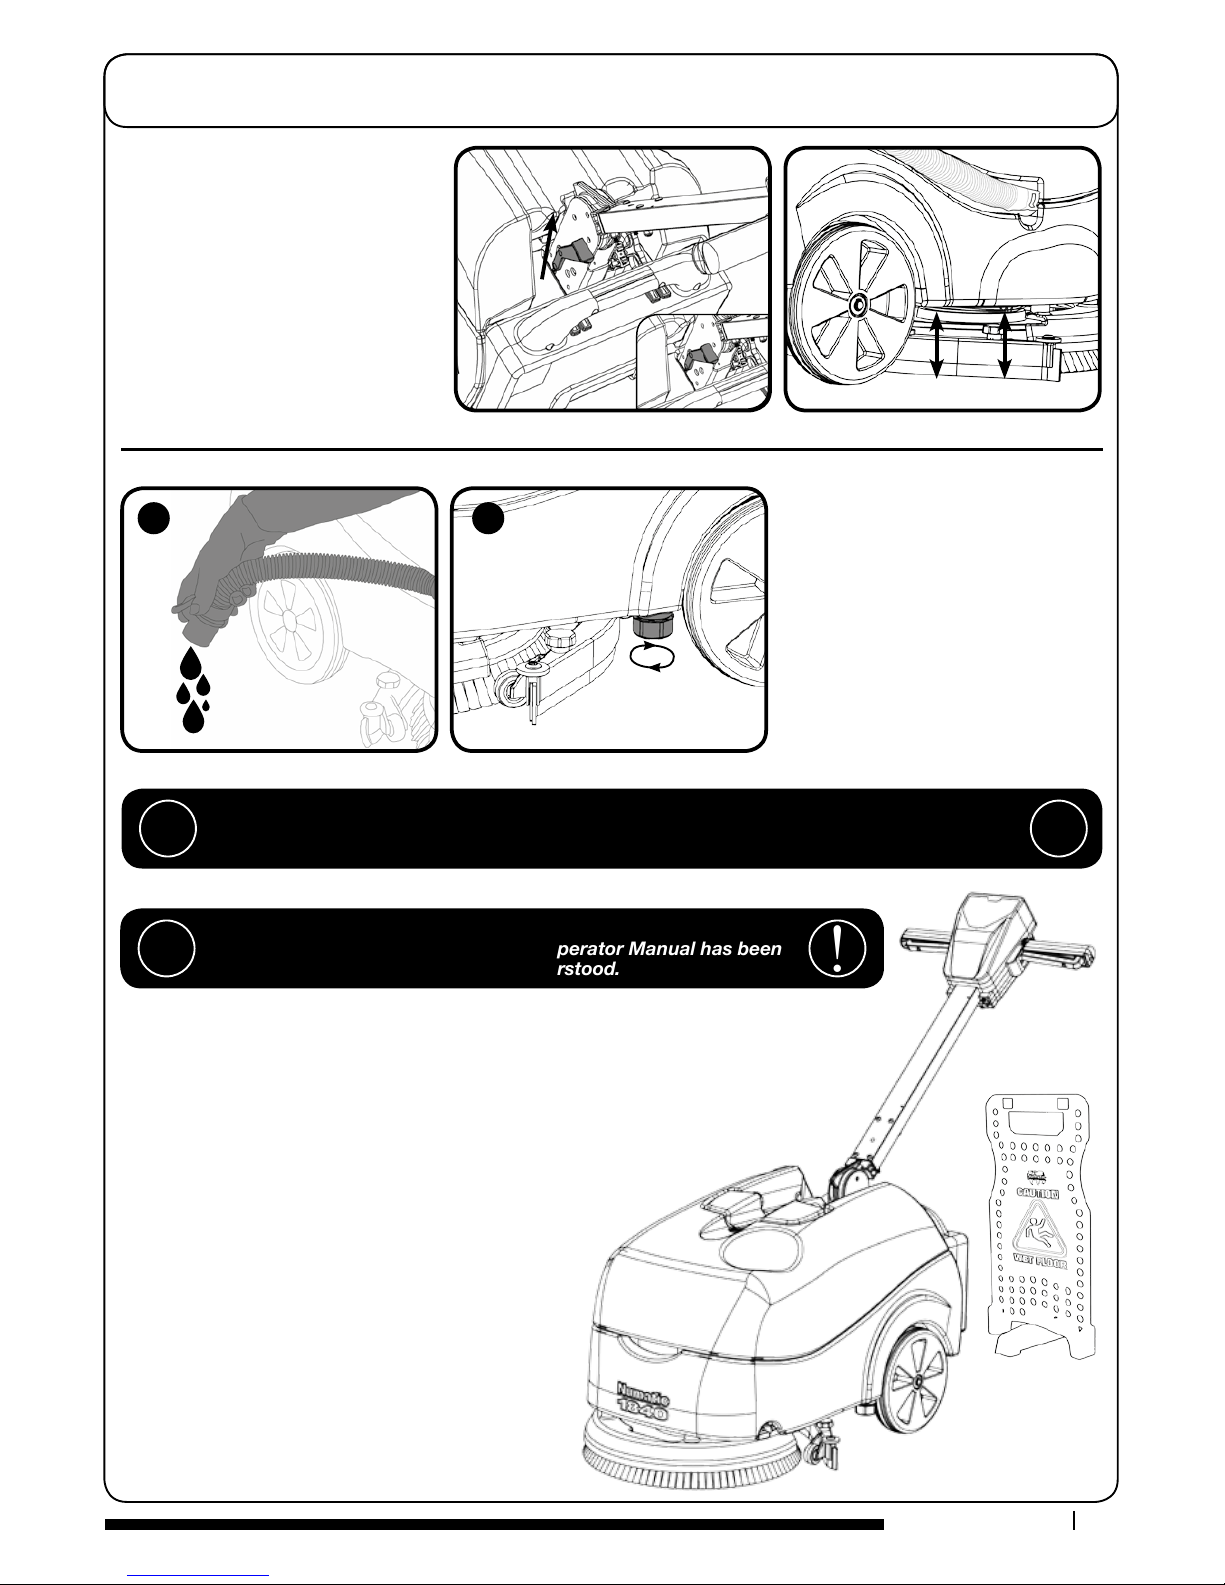
To raise the oor-tool, ensure the oor-tool
carrier is central to the machine.
Lift the lever near the base of the handle
and lock into position.
After use, empty waste-water tank using
emptying hose and ush-out with clean
water. (g.A).
The clean-water tank can be drained via
the yellow cap tted to the left hand side
of the machine. There is a sealing bung
beneath the yellow cap (ensure the sealing
bung is clean) The cap should only be done
up by hand. (g.B).
Raising/Lowering
the Floor Tool
Emptying Top Tank
Emptying Bottom Tank
Machine Operation
WHEN HANDLING AND MIXING CHEMICALS
Always ensure that chemical manufacturer’s safety guidelines are followed.
Only use chemicals recommended for use in auto scrubber-dryers. !!
IMPORTANT
Do not operate machine unless the Operator Manual has been
read and fully understood. !!
A
B
To operate, set water ow rate tap, lower the oor tool, press the vacuum / water switches, pull brush
On/O trigger.
The waste water is then retrieved by the suction oor tool.
Overlap each scrubbing path by 10cm to ensure an even clean.
Do not operate the machine on inclines that exceed (2%), when full.
On heavily soiled oors use a ‘double scrub’ technique.
First pre-scrub the oor with the oor tool in the raised position,
allow the chemical time to work then scrub the area a second
time with the oor tool lowered.
If streaking occurs wipe oor tool blades clean.
NOTE: Care must be taken to reduce speed when
cornering or when manoeuvring around obstacles
Machine In Use
9
www.numatic.co.uk
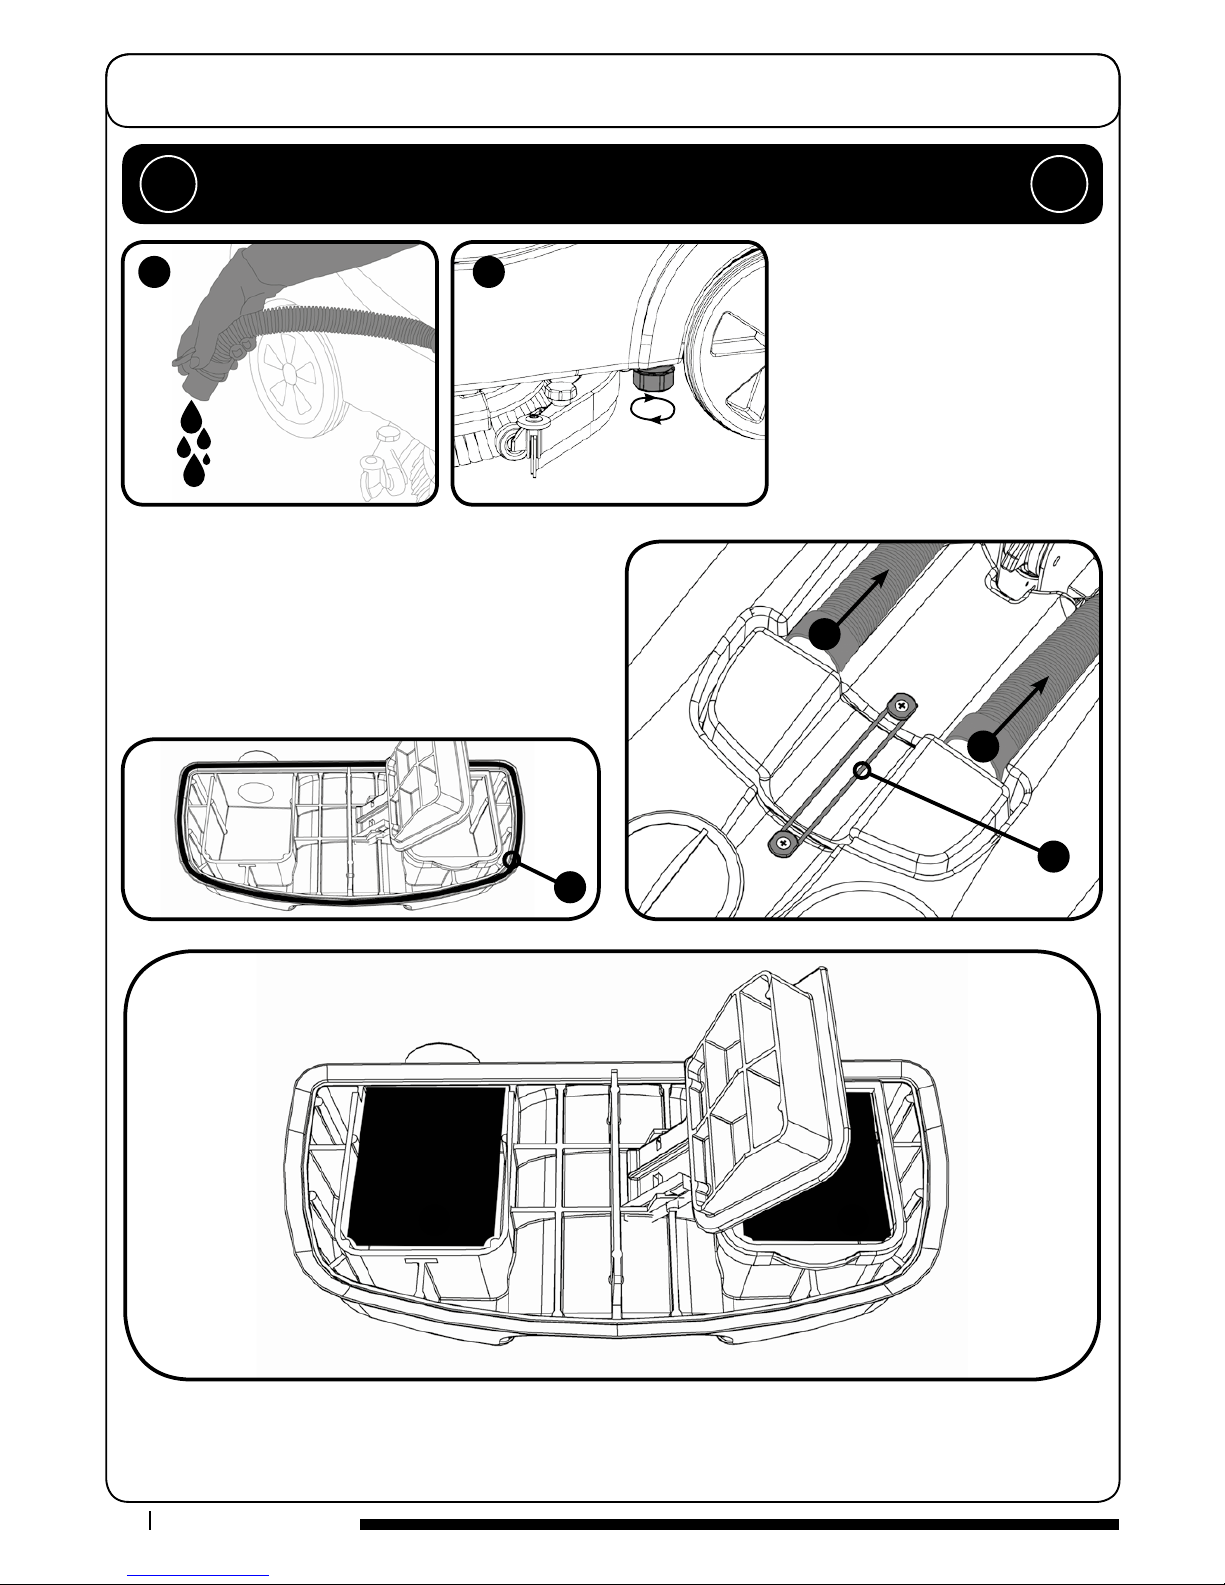
Regular Maintenance
Remove the two hoses to disconnect the separator from the
machine (Fig.1 & 2).
Remove xing band holding separator in place (Fig.3).
Lift o the separator. The separator has a sealing-rubber which
should be examined at every clean-down (Fig.4).
Rinse using clean water.
ALWAYS ENSURE THAT THE BATTERY IS DISCONNECTED
PRIOR TO ANY MAINTENANCE OPERATION !!
After use, empty waste-water tank using
emptying hose and ush-out with clean
water. (g.A).
The clean-water tank can be drained via
the yellow cap tted to the left hand side
of the machine. There is a sealing bung
beneath the yellow cap (ensure the sealing
bung is clean) The cap should only be done
up by hand. (g.B).
Emptying Top Tank
Separator
Emptying Bottom Tank
A
1
2
3
4
A
B
B
Remove the two lters clipped into the separator and ush with clean water (Fig.A & B).
Replace by tting the rear of the lter rst then clipping the front to lock in place.
Altri manuali per TTB 1840G
1
Indice
Altri manuali Numatic Asciugatrice

Numatic
Numatic TTV-5565/200T Manuale utente

Numatic
Numatic HT 1840 Manuale utente

Numatic
Numatic NX300 Manuale utente

Numatic
Numatic TBL6055/100 Manuale utente

Numatic
Numatic CRL8055/100T Manuale utente

Numatic
Numatic HBG 3045 Manuale utente

Numatic
Numatic TTV - 4555/100T Manuale utente

Numatic
Numatic CRG 8055/100T Manuale utente

Numatic
Numatic TTV 678-300 Istruzioni per il montaggio

Numatic
Numatic CRG 8055/100T Manuale utente


