
NUWA Kebbi Air Manuale operativo
Product User Manual
Please read this manual carefully prior to use and keep it for future reference.

Thank you for choosing Kebbi Air!
Kebbi is a robot consisting of education, accompanianship, and services.
The R&D team integrates artificial intelligence, hardware and software technologies, so that the robot has full
facial expressions, body movements and communication and interaction capabilities. Also, the team uses voice
interaction and body sensor technology to vividly present a variety of education and service.
Robots enable digital content to jump out of the screen and enter the real world. We believe that the interactive
form brought by robots can provide users with affectionate and warm-hearted companionship experience. The
R&D team uses design thinking to explore human needs, combining various theories and trends of interactive
experience as the design direction of hardware, software, and content applications. Kebbi Air is more than a
multifunctional robot, it touches people's true feelings.
Kebbi Air is endowed with infinite possibility. When parents and kids are having fun together, it plays the role of
a learning tutor. When a store is in need of a clerk, it serves as a little assistant. When the elderly needs help,
it becomes a little helper. Through various development tools, you may also leverage your imagination, building
your own robot partner.
Now, invite Kebbi Air to be your partner and move forward together in the future!
V1.02020/5
01
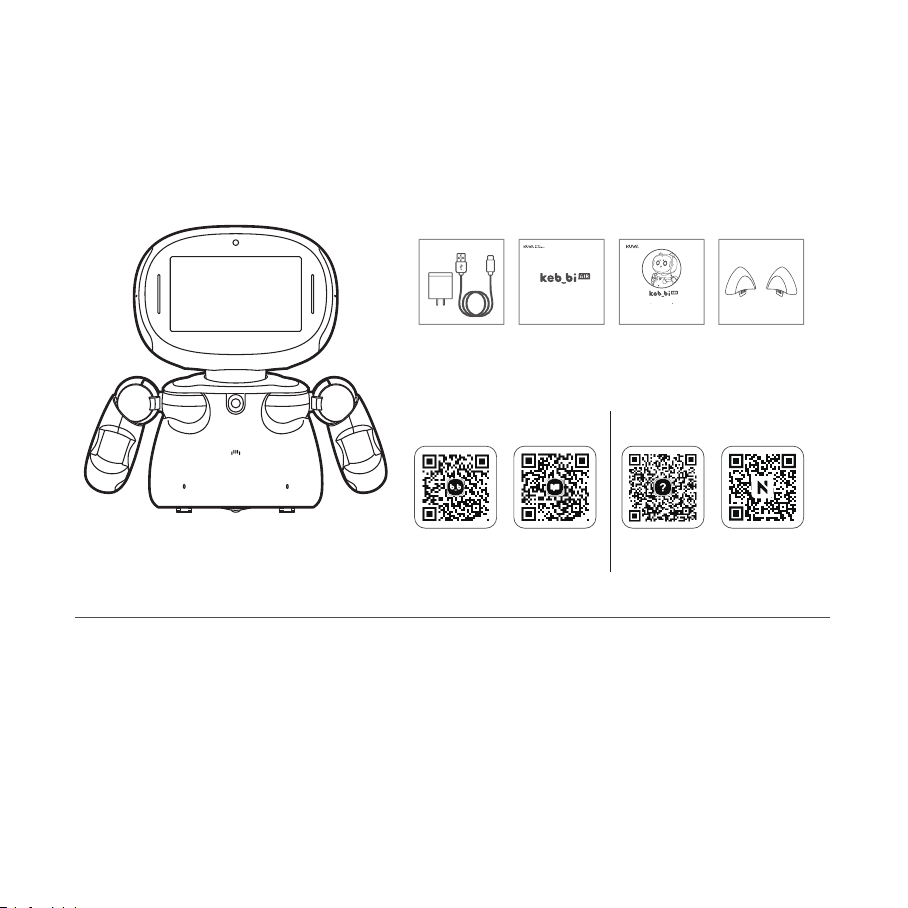
Please carefully check the contents of the box. If anything is missing or damaged, please contact our
customer service representatives.
The charger in the accessory package is a OEM charger. Please avoid using any other brand charging
cables in order to keep the robot working appropriately.
Please read this User Manual thoroughly to ensure correct and safe use of this product.
Regularly check the charging cable, connector, and outer casing for damage. If damage is found, do not use
until repaired.
1.
2.
3.
4.
02
Accessory ListKebbi Air
OEM charger
使用說明書
使用前請仔細閱讀本使用說明書並妥善保存
User Manual Quick-Start
Guide
Kebbi air
Product Introduction
Ear accessory styles may differ
恭喜你成為機器人的父母,相信你已經做好心理準備要迎接這新來的小生命。本手
冊會引導您完成機器人的第一次啟動,以及如何與他溝通、互動的使用指南,若你想
了解更多,我們的官網有完整詳細的介紹,希望您能享受與機器人生活的點點滴滴。
凱比AIR快速育兒指南
Ear
Accessory
NUWA APPs
Nuwa
CodeLab
NuwaSpace
Help Cneter
User
Mnaual
Official
website
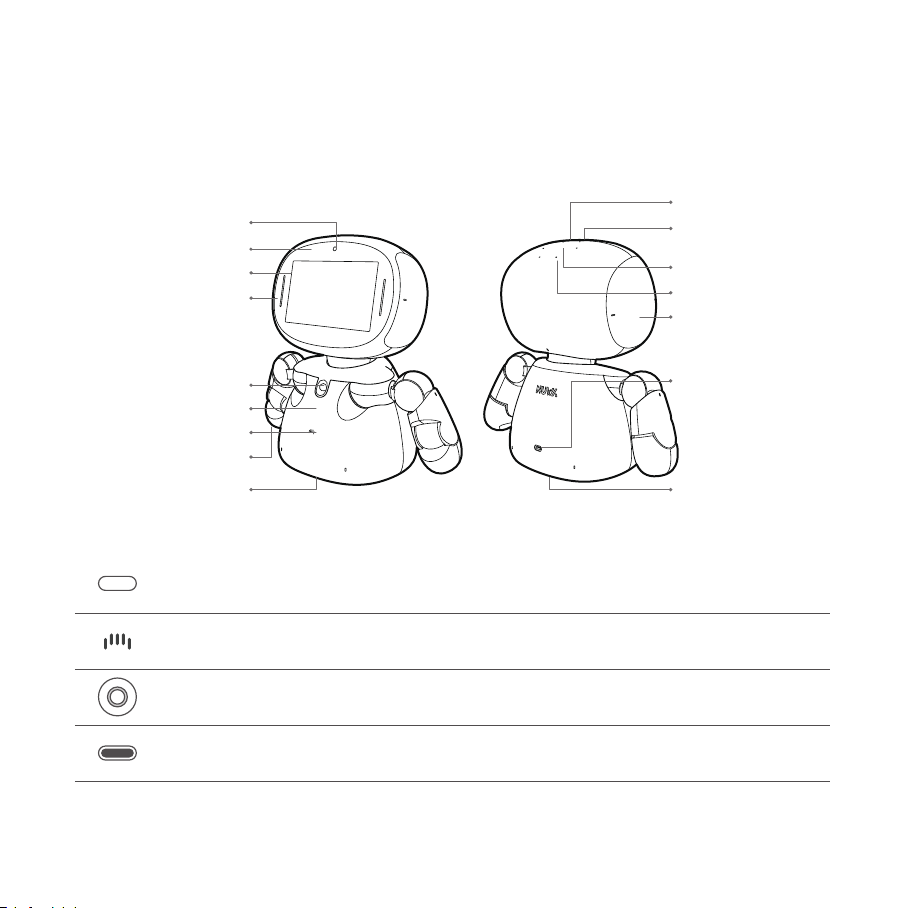
Listening LED Indicator
7" Touch Panel
Power LED Indicator
Touch Area (Belly)
Status LED Indicator
Touch Area (Hands)
PIR Sensor
IR Drop Sensor
Product Description
Product Introduction
03
Camera
Charging Port
Return to Home Screen, Turn On / Off (Please refer to Page 8 for more
details)
There are 5 Touch Sensing Areas: Head, left and right Cheeks, Belly, left and
right Hands. Please remember to touch Kebbi gently.
PIR Sensor: Senses whether there is anyone passing by in front of Kebbi.
Please use with the orginal OEM charger.
Home Screen / Power Button
Touch Area
PIR Sensor
USB Type C Charging Port
Touch Area (Head)
Touch Area (Cheeks)
Speakers
Microphone
Micro SD Card Slot
Home (Power) Button
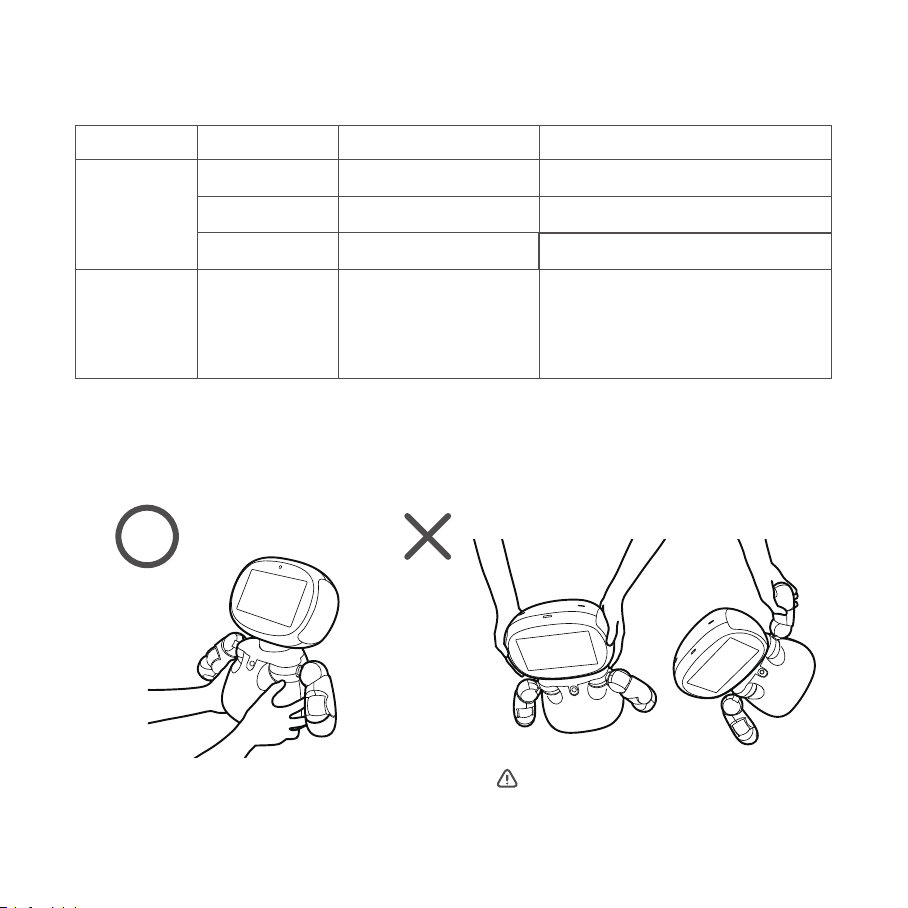
Charging Indicator
(next to the lens)
Power LED Indicator Information
ColorIndicator Status Description
Blue
Steady blue light System is normal
Orange
Steady orange light
Low battery
(less than 15%).
Red
Steady red light
Very low battery
(less than 5%)
-
Please charge the robot.
Please charge the robot.
Status Indicator
(on the chest)
Green
Flashing green light
Charging
Blinking green light means one of two
things:
1. The battery is fully charged
2. The battery is too low, please continue
charging for 10 minutes
Please refer to P. 14 for more information
Safety Instructions
Pleaseholdtherobotwithbothhands
04
Pleasedonotliftorpulltherobot
byitsheadorarms.

Using Kebbi for the First Time
05
Second:
Press and hold the power button until the screen turns on.
Be sure there is enough space for your robot to safely move around.
Connect the charger and turn the power on. Hold for three seconds.
First:
Prepare a safe place for Kebbi and connect the charger.
Fourth:
Install the App on your smartphone.
(Android and iOS systems are available)
Third:
Please follow the robot's instructions to complete the initial setup.
WELCOME!
ID
PASSWORD
LOG IN
06
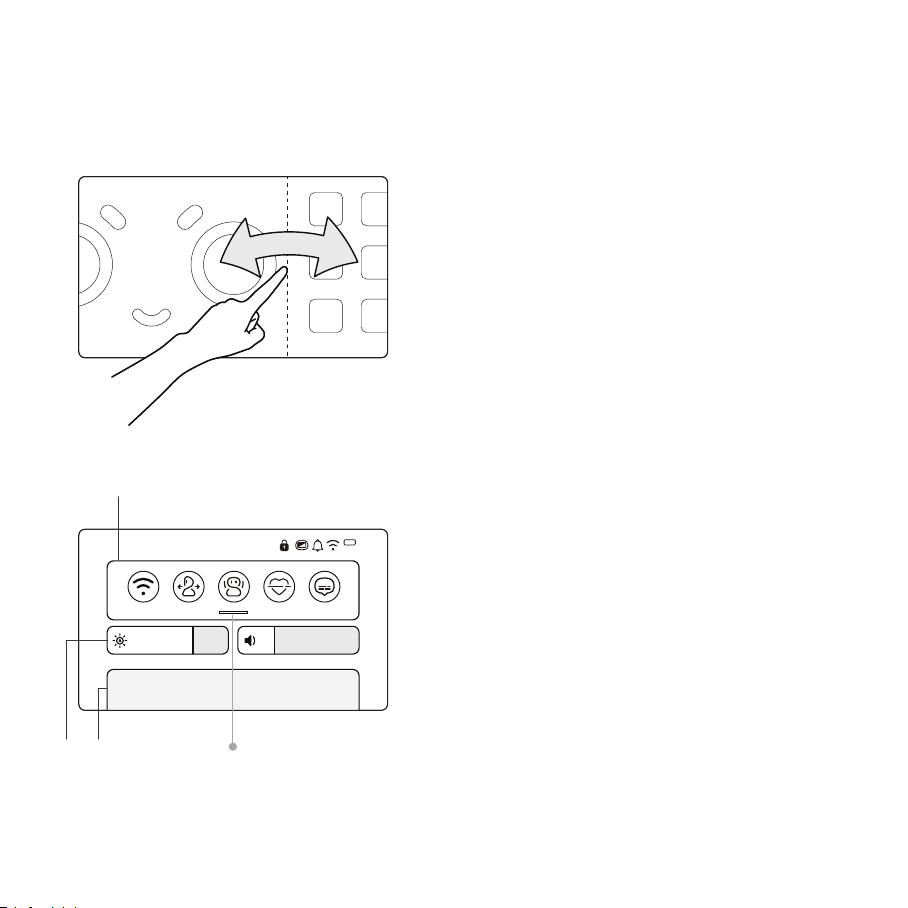
Open the Menu
Notification Panel
Slide down from the top edge of the screen to open the
Notification Panel. There are three main areas: Function
Shortcut, Screen Brightness / Volume Control, and Notifica-
tion Area.
Function Shortcut:
Shortcuts in this area enable you to quickly set up your robot. You may click
the editing button on the bottom to change the sequence; or to display or
cancel the shortcuts.
Screen Brightness / Volume Control:
Drag the control bar to adjust the screen brightness or volume.
Notification Area:
Display the system status, system notification, or messages from different
applications of the robot.
Scrolldowntoseemorefunctions.
❶
❶
❸❷
❷
❸
00:00 MM/DD 100%
Pet Screen / Function Menu
You may swipe left and right on the screen to switch between
the Pet Screen and Function Menu.
Pet Screen:
This is the start-up default mode. You can have a conversation with the
robot on the Pet Screen. Click "Home Button" or swipe to the right from
the Function Menu to return to the Pet Screen.
Functon Menu:
You can browse all the built-in APPs of the robot in the Function Menu,
including Sing and Dance and Creative Learning. You can also explore
the various functions of the robot and delete / manage them.
07
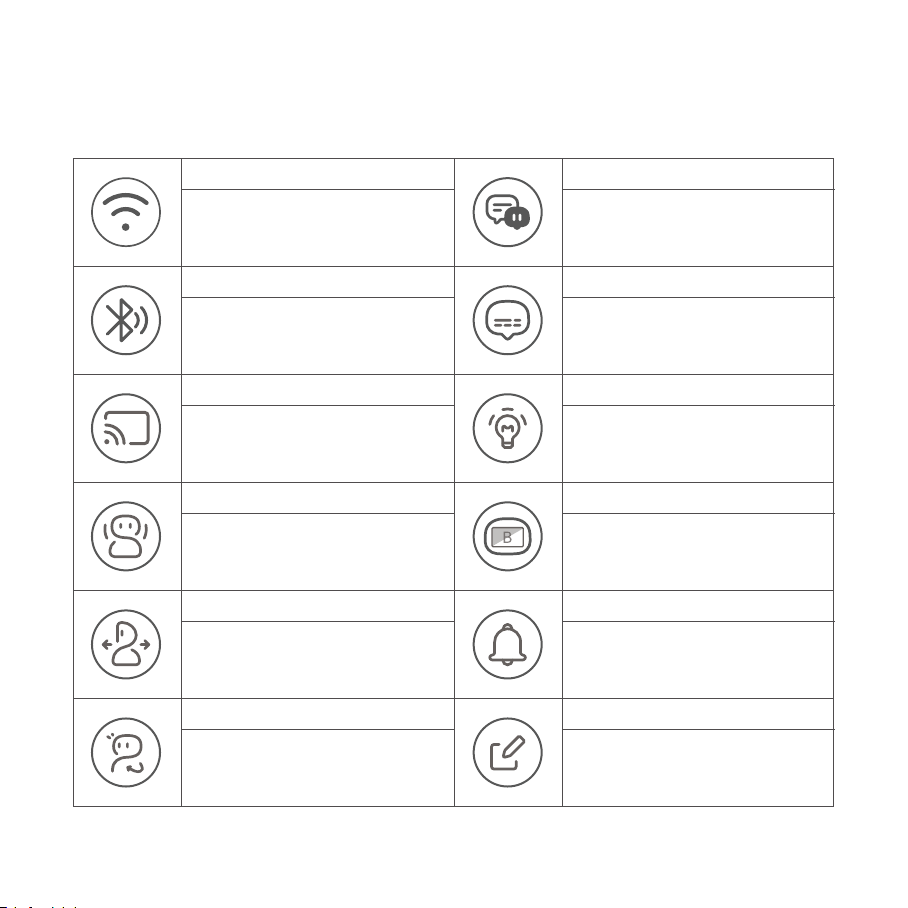
WiFi
Please connect to WiFi or mobile hotspot
to allow you to enjoy a complete robot
experience.
Bluetooth
Bluetooth device can be connected
according to the guidance of some
value-added services.
Image delivery
Images from the robot can be dropped on other
devices (supported but not guaranteed to be
compatible with all devices).
Action
Robot's body movement can be turned
off (it can still move when the movement
is turned off).
Movement
The robot can move while turned off (its
body still moves when it is turned off)
Audio recognition
When the robot is under the turning-off condition,
it turns in the direction of wherever the wakening
words come. (This function does not work when
the movement function is off).
Active dialogue
You may trun off the recognition function
to avoid robot seeing you, that is, the
function enables it to talk to you actively.
Subtitle
Captions can be turned off.
LED
LED lights can be turned off on the robot.
Eye Protection Mode
The eye protection mode of the robot screen can
be turned on to reduce the damage of blue light
to the eyes (the screen color will be yellow)
Notification
You can watch the information sent by
Nuwa to the robot user
Edit
In the last button of Shortcut Area, you
can edit the contents and orders of the
buttons.
Common control instructions
You can adjust the following robot functions in the shortcut area of "Notification Panel" or "Settings" according to the situation:

08
1. Press and Hold the Home Button for three seconds to activate the system and display the startup screen.
2. When the Pet Screen appears, the robot has been successfully activated.
Home Button
(The function of this button may be modified due to specific needs)
On/Off Instructions
Update Instructions
1.Under the System Startup Menu, press and hold the Home Button for three seconds to access the power options (as shown in picture on
the right).
2.Select "Restart" and all the Apps in Kebbi will restart automatically.
Restart
Turning On the System
Press the Home Button on the Pet Screen quickly to turn off the screen and have Kebbi enter Sleep Mode.
Press the Home Button in any application to return to the Home Page (Pet Screen).
Press and Hold the Home Button for three seconds to access the following power options: Do-Not-Disturb
Mode; Restart; or Power Off.
When the robot is shut down, press and hold the Power Button on Kebbi's head for three seconds to
turn on the system.
Action
Quick Press
Press and Hold
Effects
1.Under System Startup, press and hold the Home Button for three seconds to access the power options.
2.Select "Turn Off".
1.The robot will automatically check for updates while connected to the internet and will prompt you when a new update is available.
2.You can also enter "Settings" and select, "Check Update Manually" to manually check for any newly released updates.
We will continue to optimize the functions and content of the robot, so we strongly recommend staying up-to-date with the latest
system upgrades.
Robot Connection Name
The robot connection name appears when you are connecting to the robot using the mobile APP or related webpage. The default name is: The
robot's product name + last three digits of the serial number. You may edit the Robot Connection Name in "Settings" →"About Robot"→"Robot's
Name" so that you will recognize your robot faster in the future.
*Editing this name will not cause any change on the awakening words or the name the robot uses to refer to you.
Turning Off the System
Power Options
Do-Not-Disturb
Mode
Restart
Turn Off

09
Enter Sleep Mode:
- Press the Home Button on the Pet Screen to enter Sleep Mode and the robot will fall asleep.
- The robot will automatically enter Sleep Mode after 5 minutes in Standby Mode.
End Sleep Mode:
- Press the Home Button once to end the Sleep Mode and open the Pet Screen.
- Say, "Hello Kebbi" to wake the robot, ending Sleep Mode.
Sleep Mode (Standby)-When the robot is in Sleep Mode, the screen is off. Kebbi will still
respond when called.
Turning the Motion Lock On/Off:
- When the robot is awake, you can set the motion options to: On (Unlocked) or Off (Locked).
- From the Notification Panel → Click the "Motion" button. When the button is green, motion is unlocked, and the
robot can move. When the button is white, motion is locked.
*When the robot is plugged in and charging, the system will automatically lock the motion setting to prevent the
robot from moving and pulling its power cord. Do not attempt to unlock the motion setting while your robot is
charging. Once the robot is unplugged, motion will automatically be unlocked.
Motion Lock-The Motion Lock will turn off the motor on the bottom of the robot, preventing
the robot from moving.
Turning the Action Lock On/Off:
- When the robot is awakened, you can set the Action options of the robot to: On (Unlock Action) or Off (Lock Action)
- From the Notification Panel → Click the "Action" button. When the button is green, Action is unlocked and the
robot's face and arms can move. When the button is white, Action is locked and the face and arms will not move.
Action Lock-The Action Lock will turn off the motor controlling the robot's head and arms. The
indicator lights on the robot's face and arms will turn dark blue when in this mode.
Enter Do-Not-Disturb Mode:
- Press and hold the Home Screen button for 3 seconds → Click "Do-Not-Disturb Mode" under Power Options.
End Do-Not-Disturb Mode:
- Press the Home Button to open the Pet Screen.
Do-Not-Disturb Mode-When the robot is in Do-Not-Disturb Mode, speaking to Kebbi will not
awaken it. The only way to wake the robot from this mode is by pressing the Home Button.
Introduction to Power Modes
Indice
Altri manuali NUWA Robotica


