Omega Engineering iDRN-PS-1000 Manuale utente

LN
+-
USA
MADE
IN
®
®
Shop on line at
iDRN-PS-1000
UNIVERSAL SWITCHING POWER SUPPLY
Co pact DIN-Rail 24 Volt

Servicing North A erica:
USA: One Omega Drive, P.O. Box 4047
ISO 9001 Certified Stamford, CT 06907-0047
T L: (203) 359-1660 FAX: (203) 359-7700
e-mail: [email protected]
Canada: 976 Bergar
Laval (Quebec) H7L 5A1
T L: (514) 856-6928 FAX: (514) 856-6886
e-mail: [email protected]
For i ediate technical or application assistance:
USA and Canada: Sales Service: 1-800-826-6342 / 1-800-TC-OM GA®
Customer Service: 1-800-622-2378 / 1-800-622-B ST®
ngineering Service: 1-800-872-9436 / 1-800-USA-WH N®
T L X: 996404 ASYLINK: 62968934 CABL : OM GA
Mexico T L: (001)800-TC-OM GASM FAX: (001) 203-359-7807
Servicing Europe:
Benelux: Postbus 8034, 1180 LA Amstelveen, The Netherlands
T L: +31 (0)20 6418405 FAX: +31 (0)20 6434643
Toll Free in Benelux: 0800 0993344
e-mail: [email protected]
Czech Republic: Rudé armády 1868, 733 01 Karviná 8
T L: +420 (0)69 6311899 FAX: +420 (0)69 6311114
e-mail: [email protected]
France: 9, rue Denis Papin, 78190 Trappes
T L: +33 (0)130 621 400 FAX: +33 (0)130 699 120
Toll Free in France: 0800406342
e-mail: [email protected]
Ger any/Austria: Daimlerstrasse 26, D-75392 Deckenpfronn, Germany
T L: +49 (0)7056 9398-0 FAX: +49 (0)7056 9398-29
Toll Free in Germany: 0800 TC-OM GASM
e-mail: [email protected]
United Kingdo : One Omega Drive
ISO 9002 Certified River Bend Technology Centre
Northbank, Irlam
Manchester M44 5 X United Kingdom
T L: +44 (0)161 777 6611 FAX: +44 (0)161 777 6622
Toll Free in the UK: 0800 488 488
e-mail: [email protected]
omega.com
OMEGAnetSM On-Line Service Internet e- ail
http://www.o ega.co info@o ega.co
It is the policy of OM GA to comply with all worldwide safety and MC/ MI regulations that apply. OM GA is constantly
pursuing certification of its products to the uropean New Approach Directives. OM GA will add the C mark to every
appropriate device upon certification.
The information contained in this document is believed to be correct but OM GA ngineering, Inc. accepts no liability
for any errors it contains, and reserves the right to alter specifications without notice.
WARNING: These products are not designed for use in, and should not be used for, patient connected applications.
This device is marked with the international caution symbol. It is important to read the Setup Guide before installing or
commissioning this device as it contains important information relating to safety and MC.

1. General Information and Features 2
2. Safety Considerations 3
3. Installation and Removal 4
3.1 Installation Clearance 5
3.2 Mounting on IN Rail 6
3.3 Removal of Unit 7
4. Input and Output Connections 8
4.1 Block iagram 8
4.2 Wiring for 115 Vac - Single Phase 9
4.3 Wiring for 230 Vac - Two Phase 10
5. Specifications 11
Input Power 11
Output Power 11
General 12
Wire Connections 12
6. imensions 13
7. Temperature erating Graph 14
CONTENTS
1

The compact i RN power supplies are designed to
supply well-regulated 24 volt C power to sensors,
signal conditioners, data acquisition systems and
high level logic equipment.
Significant i RN features include:
• Tested isolation, primary to output
• Recessed live parts and connector screws
• 35mm IN rail mounting
• Wide input voltage tolerances
• Protective varistor input shunt
• Input AC spike rejection with LC filters
• LE power-on lamp
• Over-temperature protection
• Short circuit protection
• Low-ripple, well-regulated design
Features
GENERAL INFORMATION AN FEATURES
1
2
SAFETY CONSI ERATIONS
2
3
This device is marked with the international Caution symbol. It is
important to read this manual before installing or commissioning this
device as it contains important information relating to Safety and EMC
(Electromagnetic Compatibility).
Unpacking & Inspection
Unpack the instrument and inspect for obvious shipping damage. o not attempt to
operate the unit if damage is found.
This instrument is a IN rail mount device. Installation of this instrument should be done
by Qualified personnel. In order to ensure safe operation, the following instructions
should be followed.
This instrument has no power-on switch. An external switch or circuit-breaker shall be included in the
building installation as a disconnecting device. It shall be marked to indicate this function, and it shall
be in close proximity to the equipment within easy reach of the operator. The switch or circuit-breaker
shall not interrupt the Protective Conductor (Earth wire), and it shall meet the relevant requirements
of IEC 947–1 and IEC 947-3 (International Electrotechnical Commission). The switch shall not be
incorporated in the mains supply cord.
Furthermore, to provide protection against excessive energy being drawn from the mains supply in
case of a fault in the equipment, an overcurrent protection device shall be installed.
• The Protective Conductor must be connected for safety reasons. Check that the
power cable has the proper Earth wire, and it is properly connected. It is not safe to
operate this unit without the Protective Conductor Terminal connected.
• o not exceed voltage rating on the label located on the top of the instrument
housing.
• Always disconnect power before changing signal and power connections.
• o not use this instrument on a work bench without its case for safety reasons.
• o not operate this instrument in flammable or explosive atmospheres.
• o not expose this instrument to rain or moisture.
• Unit mounting should allow for adequate ventilation to ensure instrument does not
exceed operating temperature rating.
• Use electrical wires with adequate size to handle mechanical strain and power
requirements. Install without exposing bare wire outside the connector to minimize
electrical shock hazards.
EMC Considerations
• Whenever EMC is an issue, always use shielded cables.
• Never run signal and power wires in the same conduit.
• Use signal wire connections with twisted-pair cables.
• Install Ferrite Bead(s) on signal wires close to the instrument if EMC problems
persist.

If a rail assembly is to be transported, then
disconnection, dismounting and separate
packing of the power supply is
recommended.
For units that must be shipped installed on
the rail, additional bracing to resist
transportation shocks is recommended.
o not attempt to install or connect to the
power supply when the mains are
energized.
Warning!
INSTALLATION AN REMOVAL
3
4
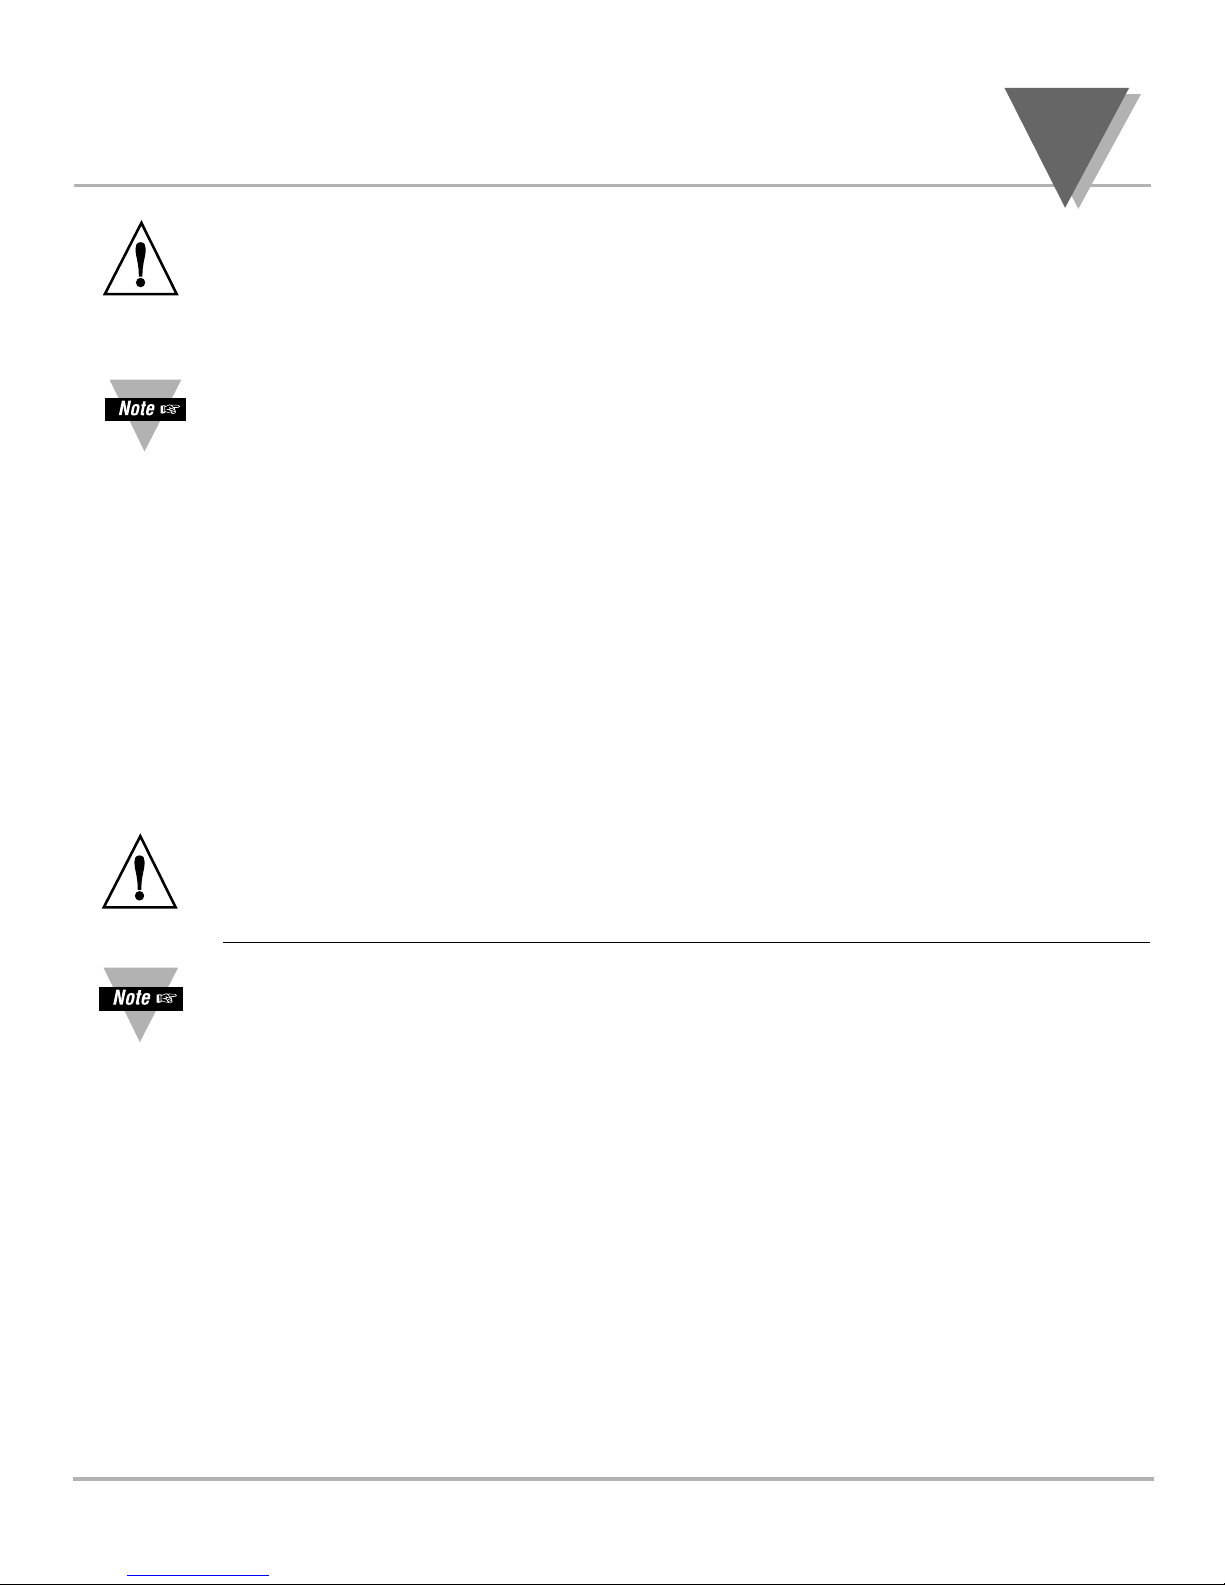
3.1 Installation Clearance
Ensure that there is enough room for mounting the power
supply unit. There should be a minimum of 1" [25mm] spacing
to allow sufficient air circulation for proper cooling.
Figure 3.1 — Mounting
INSTALLATION AN REMOVAL
3
DC POWER OUT
AC POWER IN
DC POWER IN
SIGNAL INPUT
DC POWER IN
SIGNAL INPUT
DC POWER IN
SIGNAL INPUT
IN RAIL
SIGNAL
CON ITIONER
MO ULES
24V-BUS
POWER SUPPLY
1" [25mm] 1" [25mm]

3.2 Mounting on DIN Rail
To install unit onto DIN Rail
1. Tilt unit, position mounting slot onto DIN Rail, as shown.
2. Push unit towards DIN Rail and it will snap into place.
Figure 3.2 — Mounting on 35mm DIN Rail
INSTALLATI N AND REM VAL
3
6

3
7
3.3 Removal of Unit
1. Insert flat screw-driver into tab and push downwards.
2. Unit will detach from DIN Rail.
Figure 3.3 — Removal of Unit
INSTALLATI N AND REM VAL
4
8
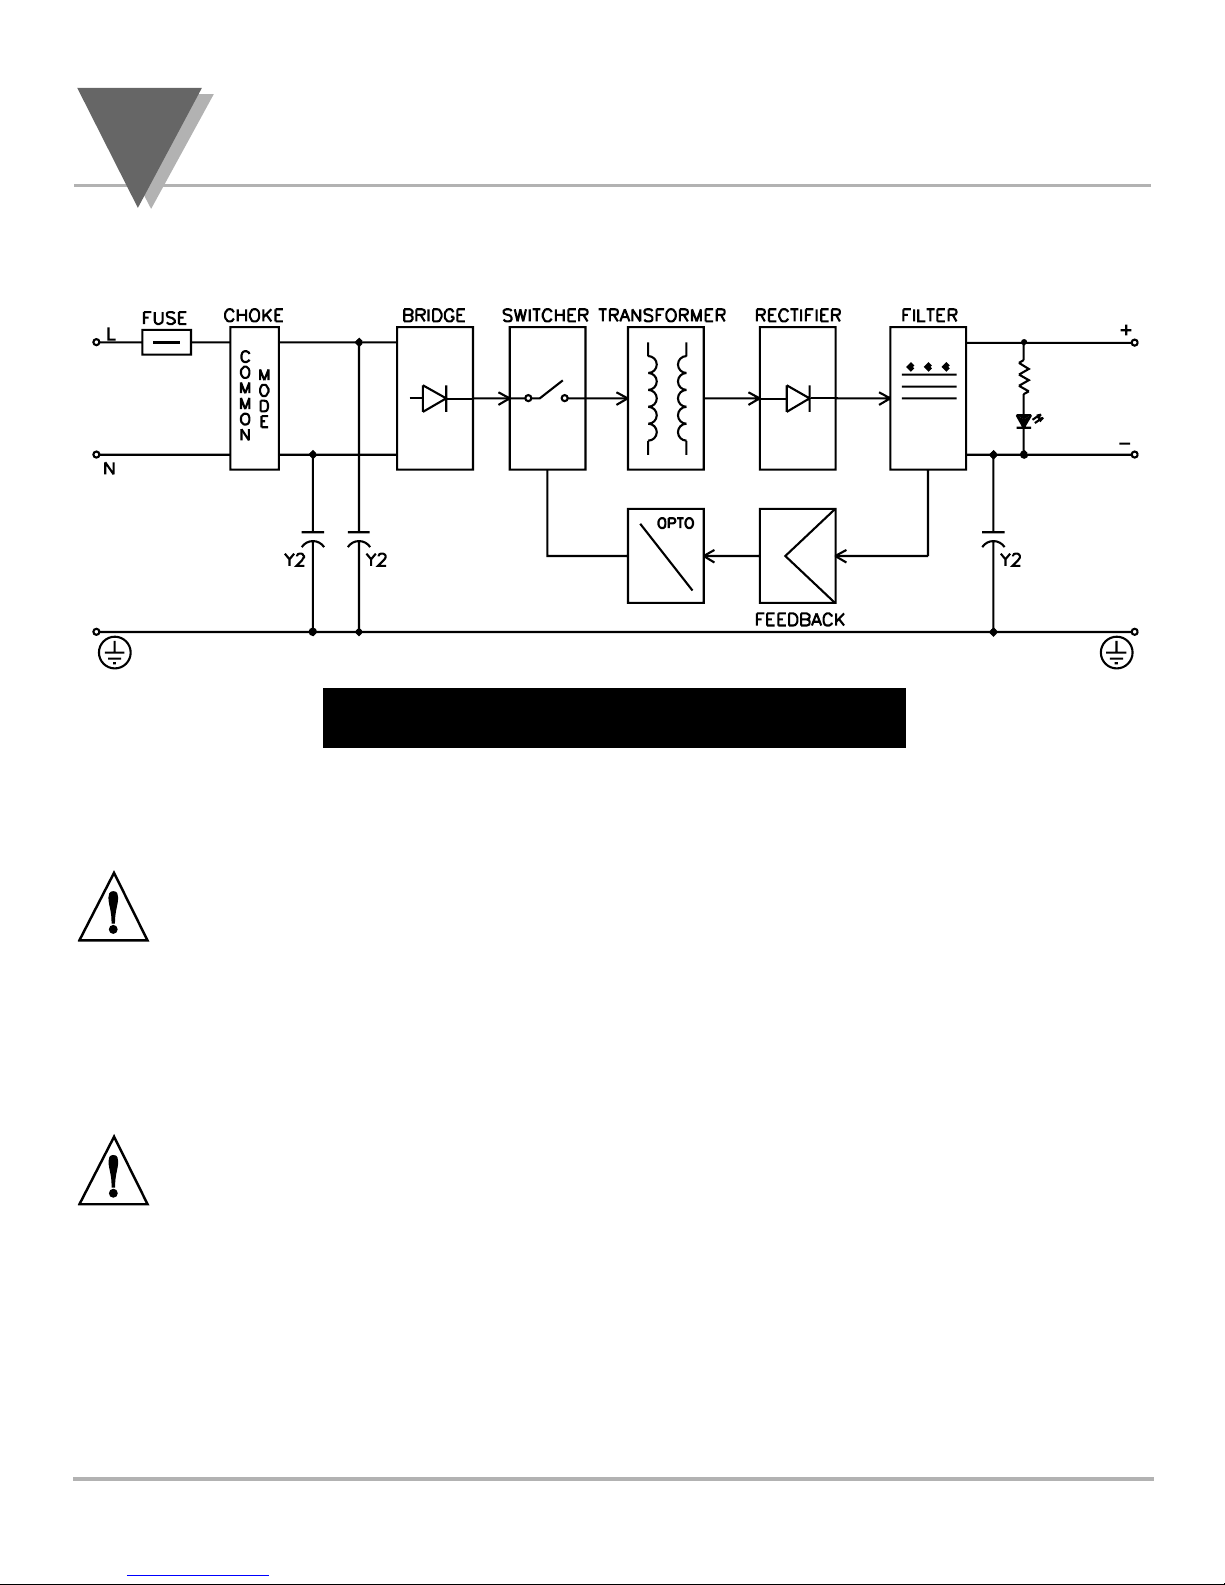
4.1 Block Diagram of Power Supply
Figure 4.1 — Block Diagram
4.2 Wiring
Warning: o not turn on the ac power to the power supply
unit until you have completed all output connections. Failure
to do so may result in injury!
This device must only be installed electrically by a specially
trained electrician with corresponding qualifications.
Warning: To avoid potential electric shock use National
Electrical Code (NEC) safety practices when wiring and
connecting this unit to a power source.
INPUT AN OUTPUT CONNECTIONS
Altri manuali Omega Engineering Alimentazione elettrica

Omega Engineering
Omega Engineering FAR-1 FAR-1 Series Manuale utente

Omega Engineering
Omega Engineering OM-420 Manuale utente

Omega Engineering
Omega Engineering PSP Manuale utente

Omega Engineering
Omega Engineering LDN-PS Manuale utente

Omega Engineering
Omega Engineering DIN-RAIL DRN-PS-750 Manuale utente

Omega Engineering
Omega Engineering U24Y101 Manuale utente


