ONFORU DT5UV Manuale utente
12V UV LED Strip Light
THANK YOU for buying this product. To provide an excellent
user experience, please install it according to these
instructions.
INSTALLATION GUIDE
1
English
SAFETY INFORMATION
1.Disconnect the power supply before attempting any work on the unit!
2.Check all components for damage, do not use the product if it is
damaged.
3.To ensure the product can work normally, please use it in the voltage
within the range on the lamp label.
4.Do not install the unit on (normally) flammable surfaces.
5.The light source of this luminaire is not replaceable; when the light
source reaches its end of life the whole luminaire shall be replaced.
6.This light is a non-dimmable product.To avoid failure, please don’t
connect it with the dimming controller.
7.Please pay attention to anti-static during the installation and use of the
product. Don’t touch the product with sharp tools
8.Never plug the light in with wet hands in case of electric shock.
9.This product is not a toy. Do not let children play it as the toy.
10.The 3M adhesive might be used during the installation, please make
sure it is applied firmly to prevent the product from falling.
11.This product is used for decoration, not suitable for lighting
12.To reduce the risk of strangulation the flexible wiring connected to
this luminaire shall be effectively fixed to the wall if the wiring is within
arm's reach.

2
English
NOTE
Please install the lights on the dust-free, clean and smooth
surface, otherwise the strips will fall.
During the installation, the bend should be avoided to be just in
the position of LEDs or other components.
01 - Safety Class III = Only operate lamps with this symbol with
Safety Extra Low Voltage (SELV). Only connect to SELV circuits.
02 - Lights that are not suitable for covering with thermal insulation materials.
03 - Lights that are not suitable for being directly installed on normally
flammable surfaces.(only suitable for being installed on a non-flammable
surface)
04 - It is not suitable for household room illumination.
05 - Safety Class II=This lamp is doubly insulated and may not be wired to a
protective conductor.
13.This product is not waterproof, please do not submerge in water or
do not use it in the humid environment for a long time.
14.Don't roll the light strip during the operation, otherwise it will melt.
15.Don't cover the light strip as the covering may cause the light strip to
overheat and melt or ignite.
16.Please use our power adapter, controller or dimmer, the power of
the strip light cannot be higher than the maximum power of the
adapter, controller or dimmer.
17.Only use the provided hanger or clip to protect the light strip. Do not
use staplers, nails or similar things to fix this product or its wires, which
may damage the insulation.
18.Risk of fire - do not replace the plug. The plug contains a safety
device (fuse) that should not be removed. Discard product if the
plug is damaged.
01 02 03 04 05

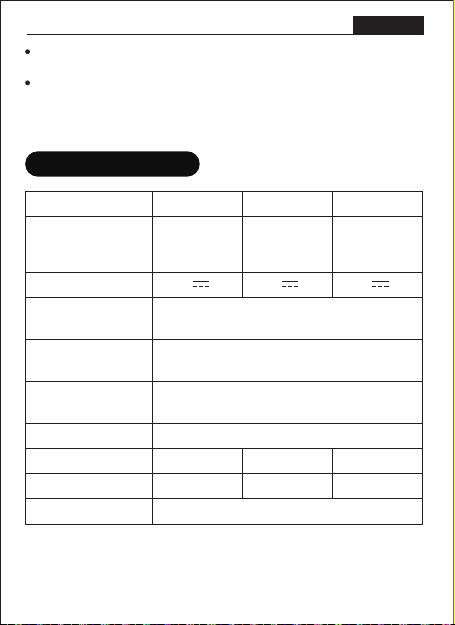
SPECIFICATIONS
English
3
The intended purpose of this special purpose product:This light is used
to create atmosphere. it is not suitable for household room illumination,
the light source is not intended for use in other applications.
100-240 V~
50/60Hz
0.8A
100-240 V~
50/60Hz
0.6A
100-240 V~
50/60Hz
0.8A
DT5UVDT5UV DT10UVModel
Input of Adapter
Input of light strip
Wavelength 385-400nm
Chromaticity
coordinate x=0.1763 y=0.0317
CRI -1.9
Power factor ≥0.5
Length 5m/16.4ft
LEDs Quantity 300units
5m/16.4ft
300units
ta:
-20-40°C / -4°F-104°F
2*5m/2*16.4ft
600units
12V 1A 12V 2A
12V 2A

4
STEP 1
STEP 1
STEP 2
STEP 2
Peel off the cover of LED
strip light.
Stick the adhesive strip onto
the targeted places where you
want to use the strip. To avoid
falling out, please choose the
proper area to stick the LED
strip lights, and sweep the dust
off the surface.
How to install:
Tips
You can reinforce the strip light
with transparent fixing clips
in the package.
English

5
STEP 3
STEP 3
Connect the DC Female Side
of the LED strip light to the
power adapter. Plug the power
adapter into the socket. Then
the LED strip light works.
Model: DT5UV
For the pack of 1 sets
1
1
Mains
plug
Model: DT10UV
DC
DC
1. Connect the DC female side
of the LED strip light with the
DC Line.
2. Connect the Line with the
power adapter.
3. Plug the power adapter into
the socket. Then the LED strip
light work.
For the pack of 2 sets
Mains
plug
English
Model: DT15UV
DC
DC
Mains
plug
3
2
1
1. Connect the DC female side of the LED strip light with the
DC Line.
2. Connect the Line with the power adapter.
3. Plug the power adapter into the socket. Then the LED strip
light work.
For the pack of 3 sets
English
6
If the strip can’t be turned on after installation, please check whether
the joint is connected correctly.
If the light strip is not fixed with tape, you can reinforce it with clips
in the package.
Tips
Do not dispose of electrical and electronic
equipment as domestic waste.
EU countries only:
Under the current European Directive on Waste Electrical and
Electronic equipment and its implementation in national law,
electrical and electronic equipment no longer suitable for use must
be collected separately and recycled in an environmentally
compatible manner.
Disposal
Electrical and electronic equipment, accessories and packaging must
be recycled in an environmentally compatible manner.
Operation / Maintenance
Priortocleaningthelight,makesure ithas been disconnectedfrom the
power supply.
The unit is not suitable for burglar alarm systems as it is not tamperproof
in the manner prescribed for such systems.
Never use any chemicals or corrosive substances for cleaning.
This light should be used in condition with sound heat dissipation. The
working temperature of it should be less than 40°C. Overhigh working
temperature will cause serious lumen depression and affect lifespan
of the light.

1.Vor allen Arbeiten am Gerät muss die Stromversorgung unterbrochen
werden!
2.Überprüfen Sie vor der Installation alle Bauteile. Verwenden Sie das
Produkt nicht, wenn es beschädigt ist.
3.Verwenden Sie die Spannung im Bereich der angegebenen Spannung
auf dem Lampenetikett, um den normalen Betrieb des Produkts zu
gewährleisten.
4.Installieren Sie das Gerät nicht auf gewöhnlichen leicht brennbaren
Oberflächen.
5.Die Lichtquelle dieser Leuchte ist nicht austauschbar; wenn die
Lichtquelle ihr Ende erreicht Lebensdauer soll die gesamte Leuchte
ersetzt werden.
6.Diese Leuchte ist ein nicht dimmbares Produkt.Um Fehler zu
vermeiden, verbinden Sie es bitte nicht mit dem Dimmer-Controller.
7.Bitte achten Sie bei der Installation und Verwendung des Produkts auf
Antistatik und berühren Sie nicht mit den scharfen Gegenstände das
Produkt.
8. Schließen Sie das Licht im Falle eines Stromschlags niemals mit
nassen Händen an.
9.Dieses Produkt ist kein Spielzeug. Lassen Sie Kinder es nicht als
Spielzeug spielen.
10. Der 3M-Kleber könnte während der Installation verwendet werden,
bitte stellen Sie sicher, dass er fest aufgetragen wird, um zu verhindern,
dass das Produkt herunterfällt.
11.Dieses Produkt dient zur Dekoration und ist nicht zur Beleuchtung
geeignet.
7
12V UV LED-Streifen
INSTALLATIONSANLEITUNG
Vielen Dank für Ihren Kauf des Produktes. Um eine gute
Benutzererfahrung zu gewährleisten, bitte installieren Sie es
gemäß der folgenden Anweisung.
Deutsch
SICHERHEITSINFORMATIONEN

8
Deutsch
HINWEISE
01 - Schutzklasse III = Leuchten mit diesem Symbol nur mit
Schutzkleinspannung betreiben. Anschluss nur an SELV Stromkreise.
02 - Die Lampen sind nicht zum Abdecken mit wärmedämmenden Materialien
geeignet.
03 - Die Lampen sind nicht für die direkte Montage auf normal entflammbaren
Oberflächen geeignet. (nur für die Montage auf nicht brennbaren Oberflächen
geeignet)
04 - Es ist nicht für die haushaltsraumbeleuchtung geeignet.
05 - Schutzklasse II=Diese Lampe ist doppelt isoliert und darf nicht an einen
Schutzleiter angeschlossen werden.
12. Um das Risiko einer Strangulation zu verringern, muss die flexible
Verkabelung, die an diese Leuchte angeschlossen ist, effektiv an der
Wand befestigt werden, wenn die Verkabelung in Reichweite ist.
13. Dieses Produkt ist nicht wasserdicht, bitte nicht in Wasser tauchen
oder für längere Zeit in feuchter Umgebung verwenden.
14. Rollen Sie den Lichtstreifen während des Betriebs nicht, da er sonst
schmilzt.
15. Decken Sie den Lichtstreifen nicht ab, da die Abdeckung dazu
führen kann, dass der Lichtstreifen überhitzt und schmilzt oder sich
entzündet.
16.Bitte verwenden Sie unseren Netzadapter, Controller oder Dimmer,
die Leistung der Lichtleiste kann nicht höher sein als die maximale
Leistung des Adapters, Controllers oder Dimmers.
17.Verwenden Sie nur den mitgelieferten Aufhänger oder Clip, um den
Lichtstreifen zu schützen. Verwenden Sie keine Hefter, Nägel oder
ähnliche Dinge, um dieses Produkt oder seine Drähte zu befestigen, da
dies die Isolierung beschädigen kann.
18.Brandgefahr - Stecker nicht ersetzen. Der Stecker enthält eine
Sicherheitsvorrichtung (Sicherung), die nicht entfernt werden sollte.
Entsorgen Sie das Produkt, wenn der Stecker beschädigt ist.
01 02 03 04 05
SPEZIFIKATIONEN
Deutsch
9
Der Verwendungszweck dieses Spezialprodukts: Diese Leuchte wird
verwendet, um Atmosphäre zu schaffen.es ist nicht für die
haushaltsraumbeleuchtung geeignet,die lichtquelle ist nicht für
andere anwendungen geeignet.
Bitte stellen Sie sicher, dass der Installationsbereich staubfrei,
sauber und glatt ist, da sonst der Lichtstreifen abfallen kann.
Bei Installation sollte die Biegung nicht an der Position der LED
oder anderer Komponenten sein, um das Produkt nicht zu
beschädigen und die Lebensdauer des Lichts nicht zu
beeinträchtigen.
100-240 V~
50/60Hz
0.8A
100-240 V~
50/60Hz
0.6A
100-240 V~
50/60Hz
0.8A
DT5UVDT5UV DT10UV
385-400nm
x=0.1763 y=0.0317
-1.9
≥0.5
5m/16.4ft
300units
5m/16.4ft
300units
ta:
-20-40°C / -4°F-104°F
2*5m/2*16.4ft
600units
12V 1A 12V 2A
12V 2A
Modell
Eingang der
Lichtleiste
Chromatizitätsk-
oordinate
Farbwiedergab-
eindex
Leistungsfaktor
Länge
Anzahl der LED
Eingang des
Adapters
Input of light strip

10
Deutsch
Modell: DT5UV
Tipps
Wenn der LED Streifen nicht mit
Klebeband fixiert ist, können Sie
es mit Befestigungsclips
verstärken, die in der
Verpackung mitgeliefert haben.
Säubern Sie vor der Montage die
gezielte Fläche. Kleben Sie den
Streifen an einer glatten,
trockenen Fläche, um einen
optimalen Halt des LED Streifen
zu gewährleisten.
Installationsschritte
Schritte 1
Ziehen Sie bitte die Abdeckung
ab.
Schritte 1
Schritte 1
Schritte 2
Altri manuali per DT5UV
1
Questo manuale è adatto per i seguenti modelli
1
Indice
Lingue:
Altri manuali ONFORU Attrezzatura di illuminazione

ONFORU
ONFORU BDJ55G-3 Manuale utente

ONFORU
ONFORU BDD50D-2 Manuale utente

ONFORU
ONFORU CTB24UVBL Manuale utente

ONFORU
ONFORU CTB48RGBU Manuale utente

ONFORU
ONFORU CTB24BL Manuale utente

ONFORU
ONFORU CTB48RGB Manuale utente

ONFORU
ONFORU DT5UV Manuale utente

ONFORU
ONFORU CTB24UV Manuale utente

ONFORU
ONFORU BDTYB03 Manuale utente

ONFORU
ONFORU MZT-FW01 Manuale utente


