
OWC Mercury Elite-AL Pro Manuale utente
OWC Mercury Elite-AL Pro Dual Bay
Assembly Instructions

OWC Mercury Elite-AL Pro Dual Table of Contents
1 INTRODUCTION
1.1 SYSTEM REQUIREMENTS
1.1.1 Mac® Requirements
1.1.2 PC Requirements
1.2 PACKAGE CONTENTS
1.3 ABOUT THIS MANUAL
1.4 PORT VIEW & CABLE CONNECTIONS
1.5 DETAILED VIEW
1.5.1 Front Activity Light View
2 SYSTEM SETUP
5 APPENDIX
6 CUSTOMER SERVICE
6.1 BEFORE CONTACTING CUSTOMER SERVICE
6.2 CONTACT INFORMATION
2.1 COVER REMOVAL
2.2 DRIVE INSTALLATION
2.3 RAID CONFIGURATION (FW/USB/ESATA MODEL ONLY)
2.4 FINAL ASSEMBLY
3 FORMATTING
3.1 MACINTOSH FORMATTING
3.2 REMOVING AN EXISTING GUID PARTITION
3.3 WINDOWS FORMATTING
4 TROUBLESHOOTING & TIPS
4.1 TROUBLESHOOTING
4.2 USAGE TIPS
5.1 FAQ
5.2 ABOUT DATA PROTECTION
Thank you for purchasing the OWC Mercury Elite-AL Pro Dual!
We’re condent that it will provide years of high performance
service for your storage and backup needs. This manual contains
information on how to install the drives of your choice into the en-
closure, set the desired RAID level (0, 1, Span or Independent (quad
interface models only), format and connect your new storage solu-
tion to your computer.
Should you require additional support after reading this manual
along with helpful tips and FAQs, please see the inside back page
for OWC customer support options.
OWC Mercury Elite-AL Pro Dual Chapter 1 - Introduction
1 INTRODUCTION
1.1 System Requirements
1.1.1 Mac Requirements
•Minimum PowerPC® G4 CPU, 128MB RAM
•eSATA interface, Mac OS X 10.3 or later
•FireWire® interface, Mac OS X 10.2 or later
•USB 2.0 interface, Mac OS X 10.2 or later
1.1.2 PC Requirements
•Minimum 500MHz Intel® Pentium III CPU, 128MB RAM
•eSATA interface, Windows® XP / Vista® / Windows 7
•FireWire interface, Windows 2000 / XP / Vista / Windows 7
•USB 2.0 interface, Windows 2000 / XP / Vista / Windows 7
1.3 About This Manual
Firmware, images, and descriptions may vary slightly between this man-
ual and the unit shipped. Functions and features may change depend-
ing on the rmware version. Please visit the product webpage for the
most recent specications.
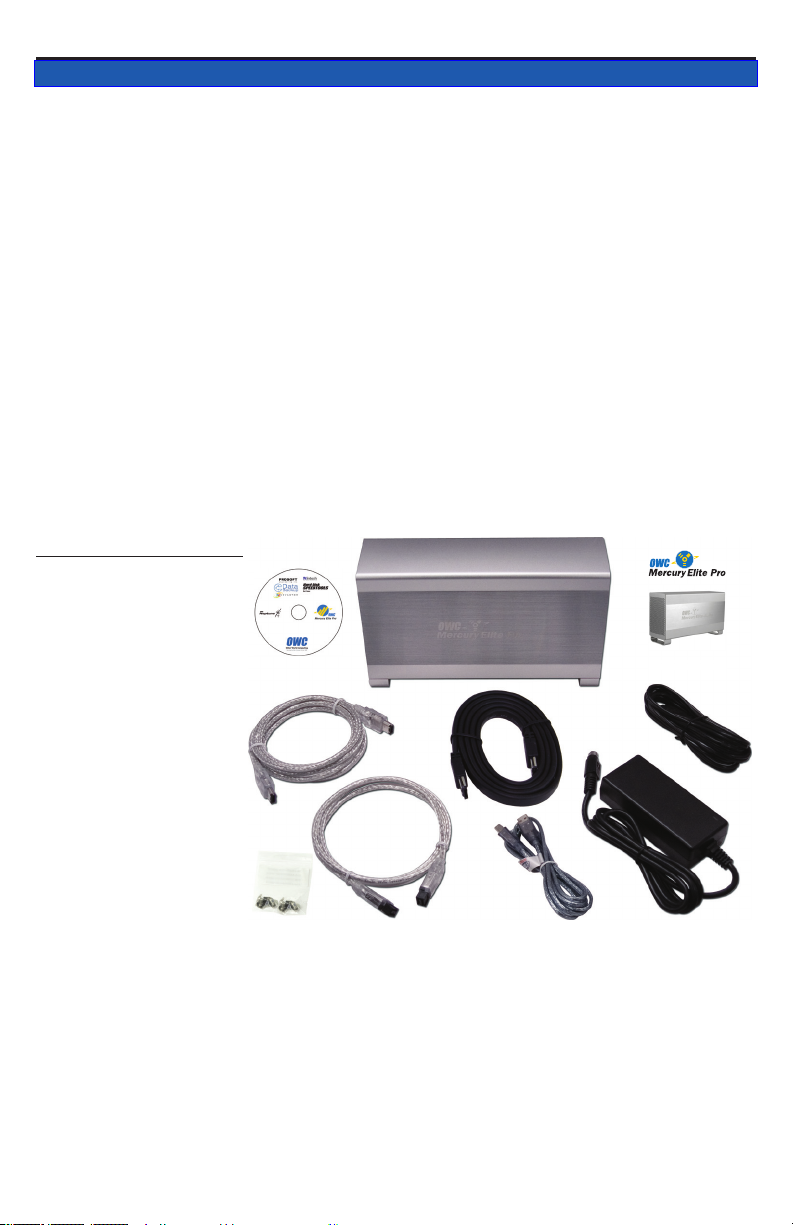
Item
➀ OWC Mercury Elite-AL Pro Dual
Enclosure
➁ FireWire 400 Cable (*1)
➂ FireWire 800 Cable (*1)
➃ eSATA Cable (*1, *2 (includes 2))
➄ USB 2.0 (A-B) Cable (*1)
➅ Power Supply
➆ Power Supply Cable
➇ Screws for Hard Drives
➈ Software CD Bundle (*4)
➉ Assembly Instructions
OWC Mercury Elite-AL Pro Dual Bay
Assembly Instructions
➀
➁
➂
➄
➃
➅
➆
➇
➈
➉
(*1) Included with Quad Interface Model
(*2) Included with eSATA Passthrough Model
(*3) Included with some bundled items only ; see website for details.
1.2 Package Contents
OWC Mercury Elite-AL Pro Dual Chapter 1 - Introduction
1.4 Port View & Cable Connections
1.5 Detailed View
1.5.1 LED Indicator
The OWC Mercury Elite-AL Pro has a single cool blue LED at the front of
the hard drive enclosure. It will illuminate blue when powered on, and
ash on drive activity (both reading and writing).
➂ ➃ ➄
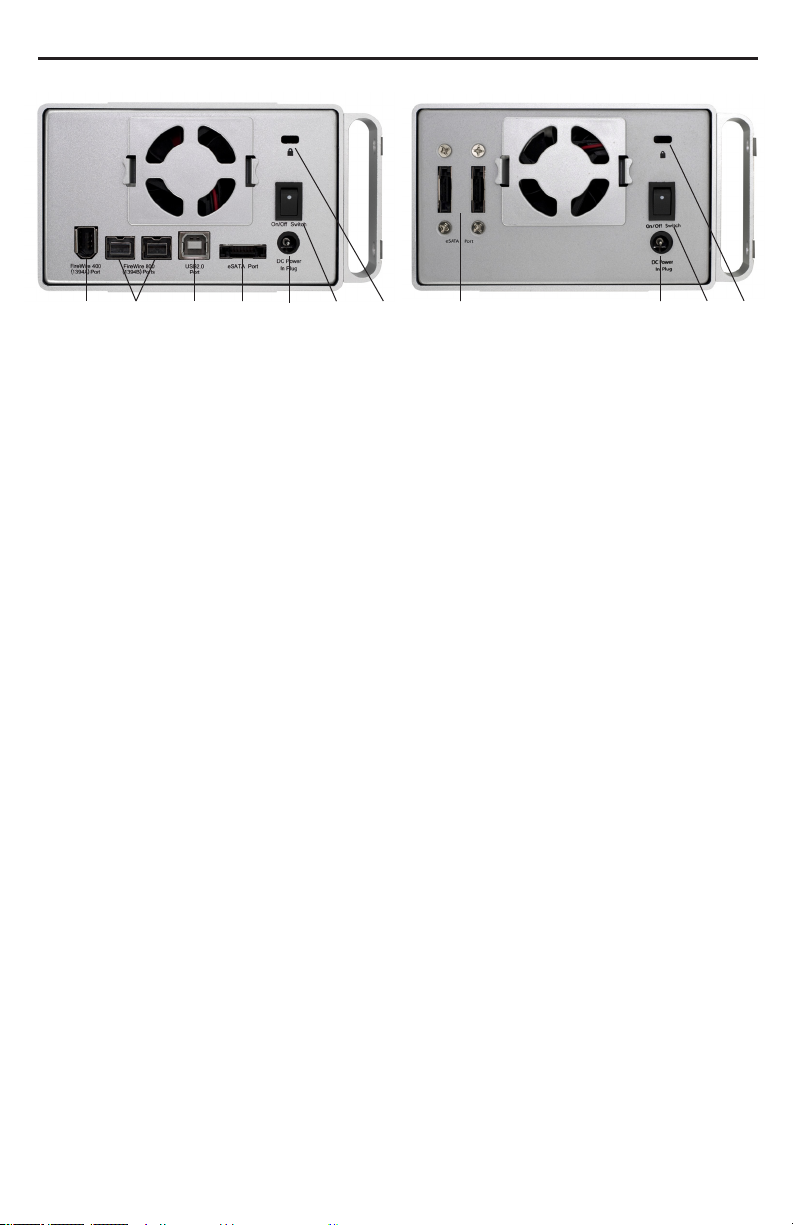
Cable Connections:
The OWC Mercury Elite-AL Pro family has multiple interfaces to work
with any computer system.
➀ FireWire 400 (1394A) Port - Connect one FireWire 400 port to your
computer using the included cable.
➁ FireWire 800 (1394B) Ports - Connect one FireWire 800 port to your
computer using the included cable and have an extra FireWire 800 port
to add peripherals with!
➂ USB Port - Connect one of your computer’s USB ports to the OWC
Mercury Elite-AL Pro here using the included cable.
➃ eSATA Port - The utmost in speed. If you’re trying to make your OWC
Mercury Elite-AL Pro the fastest it can be, attach an eSATA cable to this
port.
➄On/O Switch - Turn the OWC Mercury Elite-AL Pro on and o here.
➅ DC IN port - Connect the include external power supply to the OWC
Mercury Elite-AL enclosure here.
➆ Security Lock - Attach a security cable to your OWC Mercury Elite-AL
enclosure here and tether it to your desk for theft prevention.
➀ ➁ ➅ ➆ ➃➄ ➅ ➆
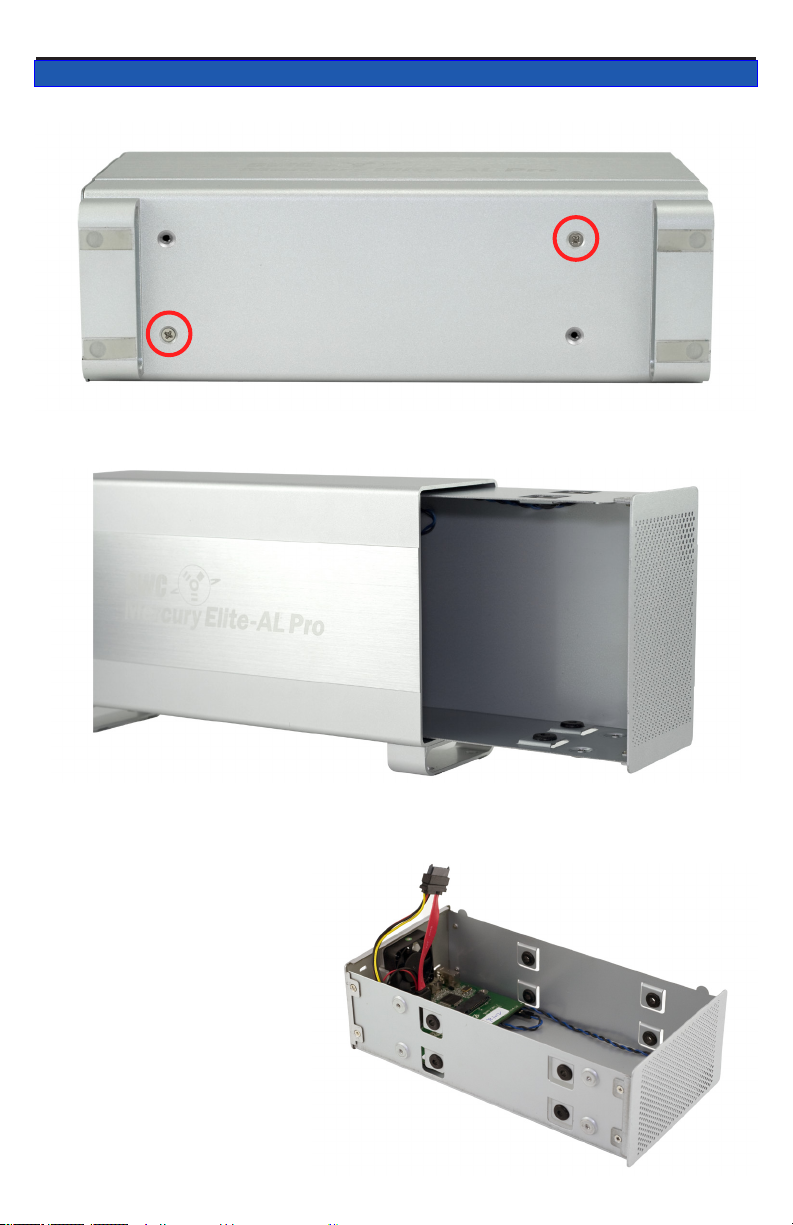
Remove the 2 Phillips screws from the bottom of the enclosure
From the rear of the enclosure, push forwards on the interior to slide the
chassis out of the outer shell.
Once the chassis is
removed from the outer
shell, you can begin
installing your hard drive
mechanisms or edit the
settings on your RAID.
OWC Mercury Elite-AL Pro Dual Chapter 2 - System Setup
2 SYSTEM SETUP
2.1 Cover Removal
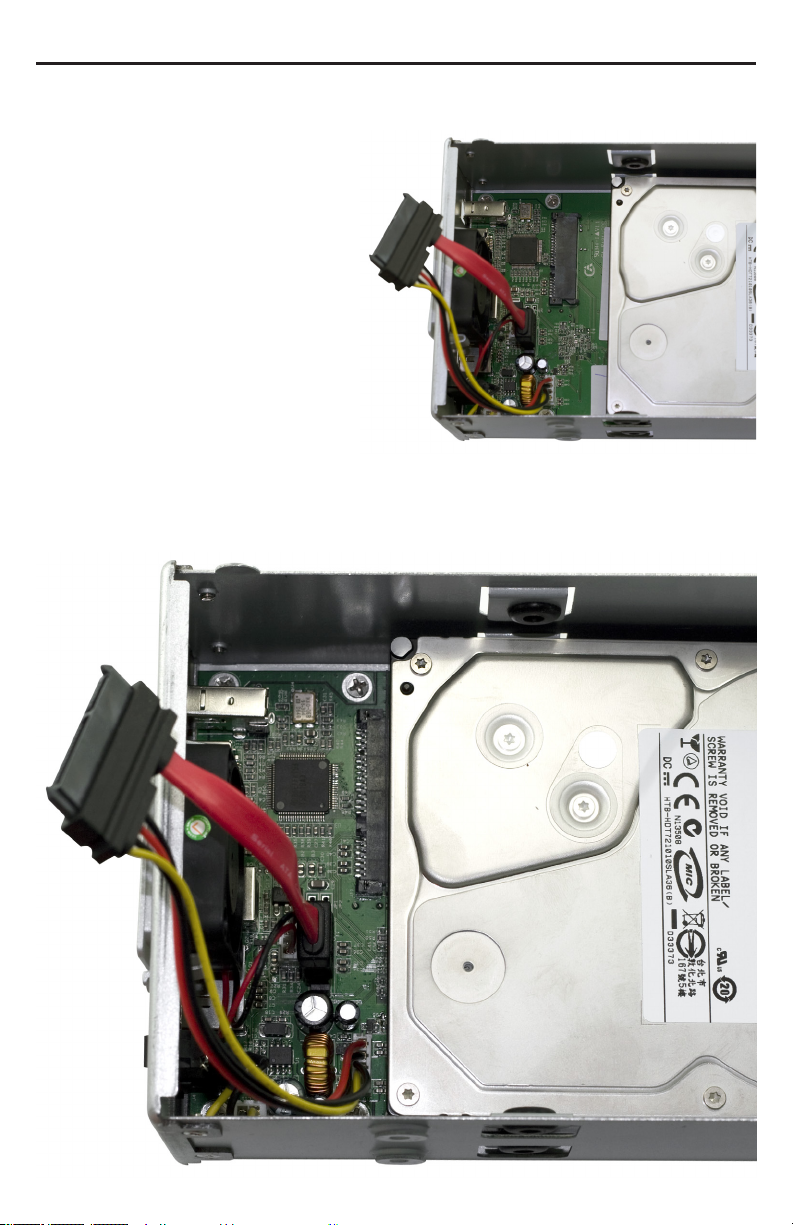
(Versions with FireWire & USB)
Begin drive installation by
setting your hard drive into the
chassis, towards the front of
the chassis and slide the drive
onto the black connector on the
green logic board.
(Versions with eSATA ONLY)
Connect one of the multicolored
power cables to the hard drive
you are installing in the lower
drive position, and connect one of the red SATA cables to the hard drive
you are installing in the lower position, and place the hard drive into the
chassis.
OWC Mercury Elite-AL Pro Dual Chapter 2 - System Setup
2.2 Drive Installation
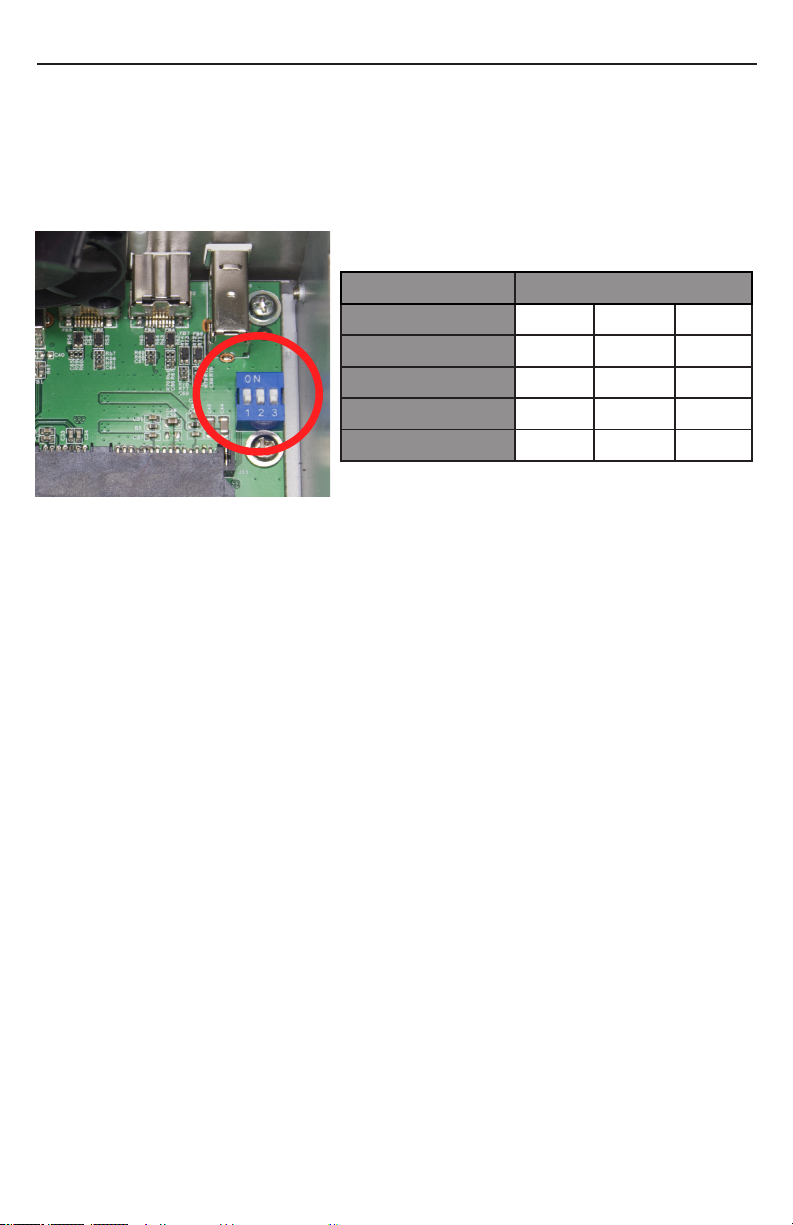
MODE SW#1 SW#2 SW#3
RAID 1 --- OFF OFF
RAID 0 --- OFF ON
SPAN --- ON OFF
INDEPENDENT --- ON ON
2TB MODE ON --- ---
To change the RAID settings on your FireWire & USB equipped enclo-
sure, there are jumpers located on the bridge board inside the enclo-
sure that need to be adjusted. To do so, you will need to remove the
outer shell of the enclosure.
INDEPENDENT - Each hard drive will appear as a separate volume. You
can use dierent models and sizes of hard drive with this mode. NOTE:
Only FireWire and USB connections support independent mode.
SPAN (JBOD) -The drives show up as one large single volume. The total
size will depend on the drives installed, you can use drives of dierent
capacities. Spanning is an array (not RAID) that is written sequentially to,
across the hard drives. By itself, it does not provide any performance or
redundancy benets.
RAID 0 (STRIPE) - The drives show up as one large (single) volume. It is
highly recommended to use identical hard drives for this RAID method.
However, you can utilize drives of dierent capacity, but realize that the
RAID size will be based on the smallest capacity total of the drives used
in the RAID set.
RAID 1 (MIRROR) - The drives show up as one volume, but only 50% of
the total capacity can be used. It is highly recommended to use identical
hard drives for this RAID method. However,while you can utilize drives
of dierent capacity, the RAID size will be based on the smallest capacity
total of the drives used in the RAID set. RAID 1 creates an exact copy (or
“mirror”) of a set of data on the second drive. This is useful when reliabil-
ity and backup are more important than capacity. When one drive fails,
it can be replaced and the data rebuilt.
2TB MODE - When Switch #1 is in the ON position, the total capacity of
the drives (either in INDEPENDENT or any other mode) are limited to a
maximum of 2.2TB for compatiblity with older systems.
OWC Mercury Elite-AL Pro Dual Chapter 2 - System Setup
2.3 RAID Conguration (FW/USB/eSATA Model ONLY)
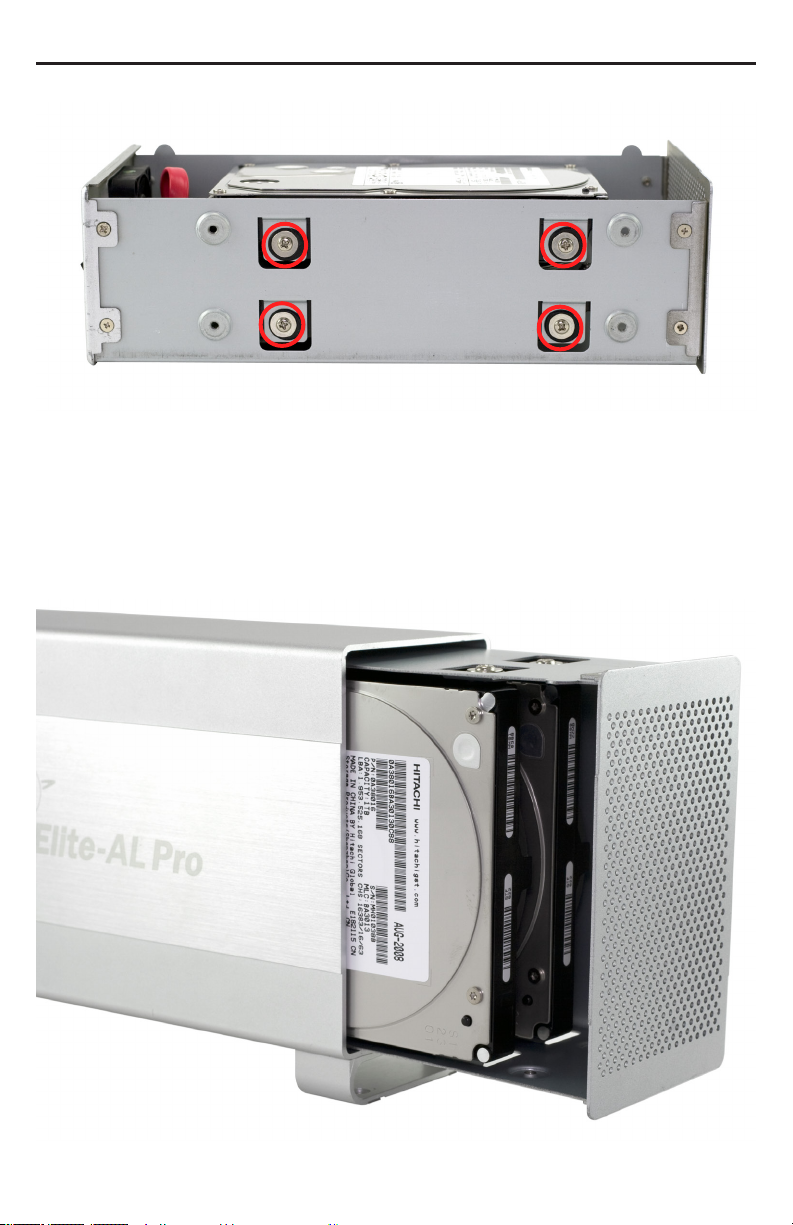
Secure the 2 hard drives into the chassis by inserting the 8 Phillips
screws (4 each side) through the black rubber anti-vibration grommets,
and into the hard drives. You may have to lift up a bit on the drives to
get them into position. Firmly tighten the 8 screws to secure your hard
drives into the chassis.
Slide the assembled chassis back into the enclosure from the front to
the rear.
OWC Mercury Elite-AL Pro Dual Chapter 2 - System Setup
2.4 Final Assembly
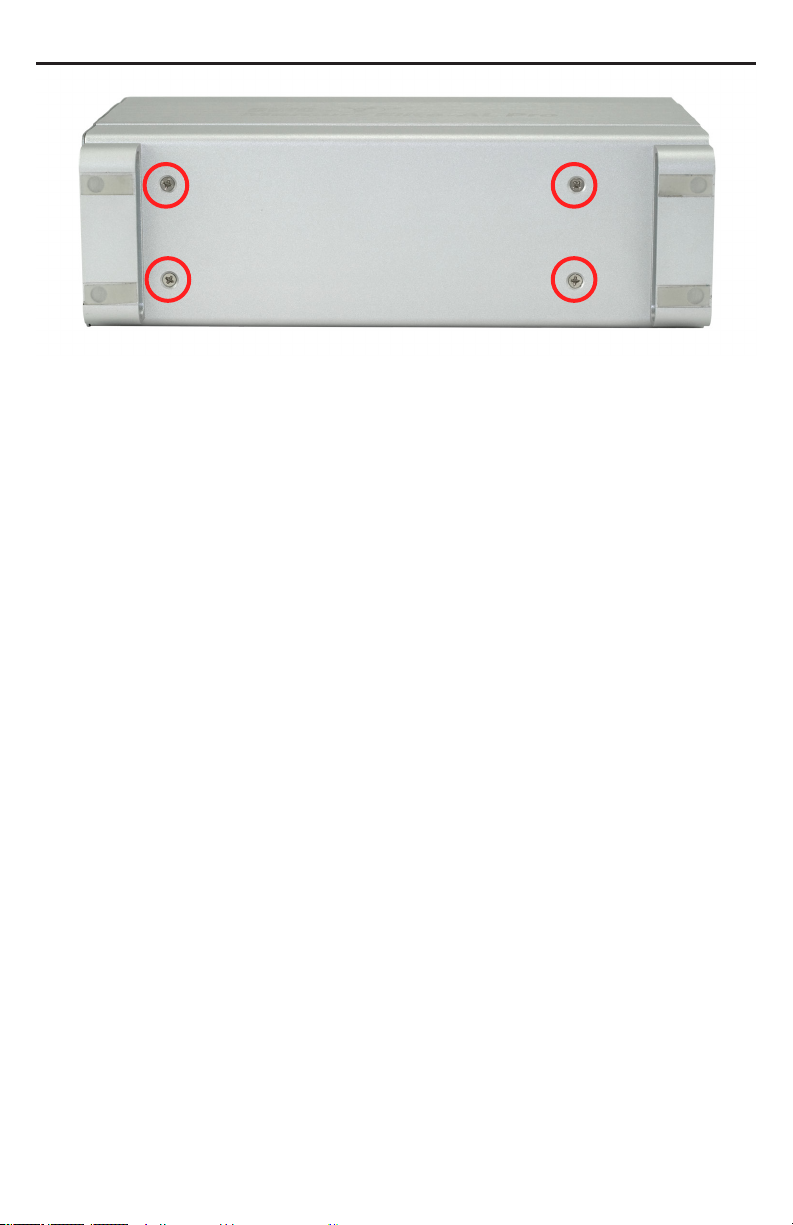
Place the enclosure on it’s side and insert 4 Phillips screws into the holes
in the bottom of the enclosure to complete assembly of your new OWC
Mercury Elite-AL Pro Dual Bay.
Time to power up your new OWC Mercury Elite-AL Pro Dual Bay!
Turn the drive so you can see the rear ports. Connect the power cable to
the back of the drive, and whichever drive interface cable (FireWire, USB,
eSATA) you plan on using to connect to your computer. Plug the power
brick into the AC power cable (not shown), and power the unit on. You
should hear the drives spin up, and click a couple of times. After about
15 seconds, the drives will be ready to use.
You now need to initialize your drive. If you’re using a Macintosh, the
next pages walk you through that procedure.
If you are using Windows 98/ME/2000/XP/Vista:
You will need to initialize the hard drive before it will show up in “My
Computer”.
For instructions on how to initialize the hard drive please use the link
below. Click on the link that corresponds to the version of Windows you
are using:
http://eshop.macsales.com/tech_center/formatting.cfm
OWC Mercury Elite-AL Pro Dual Chapter 2 - System Setup
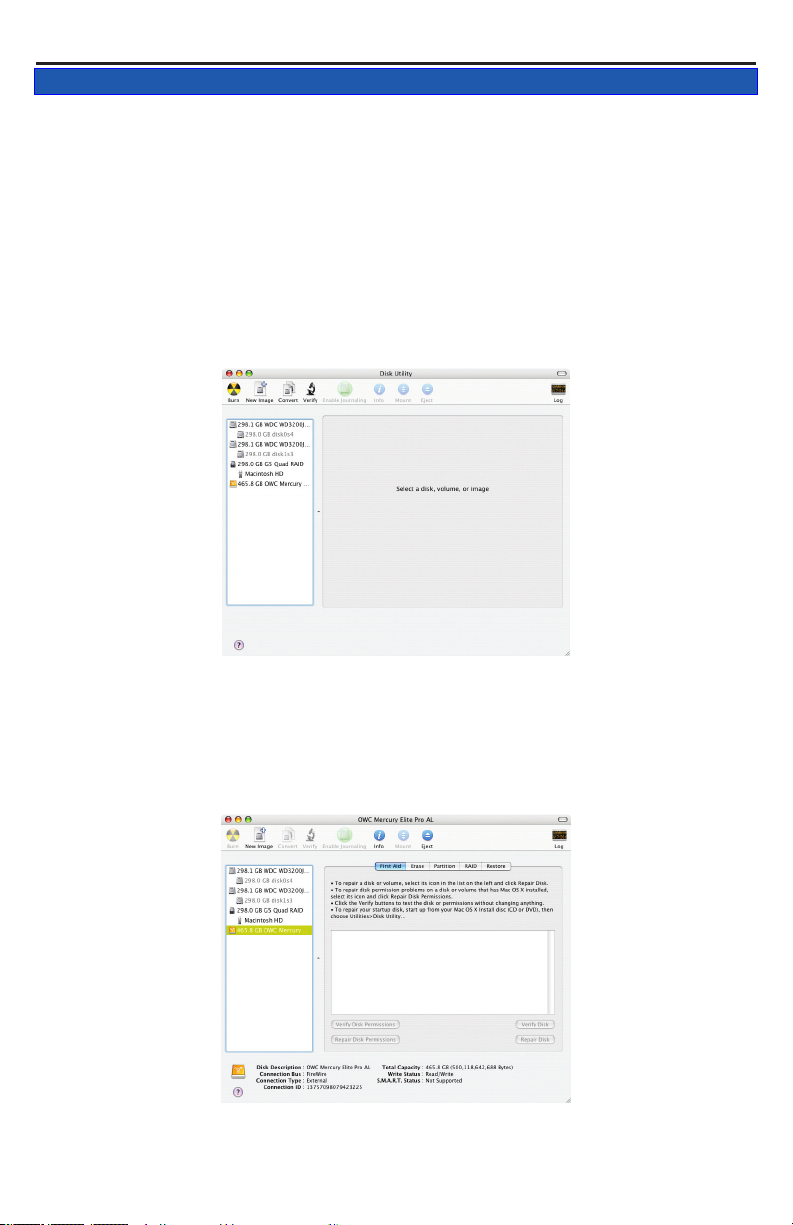
Select the device with no volumes attached to it; in this picture, that
would be the 465.8GB OWC Mercury drive, your drive may be of a dif-
ferent size depending on the mechanisms you use. Click once on the
picture of the drive icon next to the text.
Once you’ve selected the OWC Mercury drive, you’ll notice the above
change in the Disk Utility program. Click on the “Erase” tab, next to the
highlighted blue “First Aid”tab in this picture.
3.1 Formatting your OWC Mercury Elite-AL Pro Dual on a Macintosh
with Mac OS X
Open the Disk Utility application, which is located in /Applications/
Utilities
IMPORTANT NOTE: This procedure will erase all data on your hard disk
drives in the OWC Mercury Elite-AL Pro Dual. Back up any important
data before proceeding!
OWC Mercury Elite-AL Pro Dual Chapter 3 - Formatting
3 FORMATTING
➀
➁
Altri manuali per Mercury Elite-AL Pro
7
Indice
