PhaseOne PhotoPhase Manuale utente

Artisan Technology Group is your source for quality
new and certied-used/pre-owned equipment
• FAST SHIPPING AND
DELIVERY
• TENS OF THOUSANDS OF
IN-STOCK ITEMS
• EQUIPMENT DEMOS
• HUNDREDS OF
MANUFACTURERS
SUPPORTED
• LEASING/MONTHLY
RENTALS
• ITAR CERTIFIED
SECURE ASSET SOLUTIONS
SERVICE CENTER REPAIRS
Experienced engineers and technicians on staff
at our full-service, in-house repair center
WE BUY USED EQUIPMENT
Sell your excess, underutilized, and idle used equipment
We also offer credit for buy-backs and trade-ins
www.artisantg.com/WeBuyEquipment
REMOTE INSPECTION
Remotely inspect equipment before purchasing with
our interactive website at www.instraview.com
LOOKING FOR MORE INFORMATION?
Visit us on the web at www.artisantg.com for more
information on price quotations, drivers, technical
specications, manuals, and documentation
Contact us: (888) 88-SOURCE | sales@artisantg.com | www.artisantg.com
SM
View
Instra

Digital Camera Back for
4"x5" Large Format
Cameras
User’s Guide
DIGITAL STUDIO CAMERA SYSTEM
Edition 3.0
85280002
Artisan Technology Group - Quality Instrumentation ... Guaranteed | (888) 88-SOURCE | www.artisantg.com

Artisan Technology Group - Quality Instrumentation ... Guaranteed | (888) 88-SOURCE | www.artisantg.com

Table of Contents
For Your Safety..................................................................................................................2
Section 1: Introduction......................................................................................................3
Section 1.1: How it Works............................................................................................3
Section 2: Back Panel Description.....................................................................................5
Section 3: Mounting and Unmounting the Camera Back..................................................7
Section 3.1: Mounting the Camera Back ......................................................................7
Section 3.2: Unmounting the Camera Back..................................................................7
Section 4: Care and Cleaning............................................................................................8
Section 4.1: Storage and Handling................................................................................8
Section 4.2: Cleaning the Camera Back Case................................................................8
Section 4.3: Cleaning the CCD Sensor.........................................................................9
Section 5: Camera Back Specifications.............................................................................10
PhotoPhase Digital Camera Back for Large Format Cameras – User's Guide
1
Artisan Technology Group - Quality Instrumentation ... Guaranteed | (888) 88-SOURCE | www.artisantg.com

PhotoPhase Digital Camera Back for Large Format Cameras – User's Guide
2
For Your Safety:
Read this manual carefully before turning on your system.
•If any component of your system becomes wet or damaged, remove
power by unplugging the power unit from the wall socket.
•Keep these instructions handy for reference by you or others.
•If you receive a shock while using this equipment, remove power and con-
tact a licensed electrician immediately.
•Follow all instructions and warnings dealing with your system.
•Never try to open any of your PhotoPhase units; electrical shock may result.
If your units require service, contact your licensed PhotoPhase dealer.
Warning: Electrical equipment may be hazardous if misused. Always super-
vise children when electrical equipment is present.
!
Artisan Technology Group - Quality Instrumentation ... Guaranteed | (888) 88-SOURCE | www.artisantg.com

Section 1 The PhotoPhase Digital Camera Back
The PhotoPhase digital camera back for large format cameras will enable
you to use your usual 4" x 5" large format cameras and lenses to take
digital photographs in color. The camera back fits into a standard spring-
back film loading mechanism, just like a normal camera back.
Section 1.1 How it Works
The camera back contains a light sensitive element called a CCD (charge
coupled device). This device contains many tiny light sensitive areas,
each of which maps to one pixel in the final photograph. A pixel is one
picture element or picture cell, and is analogous to the grain size of film
stock.
The camera back uses a sensor with three linear CCDs; there is one line
for each additive primary color: red, green, and blue (RGB). Each line,
or array, is one pixel high and 5000 pixels wide. In the final image, the
three RGB lines are digitally mixed to produce a single line of pixels in
full color.
Before exposure, called capturing in digital techniques, the image is
focussed onto the plane in which the CCD array will travel. At the start
of the capture process the array is positioned at the top of the area to be
scanned. During capture, the RGB lines are read, the CCD sensor is
moved a distance equal to the height of one pixel, and then the next lines
are read. This is repeated until the entire image area has been covered.
This process is called scanning.
The camera back contains the basic sensory electronics for image cap-
ture (the CCD and analog to digital converter). The camera back also
contains microprocessors which control the camera back, processes
incoming images, and communicate with your computer. The Phase
One software, running on the computer, makes it possible for you to
calibrate and control the camera back, view your images, and make
PhotoPhase Digital Camera Back for Large Format Cameras – User's Guide
3
Artisan Technology Group - Quality Instrumentation ... Guaranteed | (888) 88-SOURCE | www.artisantg.com
PhotoPhase Digital Camera Back for Large Format Cameras – User's Guide
4
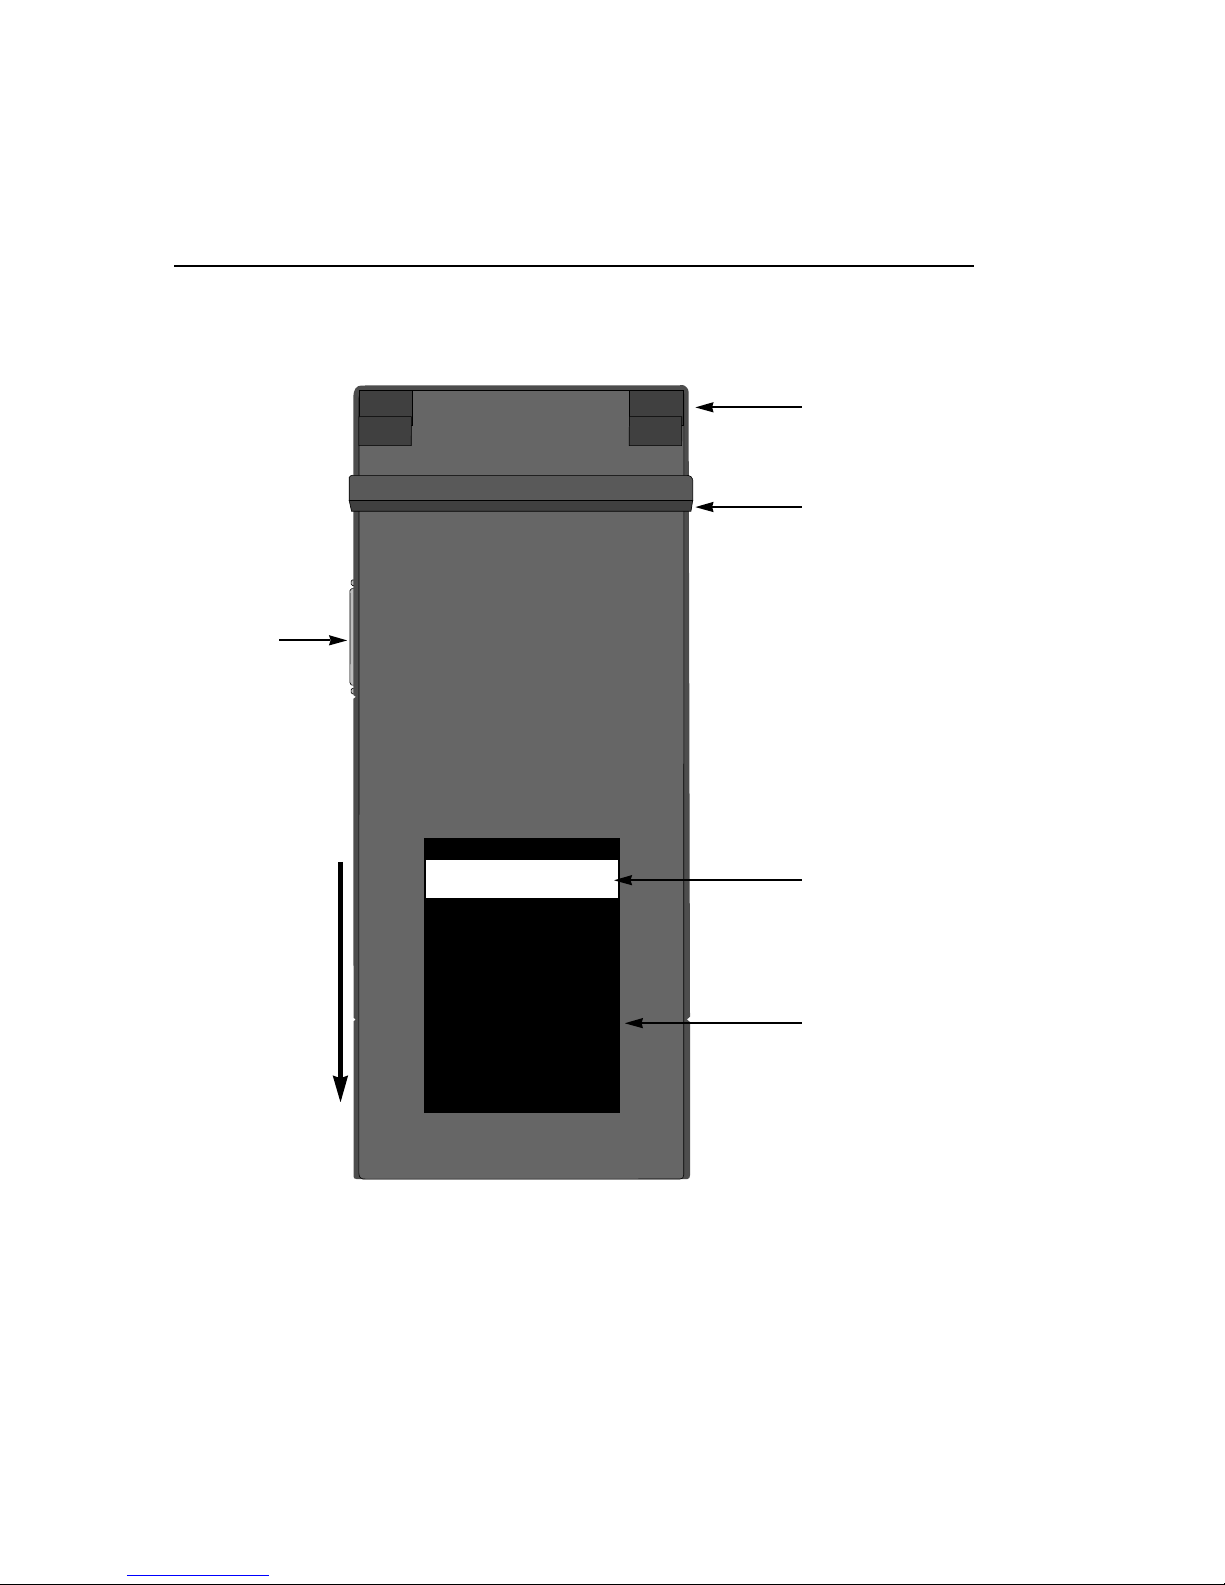
CCD Sensor
Scan Area
SCSI
Connector
Scan
Direction
Protection
Legs
Dust Cover
Handle
(in open
position)
Fig.1 Back Panel of the PhotoPhase Plus
Artisan Technology Group - Quality Instrumentation ... Guaranteed | (888) 88-SOURCE | www.artisantg.com

image processing settings to perfect your images. Final images are con-
verted into the TIFF file format, which is readable by nearly every other
image processing and desk top publishing program.
Section 2 Back Panel Description
Referring to Fig.1, the following back panel features can be seen:
• CCD Sensor: This is a linear light sensitive surface. It scans across the
entire exposure area to capture the full image.
• Scan Direction: The arrow shows the direction of the CCD sensor's
movement during camera back operation. This information is useful
when troubleshooting your system.
• SCSI Connector: The camera back communicates with your comput-
er through a SCSI cable connected here.
• Scan Area: The rectangular area on the back panel is the scan area.
The CCD sensor moves across this area during scanning.
• Protection Legs: The protection legs help to protect the scan area
when the camera back is placed on a horizontal surface.
• Dust Cover: This aluminum cover slides over the scan area. The cover
must be slid all the way up to fully expose the scan area before use (as
shown). Always store your camera back with the dust cover fully
closed to protect the CCD and other internal components.
PhotoPhase Digital Camera Back for Large Format Cameras – User's Guide
5
Artisan Technology Group - Quality Instrumentation ... Guaranteed | (888) 88-SOURCE | www.artisantg.com

PhotoPhase Digital Camera Back for Large Format Cameras – User's Guide
6
Fig.2 PhotoPhase camera back mounted on a Sinar camera
Artisan Technology Group - Quality Instrumentation ... Guaranteed | (888) 88-SOURCE | www.artisantg.com

Section 3 Mounting and Unmounting the Camera Back
The camera back fits to your camera just like a normal camera back. Use
the following procedures to mount and unmount the camera back:
Section 3.1 Mounting the Camera Back
1. Set your film mounting assembly in the portrait or landscape posi-
tion.
2. Pull back the focusing screen release lever on your camera to make
room to slide the camera back into place in front of the screen.
3. Gently slide the camera back into place until it will slide no further.
4. Return your camera's focusing screen release lever to the closed posi-
tion to hold the camera back in place.
5. Slide the camera back's dust cover all the way up to fully expose the
scan area.
6. Be sure to install a Phase One optical filter to reduce infrared light
before using the camera back.
See Fig.2 for an example of a PhotoPhase camera back fitted to a large
format camera.
Section 3.2 Unmounting the Camera Back
1. Slide the dust cover all the way down to protect the scan area.
2. Securely grasp the camera back by its rubber grip.
3. Pull back the focusing screen release lever on your camera to make
room to slide the camera back away from your camera.
4. Pull the camera back up and away from the camera.
PhotoPhase Digital Camera Back for Large Format Cameras – User's Guide
7
Artisan Technology Group - Quality Instrumentation ... Guaranteed | (888) 88-SOURCE | www.artisantg.com
Indice
Altri manuali PhaseOne Accessori per fotocamere

PhaseOne
PhaseOne PAS 150MP MK2 Manuale utente

PhaseOne
PhaseOne H 101 Manuale utente

PhaseOne
PhaseOne H 25 Manuale utente

PhaseOne
PhaseOne PhotoPhase 85280002 Manuale utente

PhaseOne
PhaseOne FlexAdaptor Manuale utente

PhaseOne
PhaseOne H 10 M645 Manuale utente

PhaseOne
PhaseOne H 5 Manuale utente

PhaseOne
PhaseOne P+ Series Manuale utente

PhaseOne
PhaseOne XF V-Grip Manuale utente

PhaseOne
PhaseOne PAS 150 Manuale utente


