Photronic Mini Pan/Tilt Dome Camera Manuale utente

INSTRUCTION MANUAL Ver 1.1.0
Mini Pan/Tilt Dome Camera
Firmware Ver. 1.1

M
ini Pan/Tilt Dome Camera Instruction Manual 2/21
○
1Introduction
Features 3
Product&Accessory 4
○
2Installation
CheckingHomePosition 5
DirectCeilingMountwithMountingPlate 6
WallMountwithWallMountBracket 7
HowtoSettheDIPSwitches 9
Connection 12
○
3Operation
CheckingbeforeOperation 13
Start OSD Menu
14
Preset
14
Group
14
OSD Display of Main Screen
15
○
4OSD Menu
General Rules of Key Operation for Menu
16
Main Menu
16
Display Setup
16
Preset Setup
17
Group Setup
18
Alarm Setup
19
○
5Specification
20
CONTENTS

M
ini Pan/Tilt Dome Camera Instruction Manual 3/21
Features
Powerful Pan/Tilt Function
zHigh Speed Pan/Tilt Operation : MAX. 50°/sec
zVector Drive : Simultaneous Pan/Tilt Calculation & Positioning
zHigh Precision Operation : 0.5°/sec
Preset & Group Function
z32 Presets with Independent Dwell Time & Digital In/Out
z4 Groups : 20 Presets / 1 Group
OSD(On Screen Display) Menu
zVarious Functions with OSD Menu
zOSD with Camera ID, Pan/Tilt Angle, Alarm In/Out, Preset Information
Alarm I/O Function
zIf optional Alarm I/O module is connected to Mini P/T dome camera, maximum 8 external sensor
inputs and 4 relay outputs can be utilized to give more intelligence to this camera.
zIf an external sensor is activated, camera can be set to move to corresponding preset position. Also,
the output relay can be matched to some specific preset positions to do counteractions such as
turning on the light or sounding the alarm.
Compact size and Easy installation
zThe size of the dome is as small as ∅104 ×110(H) mm.
zThere are two mounting choices.
Direct ceiling mount with mounting plate.
Wall mount with wall mount bracket.
INTRODUCTION 1

M
ini Pan/Tilt Dome Camera Instruction Manual 4/21
Product & Accessories
Product & Accessories
zDome Camera zMount Plate zTerminal Blocks zScrews
Options
zWall mount bracket zAlarm I/O module
INTRODUCTION 1

M
ini Pan/Tilt Dome Camera Instruction Manual 5/21
Checking Home Position
zThe angular range of pan motion is limited to 345°(±172.5°). Therefore, please, check the home position of
camera which is marked with an arrow mark as shown in the picture below.
zWhenever, camera is turned on, camera is located this home position automatically. To facilitate easy
accessing to major target view, it is highly recommended to mount camera to face this arrow toward the
target view. Also, camera always regard this home position as zero angle and move pan motion from -
172.5°to +172.5°.
172.5172.5
Home Position
INSTALLATION 2

M
ini Pan/Tilt Dome Camera Instruction Manual 6/21
Direct ceiling mount with mounting plate
○
1For cabling, make a hole sized 30~40mm on the
ceiling panel.
○
2Attach the mounting plate with screws included.
○
3Insert the camera cable into the hole in the
mounting plate.
○
4Locate three transparent bosses of camera to the
three slots of the mounting plate
○
5By pushing and twisting the camera into the
mounting plate, fix the camera to the mounting
plate.
○
6By pushing and twisting the gray ring, assemble
the clear dome cover. Care must be taken not to
make fingerprint on to the clear dome.
INSTALLATION 2

M
ini Pan/Tilt Dome Camera Instruction Manual 7/21
Wall mount with wall mount bracket.
○
1Remove the top cover of wall mount bracket. ○
2Assemble the mount plate on to the wall mount
bracket with screws included.
○
3Mark appropriate two screw hole points. Tighten
the screw loosely to hang the bracket in the next
step.
○
4After hang the bracket on the screw in step ○
3,
pull down the bracket for screws to slide into
slots. Then, tighten screw completely.
○
5Make cable to pass through the center hole of
bracket.
○
6By pushing and twisting the camera into the
mounting plate, fix the camera to the wall
mount.
INSTALLATION 2

M
ini Pan/Tilt Dome Camera Instruction Manual 8/21
○
7Assemble the top cover of wall mount bracket with
screws included.
○
8By pushing and twisting the gray ring, assemble
the clear dome cover. Care must be taken not to
make fingerprint on to the clear dome.
INSTALLATION 2

M
ini Pan/Tilt Dome Camera Instruction Manual 9/21
How to set the DIP switches
○
1By pressing the side lock of shield dome (black
inner cover), take off the shield dome.
○
2Adjust the DIP switch on the PCB to configure
your camera. Refer to the switch settings bellow.
Camera ID Selection
12345678
ON
Address
P1
TR
P0
zBy changing the DIP switch, you can set the binary number for camera
ID. ON state of switch means ‘1’ and OFF means ‘0’.
Ex) If you want to set camera ID as 10.
12345678
ON
1 (if 'ON')
16 (if 'ON')
8 (if 'ON')
4 (if 'ON')
2 (if 'ON')
ID : 0+2+0+8+0=10
zYou can assign camera ID in the rage 1~31. Do not use ID ‘0’
zFactory default of Camera ID is ‘1’.
zWhen you want to operate the camera with a controller. The Camera ID
in this DIP switch setting must be identical to the camera ID of the
controller. If you have multiple cameras, it is recommended to
memorize the Camera IDs and their camera locations.
INSTALLATION 2
M
ini Pan/Tilt Dome Camera Instruction Manual 10/21
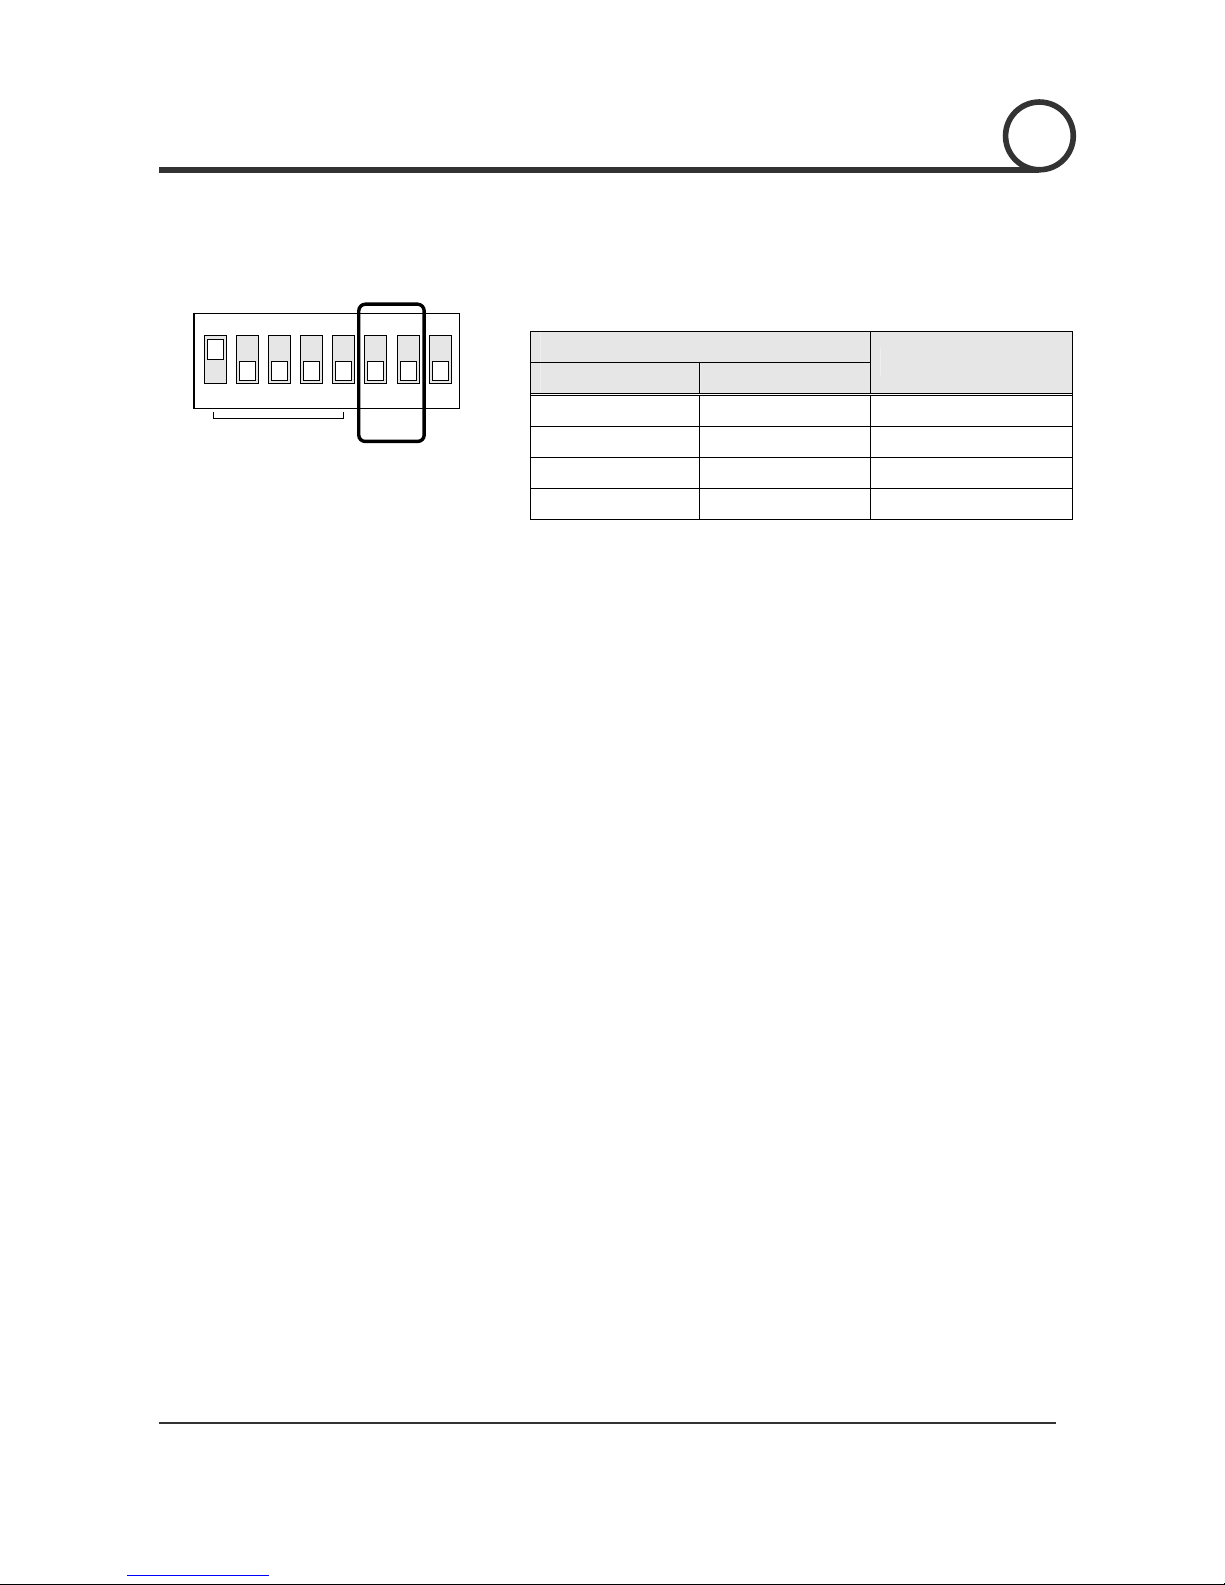
Control Protocol Selection
12345678
ON
Address
P1
TR
P0
zSelect the appropriate Protocol with DIP switch combination.
Switch State
P0(Pin 6) P1(Pin 7)
Protocol / Baud Rate
OFF OFF PELCO-D, 2400 bps
ON OFF PELCO-D, 9600 bps
OFF ON PELCO-P, 4800 bps
ON ON PELCO-P, 9600 bps
zIf you want to control using DVR or P/T controller, their protocol must
be identical to that of your camera. Otherwise, the camera will be
out of control.
zIf you changed camera protocol by changing DIP S/W, the change
will be effective after you reboot the camera.
INSTALLATION 2
Indice


