Planar PA1575R Manuale utente

PA1575R All-in-One
Touchscreen Computer
USER’S GUIDE
www.planartouch.com

The information contained in this document is subject to change without notice.
This document contains proprietary information that is protected by copyright. All rights
are reserved. No part of this document may be reproduced,translated to another language
or stored in a retrieval system, or transmitted by any means, electronic, mechanical,
photocopying, recording, or otherwise, without prior written permission. Windows is a registered
trademark of Microsoft, Inc. Other brand or product names are trademarks of their respective
holders.
The test results show that this device meets the FCC rules. Those limits are set to protect
residential areas from the devices with harmful emission. This device will produce, use and
radiate radio frequency energy. In addition, failure to follow the user’s manual to install or use
this device might produce harmful interference with radio communication. Not withstanding
the foregoing, it does not guarantee that this type of harmful interference does not occur in
some special installations. The interference caused by this device to the reception of radio or
television signals may be verified by turning it on and off. Any changes or modifications to this
TFT LCD would void the user’s authority to operate this device.
Important Recycle Instructions:
Lamp(s) inside this product contains mercury. This product may contain other
electronic waste that can be hazardous if not disposed of properly. Recycle or
dispose in accordance with local, state, or federal Laws. For more information,
contact the Electronic Industries Alliance at WWW.EIAE.ORG. For lamp specific
disposal information check WWW.LAMPRECYCLE.ORG.
For more information on how to recycle your product, please visit
WWW.PLANARSYSTEMS.COM/GREEN.

Table of Contents
Usage Notice
Precautions .......................................................................................................................... 1
Introduction
About PA1575R .................................................................................................................... 2
Package Overview .......................................................................................................3
Installation
Product Overview ................................................................................................................. 4
Start Your Installation............................................................................................................ 5
Kensington Security Slot....................................................................................................... 6
VESA Mount For Your Computer .......................................................................................... 7
Remove the Deskstand .................................................................................................... 8
User Controls
Side Panel Controls .............................................................................................................. 9
Initial Turn-On ..................................................................................................................... 10
XP PRO Initial On Steps................................................................................................. 10
Test Devices ....................................................................................................................... 17
Testing the Touchscreen ................................................................................................. 17
Recovering the Operating System...................................................................................... 18
1.Using the Recovery CD ............................................................................................... 18
2.PA1575R Touchscreen Driver Install Instructions ........................................................ 26
Environmental Specifications.............................................................................................. 27
Touch Computer Specifications .......................................................................................... 28
Display Specifications......................................................................................................... 29
Power Supply Specifications .............................................................................................. 29
Appendix
Troubleshooting .................................................................................................................. 33
Product Dimensions............................................................................................................ 34
Compatibility Modes ........................................................................................................... 35
Product Registration and Technical Support .......................................................................36

Usage Notice
! Warnin
g
- To prevent the risk of fire or shock hazards, do not expose
t
hi
s pro
d
uct to ra
i
n or mo
i
sture.
! Warnin
g
- Please do not open or disassemble the product as this ma
y
cause
elec
tr
ic
shock
.
Precautions
Follow all warnings, precautions and maintenance as recommended in this user’s manual to
maximize the life of your unit.
Do:
• Turn off the product before cleaning.
• Touch screen surface may be cleaned using a soft clean cloth moistened with mild
window glass commercial cleaners or 50/50 mixture of water and isopropyl alcohol.
• Use a soft cloth moistened with mild detergent to clean the display housing.
• Use only high quality and safety approved AC/DC adapter.
• Disconnect the power plug from AC outlet if the product is not going to be used for
an extended period of time.
Don’t:
• Do not touch the LCD display screen surface with sharp or hard objects.
• Do not use abrasive cleaners, waxes or solvents for your cleaning.
• Do not operate the product under the following conditions:
- Extremely hot, cold or humid environment.
- Areas susceptible to excessive dust and dirt.
- Near any appliance generating a strong magnetic field.
- In direct sunlight.
1

Introduction
About PA1575R
The PA1575R Series is All-in-One Touch computer model, it has a 15" flat panel screen
with an active matrix, thin-film transistor (TFT) liquid crystal display (LCD). The TPC-152x
incorporates the Mobile Intel®Atom processor N270 at 1.6GHz, FSB533 and the Mobile Intel
945GSE Express Chipset with the ICH7M.
Features include:
• Intel Atom processor N270,1.6GHz, FSB 533MHz
• Onboard 10/100 BaseT and Gigabit LAN
• 7 ports, USB 2.0(Ext x 3, Int x 4)
• 2 x DB9 for COM1/COM2
• 1 x Digital displays(DVI-D)
• 1 x Line out
• 1 x 12V power jack
• 1024x768 XGA resolution
• 15" viewable display area
• Kensington security slot
• 75 mm VESA mount
• Touch function with USB interface
• Built-in speakers-1W x 2
Touch Screen for PA1575RXP
• Analog 5-wire resistive touch screen for finger and stylus input
• Surface: Anti-glare treatment
• Interface: USB controller
• Durability: 35 million touches at a single point
• Hardness of surface: 3H Typical
• Operating force: 40g~200g when using a silicon rubber tipped pen with a 1mm
diameter minimum and a hardness of 60 degree.
• Transmittance: 82%±5%
2
3
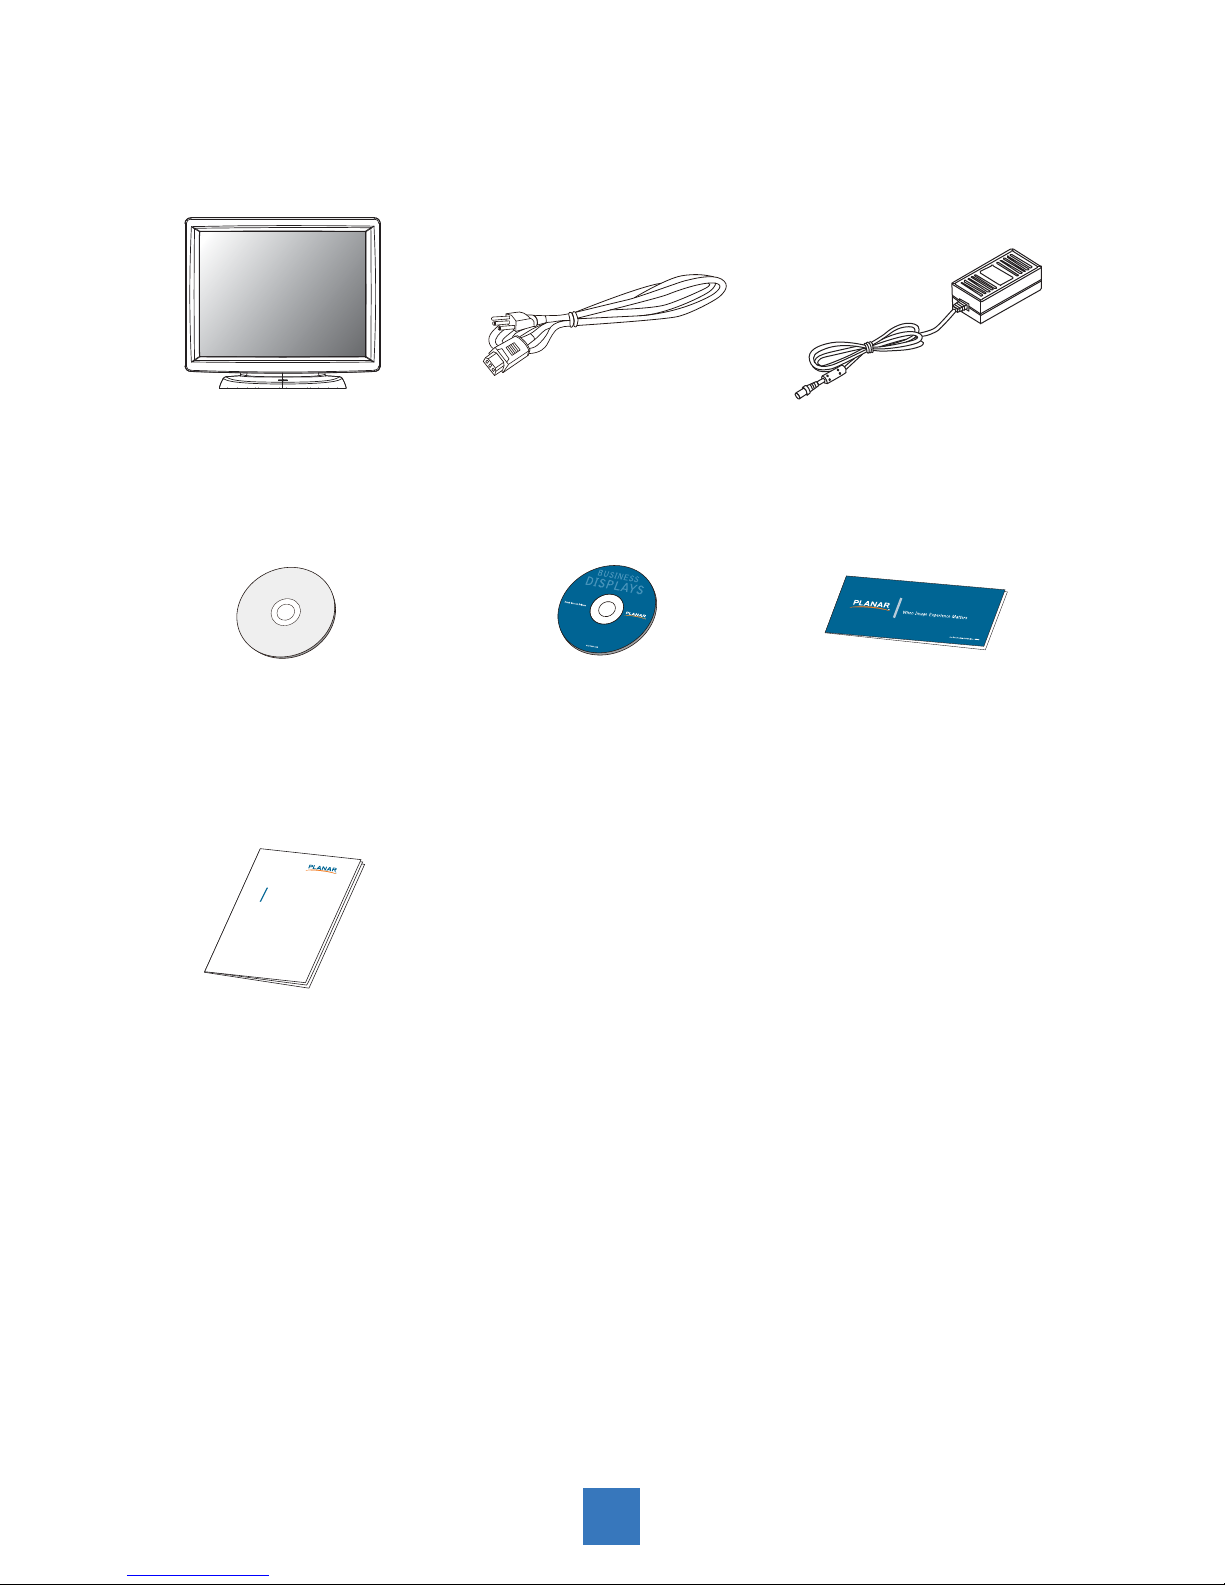
Package Overview
LCD Touch Computer Power Cord
Recovery CD Touch Screen Driver
Installation CD-ROM
DC Power Supply
Landing Strip
User's Guide
xxxxxxxxx
/
xxxxxxxxx
xxxxxxxxx
USER’S GUIDE
www.planartouch.com

Installation
Product Overview
• Front View
• Button View (Without Stand)
RJ-45 DVI
RS-232 USB
AUDIO
DC IN
4
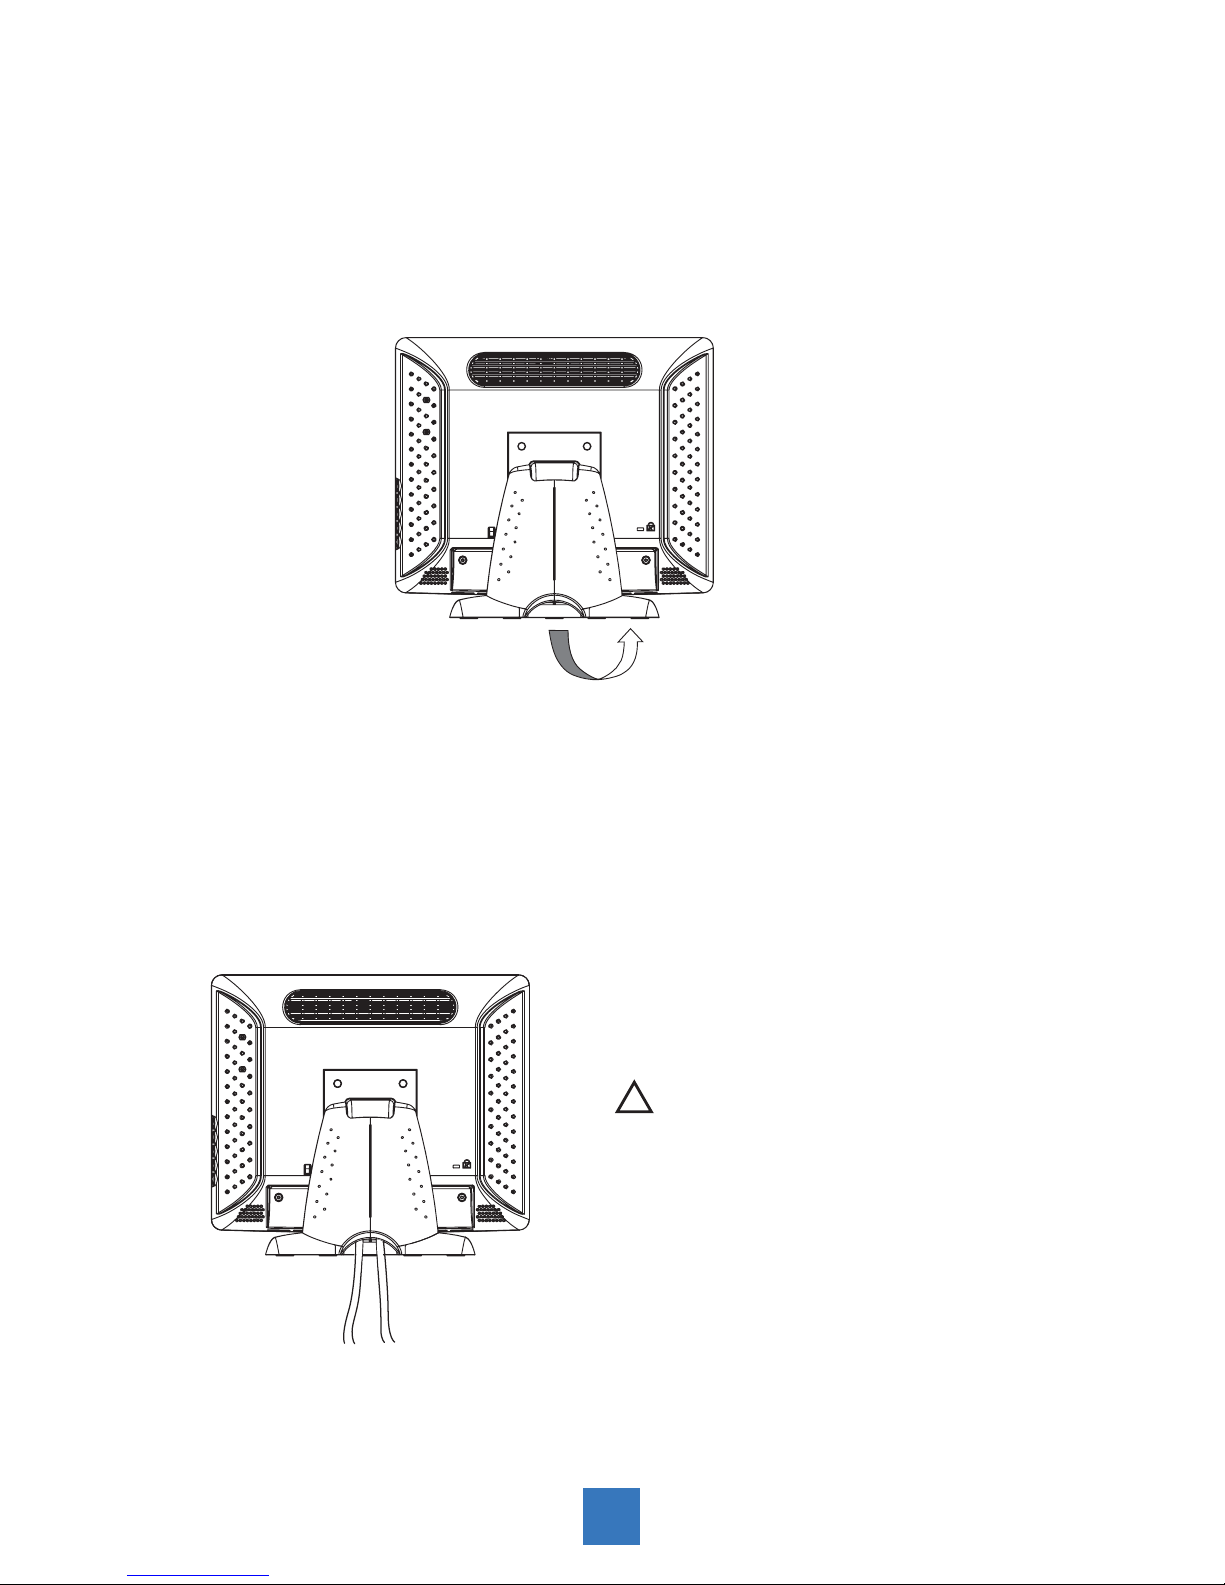
Start Your Installation
Remove the Back Cover
Please follow these instructions to remove the cover on the back panel of the LCD so that
you can hookup the cables to associated connector.
Figure A
1. Remove the stand back cover by pulling in the direction of the arrow.
2. Connect applicable cables to the appropriate connectors.
3. Re-attach the stand back cover by pressing firmly until the tabs snap into place. You
may also keep the cables in order by using the cable organizer.
! Note!
You can place the LCD flat horizontally to make it
easier to connect the cables. Please make sure
that you place it on an even surface lest the LCD
should be damaged by scratches or collision.
included cables organizer
5
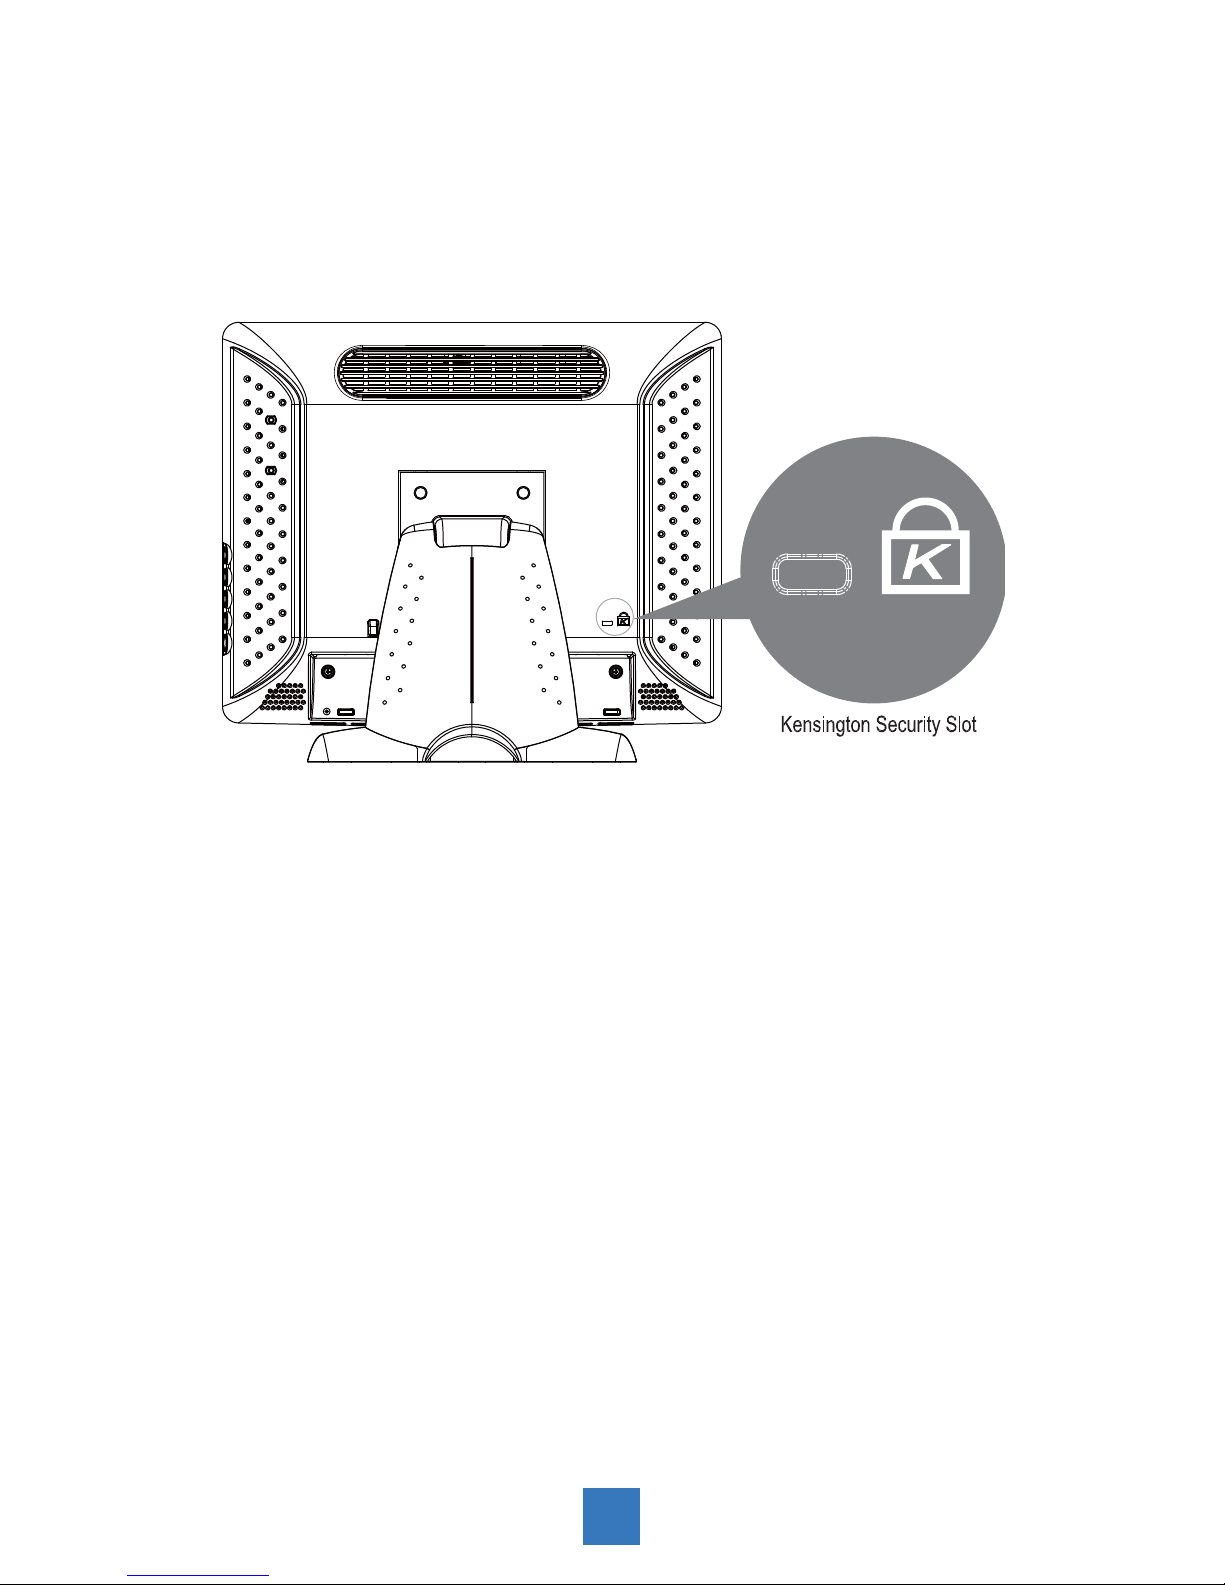
Kensington Security Slot
The computer can be secured to your desk or any other fixed object with Kensington lock
security products. The Kensington lock is not included.
6

VESA Mount For Your Computer
This computer conforms to the VESA Flat Panel Mounting Physical Mounting Interface
Standard which defines a physical mounting interface for flat panel computers, and
corresponding with the standard mounting devices of flat panel computer, such as wall and
table arms. The VESA mounting interface is located on the back of touch computer.
To mount the computer on a swing arm or other mounting fixture, follow the instructions
included with the mounting fixture to be used, please note to mount touch computer to the
devices (either mounting fixture or swing arm) what conforms to the UL listed.
75.0 mm
75.0 mm 124.5 mm
Slots ( x 4)
VESA
Mounting
Interface
! Warning!
Please select the proper screws!
The distance between the back cover surface and the bottom of the screw hole
is 8 mm. Please use four M4 screws diameter with proper length to mount your
monitor.
Please note: the mounting stand must be able to support at least 11 lbs ( 5Kg).
7
Altri manuali per PA1575R
1
Indice
Altri manuali Planar Scrivania

Planar
Planar DS15 Manuale elenco delle parti

Planar
Planar Clean Screen C3012T Manuale utente

Planar
Planar Invitium Tk7 Manuale utente

Planar
Planar ND1750 Manuale utente

Planar
Planar Invitium Tk7 Manuale utente

Planar
Planar DS15 Guida utente

Planar
Planar invitium Manuale utente

Planar
Planar PA1575R Manuale utente

Planar
Planar DS15 Manuale utente

Planar
Planar C3215 Clean Screen II Manuale utente


