Planar PT3270Q Manuale utente

PT3270Q
Touch LED LCD Monitor
USER'S GUIDE
www.planar.com

Content
Operation Instructions .........................................................................................................1
Unpacking Instructions ........................................................................................................3
Safety Precautions ..............................................................................................................3
Consignes de sécurité .........................................................................................................4
Package Overview ..............................................................................................................5
Front View of the Product.....................................................................................................6
Rear View of the Product ....................................................................................................7
Quick Installation..................................................................................................................8
Basic Operation ...................................................................................................................9
OSD Menu ........................................................................................................................ 11
Supporting Timing Modes ................................................................................................. 17
Technical Information ........................................................................................................18
Wall Mount Instructions .....................................................................................................19
Care and Maintenance Wall ..............................................................................................20
Troubleshooting ................................................................................................................20
Planar Support ..................................................................................................................21

1
Operation Instructions
Thank you for purchasing the PT3270Q monitor. Please read this guide thoroughly before
installation.
FCC RADIO FREQUENCY INTERFERENCE STATEMENT
WARNING: (FOR FCC CERTIFIED MODELS)
This LED LCD Monitor has been tested and found compliant with the limits for a Class B
digital device, pursuant to part 15 of the FCC Rules. These limits are designed to provide
proper protection against harmful interference to a residential installation. This Touch LED
LCD Monitor generates, uses, and can radiate radio frequency energy. Harmful interference
to radio communication may be the result if it’s not properly installed and used. However,
there is no guarantee that interference will not occur in a particular installation. If this Touch
LED LCD Monitor does cause serious interference to radio or television reception, resetting
may correct it. Moreover, users are encouraged to reduce interference by doing one or more
of the following:
Reorient or relocate the receiving antenna.
Move the Touch LED LCD Monitor and the receiver further away from each other.
Connect the Touch LED LCD Monitor into an outlet on a circuit different from that to which the
receiver is connected.
Consult your local dealer or a qualified technician.
FCC Warning:
To assure a continued FCC compliance, a user must use a grounded power supply cord and
the provided shielded video interface cable with bonded ferrite cores. Also, any unauthorized
changes or modifications to this Touch LED LCD Monitor would void the user's authority to
operate this device.
Note: If necessary, shielded interface cables and AC power cord must be used to meet the
emission level limits.
Shielded cables must be used with this unit to ensure compliance with the Class B FCC
limits.
According to WEEE regulation, this Touch LED LCD Monitor can't be handled as normal trash in Europe
when it is out of usage. Please refer to the recycle information on Planar's website to handle it.
For more information on how to recycle your product, please visit http://www.planar.com/about/green/

2
COMMUNIQUE D'AVERTISSEMENT DE LA FCC CONCERNANT LES INTERFERENCE DE
FREQUENCE RADIO: (SEULEMENT POUR MODELES CERTIFIE PAR LA FCC)
Ce moniteur a été testé et àété trouvé conforme aux limites pour un appareil numérique de
Class B, suivant la partie 15 des règlements de la FCC. Ces limites ont été développées
pour offrir une protection satisfaisante contre les interférences nuisibles dans une installation
résidentielle. Ce moniteur génère, utilise et peut radier de l'énergie de fréquence radio. Ceci
peut causer des interférences nuisibles à des communication radio si l' appareil n' est pas
convenablement installé et utilitsé. ll n'y à néanmoins aucune garantie que des interférences
n'apparaîtront pas dans une installation particulière. Si ce moniteur cause de sérieuses
interférences à la réception de signaux radios ou télévisées, une possibilité est de
réinitialiser le moniteur. Les usagers sont aussi encouragés à corriger les interférences en
appliquant une ou plusieurs des démarches suivantes:
Réorientez ou déplacez l'antenne de réception.
Placez le moniteur et le récepteur plus loin l'un de l'autre.
Connectez le moniteur à une prise différente de celle à laquelle le récepteur est
connecté.
Consultez votre revendeur local ou un technicien qualifié.
Avertissement de la FCC:
Pour assurez une conformité continue au règlements de la FCC, l'utilisateur doit utiliser un
cordon d'alimentation mis à terre et le câble d'interface vidéo protégé avec noyaux en ferrite,
fourni avec l'appareil. Chaque modification ou changement non-autorisé appliqué à ce
moniteur peut faire perdre à l'utilisateur sont droit d'opération de cet appareil.
Note: Si nécessaire, des câbles d'interface protégés et un cordon d'alimentation alternante
doivent être utilisépour être conforme aux limites d'émission.
Des câbles blindés doivent être utilisés avec cet appareil pour assurer la conformité aux
limites FCC Class B.

3
Unpacking Instructions
Remove the Touch LED LCD Monitor out of the package and take off EPE Foam.
Safety Precautions
Follow all warnings, precautions and maintenance as recommended in this user's manual to
maximize the life of your unit.
DO :
Turn off the product before cleaning.
Surface may be cleaned using a soft clean cloth moistened with mild window glass
commercial cleaners or 50/50 mixture of water and isopropyl alcohol.
Use a soft cloth moistened with mild detergent to clean the display housing.
Disconnect the power plug from AC outlet if the product is not going to be used for an
extended period of time.
Don't :
Do not touch the LED display screen surface with sharp or hard objects.
Do not use abrasive cleaners, waxes or solvents for your cleaning.
Do not operate the product under the following conditions:
Over 16 hours per day.
Extremely hot, cold or humid environment.
Areas susceptible to excessive dust and dirt.
Near any appliance generating a strong magnetic field.
In direct sunlight.
If smoke, abnormal noise or odor emits from your Touch LED LCD Monitor, remove the
power cord immediately and call your service center.
Never remove the rear cover of your Touch LED LCD Monitor. The display unit inside
contains high-voltage parts and may cause electric shock.
Never try to repair your Touch LED LCD Monitor yourself. Always call your service
center or a qualified technician to fix it.
Due to safety concerns, if the VESA mounting kit is purchased separately, please make
sure the mounting kit is UL-listed, and replaceable only by service personnel.

4
Consignes de sécurité
Respectez tous les avertissements, les précautions et conseils d'entretien recommandés
dans ce manuel de l'utilisateur pour maximiser la durée de vie de votre appareil.
A faire:
Éteindre le produit avant de le nettoyer.
La surface de l'écran tactile peut être nettoyée avec un chiffon doux et propre imprégné
d'un nettoyant doux du commerce pour vitres ou d'un mélange à 50/50 d'alcool
isopropylique et d'eau.
Utiliisez un chiffon doux imprégné d'un détergeant doux pour nettoyer le carter de
l'affichage.
Débranchez la fiche d'alimentation de la prise de courant secteur si le produit ne doit
pas être utilisé pendant une période prolongée.
A ne pas faire:
Ne touchez pas la surface de l'écran LED avec des objets coupants ou durs.
N'utilisez pas des produits de nettoyage abrasifs, de la cire ou des solvants pour le
nettoyage.
N'utilisez pas le produit dans les conditions suivantes:
Plus de 16 heures par jour.
Environnement extrêmement chaud, froid ou humide.
Endroits poussiéreux ou sales.
Près d'appareils générant un fort champ magnétique.
Sous la lumière directe du soleil.
Si de la fumée, un bruit anormal ou une odeur s'échappait de votre moniteur Toucher
LCD LED, débranchez immédiatement le cordon d'alimentation et appelez votre centre
de réparation.
Ne retirez jamais le couvercle arrière de votre moniteur Toucher LCD LED. L'unité
d'affichage contient des éléments où circule un voltage élevé et présentant un risque
d'électrocution.
N'essayez jamais de réparer vous-même votre moniteur Toucher LCD LED.Faites
toujours appel à votre centre de service ou à un technicien qualifié pour toute réparation.
Pour des raisons de sécurité, is vous achetez séparément le kit de fixation VESA,
assurez-vous que celui-ci est certifié UL, et qu'il peut être remplacé uniquement par un
technicien qualifié.

5
Package Overview
TOUCH LED LCD MONITOR
DP Cable
TYPE-C to TYPE-C Cable
HDMI Cable
Power Cord
USB-A to TYPE-C Cable
User's Guide

6
Front View of the Product

7
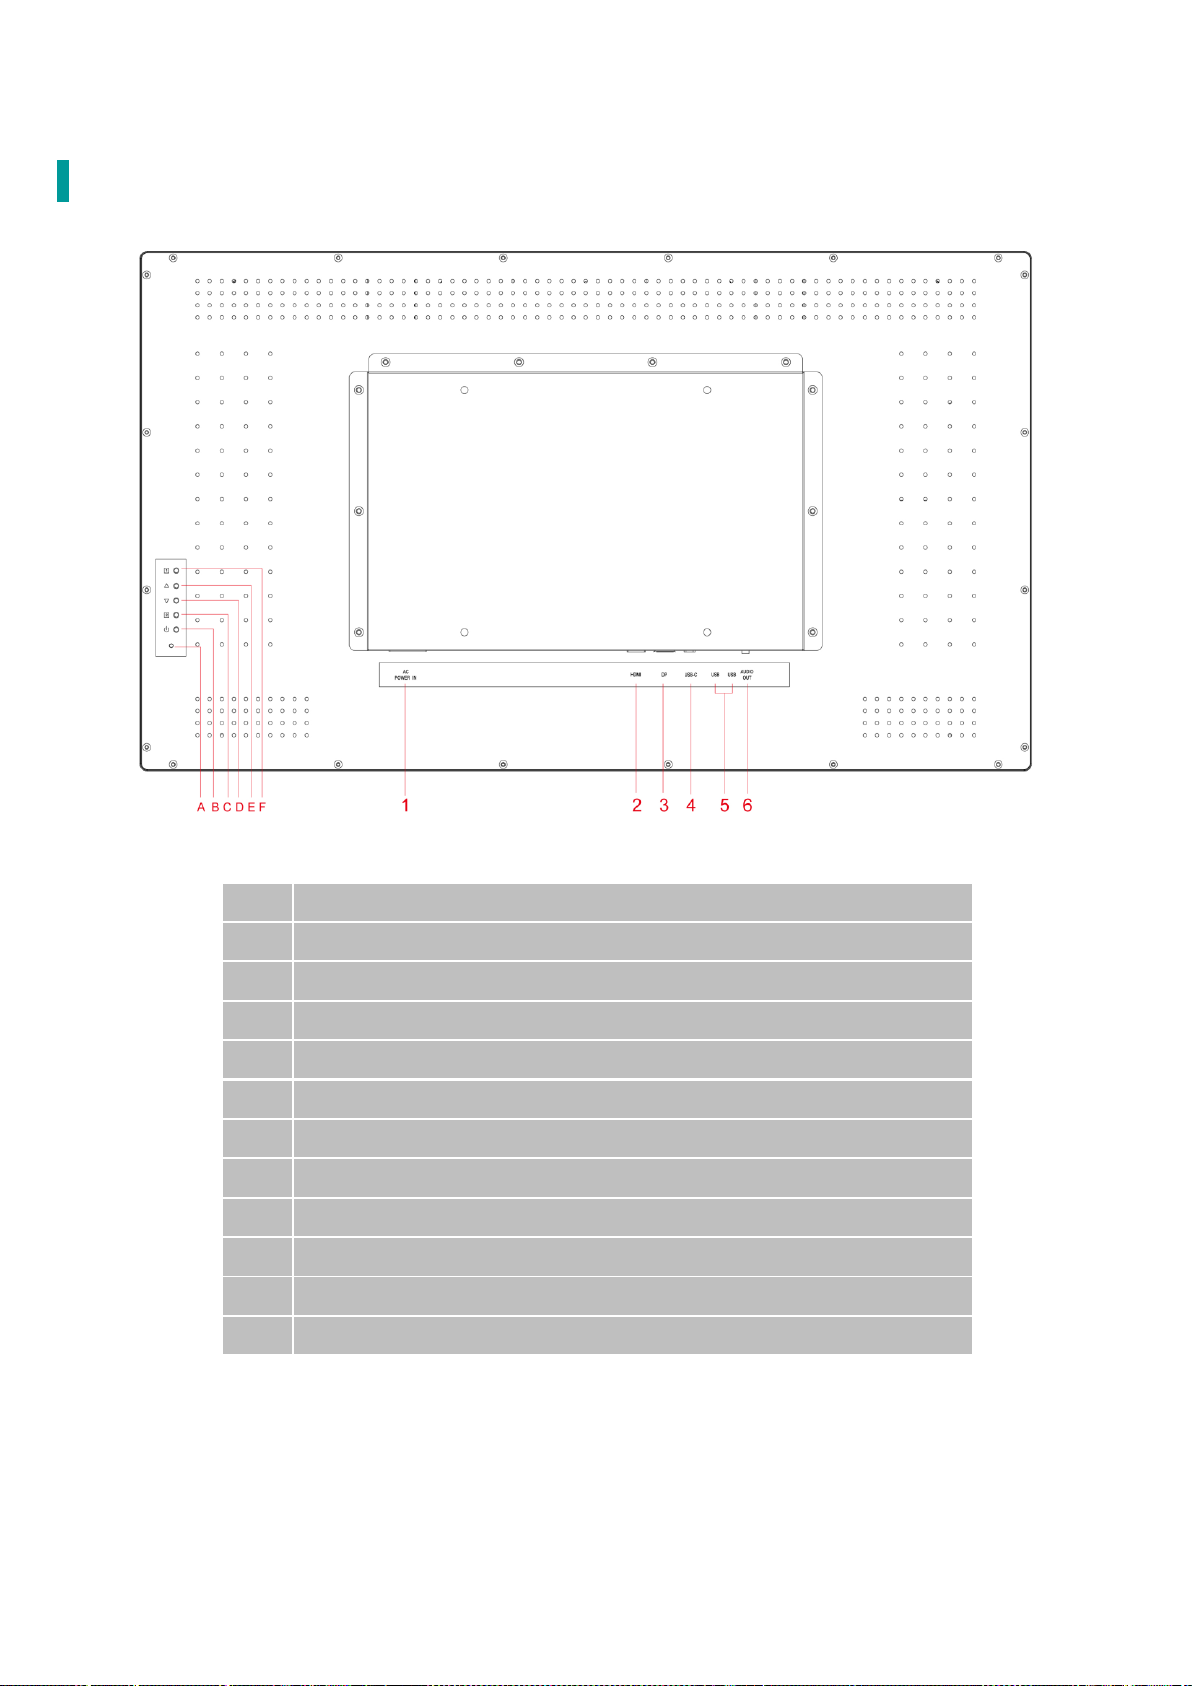
Rear View of the Product
1
Power Input (AC input)
2
HDMI Input
3
DP Input
4
USB-C Input (Output 5V1A)
5
USB3.2 Gen 1 *2 (Output DC 5V1A)
6
Audio Output (EARPHONE)
A
LED Indicator
B
Power On / Off
C
Input select / Enter
D
Brightness / Down
E
Blue Light Reducer / Up
F
Menu / Exit

8
Quick Installation
1.
2.
3.
4.
Connect either USB-C to USB-C, DP, or HDMI Video Source from the monitor to the
computer. If connecting USB-C only , see Fig 1. If connecting DP or HDMI inputs,
please also connect the USB-A to TYPE-C Cable, see Fig 2.
Connect the power cord to a properly grounded AC outlet, then to the monitor.
Power-ON computer and then POWER-ON the monitor.
Set the timing mode on your computer. Recommended resolution and refresh rate is
2560x 1440@60Hz.
Figure 1:
Figure 2:
Power Cord
DP Cable
TYPE-C to TYPE-C Cable
Power Cord
HDMI Cable
USB-A to TYPE-C Cable
Indice
Altri manuali Planar Monitor

Planar
Planar LC12 Manuale utente

Planar
Planar PS5580 Manuale utente

Planar
Planar PT1700MX Manuale utente

Planar
Planar LC15 Manuale utente

Planar
Planar WS231 Manuale utente

Planar
Planar UltraRes P Series Manuale utente

Planar
Planar PT150M Manuale utente

Planar
Planar LC12 Manuale del proprietario

Planar
Planar Dome E4c Manuale utente

Planar
Planar PT1700M Manuale utente

Planar
Planar m70L Manuale utente

Planar
Planar PLL2210MW Manuale utente

Planar
Planar LO552 Manuale utente

Planar
Planar VM55LX-U Manuale utente

Planar
Planar SD2220W Manuale utente

Planar
Planar PXL2230MW Manuale utente

Planar
Planar PX2211MW Manuale utente

Planar
Planar PE170 Manuale utente

Planar
Planar LO552 Manuale utente

Planar
Planar CT1744NU Manuale utente