POWERCOLOR RX 7900 XT Series Manuale utente

2
Quick Installation Guide (English)
快速安装指南 (简体中文)
快速安裝指南 (繁體中文)
Installationsanleitung (Deutschland)
Guía de Instalación rápida (Española)
Guia Rápido de Instalação (Portuguesa)
Руководство по установке (русский)
Hızlı Kurulum Kılavuzu (Türk)
クイックセットアップガイド (日本語)
빠른�설치�가이드 (한국어)
Quick Installation Guide (ไทย)
5
8
11
14
17
20
23
26
29
32
35
3
2
3
6
5
4
8
1
7
4
9
D
A
10
C
B

5
Additional Support (Optional)
*If the graphics card has multiple BIOS switches,
you can switch to your personal preference.
1. Confirm that the computer is powered off and
switch the BIOS you want.
2. Reboot your PC.
(For additional support details, please refer to:
https://www.powercolor.com/ for specific model
support)
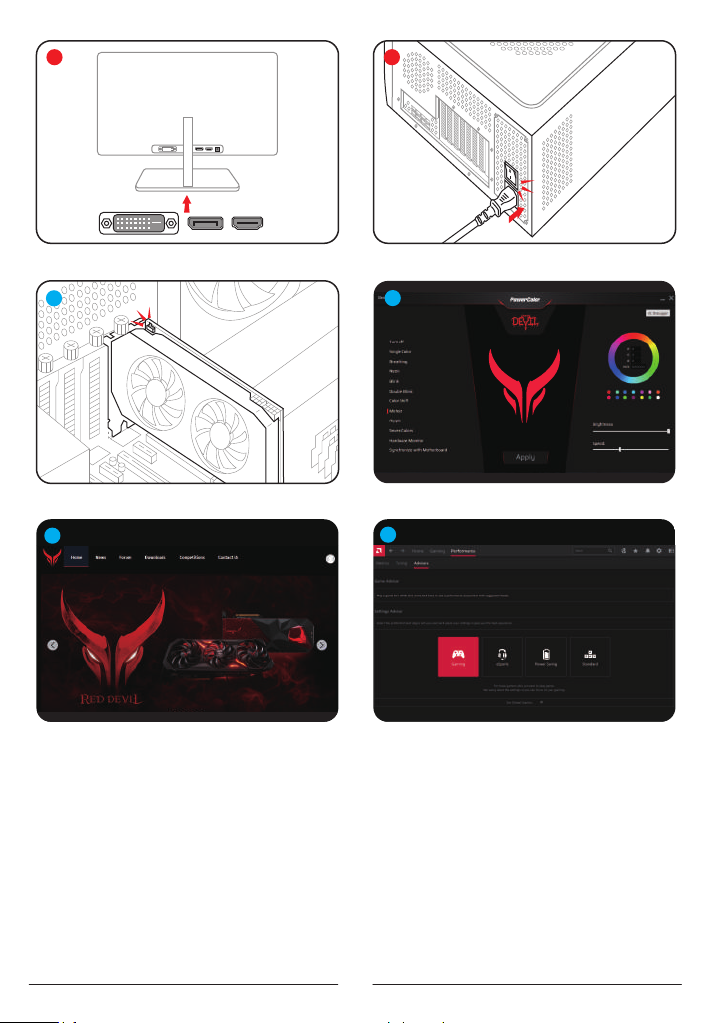
LED Software Support (Optional)
*For graphics card with RGB functions, the Devil
Zone RGB Software will enable color
customizations.
(For additional support details, please refer to:
https://www.powercolor.com/downloads for
specific model features)
Devil Club (Optional)
Join our DevilClub!
*If you bought a Red Devil card, you will find
invitation code inside the retail box.
Join at: https://devilclub.powercolor.com/
AMD Radeon Setting Software Installation
To take full advantage of the features and
capabilities of your Radeon Graphics products,
installing the most up-to-date Radeon Software is
recommended.
(For more support, visit: https://www.amd.com/en/
support/driverhelp)
*Please make sure you choose “Full Install” when
installing the driver to enjoy full function of the
software.
System Requirements
1. Expansion Slot: Motherboard with one or more
PCI Express x16 slot.
2. Display: Monitor or other display device with
compatible connectivity to the output interface of
your graphics card.
3. Power requirement: Power Consumption differs
by model.
(For additional support details, please refer to:
www.powercolor.com/ to calculate your minimum
system power requirement.)
4. Operation System: Linux©/Windows® 10/
Windows® 11
(For additional support details, please refer to:
https://www.amd.com/en/support)
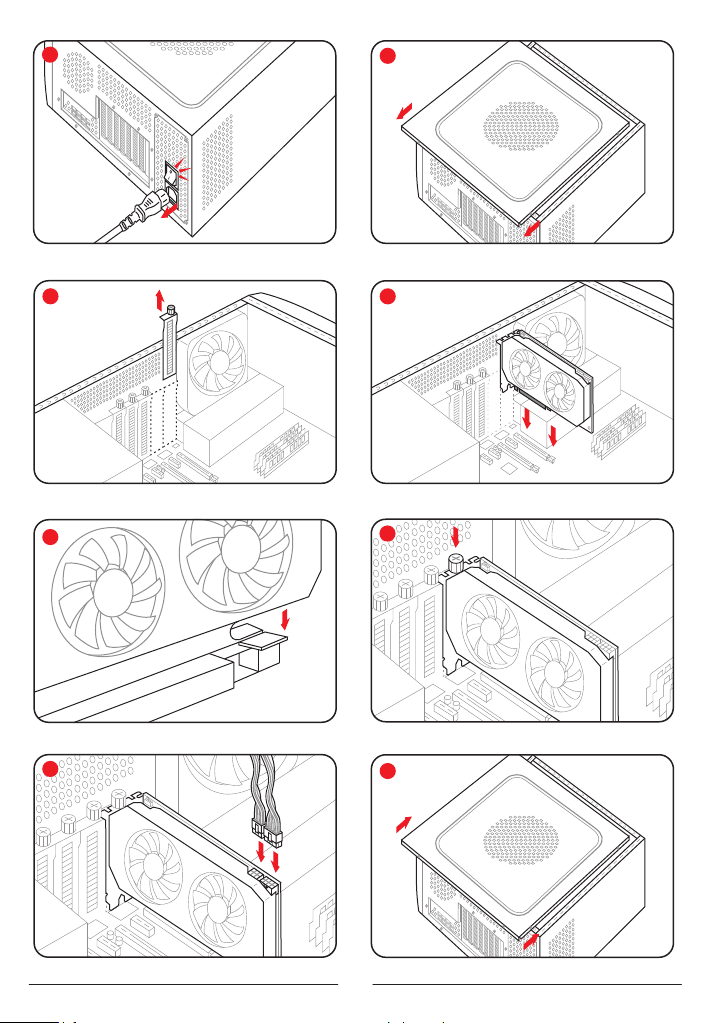
Hardware Installation
Turn off computer, switch off the PSU, and
disconnect the power cord.
Open the case.
Remove any existing graphics card (if applicable)
or PCIE slot covers.
Insert the Graphics Card into the PCIE slot.
Make sure seating is secured with the PCIE
locking mechanism in place.
Secure graphics card to the PCIE bracket with
thumbscrew.
Plug in the required external PCIE power
connectors (if applicable) from the appropriate
PC Power Supply Unit.
Close the case.
Connect the display cable into the corresponding
GPU display output port.
Power on System, booting to OS. (Removing all
drivers for your previous card and performing a
clean install of the new drivers is recommended.)
Driver Installation
1. Please download the driver.
2. Install the driver based on your product.
3. Execute the driver and follow the instruction.
Driver Installation Link
Driver for PowerColor
https://www.powercolor.com/downloads
Driver and Support for AMD
https://www.amd.com/en/support
Quick Installation Guide
A
B
C
D
1
2
3
4
5
6
7
8
9
10
6
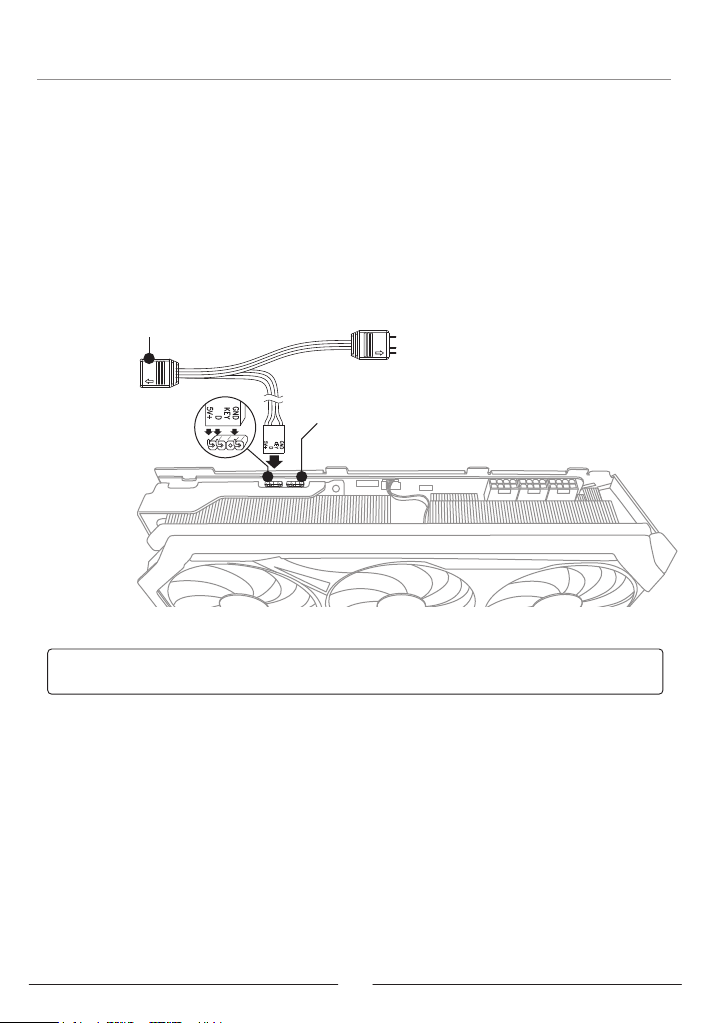
Addressable RGB (ARGB) LED Cable Connection
Notices:
- Do not install an RGB LED cable in the ARGB LED Header; otherwise the hardware
and cable may be damaged.
- Only use the ARGB LED cable to connect on both motherboard and PowerColor
graphics card.
- PowerColor graphics card is compatible with motherboards which have headers for
ARGB LED cables. The headers should have the 3-pin configuration. For further
information concerning compatibility, refer to the manual of your mainboard, or visit the
manufacturer's website.
- To avoid damaging any hardware, please make sure the system is turned off and the
power cord is unplugged before connecting or removing the ARGB LED cable.
* The ARGB LED Header supports ARGB LED cable, with a maximum power rating of 3A (5V)
and total length within 2 meters.
• Connect the ARGB LED cable to the ARGB LED Headers between
PowerColor graphics card and your motherboard, the PowerColor LED light
can be controlled by PowerColor Devil Zone software or synchronized via
motherboard software.
* The factory default setting is controlled by PowerColor Devil Zone, if you want to sync with
motherboard software, please disable GPU control on Devil Zone.
• You can also connect another ARGB device to the male connector for syncing
with motherboard ARGB control.
Connect to PowerColor
graphic card RGB header
Connect to motherboard header
(Optional) Connect to other components such as
chassis or chassis cooling fans

7
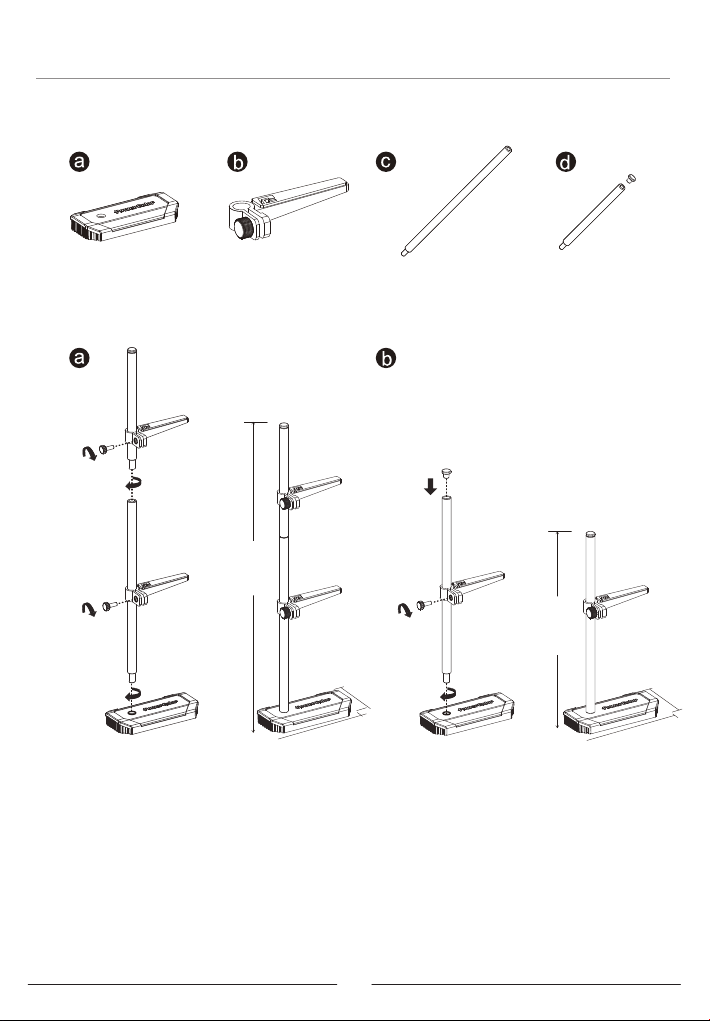
Graphics Card Holder Installation Guide
x1 x1
x1
x2
Instructions
257 mm
172.5 mm
38 mm
79.3 mm
38 mm
79.3 mm
Contents
8
其他功能
多BIOS开关切换(选择性使用)
* 如该显卡有搭载多BIOS开关,可按照个人需求
切换使用。
1. 请确认电脑电源已关闭,切换成欲使用的
BIOS。
2. 重新开机即可。
(视产品型号而定,可参照以下网址查询:
https://www.powercolor.com)
Devil Zone RGB控制软体(选择性使用)
透过官网下载Devil Zone RGB控制软体即可快
速调节多种灯效。
* 如该显卡有搭载RGB模组,可按照个人需求切
换使用。)
(视产品型号而定,可参照以下网址查询:
https://www.powercolor.com/cn/downloads)
Devil Club线上讨论区(限产品使用)
可掌握最新消息及活动资讯,专人线上回覆问题。
* 仅购买红魔系列产品符合会员资格,请至以下
网址申请加入会员。)
网路链接:
https://devilclub.powercolor.com/
AMD Radeon设置软件使用指南
针对游戏,视频及显示器,可以进一步设定AMD
显卡相关功能以增进最佳体验。
(可参照以下网址查询:https://www.amd.com/
zh-hans/support/driverhelp)
* 请确认驱动程序类型选择「Full Install」,即 可
提供所有软件功能。
设备规格要求
1. 主板:须具备一组PCI Express x16插槽。
2. 显示器:须与显卡的输出接口兼容。
3. 电源:须符合官方最低电源供应(W)。
(视产品型号而定,可参照以下网址查询:
https://www.powercolor.com)
4. 操作系统:Linux©/Windows® 10/Windows®11。
(视产品型号而定,可参照以下网址查询:
https://www.amd.com/en/support)
硬件安装
1请确认电脑电源已关闭,然后拔掉电源线。
1取下机箱外盖。
1选择欲安装的显卡插槽,并移除机箱的金属后档板。
1将显卡插入插槽(拿取时避免手指压到风扇)。
1确定显卡完整固定。
1锁上档板螺丝。
1如果显卡有外接电源插孔,请从电源供应器插上对
应的外接电源线。
1装回机箱外盖。
1连接显示器线材到显卡输出接口。
1连接电源线后将电脑开机。
*如果您的电脑已装载其它显卡,请先卸载其它显卡
驱动程序,并将原显卡从您的电脑中移除。
驱动程式安装
1. 前往驱动程式下载连结。
2. 选择欲安装的产品型号并下载驱动。
3. 下载完成后,执行该档案以启动安装程式,并按照操
作指示完成驱动安装。
驱动程式下载连结
PowerColor下载专区
https://www.powercolor.com/cn/downloads
AMD 驱动程式和支援
https://www.amd.com/zh-hans/support
快速安装指南
A
B
C
D
1
2
3
4
5
6
7
8
9
10

9
安装设定ARGB线
注意:
- 请勿在ARGB LED接头上使用RGB LED线,误用线材会造成显示卡和主机板的损坏。
- 请务必使用ARGB LED线连接主机板和PowerColor显示卡。
- PowerColor显示卡的ARGB LED兼容于支援ARGB LED规格的主机板,该主机板ARGB
LED插座应具有3-pin配置(请参见上图)。有关兼容性的更多信息,请参阅主机板的使用手
册,或造访主机板制造商网站。
- 为避免任何硬件损坏,请在安装或卸下ARGB LED线之前,确保关闭电源或移除电源线。
* ARGB LED 接头所支援的线材,最大额定功率为3A(5V),总长度在2米以内。
• 将ARGB LED 线连接至PowerColor显示卡与主机板的ARGB LED插座,
PowerColor LED灯由PowerColor Devil Zone软件控制,或者由主机板软件同步
控制灯光。
* 系统预设LED灯由PowerColor Devil Zone软件控制。如需由主机板同步控制灯光,请先进入
PowerColor Devil Zone软件关闭显示卡控制这个选项。
• 若您有额外的ARGB灯条/装置也可以直接连接到ARGB LED在线的扩充端,并
同时透过主机板控制同步灯效。
连接PowerColor显示卡的
ARGB LED接头
连接至主机板的ARGB LED接头
可以连接额外的ARGB装置,如机壳或风扇
10
显卡支架组装示意图
x1 x1
x1
x2
组装示意图
257 mm
172.5 mm
38 mm
79.3 mm
38 mm
79.3 mm
配件
Questo manuale è adatto per i seguenti modelli
1
Indice
Lingue:
Altri manuali POWERCOLOR Hardware per computer


Manuali Hardware per computer popolari di altre marche

EMC2
EMC2 VNX Series Manuale del proprietario

Panasonic
Panasonic DV0PM20105 Manuale utente

Mitsubishi Electric
Mitsubishi Electric Q81BD-J61BT11 Manuale utente

Gigabyte
Gigabyte B660M DS3H AX DDR4 Manuale utente

Raidon
Raidon iT2300 Manuale utente

National Instruments
National Instruments PXI-8186 Manuale utente


